| Author |
 Topic Search Topic Search  Topic Options Topic Options
|
modirt 
Orange Level Access

Joined: 18 Jul 2018
Location: Missouri
Points: 9474
|
 Post Options Post Options
") Thanks(0) Thanks(0)
 Quote Quote  Reply Reply
 Topic: Hot engine won't start? Topic: Hot engine won't start?
Posted: 24 Jun 2025 at 12:04pm |
Have a DewEze Bale Mobale (aka, hay monster) that starts and runs fine. Unless you manage to kill it when hot. Then it won't start. An other wise fully charged battery can barely turn it over. But give it a couple hours to cool down and she turns over and starts right u.
Engine is a 318 Chrysler........with carter 2 barrel carb.......from early 70's. Hay monster built on Dodge D600 truck chassis. Aside from the hydraulics, more or less a stock truck.
Any ideas on why it won't start? Carb vapor locked maybe?
|
 |
|
Sponsored Links
|
|
|
steve(ill)
Orange Level Access

Joined: 11 Sep 2009
Location: illinois
Points: 90919
|
Post Options
Thanks(0)
Quote Reply
Posted: 24 Jun 2025 at 12:26pm |
|
or a bad coil / condenser... break down when hot... Since it does not DIE when hot, just not RESTART , vapor is a good guess.... Maybe start in ether ?
|
|
Like them all, but love the "B"s.
|
|
TedN
Bronze Level

Joined: 30 Apr 2025
Location: Central WA
Points: 178
|
Post Options
Thanks(0)
Quote Reply
Posted: 24 Jun 2025 at 12:54pm |
|
I would guess you are getting voltage drop between battery and starter, a voltage test at the starter while cranking will tell you. get a set of test leads (I have a Maddox 30' set from Harbor Freight, under $20) so you can check from the starter housing to the positive lead. What I have most commonly found is the ground isn't sufficient when hot. A lot of older vehicles used an open weave ground cable that gets to the point it doesn't conduct well. If you don't have a test meter or just want to try an easy way to test for a bad ground, hook jumper cables from the negative terminal on the battery to the engine block when it doesn't start and see if that helps. You could have other issues, but the bad ground is the one I have seen the most.
Ted
|
|
190XTD seriesIII, 190XTD seriesI, maroon belly 7000, 7045, 190XTD series??? project(or maybe parts)
|
|
modirt
Orange Level Access
Joined: 18 Jul 2018
Location: Missouri
Points: 9474
|
Post Options
Thanks(0)
Quote Reply
Posted: 24 Jun 2025 at 2:08pm |
Now that I think of it, there may be another cause/fix. The fuel line from the fuel pump is now exposed. Somebody had wrapped it with a glass mat insulation and black tape, but that is now gone. I have some insulation tube that I forgot to install. That may help. It also may not help that the radiator and fan are mounted up high and remote. No cooling fan on the motor block itself, so no help for the fuel line.
Ground could also do it, but this one has black battery cable running directly from battery to the chassis frame.
Previous owner told me he was also looking for a coil, so that may help too.
Can't ever recall any farm truck.....once it was running and warmed up......not starting.
|
|
Tbone95
Orange Level Access
Joined: 31 Aug 2012
Location: Michigan
Points: 12423
|
Post Options
Thanks(1)
Quote Reply
Posted: 24 Jun 2025 at 2:25pm |
|
Just doesn’t seem like stuff like fuel line insulation, coil, condenser would have anything to do with barely being able to crank it. Ground going bad or something seizing.
|
|
AveryD12
Bronze Level

Joined: 05 Mar 2018
Location: Foxworth.MS
Points: 162
|
Post Options
Thanks(0)
Quote Reply
Posted: 24 Jun 2025 at 3:17pm |
|
I had similar issues with a Chrysler product. When the engine got up to operating temp and it had run for an hour or so it wouldn’t restart until it cooled down. Found it to be a bad starter. Don’t know if this could be your problem or not.
Avery
|
|
Joe Goodwill
Bronze Level Access
Joined: 12 Sep 2009
Location: Souris Manitoba
Points: 96
|
Post Options
Thanks(0)
Quote Reply
Posted: 24 Jun 2025 at 5:18pm |
|
Mid 70’s Chevy 454 would get tight and hard to turn over if you shut it down quick after running hard and temp was up. Never figured it out but that thing was sure hard on back tires!!😳
|
|
Ed (Ont)
Orange Level

Joined: 08 Nov 2009
Location: New Lowell, Ont
Points: 1611
|
Post Options
Thanks(0)
Quote Reply
Posted: 24 Jun 2025 at 6:50pm |
|
Certainly sounds like a bad starter. Slow to turn hot usually indicates starter problem. But check all your cables and connections as well and battery condition. If that starter is 50 years old it has done well!!!! Gear reduction starter on that?? Chrysler used those a lot.
|
|
modirt
Orange Level Access
Joined: 18 Jul 2018
Location: Missouri
Points: 9474
|
Post Options
Thanks(0)
Quote Reply
Posted: 24 Jun 2025 at 6:58pm |
Since last year, new points, plugs, condenser and distributor cap. Was advised to get new air filter. I said was probably fine, but did so anyway. Hard to find industrial canister type. Pulled out old filter and found a birds nest and feathers helping filter. Running on a new filter now.
New gas tank (aluminum fuel cell sold to race car guys), new starter, new battery, new gauges, including tach with hour meter. Those are hard to find.
Did look at battery cables and they are smaller gauge than I remember. Can put on larger ones.
Is it possible something in the engine is expanding enough when hot to be that much of a problem turning it over? Engine has enough power to spin it but battery and starter don't?
Fresh 10-30 oil.......looks clean and slick.
Edited by modirt - 24 Jun 2025 at 6:59pm
|
|
Ed (Ont)
Orange Level
Joined: 08 Nov 2009
Location: New Lowell, Ont
Points: 1611
|
Post Options
Thanks(0)
Quote Reply
Posted: 24 Jun 2025 at 7:28pm |
|
You have thrown a lot of parts at it and none of those will cure the problem you said you had which seems to be not turning over well hot. Check your timing to see that it is correct. Too much advance could cause that same problem. Put a starter on it. Or get yours rebuilt - that may be the better option given the poor parts quality these days.
Edited by Ed (Ont) - 24 Jun 2025 at 9:12pm
|
|
steve(ill)
Orange Level Access
Joined: 11 Sep 2009
Location: illinois
Points: 90919
|
Post Options
Thanks(0)
Quote Reply
Posted: 24 Jun 2025 at 7:44pm |
|
with a new starter, its a good bet that you have something getting TIGHTER as the engine heats up.. Maybe you got carbon the pistons ... maybe just drag between the pistons expanding and TIGHT in the bores.... you could try to rotate the engine with a torque wrench on the crank pulley when hot / cold and compare...
|
|
Like them all, but love the "B"s.
|
|
modirt
Orange Level Access
Joined: 18 Jul 2018
Location: Missouri
Points: 9474
|
Post Options
Thanks(1)
Quote Reply
Posted: 24 Jun 2025 at 8:53pm |
") Ed (Ont) wrote: Ed (Ont) wrote:
You have thrown a lot of parts at it and none of those will cure the problem you said you had which seems to be not turning over well hot. Check your timing to see that it is correct. Too much advance could cause that same problem. Put a starter on it. Or get yours rebuilt - that may be the better option give the poor parts quality these days. |
Agreed.......except most of those parts were intended to bring it back from the dead. A classic case of "it was running when parked". Had sat in the weeds for 3 or 4 years. Little to none of it to address current problem of not starting when hot. For now, that is just an annoyance. I'm careful not to kill it till the day is done.
But we are now using it. Picking up about 400 bales with it tomorrow. Back in the day, I"m told a good crew would not show up for a job less than 1,000 bales. I don't have that kind of crew.
|
|
Lars(wi)
Orange Level Access

Joined: 14 Sep 2009
Location: Permian Basin
Points: 8409
|
Post Options
Thanks(0)
Quote Reply
Posted: 24 Jun 2025 at 11:16pm |
|
When you say ‘kill it’ are referring to stalling the engine, or turning the ignition off?
|
|
I tried to follow the science, but it was not there. I then followed the money, and that’s where I found the science.
|
|
TedN
Bronze Level
Joined: 30 Apr 2025
Location: Central WA
Points: 178
|
Post Options
Thanks(0)
Quote Reply
Posted: 25 Jun 2025 at 12:44am |
|
If you running it now it doesn't take much to throw a decent set of jumpers in with you and do a quick test if the situation arises, negative terminal to block. Reading the original post again I think this is important, as I believe the issue may be between chassis and engine. With a hydraulic pump tied in you have hydraulic lines that will conduct some electricity before they burst into flames. I have witnessed this exact thing on a S2200 IH, but it was the stainless line off the compressor that lit up. Also had a local trucker lose his truck because it was using the power steering hoses for a ground, when they carried too much current the steel braid got hot enough to ignite the rubber around it. I personally like to run the ground cable directly to the engine, and either ground from there to the chassis or run a seperate ground from the battery. Could be a starter issue, but you say it has been changed. I think if you had something in the engine getting that tight with heat you would notice it, and since friction causes more heat it would get bad enough to kill the engine in short order. I hope this helps.
Ted
|
|
190XTD seriesIII, 190XTD seriesI, maroon belly 7000, 7045, 190XTD series??? project(or maybe parts)
|
|
Thad in AR.
Orange Level Access

Joined: 12 Sep 2009
Location: Arkansas
Points: 9733
|
Post Options
Thanks(1)
Quote Reply
Posted: 25 Jun 2025 at 5:32am |
|
Next time you try it and it doesn’t want to turn over quickly grab rack battery cable. If one feels hot it’s either bad or not making a good connection.
Could be a bad starter.
I’d trust a junk yard starter muck more than a new one. It took me 4 new starters to get a good one on my work truck.
As mentioned before check timing.
|
|
ekjdm14
Orange Level Access
Joined: 20 Aug 2024
Location: Alsager UK
Points: 987
|
Post Options
Thanks(0)
Quote Reply
Posted: 25 Jun 2025 at 5:59am |
Thad in AR. wrote:
I’d trust a junk yard starter muck more than a new one. It took me 4 new starters to get a good one on my work truck.
|
Agreed, wouldn't surprise me at all if the new starter is failing when hot.
|
|
Stuck Farmer
|
|
Codger
Orange Level

Joined: 23 Dec 2020
Location: Utopia
Points: 2706
|
Post Options
Thanks(0)
Quote Reply
Posted: 25 Jun 2025 at 6:03am |
I don't know the machine at all. Are you certain the load is declutching, or releasing from the engine when the engine is not running? You mention hydraulics and if these are not relieving pressure in the driven system immediately you are fighting system pressure with engine start. This possibly decays as time goes by allowing the engine to crank somewhat unloaded.
If certain the load is coming off of the engine when not operating, install either in series a shunt fed, or inductive clamp on ammeter and measure starting current. If you see over 800A inrush on starting current, start moving downstream first removing the starter motor and bench testing. Chrysler gear reduction starters should show about 90A inrush when bench testing with no load as example. within about two seconds taper to 30A or less.
I would agree with electrical connection integrity. I like a minimum of 2AWG from the negative battery post to both the engine block, and frame rail in a gasoline engine application. 2/0AWG in diesel applications. Land that negative lead under a starter mounting fastener is preferred and use dielectric paste to keep corrosion at bay.
|
|
That's All Folks!
|
|
modirt
Orange Level Access
Joined: 18 Jul 2018
Location: Missouri
Points: 9474
|
Post Options
Thanks(0)
Quote Reply
Posted: 25 Jun 2025 at 8:23am |
Lars(wi) wrote:
When you say ‘kill it’ are referring to stalling the engine, or turning the ignition off? |
Both of those. Biggest risk is when nudging front end into a barn with full load of 150 bales. That is nearly 4 tons of hay. Helps that transmission is geared way down, but can still be kind of exciting getting it where it needs to be without hitting anything.
Another time was when we had to shut it down to add fuel. Only made that mistake once.
Still odd that when I go out later today, she will fire right up on first turn. But if hot.......at moment of kill, can barely turn engine over with fully charged battery. Half an hour later, will turn over, but drags as if battery is on last legs. But no fire or hint of wanting to start. But once cool, fires right up.
|
|
modirt
Orange Level Access
Joined: 18 Jul 2018
Location: Missouri
Points: 9474
|
Post Options
Thanks(0)
Quote Reply
Posted: 25 Jun 2025 at 8:33am |
Hydraulics is powered by a single small pump mounted on frame in front of engine. A pto shaft runs from front pulley off crankshaft to the pump. If engine is turning, pump is pumping. Hydraulics running off the pump include a remote fan behind the radiator (runs on hydraulic motor), power steering, lift cylinders for the front snout and when loading or unloading, a hydraulic motor runs drag chains on front snout and conveyor down centerline of the bed.
To give an idea of it's purpose, couple days back driver and two stackers on the the truck picked up 150 bales from the field in 20 minutes. At barn, front snout raises up as much as 12 feet to become hay elevator. Can unload as fast as stacker guys in the barn can keep up. Or would if the driver (me) didn't screw up and kill it.
|
|
modirt
Orange Level Access
Joined: 18 Jul 2018
Location: Missouri
Points: 9474
|
Post Options
Thanks(0)
Quote Reply
Posted: 25 Jun 2025 at 8:46am |
I'll mention one more thing.......when we swapped out distributor cap, checked that against a firing order diagram for 318 Chrysler and concluded the distributor shaft had been put in backwards. But they they put spark plug wires on to match the order and it starts and runs.
So one thing we have not done is to check the timing. With things reversed, not sure how that would work unless #1 is #1 either way.
Have considered pulling the distributor shaft to set it right, BUT, as mounted not sure if there is enough clearance between motor and deck above it to pull it. Because it is running, decided to go with it as it. Lots of little improvements and fixes needed once hay season is over.
|
|
Les Kerf
Orange Level
Joined: 08 May 2020
Location: Idaho
Points: 1643
|
Post Options
Thanks(0)
Quote Reply
Posted: 25 Jun 2025 at 8:48am |
The first thing I check (because it is easy) is voltage drop at the battery while cranking. If the voltage barely drops but the engine barely cranks, then there is poor connectivity (corroded connections, cables too small, whatever).
If the voltage drops WAY down then either the battery has no guts or there is excessive load (dragging starter, tight engine, whatever).
|
|
TedN
Bronze Level
Joined: 30 Apr 2025
Location: Central WA
Points: 178
|
Post Options
Thanks(0)
Quote Reply
Posted: 25 Jun 2025 at 9:45am |
|
I just did a search on it, that is an interesting way to pick up hay. I can see why you don't want it to not run part way through the day, you have a crew standing around unhappy. In our area the few of us that still put up hay in small bales usuall use the New Holland Harobed. My brother has a 1068 and just picked up a S1048, we put up 16x18 bales that run #90-100 in alfalfa and #75-85 in grass. I know that our area is one of the few that uses this size bale, so I find it interesting to see how it is done in other places.
Ted
|
|
190XTD seriesIII, 190XTD seriesI, maroon belly 7000, 7045, 190XTD series??? project(or maybe parts)
|
|
Ray54
Orange Level Access
Joined: 22 Nov 2009
Location: Paso Robles, Ca
Points: 4875
|
Post Options
Thanks(0)
Quote Reply
Posted: 25 Jun 2025 at 10:50am |
modirt wrote:
Previous owner told me he was also looking for a coil, so that may help too.
Can't ever recall any farm truck.....once it was running and warmed up......not starting.
|

I the good old day (1970's ) when we grew grain here we harvested from June to September (no summer rain here,why have 2 combines when one run more hours did the job). Lot of 1940' and 50's trucks hauling grain. As a teen hauling grain, one of my greatest fears was killing a truck at the elevator in town. I never had one that did not start, but a lot of cranking sometimes. Dad had a 48 and 49 Ford F6's. The 49 had a Y block transplant including automatic choke that did not have original heat shields.
But it did happen that someone got towed off the pit or scales. It was so nice my last years having my IH 1700 that has a engine that started very easy hot.
Good luck In this situation it may be blind luck that get you there first.
|
|
modirt
Orange Level Access
Joined: 18 Jul 2018
Location: Missouri
Points: 9474
|
Post Options
Thanks(0)
Quote Reply
Posted: 25 Jun 2025 at 12:11pm |
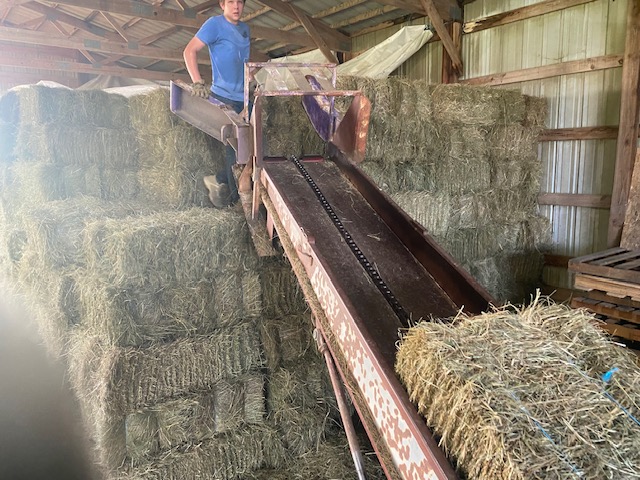
This is the actual contraption in question...........
This is a cleaner version.......closer to original. This one a Ford engine. Second half shows front chute/snout with elevator extension for reaching barn lofts, etc. I have the extension, but it's not working.....yet.
A couple items high on agenda to fix........one is that alternator. Somebody did some creative redneck engineering.......welded a tightener bracket to the FRAME, so belt tightens and loosens as engine moves. Have the actual Mopar/Dodge alternator brackets for the engine, but need to get a different alternator. This one is a Delco, with internal voltage regulator, but mounting holes don't fit.
A real Dodge has a voltage regular setup under the dashboard and behind the firewall. The hay monster doesn't have that.
Creative parts solution for some of this comes from Summit Racing......which have several self regulated alternator options for this engine. All high output, but if the lights are on, there is a big voltage drop........which may also be an indication the battery is weak......but existing alternator may only be 30 or 40 amp.
|
|
TedN
Bronze Level
Joined: 30 Apr 2025
Location: Central WA
Points: 178
|
Post Options
Thanks(0)
Quote Reply
Posted: 25 Jun 2025 at 12:36pm |
|
I watched your video and I agree that the alternator needs to be fixed, that may actually be the source of your starting issues. The belt isn't tight enough for it to put out full output. You should have about 13.5 volts at the battery when running, my guess is you are closer to 13, maybe a little less. Enough to not go dead, but not actually charged. I would still check to be sure you have good ground between engine and chassis just because of the other issues that can cause, but your alternator is only barely able to keep up as is.
Ted
Edited by TedN - 25 Jun 2025 at 12:42pm
|
|
190XTD seriesIII, 190XTD seriesI, maroon belly 7000, 7045, 190XTD series??? project(or maybe parts)
|
|
LouSWPA
Orange Level Access

Joined: 11 Sep 2009
Location: Clinton, Pa
Points: 25548
|
Post Options
Thanks(0)
Quote Reply
Posted: 25 Jun 2025 at 2:29pm |
|
Grounding or starter would be my first suspects
|
|
I am still confident of this;
I will see the goodness of the Lord in the land of the living.
Wait for the Lord;
be strong and take heart and wait for the Lord. Ps 27
|
|
Lars(wi)
Orange Level Access
Joined: 14 Sep 2009
Location: Permian Basin
Points: 8409
|
Post Options
Thanks(0)
Quote Reply
Posted: 25 Jun 2025 at 3:42pm |
|
Watched your video, what is the advantage of this contraption, instead of pulling a flat rack directly behind the baler?
|
|
I tried to follow the science, but it was not there. I then followed the money, and that’s where I found the science.
|
|
iowallis
Silver Level

Joined: 04 Jun 2017
Location: North Iowa
Points: 387
|
Post Options
Thanks(0)
Quote Reply
Posted: 25 Jun 2025 at 4:49pm |
|
I would guess battery cables and ground. Get some decent ones (4 ga minimum) and clean the connections on both ends when installing. I would also run a cable from the engine to the frame/body of the machine to insure good grounding. 2nd guess would be a bad stater despite being new.
Long shot is what happened to one of my old cars that wouldn’t start when hot. For years blamed it on vapor lock. Found out that using multi weight oil it would get too thin in my well worn engine and the cylinders couldn’t pull enough vacuum to get the gas/air mixture into the cylinder. Switched to straight weight oil (30 weight) and a bottle of STP and no hot start issues since. It is a warm weather car so no need to worry about starting in cold weather.
Edited by iowallis - 25 Jun 2025 at 4:50pm
|
|
modirt
Orange Level Access
Joined: 18 Jul 2018
Location: Missouri
Points: 9474
|
Post Options
Thanks(0)
Quote Reply
Posted: 25 Jun 2025 at 9:14pm |
Lars(wi) wrote:
Watched your video, what is the advantage of this contraption, instead of pulling a flat rack directly behind the baler? |
One advantage is I started baling today at 2 PM. It was 95 and humid. Plus had no help then. Help showed up at 6 PM when it cooled down. We put 200 bales in the barn in 2 hours, start to finish. Could have been faster if we made it in one big load. This shows front end elevated enough to stack bales 8 high, which is all we need. Could go higher.
Before finding this thing, spent some time looking for a New Holland Stackliner.......but even the smallest one needs more height to the trusses than this barn has. The other ways to haul hay all seem to be regional. I doubt there is a baler with bale thrower anywhere in MO. Some guys do stack on wagons behind the baler, but very rare. I've seen accumulators and skid loaders, but never seen one in the field.
Most common method in MO today for small squares? Crew of 4 or 5 picking them up by hand and stacking on a flatbed trailer towed by 1 ton pickup. The Amish can make it look like hay levitates onto that trailer and into the barn.
|
|
modirt
Orange Level Access
Joined: 18 Jul 2018
Location: Missouri
Points: 9474
|
Post Options
Thanks(0)
Quote Reply
Posted: 25 Jun 2025 at 9:27pm |
On a hunch, put a battery charger on the battery today at 1.00. Pulled it about 5.30. It needed some charge. Started and ran, but at start, volt meter dropped way off. So tired battery, bad cables, bad connection, or all the above.
Also, watching volt meter, alternator never kicked in as it has in past. May spend some time looking for reason, but gave up on that one long time ago. Just need to get a new one and start over.
There was quite a bit of redneck engineering that had been added that is being put back to normal / original.
|
|