| Author |
 Topic Search Topic Search  Topic Options Topic Options
|
CA13414 
Silver Level


Joined: 25 Feb 2024
Location: Nebraska
Points: 385
|
 Post Options Post Options
") Thanks(0) Thanks(0)
 Quote Quote  Reply Reply
 Posted: 04 Jun 2024 at 8:28pm Posted: 04 Jun 2024 at 8:28pm |
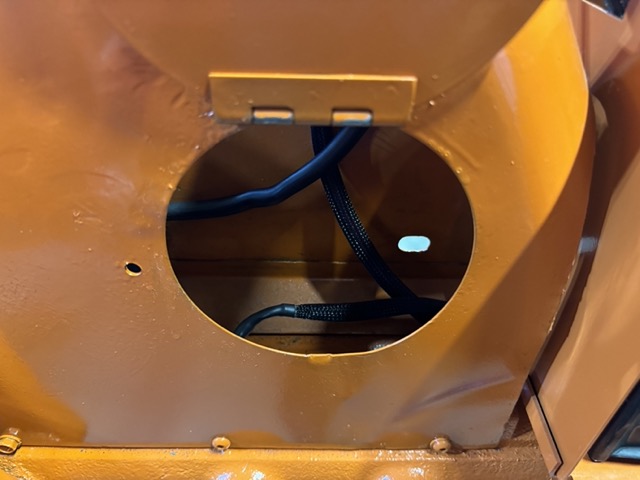
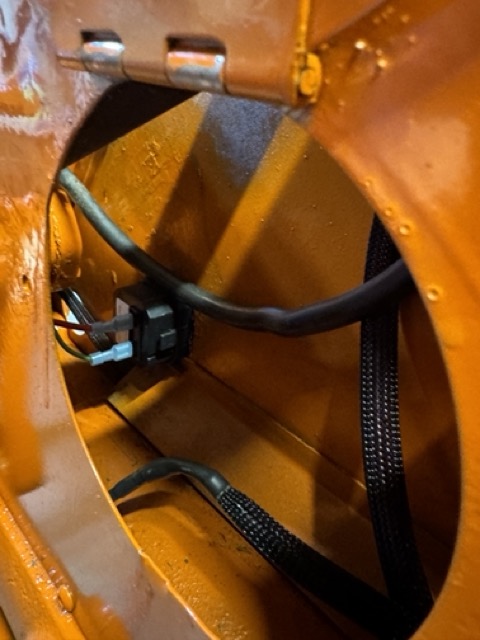
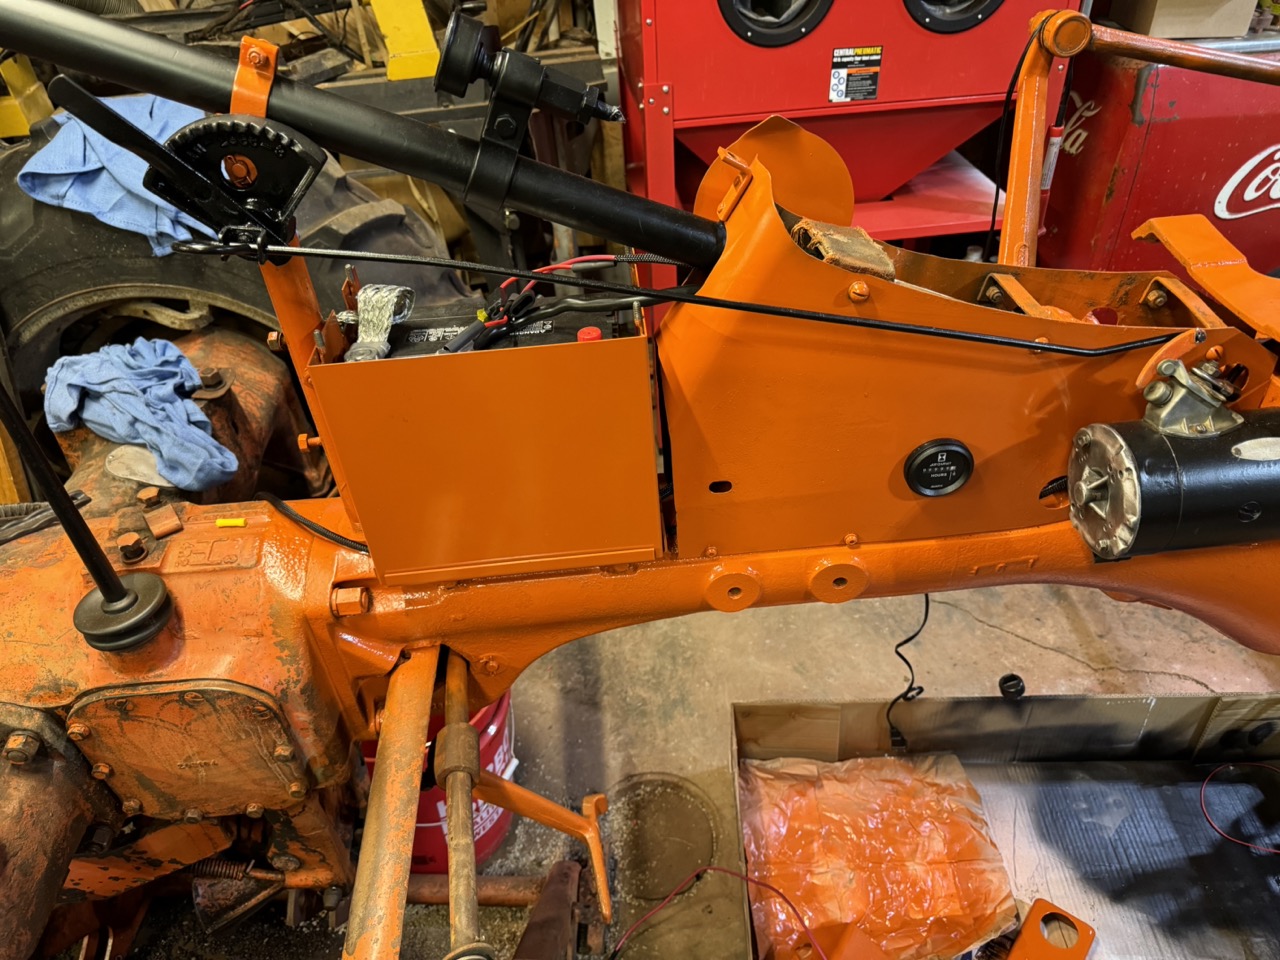
Here is a the battery with wires in place. Still will wait to connect the positive terminal until final wiring is done.... getting closer. Fuses shown in the prior psotings are down along the left side of the battery. The positive terminal should have been 6" longer... Maybe someday I will add a longer one.
Also I do want to add a split clear hose to "line" the "cutout" where the wires run. That way we avoid future problems and wearing through the insulation on the positive cable.... if things move.
Then secure the battery with a bracket!!
< id="idg-io-safe-browsing-enabled" ="" oninit="true">
Edited by CA13414 - 04 Jun 2024 at 9:47pm
|
|
Helping the aged survive and thrive! 1953 CA
|
 |
|
Sponsored Links
|
|
|
CA13414
Silver Level
Joined: 25 Feb 2024
Location: Nebraska
Points: 385
|
Post Options
Thanks(0)
Quote Reply
Posted: 04 Jun 2024 at 8:45pm |
Made a number of connections and almost done with the wiring. At this point just need to connect to the key and light switch then instal in the "control box." We did sand the control box and added a final coat of paint.
Wires connecting to the hour meter.
Tried to make sure we used heat resistant braided cable sleave everywhere possible with heat shrink at each connector. Here is the hour meter again which works well when connected to the battery.
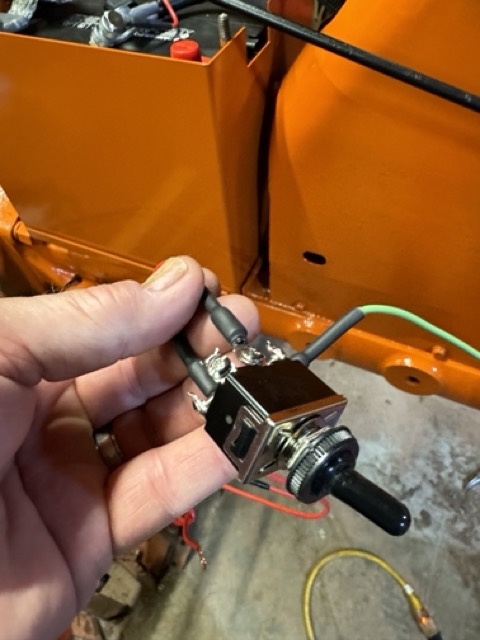
Here is the toggle switch... THANKS to Steve! This will be the "kill switch" for the magneto in the down postion and supply power to the alternater in the up position.
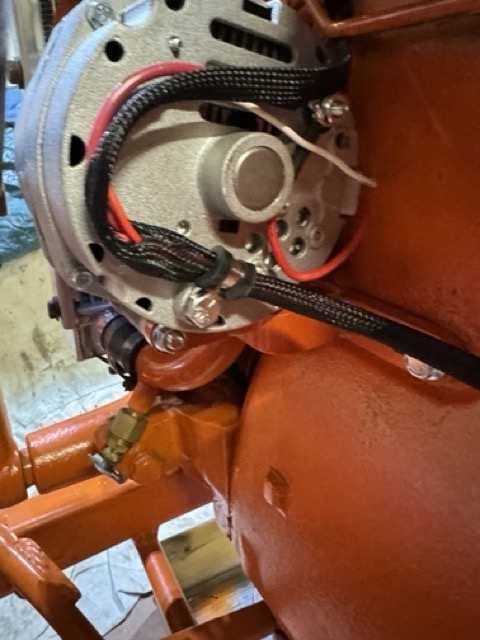
Also added a SS bracket to the wiring harness to hold the wires off the engine block and secure to the alternater.
< id="idg-io-safe-browsing-enabled" ="" oninit="true">
Edited by CA13414 - 04 Jun 2024 at 9:12pm
|
|
Helping the aged survive and thrive! 1953 CA
|
|
CA13414
Silver Level
Joined: 25 Feb 2024
Location: Nebraska
Points: 385
|
Post Options
Thanks(0)
Quote Reply
Posted: 04 Jun 2024 at 9:04pm |
Installed the throttle base and handle control. As well installed the starter pull.
Next time, will add the throttle "shaft" from the throttle control to the governor. Today we applied the last coat of black paint today to the throttle shaft.
< id="idg-io-safe-browsing-enabled" ="" oninit="true">
Edited by CA13414 - 04 Jun 2024 at 9:10pm
|
|
Helping the aged survive and thrive! 1953 CA
|
|
plummerscarin
Orange Level Access

Joined: 22 Jun 2015
Location: ia
Points: 4146
|
Post Options
Thanks(0)
Quote Reply
Posted: 04 Jun 2024 at 9:08pm |
|
Looking good!!
|
|
CA13414
Silver Level
Joined: 25 Feb 2024
Location: Nebraska
Points: 385
|
Post Options
Thanks(0)
Quote Reply
Posted: 04 Jun 2024 at 9:13pm |
 plummerscarin wrote: plummerscarin wrote:
Looking good!! |
Thank You!!
< id="idg-io-safe-browsing-enabled" ="" oninit="true">
Edited by CA13414 - 04 Jun 2024 at 9:13pm
|
|
Helping the aged survive and thrive! 1953 CA
|
|
CA13414
Silver Level
Joined: 25 Feb 2024
Location: Nebraska
Points: 385
|
Post Options
Thanks(0)
Quote Reply
Posted: 04 Jun 2024 at 9:25pm |
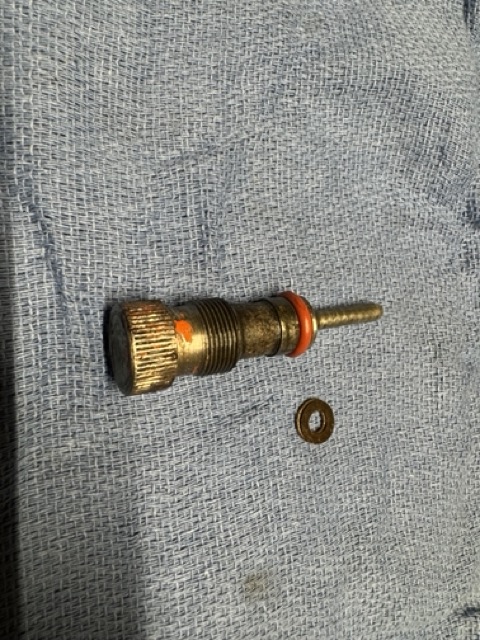
Finally added the O-ring to the hydraulic pressure control "screw C." I used a 3/8" ID and 5/8" OD ring. Was tight and actually shaved off the outer part of the O-Ring. It was still snug and I guess I will see if it leaks when there is a load.
Anyone have an idea on if this is OK or should I hunt for a different sized O-Ring.
Thank you! ....................................
Here is the O-Ring when installed on screw C
Here it is after taking it back out and you can see I shaved off the outer part of the O-Ring. Thoughts on if this will be oK. Looks like I need an O-Ring that is 1/16" smaller OD.
As I am looking at this, I think I flip the "shaved O-Ring" since it seams to have a bevel with the force of being shaved, and may would be a better seal......??????
Edited by CA13414 - 02 Aug 2025 at 7:07pm
|
|
Helping the aged survive and thrive! 1953 CA
|
|
CA13414
Silver Level
Joined: 25 Feb 2024
Location: Nebraska
Points: 385
|
Post Options
Thanks(0)
Quote Reply
Posted: 06 Jun 2024 at 9:15pm |
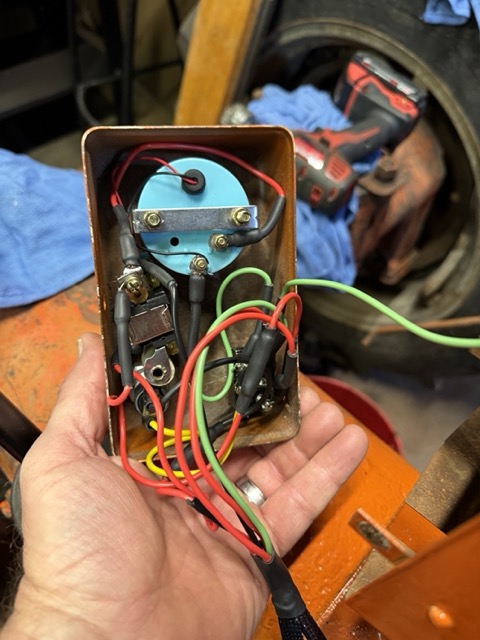
Finished up the wiring tonight. All that is left is to connect the headlights once the hood and grill are back on and the tail light once the fender is reinstalled.
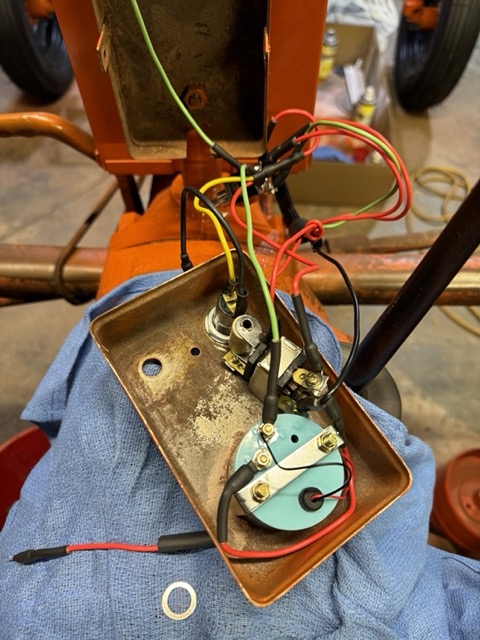
After we pulled all the wire and made up the ends, started connecting to the key, toggle switch, light pull and volt meter. The only change from the hand drawn wire schematic in a previous post, is that we added a wire to the Volt meter to power the back light when the lights are on.
Here are all the wires connected. Alot going on in this little box, but it fits. Did have to drill out the hole to fit the the toggle switch.
< id="idg-io-safe-browsing-enabled" ="" oninit="true">
Edited by CA13414 - 07 Jun 2024 at 6:22pm
|
|
Helping the aged survive and thrive! 1953 CA
|
|
CA13414
Silver Level
Joined: 25 Feb 2024
Location: Nebraska
Points: 385
|
Post Options
Thanks(0)
Quote Reply
Posted: 06 Jun 2024 at 9:24pm |
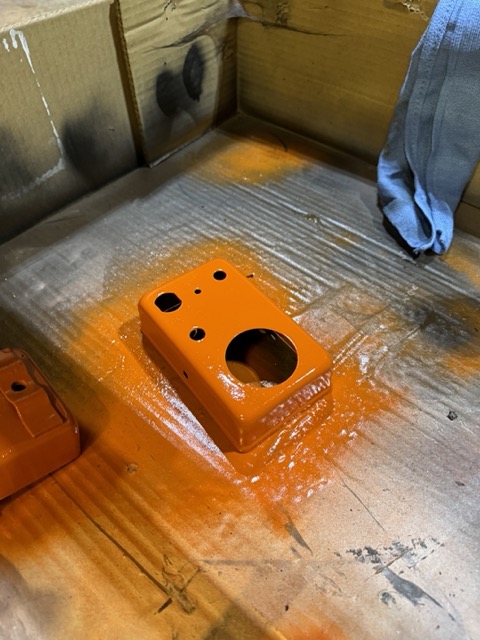
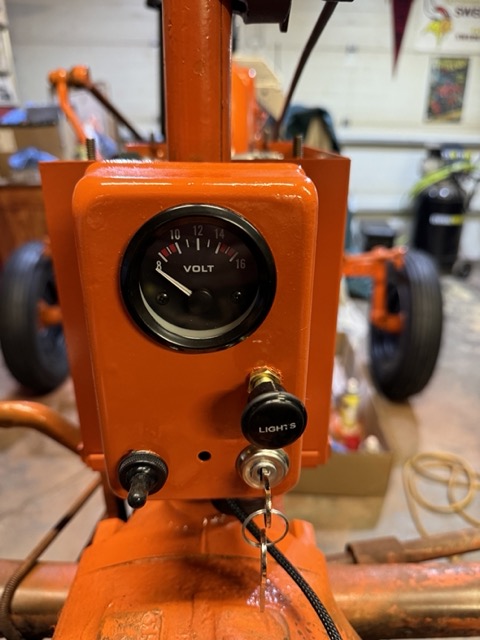
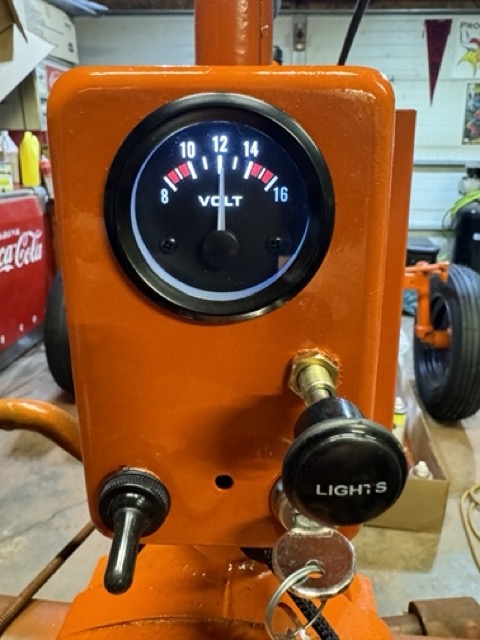
Here it is assembled. A few spots to touch up with paint, but will do that later.
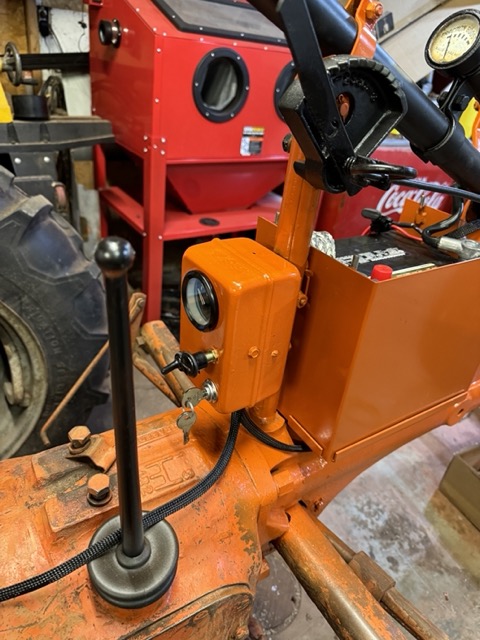
Here is a side view and you can also see the heat resistant harness with the wire for the rear fender light. Will route that once the back-end and fenders are reassembled.
The key powers everything. The toggle when down grounds out the Mag. The toggle in the up position powers the alternator and hour meter. With the key on the lights will operate regardless of the toggle position.
Key is on and the battery is at 12V.
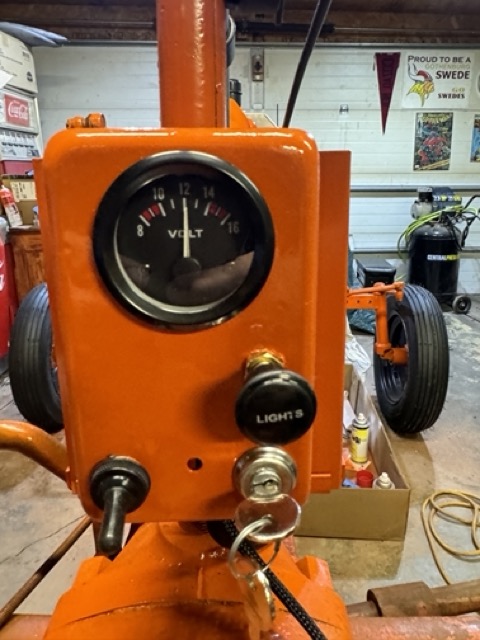
Here the lights are on and you can see the volt meter is back-light lit.
< id="idg-io-safe-browsing-enabled" ="" oninit="true">
Edited by CA13414 - 07 Jun 2024 at 5:51am
|
|
Helping the aged survive and thrive! 1953 CA
|
|
AjsAllis
Bronze Level


Joined: 07 May 2024
Location: Colorado
Points: 29
|
Post Options
Thanks(0)
Quote Reply
Posted: 06 Jun 2024 at 11:16pm |
|
You're doing am incredible job not only on the tractor but on documenting the progess.
Well done!
I need to start taking more pictures.
|
|
CA13414
Silver Level
Joined: 25 Feb 2024
Location: Nebraska
Points: 385
|
Post Options
Thanks(0)
Quote Reply
Posted: 07 Jun 2024 at 7:57pm |
Thank you!
I often forget to take the pictures, however, they really do help keep track of all the effort. As well, as I review and post photos, I write down things I need to do on my ToDo List. Has been fun!
< id="idg-io-safe-browsing-enabled" ="" oninit="true">
Edited by CA13414 - 07 Jun 2024 at 10:38pm
|
|
Helping the aged survive and thrive! 1953 CA
|
|
wjohn
Orange Level

Joined: 19 Jan 2010
Location: KS
Points: 2379
|
Post Options
Thanks(0)
Quote Reply
Posted: 08 Jun 2024 at 9:03am |
|
I would defer to others w/ experience but since nobody has responded yet... I personally would not be comfortable with the o-ring situation. I just redid the pump in my WD (95% of it is the same as a CA) and got the o-ring from AGCO. Not sure what size it was but they all of the o-rings were a pretty tight fit to install over the different internal parts. None of mine shaved anything off when installing into the bores, at least that I was able to see.
|
|
1939 B, 1940 B, 1941 WC, 1951 WD, 1952 CA, 1956 WD-45
|
|
CA13414
Silver Level
Joined: 25 Feb 2024
Location: Nebraska
Points: 385
|
Post Options
Thanks(0)
Quote Reply
Posted: 08 Jun 2024 at 12:56pm |
wjohn wrote:
I would defer to others w/ experience but since nobody has responded yet... I personally would not be comfortable with the o-ring situation. I just redid the pump in my WD (95% of it is the same as a CA) and got the o-ring from AGCO. Not sure what size it was but they all of the o-rings were a pretty tight fit to install over the different internal parts. None of mine shaved anything off when installing into the bores, at least that I was able to see. |
Thank you and appreciate the message. It makes since and would be bad to have it fail under a load.. I will check out AGCO and get the right size!
< id="idg-io-safe-browsing-enabled" ="" oninit="true">
Edited by CA13414 - 08 Jun 2024 at 12:56pm
|
|
Helping the aged survive and thrive! 1953 CA
|
|
steve(ill)
Orange Level Access

Joined: 11 Sep 2009
Location: illinois
Points: 90210
|
Post Options
Thanks(0)
Quote Reply
Posted: 08 Jun 2024 at 1:07pm |
|
"STANDARD" O-ring THICKNESSES are .070 , .103 , .139 , and .210 inches THICKNESS (why they are odd, i dont know.. probably from a metric conversion ?) .... there are probalby a FEW that are made to 1/16 , 1/8 inch, etc..
|
|
Like them all, but love the "B"s.
|
|
AWD45D15
Bronze Level

Joined: 15 May 2024
Location: Iowa
Points: 6
|
Post Options
Thanks(0)
Quote Reply
Posted: 08 Jun 2024 at 2:43pm |
I have a CA that needs split...think connection on drive shaft at transmission broken somewhere. I used it for years with woods belly mower. It mowed really well. It has been sitting for 4 or 5 years, and I have too many other projects (and a new zero turn mower), so I would like to sell it. I have not advertised it yet but I would like $1,200 for tractor and mower as is. Many great parts, including sheet metal, wheels and tires. Engine ran well, but used some oil. Are you interested in more parts for your project? 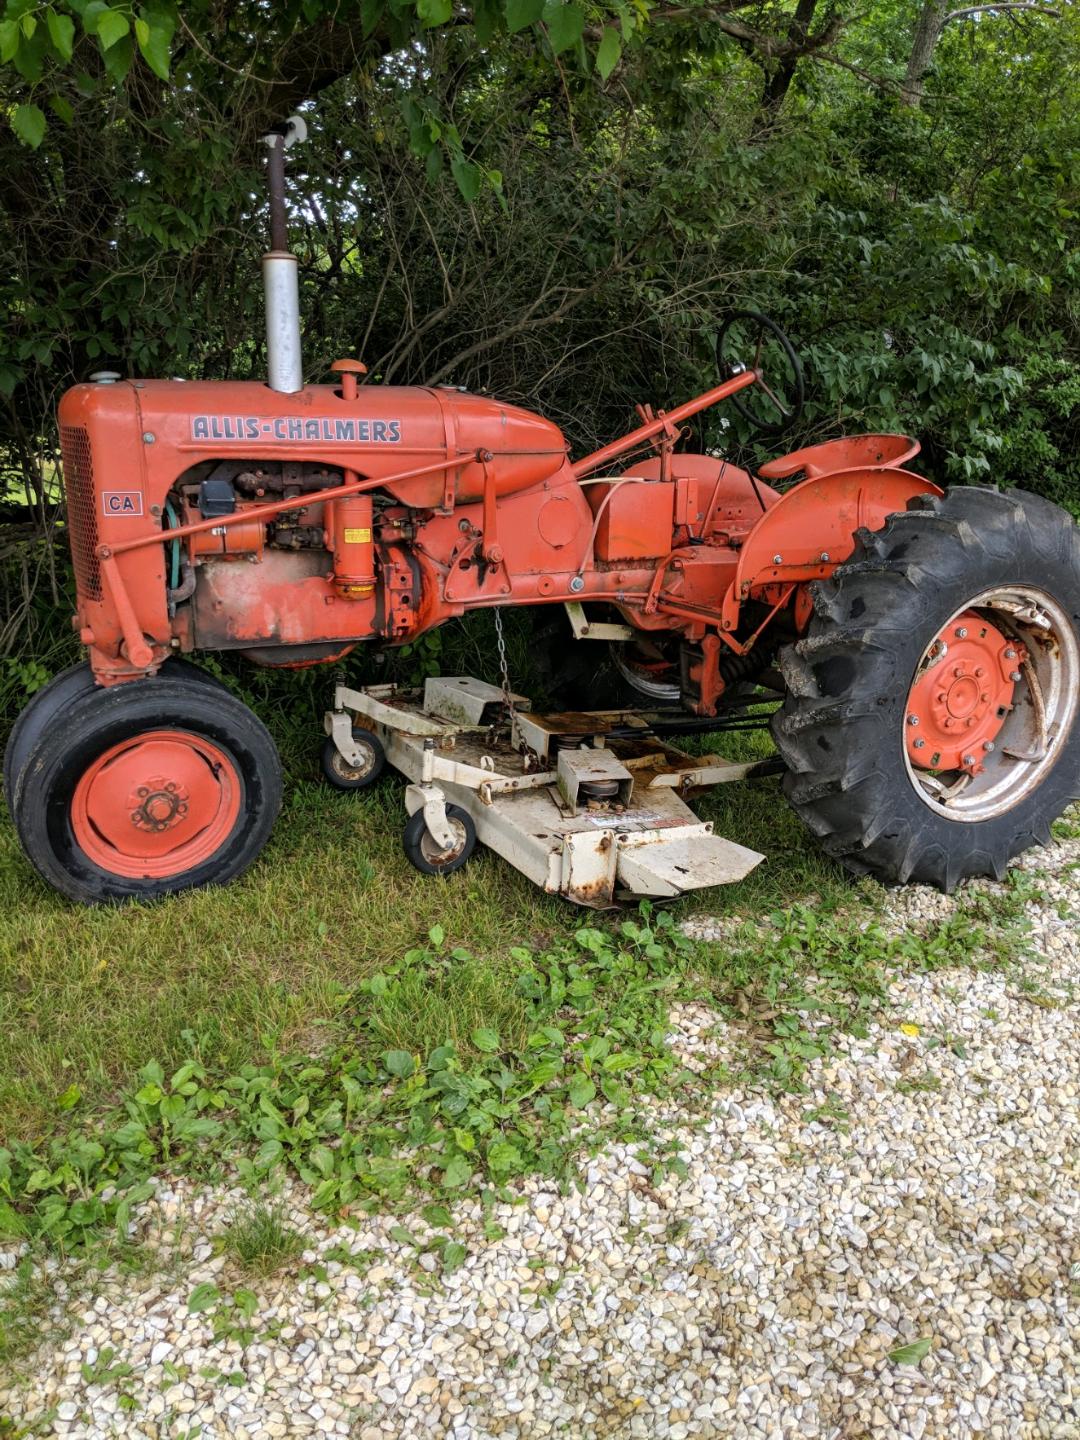
|
|
wjohn
Orange Level
Joined: 19 Jan 2010
Location: KS
Points: 2379
|
Post Options
Thanks(0)
Quote Reply
Posted: 08 Jun 2024 at 10:36pm |
CA13414 wrote:
Thank you and appreciate the message. It makes since and would be bad to have it fail under a load.. I will check out AGCO and get the right size! |
I meant to mention they are not expensive. It was something like 49 cents. More expensive than buying o-rings in bulk, sure, but still not enough for me to save literally a few dollars on all the o-rings combined and wonder if I had gotten the right sizes and had as good of quality parts.
|
|
1939 B, 1940 B, 1941 WC, 1951 WD, 1952 CA, 1956 WD-45
|
|
IBWD MIke
Orange Level
Joined: 08 Apr 2012
Location: Newton Ia.
Points: 4258
|
Post Options
Thanks(0)
Quote Reply
Posted: 09 Jun 2024 at 6:38am |
AWD45D15 wrote:
I have a CA that needs split...think connection on drive shaft at transmission broken somewhere. I used it for years with woods belly mower. It mowed really well. It has been sitting for 4 or 5 years, and I have too many other projects (and a new zero turn mower), so I would like to sell it. I have not advertised it yet but I would like $1,200 for tractor and mower as is. Many great parts, including sheet metal, wheels and tires. Engine ran well, but used some oil. Are you interested in more parts for your project?
|
Whereabouts are you in Iowa? I might be interested.
|
|
AWD45D15
Bronze Level
Joined: 15 May 2024
Location: Iowa
Points: 6
|
Post Options
Thanks(0)
Quote Reply
Posted: 09 Jun 2024 at 6:41am |
|
Near Indianola,IA 50125
|
|
CA13414
Silver Level
Joined: 25 Feb 2024
Location: Nebraska
Points: 385
|
Post Options
Thanks(0)
Quote Reply
Posted: 09 Jun 2024 at 5:17pm |
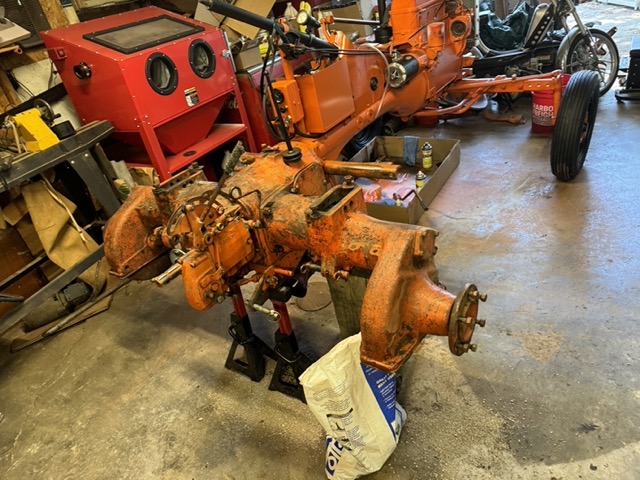
Was a good day. Wanted to take apart left and right final drive and replace the final drive inner seals and clean up the final drive tubes.
Here is the left side up on a jack stand!
< id="idg-io-safe-browsing-enabled" ="" oninit="true">
Edited by CA13414 - 09 Jun 2024 at 5:17pm
|
|
Helping the aged survive and thrive! 1953 CA
|
|
CA13414
Silver Level
Joined: 25 Feb 2024
Location: Nebraska
Points: 385
|
Post Options
Thanks(0)
Quote Reply
Posted: 09 Jun 2024 at 5:26pm |
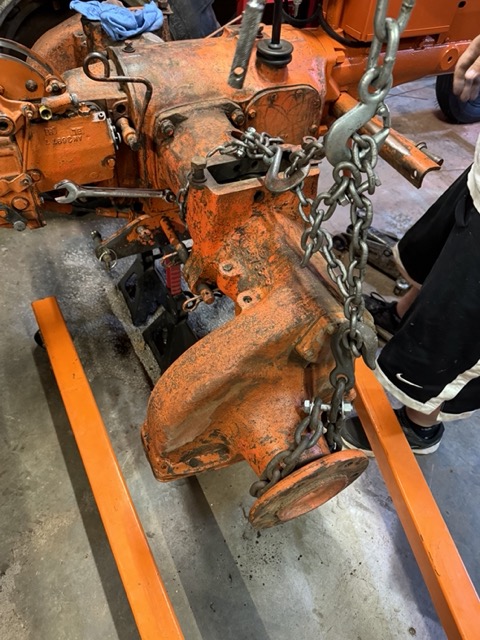
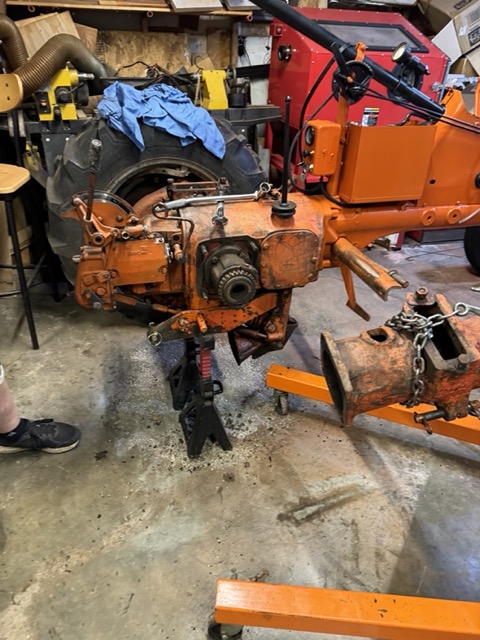
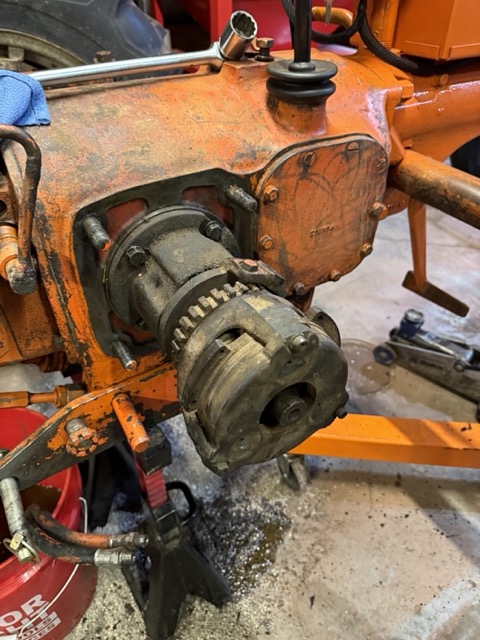
With an engine lift and a few chains we set up to take off the right final drive.
Here is the grease and dirt filled right final drive tube. Took a bit of time to clean
Yep had to catch the three 1/2" bearings for the hand clutch.
< id="idg-io-safe-browsing-enabled" ="" oninit="true">
Edited by CA13414 - 09 Jun 2024 at 8:01pm
|
|
Helping the aged survive and thrive! 1953 CA
|
|
CA13414
Silver Level
Joined: 25 Feb 2024
Location: Nebraska
Points: 385
|
Post Options
Thanks(0)
Quote Reply
Posted: 09 Jun 2024 at 5:55pm |
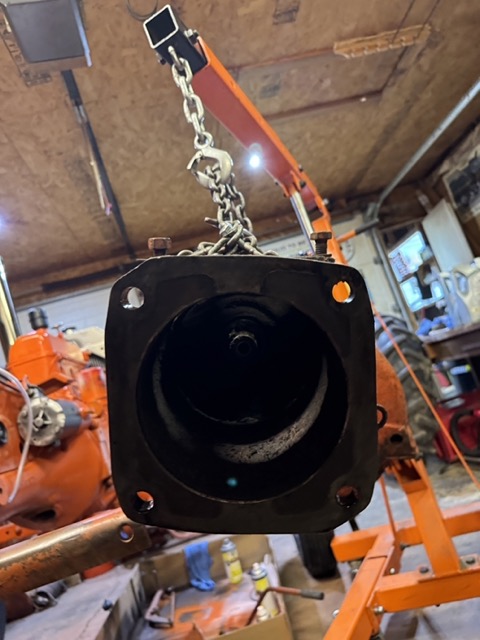
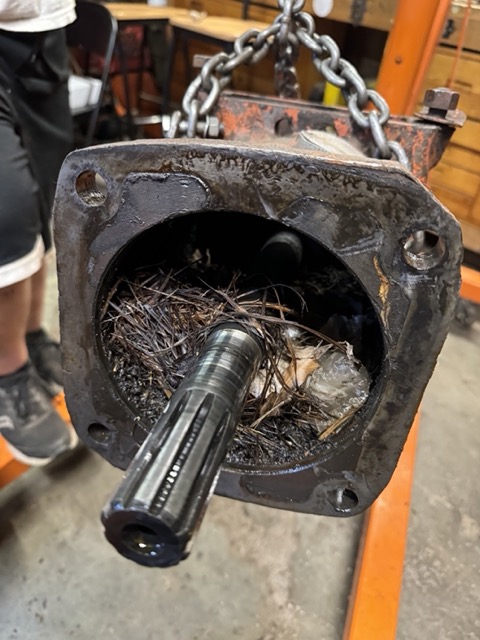
Here is the left side!! Like WTF it is a bird nest!!
This is the seal that has been leaking which is obvious with the oil soaked birds nest above!!
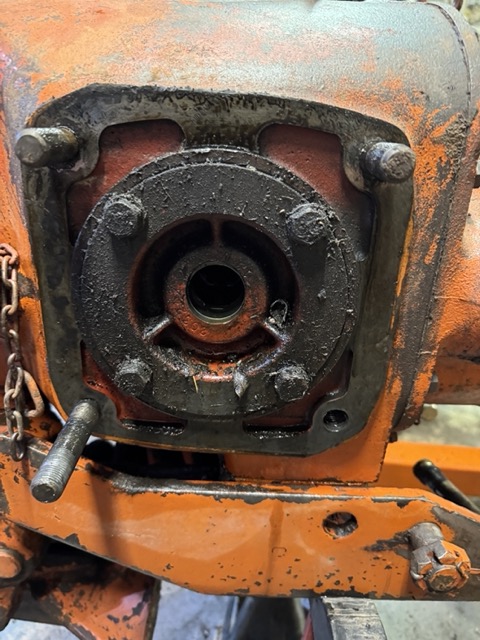
More seriously, their clearly as been some wear on the seal and bearing cone housing in prior years. Makes me think the differential cone bearing went out which resulted in this wear. As well, I didn't take pictures (...damn) but the left shaft was hard to remove. When we removed it had "chunks of fused metal" on the final drive shaft which you would expect to see with metal on metal wear. Thus, we took off these ridges and cleaned them up with emory cloth.
Importantly the race and cone bearing looked good, thus, seams like we are really are dealing with old damage. To me that is the only way we could wear the seal housing shown above and that this is not recent but old (i.e. he current seal is not worn like the seal housing.
Happy to know what other think about this wear and if there are any concerns.
Knowing that this is only to hold the new seal and the bearing race in place which is on the other side, we reinstalled both left and right seals and reassembled.
< id="idg-io-safe-browsing-enabled" ="" oninit="true">
Edited by CA13414 - 10 Jun 2024 at 8:11am
|
|
Helping the aged survive and thrive! 1953 CA
|
|
CA13414
Silver Level
Joined: 25 Feb 2024
Location: Nebraska
Points: 385
|
Post Options
Thanks(0)
Quote Reply
Posted: 09 Jun 2024 at 6:11pm |
Once we put in both left and right seals, we put it all together. Used a "light" layer of PermaTex to ensure we had a good seal when bolting the left and right seal and bearing race housings to the differential. The left side that was difficult to remove did go back together quite easy after removing the burs. Overall it took about 5 hours.
Put together the right side as below.... with the hand clutch release.... and simply to keep the "3 balls" of the clutch together. Then slid the final drive shaft into the release clutch. Did have to futz with the woodruff key and the brake drum shaft which was OK.
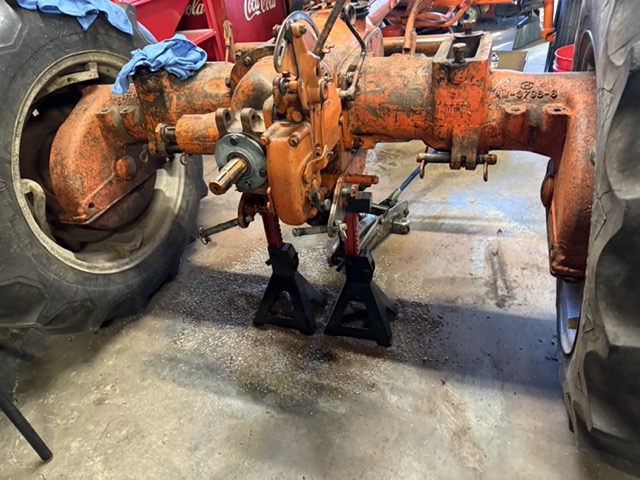
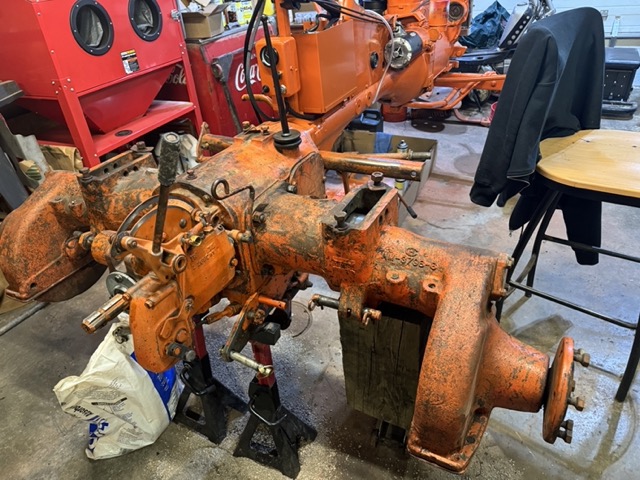
When it was all said and done here it is back together. Have two jack stands and two jacks (added the left on after this picture). Just needed to make sure it does not come off the jack stands.
We then rinsed/washed out with about a half a gallon of hydraulic/trans oil, since the drained oil seamed like it was cloudy. Then put in the drain plug with a new seal and filled with new hydrolic/trans oil. Will make sure we do not have any leaks. I plan to run this for a short bit then change out the oil again..... need to drop the pans to the final drive gears and change the oil yet.
Then the rear tires and painting!! As long as there are no leaks!!!
< id="idg-io-safe-browsing-enabled" ="" oninit="true">
Edited by CA13414 - 10 Jun 2024 at 8:17am
|
|
Helping the aged survive and thrive! 1953 CA
|
|
CA13414
Silver Level
Joined: 25 Feb 2024
Location: Nebraska
Points: 385
|
Post Options
Thanks(0)
Quote Reply
Posted: 11 Jun 2024 at 7:37pm |
A bit more achieved tonight. Used the drill and wire brush, and brake cleaner once again to clean up the rear final drive and etc a bit more. Pretty much cleaned up everything except the underside of the final drive pans and the quick connect. Will do that later when I am ready to crawl under and not in good cloths!!!
Here is the first coat of black paint on the hubs which will be black just like the front wheels. Then we are planning to paint the rear wheel with pin body, guide rail body and pin orange. The rim will be black.
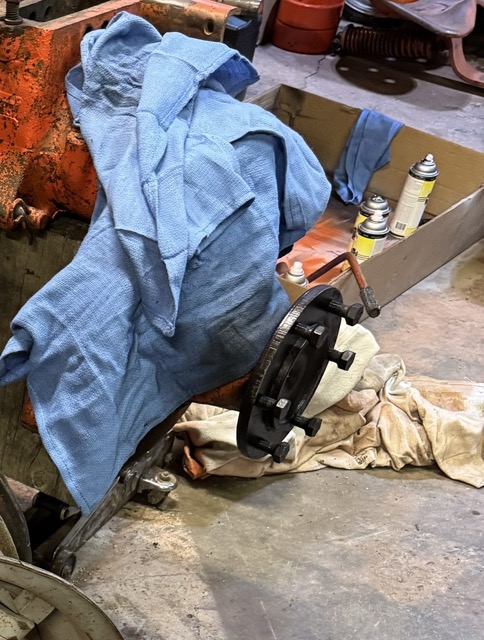
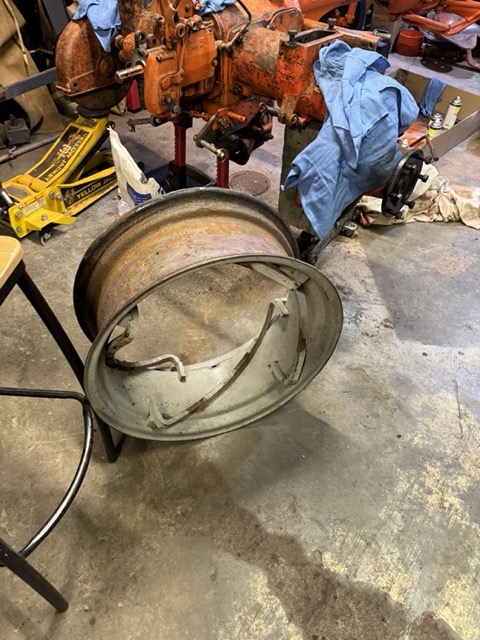
Took the Milwaulkee Sawzall and yep cut off the tire. Was the best part of the day!!
Here is the rim. It did take a bit to pry off the remaining tire and bead off. But did get it done with a couple of pry bars!! Now to either wire brush the heck out of the rim or sand blast. Then paint black.
< id="idg-io-safe-browsing-enabled" ="" oninit="true">
Edited by CA13414 - 11 Jun 2024 at 7:39pm
|
|
Helping the aged survive and thrive! 1953 CA
|
|
CA13414
Silver Level
Joined: 25 Feb 2024
Location: Nebraska
Points: 385
|
Post Options
Thanks(0)
Quote Reply
Posted: 11 Jun 2024 at 7:47pm |
However, after filling the differential Sunday with oil, the left side is leaking. Also the pulley shaft seal is leaking. Is not bad but still leaking and will replace that seal.
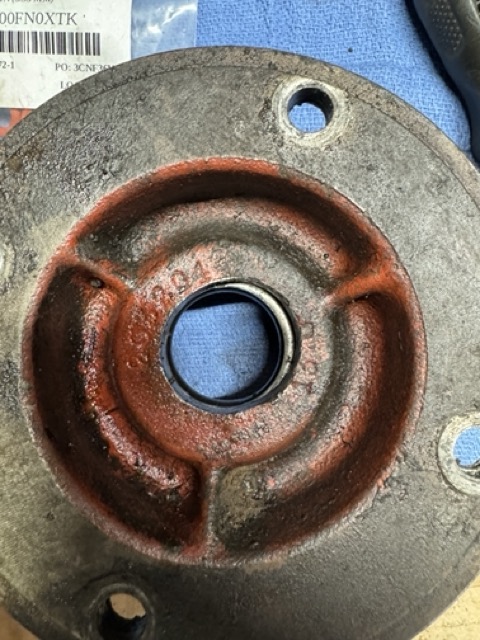
Regarding the left inner drive shaft seal, I really think this is leaking at the at the differential carrier and the shims. Reading the service manual they talk about adding sealer on the shims to prevent leaking. I think I did not get enough of the PermaTex.
I did want to ask the question to the group about the left "Differential Carrier" that I posted Sunday. As mentioned earlier, this is only to hold the bearing race and seal, thus I don't think this wear with the new seal is the issue but the carrier.
Thoughts?
< id="idg-io-safe-browsing-enabled" ="" oninit="true">
Edited by CA13414 - 11 Jun 2024 at 8:35pm
|
|
Helping the aged survive and thrive! 1953 CA
|
|
steve(ill)
Orange Level Access
Joined: 11 Sep 2009
Location: illinois
Points: 90210
|
Post Options
Thanks(0)
Quote Reply
Posted: 11 Jun 2024 at 8:23pm |
|
as long as the bearing race is snug in the hole, and the seal is covered all the way around, i dont see a problem.. You could stuff a little RTV or JB Weld in the "cavity" if you want to seal around the Seal.
Edited by steve(ill) - 11 Jun 2024 at 8:24pm
|
|
Like them all, but love the "B"s.
|
|
CA13414
Silver Level
Joined: 25 Feb 2024
Location: Nebraska
Points: 385
|
Post Options
Thanks(0)
Quote Reply
Posted: 11 Jun 2024 at 8:37pm |
steve(ill) wrote:
as long as the bearing race is snug in the hole, and the seal is covered all the way around, i dont see a problem.. You could stuff a little RTV or JB Weld in the "cavity" if you want to seal around the Seal.
|
Thank you,
The race is snug and the seal was covered all the way around. We will take it back off and then make sure we have enough sealant on the shims and carrier. Would you use something other than PermaTex?
< id="idg-io-safe-browsing-enabled" ="" oninit="true">
Edited by CA13414 - 11 Jun 2024 at 8:37pm
|
|
Helping the aged survive and thrive! 1953 CA
|
|
steve(ill)
Orange Level Access
Joined: 11 Sep 2009
Location: illinois
Points: 90210
|
Post Options
Thanks(0)
Quote Reply
Posted: 11 Jun 2024 at 9:15pm |
|
Permatex is normally good stuff... ALso check the shaft.. have seen small GROOVES cut by the seal after 50 years of service... Sometimes a double lip seal can be purchased to fix problem areas.
|
|
Like them all, but love the "B"s.
|
|
CA13414
Silver Level
Joined: 25 Feb 2024
Location: Nebraska
Points: 385
|
Post Options
Thanks(0)
Quote Reply
Posted: 11 Jun 2024 at 9:20pm |
steve(ill) wrote:
Permatex is normally good stuff... ALso check the shaft.. have seen small GROOVES cut by the seal after 50 years of service... Sometimes a double lip seal can be purchased to fix problem areas. |
That is awesome. Like the double lip seal as a solution... creative solution!!!! Don't think I have seen those on DJs or Yesterdays sell those? If not, where?
I will make sure I get an even layer of PermaTex, yet not too much.
Thanks again!!!
< id="idg-io-safe-browsing-enabled" ="" oninit="true">
Edited by CA13414 - 11 Jun 2024 at 9:21pm
|
|
Helping the aged survive and thrive! 1953 CA
|
|
CA13414
Silver Level
Joined: 25 Feb 2024
Location: Nebraska
Points: 385
|
Post Options
Thanks(0)
Quote Reply
Posted: 11 Jun 2024 at 9:27pm |
steve(ill) wrote:
Permatex is normally good stuff... ALso check the shaft.. have seen small GROOVES cut by the seal after 50 years of service... Sometimes a double lip seal can be purchased to fix problem areas. |
What do you thing about taking out the shims and putting a thin gasket in it place to seal the carrier?
< id="idg-io-safe-browsing-enabled" ="" oninit="true">
Edited by CA13414 - 11 Jun 2024 at 9:27pm
|
|
Helping the aged survive and thrive! 1953 CA
|
|
steve(ill)
Orange Level Access
Joined: 11 Sep 2009
Location: illinois
Points: 90210
|
Post Options
Thanks(0)
Quote Reply
Posted: 11 Jun 2024 at 9:53pm |
|
as long as the gasket is "non compressable" or is very thin, that will work... I have seen paper gaskets used between the shims on a couple tractors i have taken apart.. I assume that was factory ?? ...The idea of SHIMS is to get a good "dimension"... anything that is compressable or changes thickness would not be a good idea.
|
|
Like them all, but love the "B"s.
|
|
steve(ill)
Orange Level Access
Joined: 11 Sep 2009
Location: illinois
Points: 90210
|
Post Options
Thanks(0)
Quote Reply
Posted: 11 Jun 2024 at 9:55pm |
I dont have a specific seal that is double lip.. Just know they make them.. I had a 75 year old "B" that had groove cut in the shaft and always dripped.. I got the ID and OD and bought a seal that was DOUBLE LIP and probably 1/8 inch THICKER than original and installed that..
Edited by steve(ill) - 11 Jun 2024 at 9:58pm
|
|
Like them all, but love the "B"s.
|
|