| Author |
 Topic Search Topic Search  Topic Options Topic Options
|
steve(ill) 
Orange Level Access


Joined: 11 Sep 2009
Location: illinois
Points: 90507
|
 Post Options Post Options
") Thanks(0) Thanks(0)
") Quote Quote  Reply Reply
 Posted: 25 May 2024 at 7:41pm Posted: 25 May 2024 at 7:41pm |
|
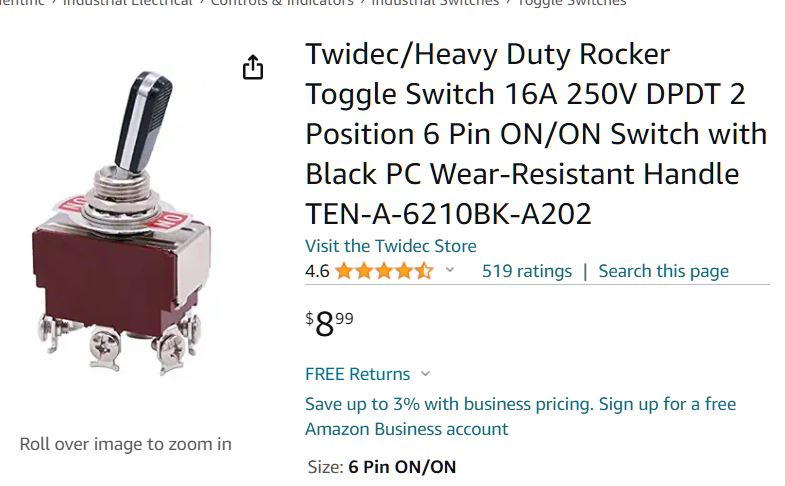
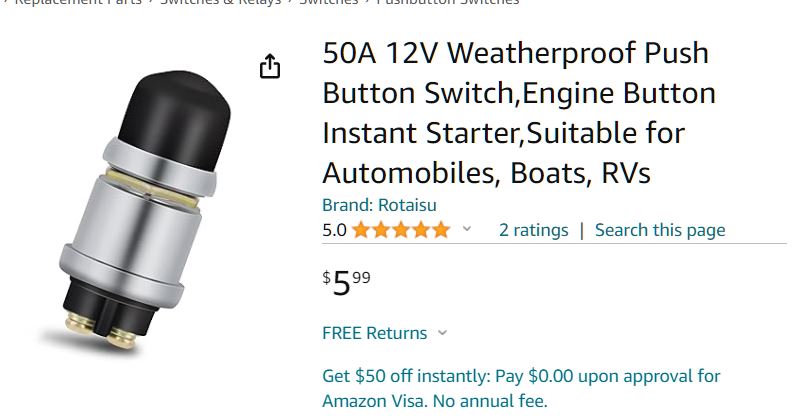
I use a single throw, double pole switch on the B tractors... Two positions... on is ground the wire from the mag... the other is power (excitation) to the alternator / dash... Then i have a push button for power to the solenoid to start.
|
|
Like them all, but love the "B"s.
|
 |
|
Sponsored Links
|
|
|
CA13414
Silver Level


Joined: 25 Feb 2024
Location: Nebraska
Points: 385
|
Post Options
Thanks(0)
Quote Reply
Posted: 25 May 2024 at 7:54pm |
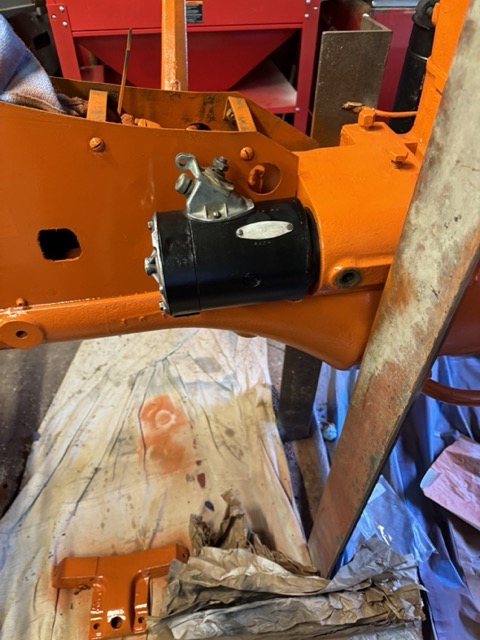
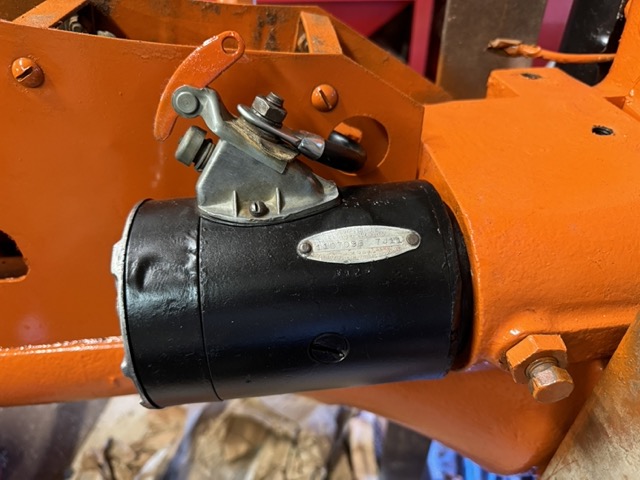
Next paint and installing the starter.
With the starter arm painted orange. Here is the "pot metal" after removing the old black paint.
< id="idg-io-safe-browsing-enabled" ="" oninit="true">
Edited by CA13414 - 25 May 2024 at 8:00pm
|
|
Helping the aged survive and thrive! 1953 CA
|
|
CA13414
Silver Level
Joined: 25 Feb 2024
Location: Nebraska
Points: 385
|
Post Options
Thanks(0)
Quote Reply
Posted: 25 May 2024 at 7:58pm |
I do like both those ideas. Do you have the toggle and push button?
< id="idg-io-safe-browsing-enabled" ="" oninit="true">
|
|
Helping the aged survive and thrive! 1953 CA
|
|
CA13414
Silver Level
Joined: 25 Feb 2024
Location: Nebraska
Points: 385
|
Post Options
Thanks(0)
Quote Reply
Posted: 25 May 2024 at 8:03pm |
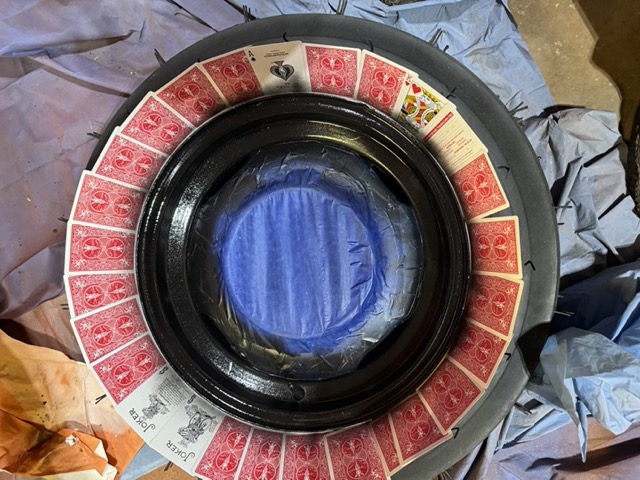
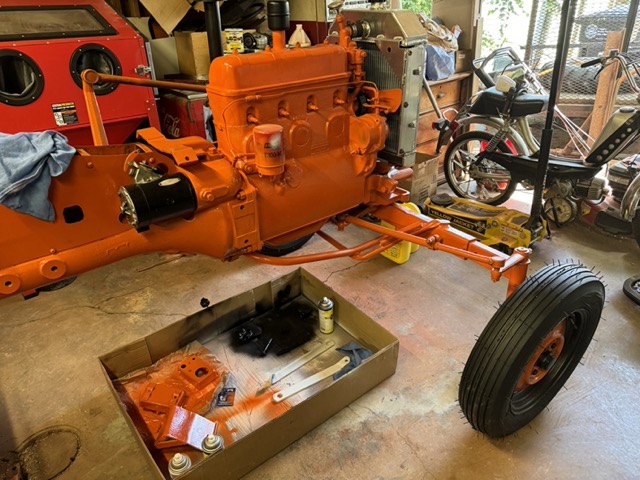
Was excited to put on the left tire. First a bit of touch up after the tire was mounted and the rims scratched. Used the deck of cards trick (cheers to my bro for this trick) to prevent painting the tire. As well, ironically, and not intentional, did deal myself a hand that wasn't too bad!!! Honestly, this is how put them down.
< id="idg-io-safe-browsing-enabled" ="" oninit="true">
Edited by CA13414 - 02 Jun 2024 at 9:17pm
|
|
Helping the aged survive and thrive! 1953 CA
|
|
CA13414
Silver Level
Joined: 25 Feb 2024
Location: Nebraska
Points: 385
|
Post Options
Thanks(0)
Quote Reply
Posted: 25 May 2024 at 8:06pm |
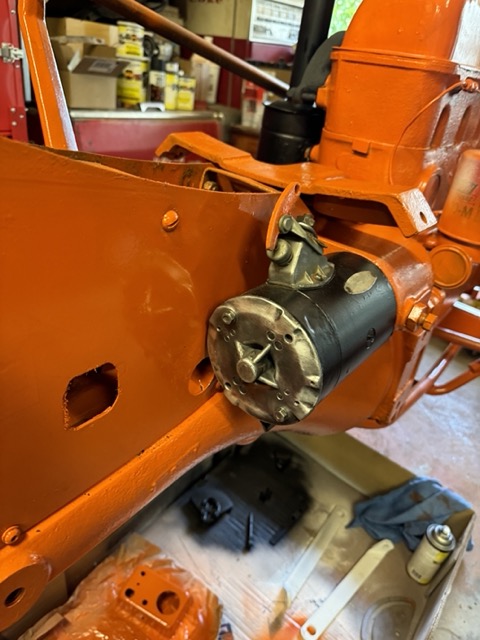
The best part of bolting on the left tire was to remove the angle iron supports and touch up the areas with paint. Love how it looks with everything coming together.
< id="idg-io-safe-browsing-enabled" ="" oninit="true">
Edited by CA13414 - 25 May 2024 at 8:07pm
|
|
Helping the aged survive and thrive! 1953 CA
|
|
steve(ill)
Orange Level Access
Joined: 11 Sep 2009
Location: illinois
Points: 90507
|
Post Options
Thanks(0)
Quote Reply
Posted: 25 May 2024 at 8:16pm |
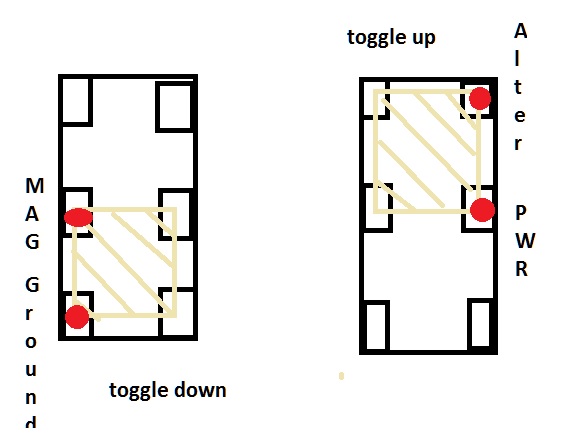
I guess the switch i used is a double pole / double throw switch.. no center off.. ON- ON.. one side is power to the alternator/ dash ... the other is ground for the mag.. something like this............ Alli have is a light switch, this "power" switch and the start button.. no key.
|
|
Like them all, but love the "B"s.
|
|
steve(ill)
Orange Level Access
Joined: 11 Sep 2009
Location: illinois
Points: 90507
|
Post Options
Thanks(0)
Quote Reply
Posted: 25 May 2024 at 8:28pm |
swith works something like this.. center and lower terminal on left when down.. center and upper terminal on right when up..
|
|
Like them all, but love the "B"s.
|
|
CA13414
Silver Level
Joined: 25 Feb 2024
Location: Nebraska
Points: 385
|
Post Options
Thanks(0)
Quote Reply
Posted: 25 May 2024 at 8:28pm |
Then put oil in the air filter and filled with antifreeze.
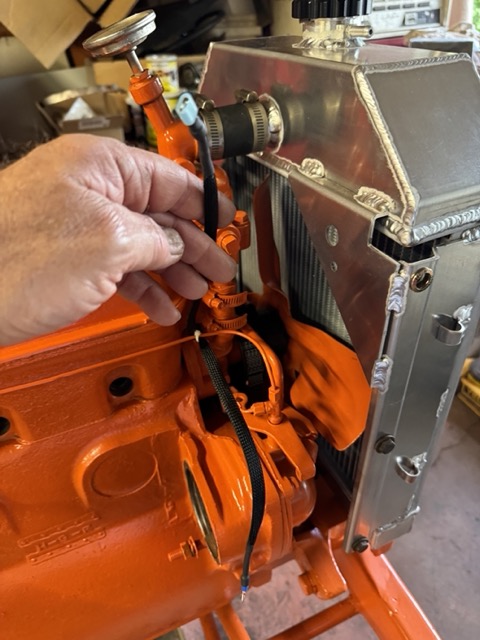
Then started wiring. Measured and cut all the wires. Was easy to put them into the heat resistant braided cable sleeve. Then made up the ends and used shrink tubes with a heat gun to finish off each connector. Note the braided sleeve next to the governor rod which passes to the right side and has the wire to power the front lights and the grounding wire which is green, to kill the magneto
Here is the finished alternator. Connected the charging post to the 10 gauge wire to the battery, and terminal #1 and #2, to the key (via a soldered connection) and to the battery via the charging post, respectively. Need to secure the grouped wires to the alternator bracket.
Here on the right side are the wires for the lights and kill switch. I am holding the wire for the lights with a finished female end. Will connect both headlights to this terminal. Hanging below this is the terminal end of the grounding wire for the magneto kill switch.
< id="idg-io-safe-browsing-enabled" ="" oninit="true">
Edited by CA13414 - 26 May 2024 at 9:55pm
|
|
Helping the aged survive and thrive! 1953 CA
|
|
CA13414
Silver Level
Joined: 25 Feb 2024
Location: Nebraska
Points: 385
|
Post Options
Thanks(0)
Quote Reply
Posted: 25 May 2024 at 8:33pm |
") steve(ill) wrote: steve(ill) wrote:
swith works something like this.. center and lower terminal on left when down.. center and upper terminal on right when up..
|
< id="idg-io-safe-browsing-enabled" ="" oninit="true">
Awesome, this is perfect! Thank you Steve!
|
|
Helping the aged survive and thrive! 1953 CA
|
|
CA13414
Silver Level
Joined: 25 Feb 2024
Location: Nebraska
Points: 385
|
Post Options
Thanks(0)
Quote Reply
Posted: 25 May 2024 at 8:38pm |
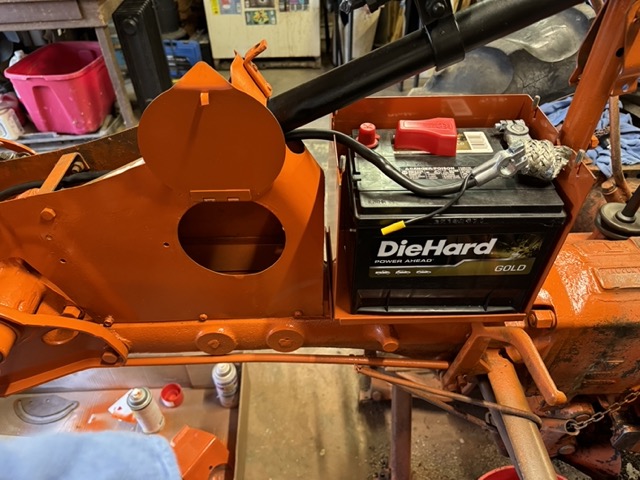
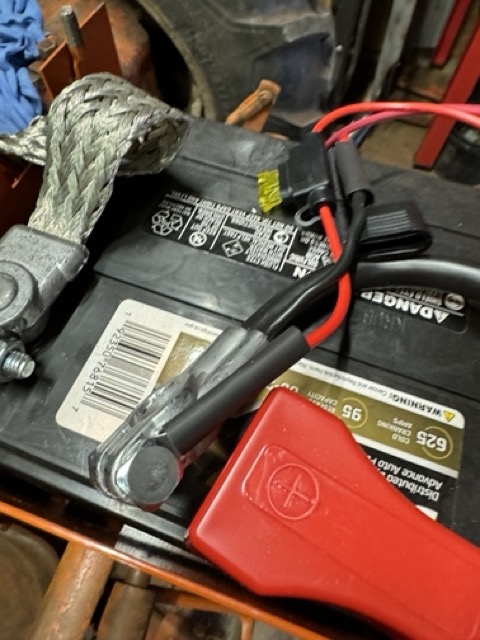
Connecting the DieHard battery. Yep will wait to connect the positive until it is done and the fuses are in place.
Also sanded and put on the final paint for the steering tube. Also reinstalled the support for the tank, which was important since the wires pass through this support.
< id="idg-io-safe-browsing-enabled" ="" oninit="true">
Edited by CA13414 - 25 May 2024 at 8:44pm
|
|
Helping the aged survive and thrive! 1953 CA
|
|
steve(ill)
Orange Level Access
Joined: 11 Sep 2009
Location: illinois
Points: 90507
|
Post Options
Thanks(0)
Quote Reply
Posted: 25 May 2024 at 8:57pm |
|
I dont think i have ever seen a Starter SWitch bolted to the starter motor that had a cast housing ?? All mine are sheetmetal.... Wonder if the cast was ORIGINAL ?? I dont know, always thought they were all sheetmetal..
|
|
Like them all, but love the "B"s.
|
|
CA13414
Silver Level
Joined: 25 Feb 2024
Location: Nebraska
Points: 385
|
Post Options
Thanks(0)
Quote Reply
Posted: 25 May 2024 at 9:09pm |
steve(ill) wrote:
I dont think i have ever seen a Starter SWitch bolted to the starter motor that had a cast housing ?? All mine are sheetmetal.... Wonder if the cast was ORIGINAL ?? I dont know, always thought they were all sheetmetal.. |
Interesting, I don't know any thing about this 'farmed in tractor," but is appears to have been taken care of very well. Most all of the tractor appears to be original, but your comment also speaks to whomever owned this.... used parts from other equipment.... as we all do on the farm.
Kinda like Johnny Cash's song.... "One Piece at a Time"
< id="idg-io-safe-browsing-enabled" ="" oninit="true">
Edited by CA13414 - 25 May 2024 at 9:10pm
|
|
Helping the aged survive and thrive! 1953 CA
|
|
CA13414
Silver Level
Joined: 25 Feb 2024
Location: Nebraska
Points: 385
|
Post Options
Thanks(0)
Quote Reply
Posted: 25 May 2024 at 9:14pm |
steve(ill) wrote:
I guess the switch i used is a double pole / double throw switch.. no center off.. ON- ON.. one side is power to the alternator/ dash ... the other is ground for the mag.. something like this............ Alli have is a light switch, this "power" switch and the start button.. no key.
|
Appreciate the info on these. Ordered both!!
< id="idg-io-safe-browsing-enabled" ="" oninit="true">
Edited by CA13414 - 25 May 2024 at 9:14pm
|
|
Helping the aged survive and thrive! 1953 CA
|
|
CA13414
Silver Level
Joined: 25 Feb 2024
Location: Nebraska
Points: 385
|
Post Options
Thanks(0)
Quote Reply
Posted: 25 May 2024 at 10:43pm |
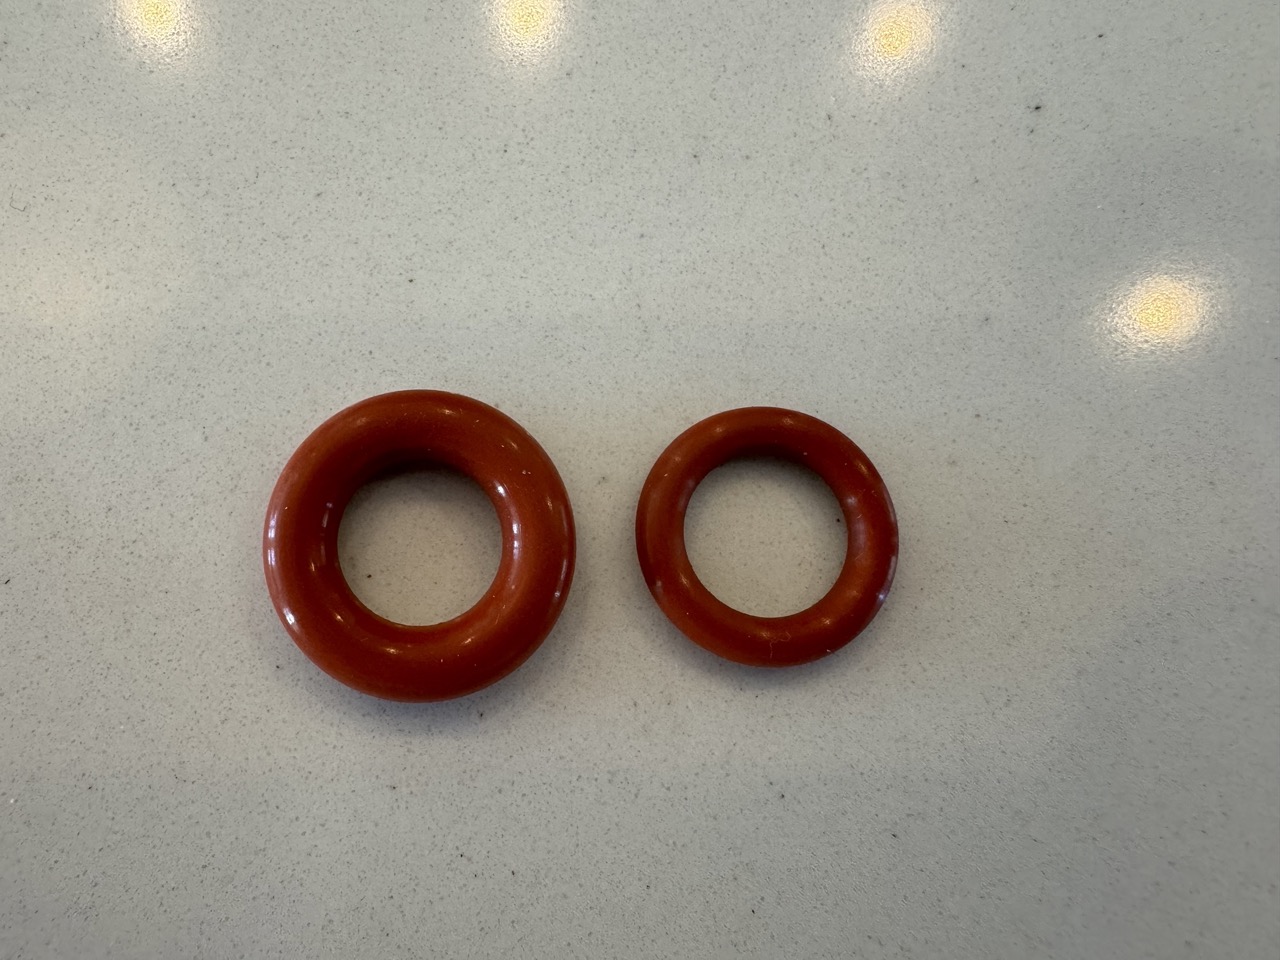
I have spent the last week trying to find the right sized O-Ring for the hydrolic adjustment Knob C. As well, spent a good chuck of the day trying to find an O-Ring locally, however..... no luck. Everywhere I went today which was NAPA, Auto Zone and Advanced Auto only had these skinny O-Rings that would not work. DJ's and YesterDays Tractors also had nothing!
Thank goodness for the internet. It took me about an hour to figure out how to search for a sized O-Ring...... which is now quite obvious! The "nomenclature" for O-Rings is the following: 1/2" ID, 7/8" OD, 3/16" Width. If you search, you will find multiple options.
Thus, I ordered from Amazon, 1/2" ID, 7/8" OD, 3/16" Width and 1/2" ID, 3/4" OD, 1/8" Width. I expect the 1/2" ID, 7/8" OD, 3/16" Width is the right one....... we will see.
The obvious part is the math - it all adds up.... ID + Width X 2 = OD!!!
< id="idg-io-safe-browsing-enabled" ="" oninit="true">
Edited by CA13414 - 27 May 2024 at 7:34am
|
|
Helping the aged survive and thrive! 1953 CA
|
|
IBWD MIke
Orange Level

Joined: 08 Apr 2012
Location: Newton Ia.
Points: 4264
|
Post Options
Thanks(0)
Quote Reply
Posted: 26 May 2024 at 7:12am |
steve(ill) wrote:
I dont think i have ever seen a Starter SWitch bolted to the starter motor that had a cast housing ?? All mine are sheetmetal.... Wonder if the cast was ORIGINAL ?? I dont know, always thought they were all sheetmetal.. |
Steve, I think that is the original style. I have some of them around here yet. Probably more of the sheetmetal type though.
Keep up the good work on that CA, it's coming right along.
|
|
steve(ill)
Orange Level Access
Joined: 11 Sep 2009
Location: illinois
Points: 90507
|
Post Options
Thanks(0)
Quote Reply
Posted: 26 May 2024 at 9:17am |
thanks Mike...i thought that might be the case.. Guess i have never seen and Original !
|
|
Like them all, but love the "B"s.
|
|
CA13414
Silver Level
Joined: 25 Feb 2024
Location: Nebraska
Points: 385
|
Post Options
Thanks(0)
Quote Reply
Posted: 27 May 2024 at 7:10pm |
The "O" rings I ordered for the hydraulic's arrived.
The 1/2" ID, 7/8" OD, 3/16 which is on the right of the picture is what I will put my money as the right one!
The left O-ring is to large: Was the 1/2" ID, 3/4" OD, 1/8".
< id="idg-io-safe-browsing-enabled" ="" oninit="true">
Edited by CA13414 - 27 May 2024 at 7:19pm
|
|
Helping the aged survive and thrive! 1953 CA
|
|
CA13414
Silver Level
Joined: 25 Feb 2024
Location: Nebraska
Points: 385
|
Post Options
Thanks(0)
Quote Reply
Posted: 27 May 2024 at 7:27pm |
So one of the front wheel hubs lug bolt threads are stripped out. Thus, I was thinking to get a 3/4" longer hub bolt and put a 1/2X20 lug nut on the inside of the hub to secure it.
Any other ideas or thoughts anyone has?
Thanks,
< id="idg-io-safe-browsing-enabled" ="" oninit="true">
Edited by CA13414 - 27 May 2024 at 7:27pm
|
|
Helping the aged survive and thrive! 1953 CA
|
|
Alberta Phil
Orange Level
Joined: 13 Sep 2009
Location: Alberta, Canada
Points: 3977
|
Post Options
Thanks(0)
Quote Reply
Posted: 27 May 2024 at 7:29pm |
|
You could use a Helicoil insert to repair it and keep the original lug bolt.
|
|
CA13414
Silver Level
Joined: 25 Feb 2024
Location: Nebraska
Points: 385
|
Post Options
Thanks(0)
Quote Reply
Posted: 27 May 2024 at 7:34pm |
Alberta Phil wrote:
You could use a Helicoil insert to repair it and keep the original lug bolt.
|
I like that idea. The more of the family tractor I preserve the better. Even if it is a lug bolt!! :')
Thanks!!
< id="idg-io-safe-browsing-enabled" ="" oninit="true">
Edited by CA13414 - 27 May 2024 at 7:41pm
|
|
Helping the aged survive and thrive! 1953 CA
|
|
BrianC
Orange Level Access
Joined: 16 Jun 2011
Location: New York
Points: 1619
|
Post Options
Thanks(0)
Quote Reply
Posted: 27 May 2024 at 8:02pm |
That type of toggle switch is what I used on my 48 C. I have magneto and alternator also. I looked and looked for an functionally equivalent pull switch, but no luck.
Toggle has been working fine for 13 years now. I used voltmeter instead of ammeter.
|
|
CA13414
Silver Level
Joined: 25 Feb 2024
Location: Nebraska
Points: 385
|
Post Options
Thanks(0)
Quote Reply
Posted: 27 May 2024 at 8:06pm |
BrianC wrote:
That type of toggle switch is what I used on my 48 C. I have magneto and alternator also. I looked and looked for an functionally equivalent pull switch, but no luck.
Toggle has been working fine for 13 years now. I used voltmeter instead of ammeter.
|
Awesome it has worked for you. The pull switch would be a cool with a two position "electrical option" of power.
< id="idg-io-safe-browsing-enabled" ="" oninit="true">
Edited by CA13414 - 27 May 2024 at 8:07pm
|
|
Helping the aged survive and thrive! 1953 CA
|
|
CA13414
Silver Level
Joined: 25 Feb 2024
Location: Nebraska
Points: 385
|
Post Options
Thanks(0)
Quote Reply
Posted: 30 May 2024 at 9:04pm |
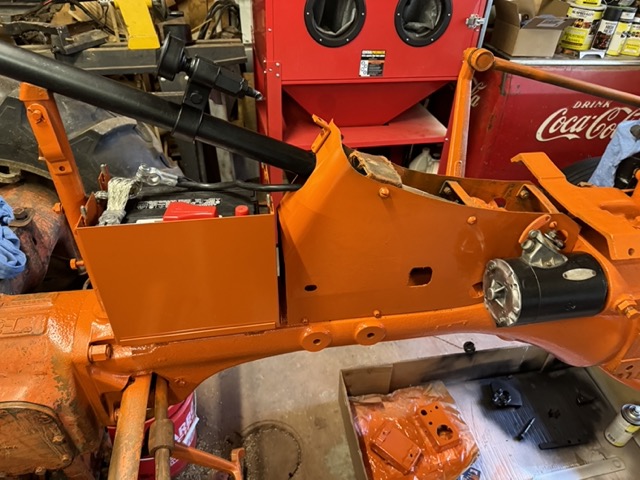
Was able to spend a few hours today. Did a number of little things. A bolt here and there. Clips to hold the wiring harness in place and a bit of touch up paint (kinda of an obsession)!!
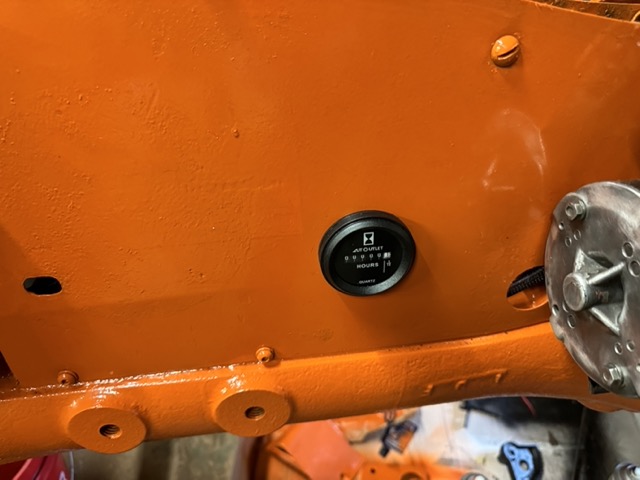
Also a bit more wiring and added fuses just as the wires come off the battery. Also "pulled" a wire for the hour meter. Next is to assemble the key, light switch and toggle.
And the hour meter. Plan to tie this into the toggle switch such that it is close to hours the engine is running. Thus, able to turn on the key, and run lights and other without running the hour meter.
< id="idg-io-safe-browsing-enabled" ="" oninit="true">
Edited by CA13414 - 30 May 2024 at 9:36pm
|
|
Helping the aged survive and thrive! 1953 CA
|
|
CA13414
Silver Level
Joined: 25 Feb 2024
Location: Nebraska
Points: 385
|
Post Options
Thanks(0)
Quote Reply
Posted: 30 May 2024 at 9:11pm |
Re-installed the muffler!!! Yeah my ADHD got me..... saw the muffler and new stainless steel (SS) bolts and thought that would be fun and quick.
Well not so quick... yet was fun!!! While we tapped the upper threads after breaking the bolt off in the manifold, despite panther piss and heat (prior post).... we did not run the tap on the lower threads. Thus, tapped out both again and then installed the muffler with the schedule 8 stainless steel (SS) bolts to have a strong bolt that will not break next time they are removed (note prior post discussion)!
< id="idg-io-safe-browsing-enabled" ="" oninit="true">
Edited by CA13414 - 01 Jun 2024 at 5:57am
|
|
Helping the aged survive and thrive! 1953 CA
|
|
CA13414
Silver Level
Joined: 25 Feb 2024
Location: Nebraska
Points: 385
|
Post Options
Thanks(0)
Quote Reply
Posted: 30 May 2024 at 9:23pm |
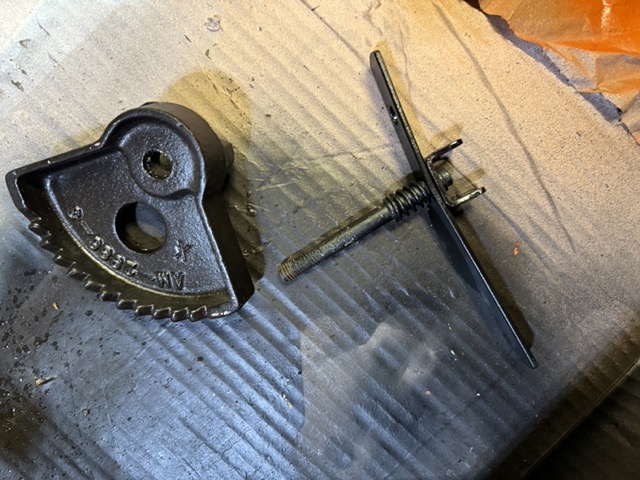
Finally, put together the throttle lever from the "family CA." Assembled the spring and retaining clip. Applied a final touch up paint and will instal this and the starter pull this weekend. This is one part of the tractor that I may regret using white primer.
I suspect the white primmer may show with a bit of use and wear. If so will get black primer and redo this piece our touch up with black paint.
< id="idg-io-safe-browsing-enabled" ="" oninit="true">
Edited by CA13414 - 30 May 2024 at 9:42pm
|
|
Helping the aged survive and thrive! 1953 CA
|
|
Sugarmaker
Orange Level

Joined: 12 Jul 2013
Location: Albion PA
Points: 8647
|
Post Options
Thanks(0)
Quote Reply
Posted: 02 Jun 2024 at 7:13pm |
CA13414, Awesome job on your family CA! Sure hope this provides a spark for me to get back on my CA puller project! Your doing a great job bringing your tractor back to great working condition. Having shared several Allis projects with folks on this forum, I can tell you it is a very good way to document your progress and work. It also helps others get started on a orange projects also. Keep up the good work! You will not regret it. Hope things are good in Orange land! Regards, Chris and Cheryl
|
|
D17 1958 (NFE), WD45 1954 (NFE), WD 1952 (NFE), WD 1950 (WFE), Allis F-40 forklift, Allis CA, Allis D14, Ford Jubilee, Many IH Cub Cadets, 32 Ford Dump, 65 Comet.
|
|
CA13414
Silver Level
Joined: 25 Feb 2024
Location: Nebraska
Points: 385
|
Post Options
Thanks(0)
Quote Reply
Posted: 02 Jun 2024 at 9:03pm |
Sugarmaker wrote:
CA13414,Awesome job on your family CA! Sure hope this provides a spark for me to get back on my CA puller project! Your doing a great job bringing your tractor back to great working condition. Having shared several Allis projects with folks on this forum, I can tell you it is a very good way to document your progress and work. It also helps others get started on a orange projects also. Keep up the good work! You will not regret it. Hope things are good in Orange land! Regards, Chris and Cheryl |
Sugarmaker, great thread yourself.... very much enjoyed reading your posts and awesome job on the rebuild!!
I appreciate the comments regarding the family CA. It has been fun to do and I often have to remind myself this is not the only thing on the "ToDo list!!!"
I do hope it helps others. No doubt every "rebuild" is different. With your effort and everyone's on the various threads, there is a wealth of information on how to make it happen.
I still envision my Grandfather and Dad sitting on the seat of the "family CA," doing what ever was needed to achieve "a goal of the day." With this notion, being able to sit on the same seat, achieving "my goal of the day," makes me smile.
< id="idg-io-safe-browsing-enabled" ="" oninit="true">
Edited by CA13414 - 02 Jun 2024 at 9:43pm
|
|
Helping the aged survive and thrive! 1953 CA
|
|
Ted J
Orange Level

Joined: 05 Jul 2010
Location: La Crosse, WI
Points: 18962
|
Post Options
Thanks(0)
Quote Reply
Posted: 03 Jun 2024 at 2:29am |
It's sure coming together nicely! Looks GREAT. Couple a questions,,,,,,, Where did you get the muffler? What number?
What number is the DieHard battery? Thanks
|
|
"Allis-Express"
19?? WC / 1941 C / 1952 CA / 1956 WD45 / 1957 WD45 / 1958 D-17
|
|
CA13414
Silver Level
Joined: 25 Feb 2024
Location: Nebraska
Points: 385
|
Post Options
Thanks(0)
Quote Reply
Posted: 03 Jun 2024 at 6:08am |
Ted J wrote:
It's sure coming together nicely! Looks GREAT. Couple a questions,,,,,,, Where did you get the muffler? What number?
What number is the DieHard battery? Thanks
|
Thanks Ted!! I will get the DieHard number tomorrow. The muffler is from DJ's.
< id="idg-io-safe-browsing-enabled" ="" oninit="true">
Edited by CA13414 - 03 Jun 2024 at 6:09am
|
|
Helping the aged survive and thrive! 1953 CA
|
|
CA13414
Silver Level
Joined: 25 Feb 2024
Location: Nebraska
Points: 385
|
Post Options
Thanks(0)
Quote Reply
Posted: 04 Jun 2024 at 8:04pm |
CA13414 wrote:
Ted J wrote:
It's sure coming together nicely! Looks GREAT. Couple a questions,,,,,,, Where did you get the muffler? What number?
What number is the DieHard battery? Thanks
|
Thanks Ted!! I will get the DieHard number tomorrow. The muffler is from DJ's.
|
Ted,
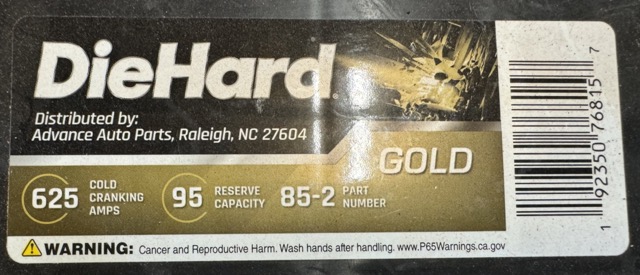
Here is the DieHard Battery. Model 85-2. This is 8" H, 9.1" L, and 6.9 W.
The Manager at the Advanced Auto distribution center I went to, was awesome.... I had the dimensions of the battery box and we walked around and found this one that fit with a bit of extra space. The DieHard was one which was not totally over the top in price.
< id="idg-io-safe-browsing-enabled" ="" oninit="true">
Edited by CA13414 - 04 Jun 2024 at 8:16pm
|
|
Helping the aged survive and thrive! 1953 CA
|
|