| Author |
 Topic Search Topic Search  Topic Options Topic Options
|
jaybmiller 
Orange Level Access

Joined: 12 Sep 2009
Location: Greensville,Ont
Points: 21487
|
 Post Options Post Options
") Thanks(0) Thanks(0)
 Quote Quote  Reply Reply
 Posted: 31 Mar 2020 at 5:59am Posted: 31 Mar 2020 at 5:59am |
re: make sure that you know where the gears and collars are in neutral
THAT's why digital cameras where invented !!! clean your hands THEN take lots of pictures, some from different angles.
I like the srpay bottle of diesel to clean idea !
When I rebuilt a JD HST, I left the 'drained' case over a pan with some paper towels in it overnight. Next day the towels were SOAKED in 'extra' oil that had slooooooowly seeped out of the case. The problem with oil and 'watery oil' is it takes a lot of time to drain. if you can, keep bucket under it for 2-3 days..longer is better.
Jay
|
|
3 D-14s,A-C forklift, B-112
Kubota BX23S lil' TOOT( The Other Orange Tractor)
Never burn your bridges, unless you can walk on water
|
 |
|
Sponsored Links
|
|
|
Dave(inMA)
Orange Level

Joined: 12 Sep 2009
Location: Grafton, MA
Points: 2395
|
Post Options
Thanks(0)
Quote Reply
Posted: 31 Mar 2020 at 5:41am |
|
Sounds as though the tranny case is getting clean. I think you'd be fine using diesel to rinse the tranny case as long as the tractor isn't running. You can remove the side cover to give you access. The shift forks are attached to that cover. Have the tractor in neutral when you remove the cover and make sure that you know where the gears and collars are in neutral in case you move something while flushing the case and contents. Use a spray bottle to flush. Have the collars lined up correctly when reinstalling the side cover and shift forks....the forks need to engage the shift lever so it needs to be in neutral position when you do this. I'm remembering all this from when I worked on the tranny years ago - it was popping out of third back then.
|
|
WC, CA, D14, WD45
|
|
Hunt4Allis
Orange Level
Joined: 13 Mar 2018
Location: Ohio
Points: 1160
|
Post Options
Thanks(0)
Quote Reply
Posted: 30 Mar 2020 at 5:42pm |
|
Before I came in the house curiosity got to me and I had to dump some cleaned oil in there to see what came out with the drain plug out. at first it was milky and then it turned to more clear looking oil...
I may pull the side cover just to have a look at other area in differential.
I did not pull my temporary cover off so I don't know what is left in that area yet because like I say I'm tempted to put something else in there that would act more as a flush but I'm not sure what would be the correct thing to use?
I could spend a couple days cleaning all the oil and crud off of underneath the plate but it's just not my main concern just yet...(I think this hydraulic leak has been going on for about 30 years by the way everything is covered on the outside at the rear of the tractor)
I bought this tractor 2 years ago and so far I've put new spin-out rims on the rear tires and got all of them operating with my old parts.(also got two good front tires on it that hold air)
Thanks Matt
Edited by Hunt4Allis - 30 Mar 2020 at 5:47pm
|
|
Dave(inMA)
Orange Level
Joined: 12 Sep 2009
Location: Grafton, MA
Points: 2395
|
Post Options
Thanks(0)
Quote Reply
Posted: 30 Mar 2020 at 5:08pm |
|
Maybe try it again with the 303 oil and see if it improves? How does the inside of the pump reservoir look now? Do you know how much water was hiding in the tranny? Might help to know how much water has to be added to the oil to turn it brown....take a known amount of the oil and start adding water to it and shake it each time to see when it starts to turn brown. One other thought: there may be pockets in the tranny that are hold oil/water but not draining. You could pull the side cover off tranny case and wash it down with something that will dissolve the oil, then carefully use compressed air to blow liquid out of the hidey holes.
Edited by Dave(inMA) - 30 Mar 2020 at 5:18pm
|
|
WC, CA, D14, WD45
|
|
Hunt4Allis
Orange Level
Joined: 13 Mar 2018
Location: Ohio
Points: 1160
|
Post Options
Thanks(0)
Quote Reply
Posted: 30 Mar 2020 at 4:35pm |
Ok thanks for info on spray Here's my "temporary plate" made from an old piece of pine board(it actually did not even drip from anywhere around this board) sealed up real nice... So I refilled with the super 303 junk just to get rid of it since I won't be using it anymore in any of my tractor's after reading how bad it is of an oil, drove it up and back my driveway about 3 or 400 ft hit all the gears including reverse just to really try to clean it up inside the best I could (I will admit in 4th gear it's a scary feeling on a bumpy gravel driveway and the neighbors probably think I'm crazy now but it doesn't matter!!!) Backed the tractor into my shop and drained oil and it still looks this bad...(I'm now tempted to fill it with either diesel fuel or kerosene like somebody had recommended they did when they used to work on these old tractors to really give it a good washing inside so to speak) The third picture is my gasket kit that just came as I was finishing all that up from Sandy lake ( thanks Brenda and Bill!) 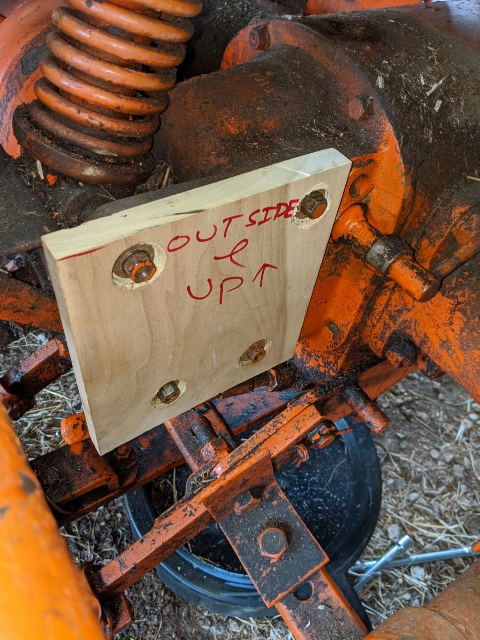 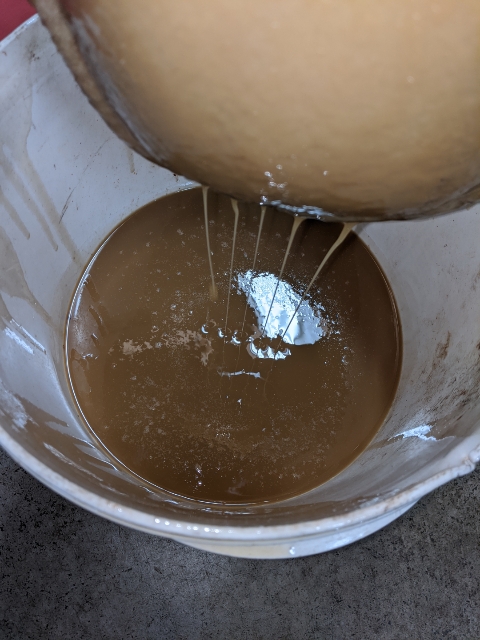 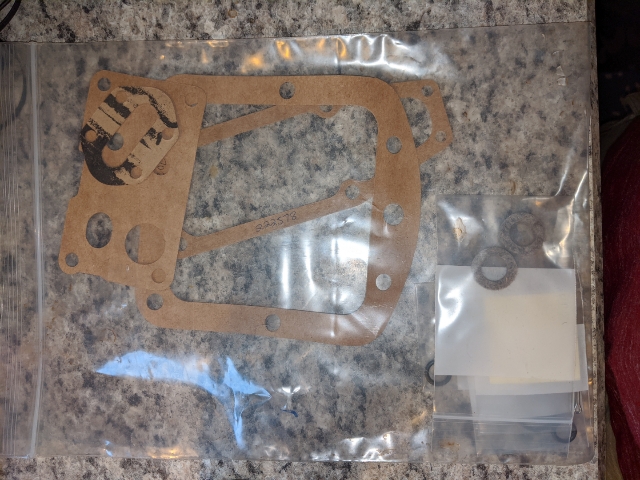
|
|
Dave(inMA)
Orange Level
Joined: 12 Sep 2009
Location: Grafton, MA
Points: 2395
|
Post Options
Thanks(0)
Quote Reply
Posted: 30 Mar 2020 at 3:54pm |
|
|
|
WC, CA, D14, WD45
|
|
Hunt4Allis
Orange Level
Joined: 13 Mar 2018
Location: Ohio
Points: 1160
|
Post Options
Thanks(0)
Quote Reply
Posted: 30 Mar 2020 at 2:31pm |
|
Copper spray on gasket sealer?( You mean copper spray on gasket?)
|
|
Dave(inMA)
Orange Level
Joined: 12 Sep 2009
Location: Grafton, MA
Points: 2395
|
Post Options
Thanks(0)
Quote Reply
Posted: 30 Mar 2020 at 1:50pm |
Matt - nifty temporary plate! Let us know how the cleanup goes.
I asked Bill at Sandy Lake about that question this morning. He uses copper spray on gasket sealer. Otherwise you get leaks......
Dave |
|
WC, CA, D14, WD45
|
|
Hunt4Allis
Orange Level
Joined: 13 Mar 2018
Location: Ohio
Points: 1160
|
Post Options
Thanks(0)
Quote Reply
Posted: 30 Mar 2020 at 11:38am |
Ended up getting this sealer and I'm wondering if I should even use any? If using this in conjunction with the gaskets provided by Sandy lake where do I apply it( it says the sealer is to be used to hold gaskets in place while reassembling but I don't really see the need for that as I can tell where these will be sitting and how they look before I completely tighten everything down) 
|
|
Hunt4Allis
Orange Level
Joined: 13 Mar 2018
Location: Ohio
Points: 1160
|
Post Options
Thanks(0)
Quote Reply
Posted: 29 Mar 2020 at 5:21pm |
Made a temporary cover What would be best to put in and let slosh around for a short drive up and back on driveway?( Trans/ hydraulic oil or diesel fuel)? 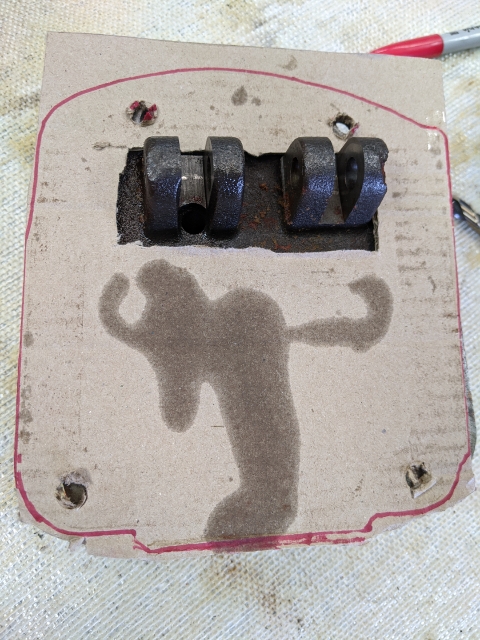 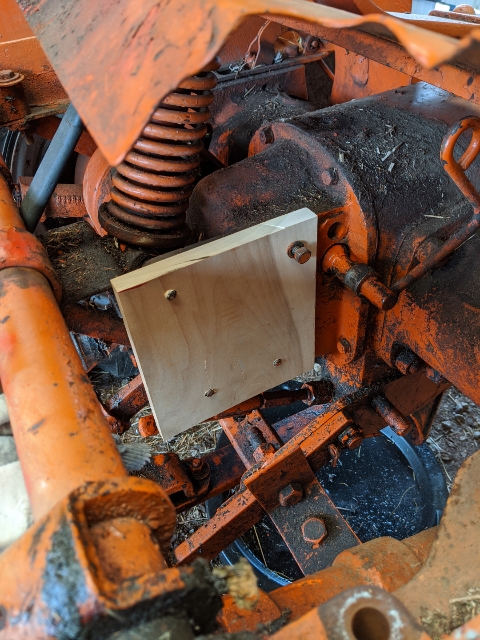 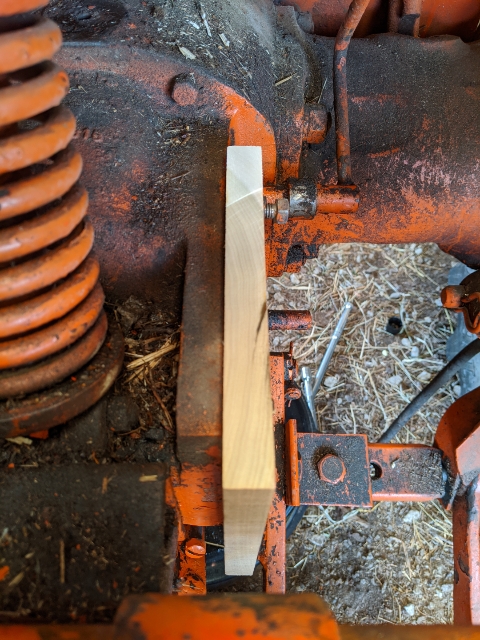 Nothing fancy but just want the cleanest area I can get with all the time and effort and small money amount invested to limit re contamination...( Plan on driving 300' total to help wash any remaining junk out of areas I can't spray brake cleaner, like the differential area I'm thinking...) Thanks Matt
|
|
SteveM C/IL
Orange Level Access
Joined: 12 Sep 2009
Location: Shelbyville IL
Points: 8002
|
Post Options
Thanks(1)
Quote Reply
Posted: 29 Mar 2020 at 1:02pm |
|
Just the pressure of springs against the lever keeping pin in place..Inside housing it is "captured" and cant get our of place.
|
|
MACK
Orange Level
Joined: 17 Nov 2009
Points: 7664
|
Post Options
Thanks(1)
Quote Reply
Posted: 29 Mar 2020 at 8:00am |
|
Drive it out with a hammer and soft punch. MACK
|
|
Hunt4Allis
Orange Level
Joined: 13 Mar 2018
Location: Ohio
Points: 1160
|
Post Options
Thanks(1)
Quote Reply
Posted: 28 Mar 2020 at 5:49pm |
|
They are not hard to remove ( I used a 3lb hammer and a large punch, just a little tappy,tap)
|
|
Dartguy
Bronze Level


Joined: 24 Mar 2020
Location: Twin Cities
Points: 3
|
Post Options
Thanks(0)
Quote Reply
Posted: 28 Mar 2020 at 5:40pm |
Mack, is the shaft that holds the cam followers pressed in? I cannot see any clips or pins securing it into place. Thanks. 
I did go ahead and tap it out with a long drift punch. I wanted to make sure it wasn't locked in place somehow and end up breaking something. thanks to all
Edited by Dartguy - 29 Mar 2020 at 8:36pm
|
|
Hunt4Allis
Orange Level
Joined: 13 Mar 2018
Location: Ohio
Points: 1160
|
Post Options
Thanks(0)
Quote Reply
Posted: 28 Mar 2020 at 5:32pm |
|
If I do the temp plate I know I have some cheap supers 303 oil to get rid of...🤪( To use to flush transmission out)
|
|
Dave(inMA)
Orange Level
Joined: 12 Sep 2009
Location: Grafton, MA
Points: 2395
|
Post Options
Thanks(0)
Quote Reply
Posted: 28 Mar 2020 at 4:51pm |
I really like the idea of a temporary plate. I think you should make one and then rent it out to guys like me!
I removed my hydraulic pump this afternoon - happily only getting what appears to be hydraulic oil dripping out of the cylinder hoses. But flushing everything would be a good idea....surely can't hurt!
Dave
|
|
WC, CA, D14, WD45
|
|
jaybmiller
Orange Level Access
Joined: 12 Sep 2009
Location: Greensville,Ont
Points: 21487
|
Post Options
Thanks(0)
Quote Reply
Posted: 28 Mar 2020 at 4:48pm |
I've made temporary plates from 1/4" finished plywood( mahogany flooring plywood). Actually sealed up pretty good without a gasket. Use 'fender' washers to spread the load from the bolts and nuts. Your bucket cleaning idea will work, not too sure how much more 'milk' you'll get out, but heck, better to do it now than ,arrghhh...later ! Jay
|
|
3 D-14s,A-C forklift, B-112
Kubota BX23S lil' TOOT( The Other Orange Tractor)
Never burn your bridges, unless you can walk on water
|
|
Hunt4Allis
Orange Level
Joined: 13 Mar 2018
Location: Ohio
Points: 1160
|
Post Options
Thanks(0)
Quote Reply
Posted: 28 Mar 2020 at 4:32pm |
|
I'm wondering if I could make a temporary plate to go over where the hydraulic pump normally sits. refill the transmission with fluid drive the tractor around a bit then drain it so that I do not get any of the leftover junk from my transmission or anywhere else that I cannot get to to flush out of it back into my pump that's super clean now...Does it sound like a feasible plan or not?( Also trying to come up with a way to completely clean out the two hydraulic cylinders for the three-point?)
I've lowered and raised the 3-point arms manually and got a lot of milky watery leftover hydraulic fluid out of the hoses and cylinders but I'm wondering if I put the hydraulic lines in a bucket of fluid and manually move the 3-point if I could suction up enough hydraulic fluid to clean it all out?
I'm mostly thinking of doing all of the flushing because of the metal filings I found on the magnetic drain plug (that was the 2 cotter pins from the drawbar control linkage that were ground up and then recirculated through the whole system I'm sure?)
Edited by Hunt4Allis - 28 Mar 2020 at 4:35pm
|
|
Dartguy
Bronze Level
Joined: 24 Mar 2020
Location: Twin Cities
Points: 3
|
Post Options
Thanks(0)
Quote Reply
Posted: 28 Mar 2020 at 12:06pm |
 MACK wrote: MACK wrote:
Use some penetration oil around them. With a small hammer, a quick rap will some times bounce them up enough to get ahold of them. Have had to weld a nut to them and twist them out. MACK |
I have it submerged in diesel fuel right now. I thought it odd that 1 out of 4 was not stuck! Thank you
|
|
MACK
Orange Level
Joined: 17 Nov 2009
Points: 7664
|
Post Options
Thanks(1)
Quote Reply
Posted: 28 Mar 2020 at 7:12am |
|
Use some penetration oil around them. With a small hammer, a quick rap will some times bounce them up enough to get ahold of them. Have had to weld a nut to them and twist them out. MACK
|
|
Hunt4Allis
Orange Level
Joined: 13 Mar 2018
Location: Ohio
Points: 1160
|
Post Options
Thanks(0)
Quote Reply
Posted: 28 Mar 2020 at 6:46am |
|
Start digging 😜into into her
|
|
Dartguy
Bronze Level
Joined: 24 Mar 2020
Location: Twin Cities
Points: 3
|
Post Options
Thanks(0)
Quote Reply
Posted: 27 Mar 2020 at 9:12pm |
Dakota Dave wrote:
No such thing as a kit for this pump. It only has two O rings for soft parts the shaft seals and they never go bad unless you tear them. Take it off the tractor put on the bench it's best to use something like a cake sheet to disassemble on. Each of the 4 Pistons has a small spring behind them. Each of the 4 plugs on the top has a ball behind it pull the control back part off . Slide out the pins that hold the actuating levers in place and remove the Pistons and springs make sure the springs aren't broke 3 Are the same the 4th is smaller diameter. Now carefully clean out the passages from the piston there are no seals just metal to metal the seats up top and the balls need to be clean and not deformed. Keep track of the 4 little slugs that slide in from the back they need to go back in the same order. There is a spring behind them that pushes against the feel after valve adjuster screw. More than 90 % of these pumps can be repaired by simple good cleaning. The pump Pistons get stuck and the cheek balls get crud in them. I've had 2 pumps that needed a spring and one I had to repair the linkage in the cap it was wore out. I assume it ran a long time without oil as it was all rusty. This pump should have oil in it. I've only ever seen one with rust. Once you get it on the bench an take it apart it's pretty apparent how it goes back together. You can look up the parts diagram on the AGCO parts site. |
Dave, my 1951 CA has 3 pistons which are stuck in the down position. I have no idea how to get them unstuck. Can you suggest what I need to do please? Thanks, Steve
|
|
MACK
Orange Level
Joined: 17 Nov 2009
Points: 7664
|
Post Options
Thanks(1)
Quote Reply
Posted: 27 Mar 2020 at 8:46pm |
|
No, the small and large spools lay length ways of pump. You have the small ones out, the large ones are what the small ones came out of. The end one will have two orings on it. Replace the orings along with the two on unloading value. MACK
|
|
Dave(inMA)
Orange Level
Joined: 12 Sep 2009
Location: Grafton, MA
Points: 2395
|
Post Options
Thanks(0)
Quote Reply
Posted: 27 Mar 2020 at 2:39pm |
Matt - sent you a PM.
Dave
|
|
WC, CA, D14, WD45
|
|
Hunt4Allis
Orange Level
Joined: 13 Mar 2018
Location: Ohio
Points: 1160
|
Post Options
Thanks(0)
Quote Reply
Posted: 27 Mar 2020 at 7:03am |
Ok thanks I'm not sure how these three large plugs and one smaller one come out because the cam followers do not move back away enough for them to come out (in my limited experience) The long pin that goes through all of the cam followers opposite the roller (where they attached to the body of the pump) seems like it is pressed in with Force because I tapped on it lightly and it did not seem to want to move? Here's the pin( yellow arrow pointing to the end of it. 
Edited by Hunt4Allis - 27 Mar 2020 at 7:15am
|
|
jaybmiller
Orange Level Access
Joined: 12 Sep 2009
Location: Greensville,Ont
Points: 21487
|
Post Options
Thanks(0)
Quote Reply
Posted: 27 Mar 2020 at 6:56am |
The 'spools' or 'plungers' are the 3 'big slugs of steel' that the 'cam followers' push upon to make the oil move. They're 11/16" in diameter according to the AGCO picture, online. In your picture, you can see 'ridges' or lines around them. Once you remove them, use 1000g autobody sandpaper to 'hone' or clean them up. To cleanup the cavities where they sit in, I wrapped 1000g paper on a pencil and twirled it in the holes. Everything should be nice and shiny and smoooooth.
Jay
|
|
3 D-14s,A-C forklift, B-112
Kubota BX23S lil' TOOT( The Other Orange Tractor)
Never burn your bridges, unless you can walk on water
|
|
Hunt4Allis
Orange Level
Joined: 13 Mar 2018
Location: Ohio
Points: 1160
|
Post Options
Thanks(0)
Quote Reply
Posted: 27 Mar 2020 at 6:44am |
|
Not sure I'm understanding correctly mack
|
|
MACK
Orange Level
Joined: 17 Nov 2009
Points: 7664
|
Post Options
Thanks(0)
Quote Reply
Posted: 27 Mar 2020 at 6:30am |
|
The spools that the small spools came out of, need to come out and be cleaned. MACK
|
|
Hunt4Allis
Orange Level
Joined: 13 Mar 2018
Location: Ohio
Points: 1160
|
Post Options
Thanks(0)
Quote Reply
Posted: 26 Mar 2020 at 10:26pm |
Came off with a putty knife 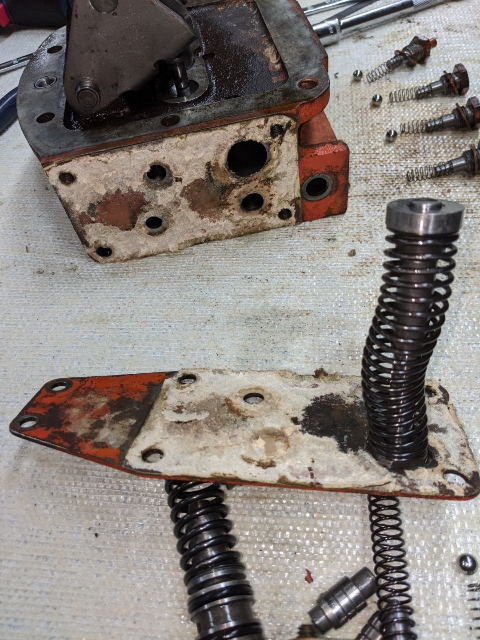 It doesn't look like the rest of it can easily come apart? I've gone this far and I believe I found some small chunks of spring in passageways and wonder if it's from the under side of the rollers that is a bit lower in this picture than the other 3 rollers?(can't tell what's normal height from exploded view I have) 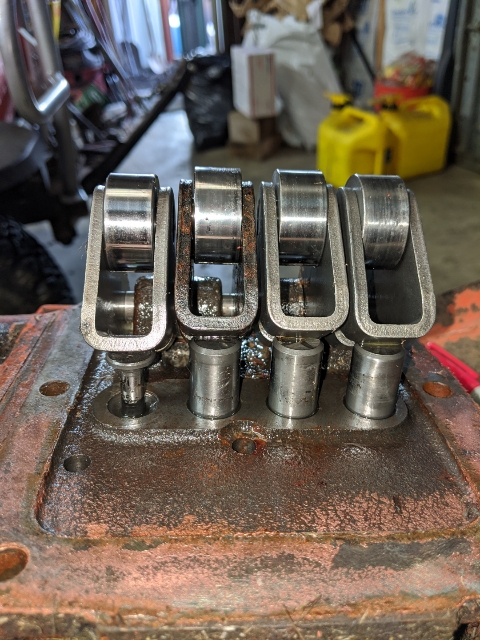 The left one is lower than other 3 to right, so what I've found small chunks of what seams to be spring material could be part of left spring which is why it's shorter now so the left one is lower? Thanks Matt
|
|
SteveM C/IL
Orange Level Access
Joined: 12 Sep 2009
Location: Shelbyville IL
Points: 8002
|
Post Options
Thanks(0)
Quote Reply
Posted: 26 Mar 2020 at 10:12pm |
|
That shaft pushes on the valves to shift them in "pump" mode...just setting in a hole.
|
|


