| Author |
|
Sugarmaker 
Orange Level


Joined: 12 Jul 2013
Location: Albion PA
Points: 8168
|
 Post Options Post Options
") Thanks(0) Thanks(0)
 Quote Quote  Reply Reply
 Posted: 01 Jul 2019 at 2:41pm Posted: 01 Jul 2019 at 2:41pm |
Ryan, Looks good from this angle! Yea you don't waste any time! Thanks for the picture of your progress too! Regards, Chris
|
|
D17 1958 (NFE), WD45 1954 (NFE), WD 1952 (NFE), WD 1950 (WFE), Allis F-40 forklift, Allis CA, Allis D14, Ford Jubilee, Many IH Cub Cadets, 32 Ford Dump, 65 Comet.
|
 |
|
Sponsored Links
|
|
|
Charlie (NC)
Orange Level

Joined: 12 Sep 2009
Location: Coastal NC
Points: 942
|
Post Options
Thanks(0)
Quote Reply
Posted: 01 Jul 2019 at 3:19pm |
|
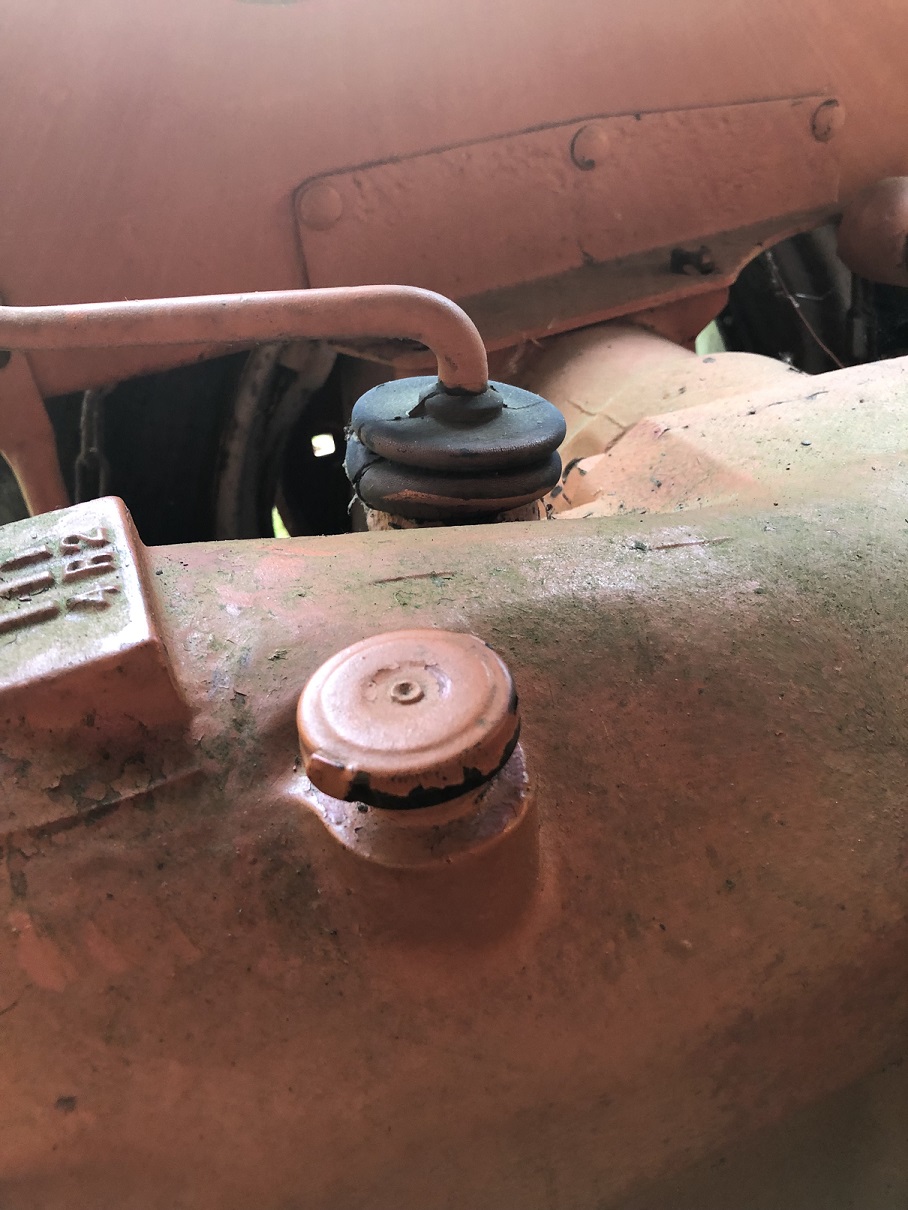
I'm confused. I have 4 D14's and unless I'm crazy none of them have that kind of vent cap in that location. They instead have a big hollowed out cap screw with a vent hole cross drilled through one of the faces of the hex head. If I had a vent cap like yours I'd have it kicked off all of the time.
|
|
Charlie (NC)
Orange Level
Joined: 12 Sep 2009
Location: Coastal NC
Points: 942
|
Post Options
Thanks(0)
Quote Reply
Posted: 01 Jul 2019 at 3:29pm |
|
Where you have that vent is supposed to be the dipstick for the transmission oil. I'm betting the hose going from the hydraulic pump to the lift cylinders is leaking fluid into the transmission. Or does that line bypass the transmission housing??
|
|
Allis-Chalmers Damon
Bronze Level

Joined: 13 Apr 2015
Location: Deer Park, WA
Points: 103
|
Post Options
Thanks(0)
Quote Reply
Posted: 01 Jul 2019 at 4:08pm |
This is an outstanding thread, great work! I have an all original D14 that will need some TLC soon as well. It runs and drives great but there are little issues that I want addressed before I have major problems. I think this thread has 90% of the information and photos needed!
|
|
1955 WD45 Diesel, 1959 D14, All-Crop Drill, 2015 John Deere 5075e, New Holland 279 Haybine, New Holland 575 square baler, New Holland 1032 Stackliner, 10ft Industrias Disc, 6ft Titan grapple
|
|
Dave(inMA)
Orange Level

Joined: 12 Sep 2009
Location: Grafton, MA
Points: 2395
|
Post Options
Thanks(0)
Quote Reply
Posted: 01 Jul 2019 at 8:38pm |
Ryan - here are shots of the tranny fill opening and dipstick per my D-14.
Here's the dipstick in place:
And the dipstick itself:
|
|
WC, CA, D14, WD45
|
|
littlemarv
Orange Level
Joined: 10 Jun 2013
Location: Wisconsin
Points: 1826
|
Post Options
Thanks(0)
Quote Reply
Posted: 02 Jul 2019 at 11:09pm |
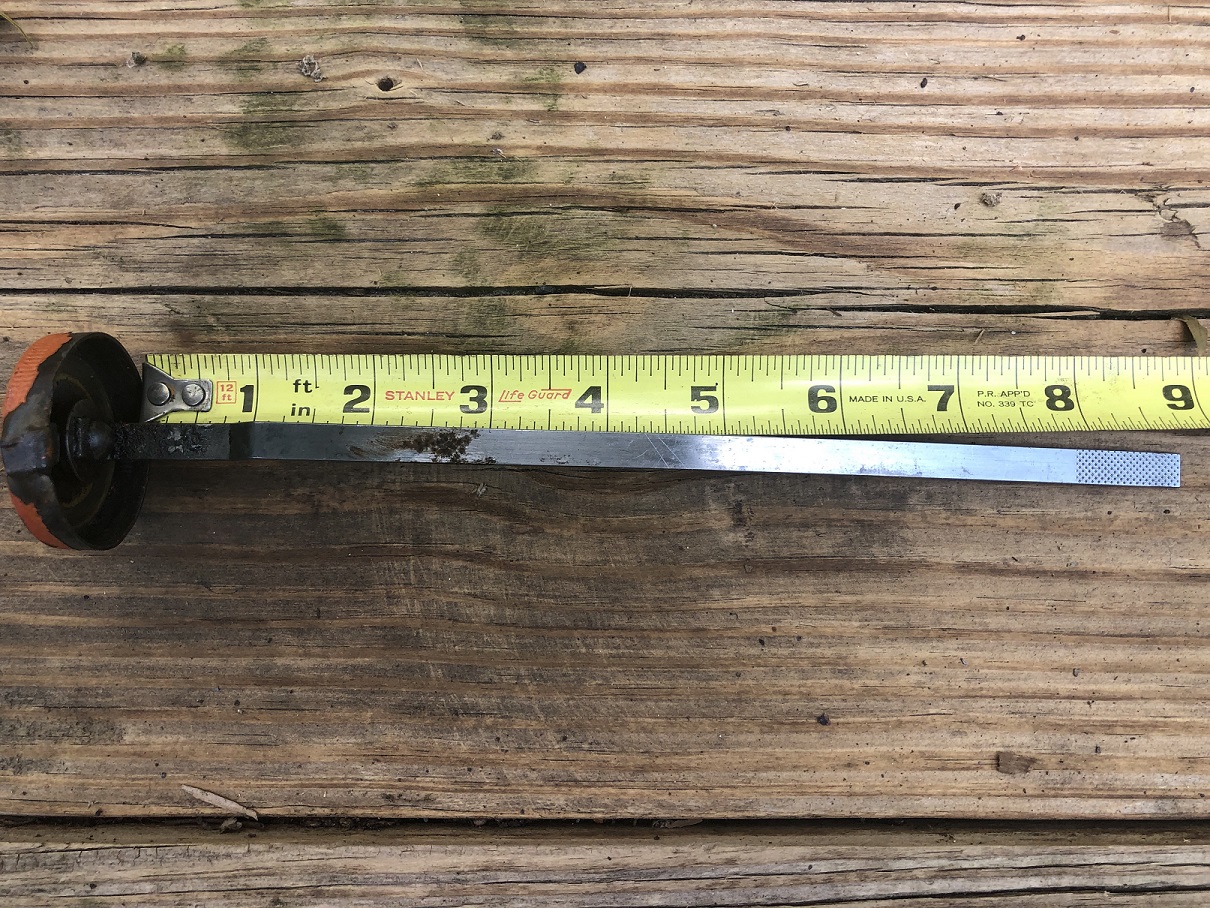
The dipstick for the hand clutch oil level is a 1 1/4" hex, with the hole drilled through the hex like mentioned above. I did some extensive internet research (translation- Googled it) and found several different pictures of trans dipsticks like the one I have. This tractor has a two thousand something serial number, maybe the earlier ones had this, then they switched to the other style? Anyways, I measured from the bottom of the cap to the full mark, exactly 8" to full, just like the one pictured above. Got the new seal installed and the right hand brakes together Slid the finals into place. They just barely squeezed over the new linings, even after I took a grinder and got rid of the lip on the drums. Cut off a 9/16" fine thread bolt to make a guide stud- makes installing loaded tires a lot easier. Set the old girl back down, filled the hand clutch and tranny. Need to install the seat and temporarily reconnect the steering, then the chassis can go outside while I work on the engine. Thanks for looking.
|
|
The mechanic always wins.
B91131, WC23065, WD89101, CA29479, B1, Early B10, HB212, 416H
|
|
Sugarmaker
Orange Level
Joined: 12 Jul 2013
Location: Albion PA
Points: 8168
|
Post Options
Thanks(0)
Quote Reply
Posted: 03 Jul 2019 at 6:21am |
Ryan, Great suggestion on the alignment pin for the wheels! I did not think of that, and it sure would have made it easier getting my wheels on the hubs. I would have had to find or build the studs. I will try to remember that aid! New brakes look good! Your coming along very nicely on this tractor! Thanks for sharing the pictures. I always seem to learn something! Regards, Chris
|
|
D17 1958 (NFE), WD45 1954 (NFE), WD 1952 (NFE), WD 1950 (WFE), Allis F-40 forklift, Allis CA, Allis D14, Ford Jubilee, Many IH Cub Cadets, 32 Ford Dump, 65 Comet.
|
|
SteveM C/IL
Orange Level Access
Joined: 12 Sep 2009
Location: Shelbyville IL
Points: 8031
|
Post Options
Thanks(0)
Quote Reply
Posted: 03 Jul 2019 at 10:29pm |
|
I can't tell from pics but you did install pto double seals with lips facing away from each other,right?
|
|
Dave(inMA)
Orange Level
Joined: 12 Sep 2009
Location: Grafton, MA
Points: 2395
|
Post Options
Thanks(0)
Quote Reply
Posted: 04 Jul 2019 at 9:22am |
|
I really like the wheel mount aid stud - having reinstalled loaded tires on my CA by hanging them from the engine hoist and wrestling them into position while trying to thread a stud into place, I wouldn't want to repeat that operation for my D-14's as its tires are a little, shall we say, chunkier?
|
|
WC, CA, D14, WD45
|
|
littlemarv
Orange Level
Joined: 10 Jun 2013
Location: Wisconsin
Points: 1826
|
Post Options
Thanks(0)
Quote Reply
Posted: 04 Jul 2019 at 7:53pm |
Yes, the front PTO shaft seals are installed correctly. The rear one keeps the tranny oil back, and the front one keeps the hand clutch oil forward. Learn from my mistakes, boys. I went out to hook up the brake pedals and sure enough, there is oil hanging from the bearing retainer plates on both sides! You can see it coming down from the shims that set the ring gear backlash. When I reassembled it, I thought to myself "I wonder if a guy should put some sealant on these shims?" But I didn't see any old sealant anywhere, I thought maybe the shims themselves would seal. Well, maybe that was the leak, doofus. Good thing I like working on tractors, otherwise I would be a little mad. Off with the wheels, off with the finals and the bearing retainers. Checked the weep holes under the seal area, where the oil would come out if the seals themselves were leaking. Dry there. The shims show evidence of oil, which definitely wasn't there when I assembled. Cleaned everything up, put a thin layer of anaerobic sealer on all the surfaces. Put the finals on, put the oil back in. Let it sit overnight. Checked it today, looks much better. You can see the sealant up in there. There. Lesson learned. I asked the local engine shop for a quote on engine work and an overhaul kit a couple weeks ago, haven't heard back from them yet. They must be busy. Guess I'll have to rattle their cage tomorrow. In the meantime, cleaned out the bellhousing. And started sizing up the new valve bank, to replace the cobbled one that is cracked. I'm assuming the new valve bank has metric o-ring fittings or something like that. The old valves are pipe thread. I will have to have a chat with the hydraulic guys at work, see how we can adapt and overcome there. More to come......
|
|
The mechanic always wins.
B91131, WC23065, WD89101, CA29479, B1, Early B10, HB212, 416H
|
|
jaybmiller
Orange Level Access
Joined: 12 Sep 2009
Location: Greensville,Ont
Points: 21562
|
Post Options
Thanks(0)
Quote Reply
Posted: 04 Jul 2019 at 8:10pm |
Wow... I can't believe the ENERGY you have !!
Th epicture of the bellhousing is a LOT cleaner than mine was....it was FULL of 'mousehouse'. JAMMED..couldn't get one more blade of grass or see in it ! I see a 'spacer' on the rear mounting for the 'wishbone'. Probably means the front 'pin' is wore real bad and the bushing is , well, missing. Yeah, nuther thing on my list... you'll probably have it done with 'pictures at 11' befor eI finish typing this. When resinstalling the clutch fork lever be sure it goes on the clutch side of the cast 'bumpout' on the left side. I 'think' it's to prevent the rod from going too far. I remember getting it wrong and having to split the tractor a 2nd time. I used longer bolts next to teh dowel pins, to gently pull the 2 halves into proper alignment, then installed the other regular bolts, removed the long ones and then 'buttoned it up'. That was 7 years ago. When you get it all done, I've got 3 more here that need a 'wee bit of attention'...
Jay
|
|
3 D-14s,A-C forklift, B-112
Kubota BX23S lil' TOOT( The Other Orange Tractor)
Never burn your bridges, unless you can walk on water
|
|
Dave(inMA)
Orange Level
Joined: 12 Sep 2009
Location: Grafton, MA
Points: 2395
|
Post Options
Thanks(0)
Quote Reply
Posted: 05 Jul 2019 at 7:31am |
"Good thing I like working on tractors" indeed!!! You talk about pulling big parts like most of us talk about changing spark plugs. 
Your experience with the shims reminds me of an oil leak from the side cover on my WC's engine. There was a tiny irregularity in the block casting...filled it with some JB Weld (my introduction to that wonderful stuff) and goodbye oil leak. The difference being that I only had to remove a handful of small bolts to get at the offending spot!
|
|
WC, CA, D14, WD45
|
|
Ted J
Orange Level

Joined: 05 Jul 2010
Location: La Crosse, WI
Points: 18727
|
Post Options
Thanks(0)
Quote Reply
Posted: 06 Jul 2019 at 12:19pm |
|
HOLY cow!!!! So much work in so little time!! But then you've got a GREAT helper. Junior going to become a restoration mechanic?
When are you going to be coming down this way?
Gonna miss seeing you this year at Hutch!!
|
|
"Allis-Express"
19?? WC / 1941 C / 1952 CA / 1956 WD45 / 1957 WD45 / 1958 D-17
|
|
Sugarmaker
Orange Level
Joined: 12 Jul 2013
Location: Albion PA
Points: 8168
|
Post Options
Thanks(0)
Quote Reply
Posted: 06 Jul 2019 at 6:30pm |
Ryan, Those shims look similar to the ones in a WD series. I did put sealer on all the shims. But your right I really did not see any original sealant either. The good thing was you knew all the moves to make and the fasteners were not frozen! Good work. Regards, Chris
|
|
D17 1958 (NFE), WD45 1954 (NFE), WD 1952 (NFE), WD 1950 (WFE), Allis F-40 forklift, Allis CA, Allis D14, Ford Jubilee, Many IH Cub Cadets, 32 Ford Dump, 65 Comet.
|
|
littlemarv
Orange Level
Joined: 10 Jun 2013
Location: Wisconsin
Points: 1826
|
Post Options
Thanks(0)
Quote Reply
Posted: 06 Aug 2019 at 10:32pm |
Well, after a one month hiatus for camping and baseball, time to get back to work on this one. Talked it over with big brother, he decided to go with an overhaul kit while we are in there. So, I removed the rod caps and pushed the pistons up out of the way. Removed the front cover and rear seal carrier. Removed the main caps and found one side of the thrust bearing to be very worn, so much so that the oil grooves are gone. Removed the crank, couldn't see any stampings on it indicating that it has been machined. Measured the rod and main journals. The rods are 0.010" undersize. The mains are all over the place, there is about 0.010" difference between the three main journals, but as best as I can figure, the mains are 0.020" under already. Inspecting the bearings confirmed my measurements, they were stamped 0.010 and 0.020, respectively. Nothing like removing a precision bearing insert and finding this under it... Oh boy, she's been farmer fixed. I'm assuming this was to tighten up some bearing clearances, probably related to the odd journal measurements. Took the crank in, they are going to polish the rod journals, and grind the mains to 0.030" under. The thrust surface was worn way out of spec. They can weld it up and machine it back to specification. There is a pretty good groove in the crank where the rear main seal was riding, may need a speedy sleeve there. Yikes. There was a whole lot wrong with the crankshaft, but its nothing that can't be fixed. Had another weekend away, then got back to it. Pulled the pistons, liners, lifters, and cam. #4 piston is cracked all the way up to the oil ring. Been cleaning parts- Popped the ring gear off, machined the flywheel, put the ring gear on a 1/4 turn from where it was, to give the starter some new teeth to work with. There was quite a bit of gunk around the back of the #4 liner, like usual. Pressure washed the block, cleaned the liner bores, all the gasket surfaces, tapped all the threaded holes. This is when things get a little interesting. Evidently she has thrown #4 rod. The block is broken, and has been welded. It was covered up by some pretty thick paint on the outside. The bottom of the o-ring groove is broken as well. Boy, this project has spiraled out of control. But I will win. Need to think on some options here..
|
|
The mechanic always wins.
B91131, WC23065, WD89101, CA29479, B1, Early B10, HB212, 416H
|
|
ACinSC
Orange Level
Joined: 16 Dec 2015
Location: South Carolina
Points: 2579
|
Post Options
Thanks(0)
Quote Reply
Posted: 07 Aug 2019 at 1:52am |
|
Good to see you're back . Sorry about all the issues you've found . Good luck and Thanks for keeping us in the loop .
|
|
Strokendiesel002
Silver Level


Joined: 04 Apr 2019
Location: 53158
Points: 252
|
Post Options
Thanks(0)
Quote Reply
Posted: 07 Aug 2019 at 11:58am |
|
Cast iron welding is an art. I hope you can find someone reasonably close. Most people don't preheat it enough nor grind out a Grove to properly penetrate it.
It's been said many times, but I really admire your work, attitude and results!
I wish you the best in this next phase of the project
|
|
littlemarv
Orange Level
Joined: 10 Jun 2013
Location: Wisconsin
Points: 1826
|
Post Options
Thanks(0)
Quote Reply
Posted: 03 Sep 2019 at 9:33pm |
Finally getting back to it... Lon stopped over again, he had a used block on hand, and even delivered it, as he was passing through anyways. Better than Amazon Prime! So, gave the new block the same clean up, and we are right back in business. Unpacked the cylinder kits. They come preassembled, supposedly to protect the rings. Dropped the liners in without the O-rings, clamped them down with some fiber washers. Checked the protrusion, OK at about 0.005". That checks out OK, so we can change the cam bearings. Pulled the old ones out, and drew some lines in the block and on the new bearings so they get pulled in straight. Put the new bearings in the freezer to shrink them down a bit. By the time I get them out and lined up and installed they are back to room temp, but its an old habit. Put the lifters back in their original place, lube up the cam and bearings, and slid it home. Unpacked the crank, installed the 0.030" undersize bearings, lined up the timing marks, and torqued the mains to 95 ft. lbs. Checked the end play. Its actually a touch shy, but it will wear in. Spec is 0.004" to 0.008". This is way better than the 0.250" I had before, that's for sure. Going to get a speedy sleeve to cover this groove. The crank measures exactly 3.375" Lubed up the O-rings and installed them in the block. Spin the liners down into position. Well, I'd like to get the rear main carrier installed, then bolt it up to the engine stand to continue assembly. Need to get a speedy sleeve this week. In the meantime, may as well get the pistons ready to go in. Center the pin in the piston, and the rod on the pin. I replace all lock washers on these old tractors. Put new lock washers on the pinch bolts. Snugged the pinch bolts down hand tight, then torqued them to spec by putting a punch in a vise, and sliding the piston pin onto it. That way you don't twist on the rod when you are torqueing the bolt to 35 ft lbs.
Edited by littlemarv - 03 Sep 2019 at 9:36pm
|
|
The mechanic always wins.
B91131, WC23065, WD89101, CA29479, B1, Early B10, HB212, 416H
|
|
littlemarv
Orange Level
Joined: 10 Jun 2013
Location: Wisconsin
Points: 1826
|
Post Options
Thanks(0)
Quote Reply
Posted: 03 Sep 2019 at 9:43pm |
Forgot to mention, the center cam bearing has a large regular sized oil hole in it, and two 1/8" holes towards one end of the bearing, across from each other. At any rate, neither small hole lined up with the 1/8" pipe port in the block where the tee fitting goes. So, I installed the bearing so the big hole lined up, and drilled my own 1/8" hole. Not sure exactly whats going on there, but I made it work.
|
|
The mechanic always wins.
B91131, WC23065, WD89101, CA29479, B1, Early B10, HB212, 416H
|
|
ACinSC
Orange Level
Joined: 16 Dec 2015
Location: South Carolina
Points: 2579
|
Post Options
Thanks(0)
Quote Reply
Posted: 04 Sep 2019 at 6:49am |
|
Looks like a good job to me . Thanks for posting
|
|
IBWD MIke
Orange Level

Joined: 08 Apr 2012
Location: Newton Ia.
Points: 3474
|
Post Options
Thanks(0)
Quote Reply
Posted: 04 Sep 2019 at 8:38am |
|
Great work and documentation as always Marv.
|
|
Sugarmaker
Orange Level
Joined: 12 Jul 2013
Location: Albion PA
Points: 8168
|
Post Options
Thanks(0)
Quote Reply
Posted: 04 Sep 2019 at 9:25am |
Ryan, Boy does that all sound and look familiar! You folks will have a real good running tractor when done the right way! Glad you found that bad block, and replaced it! Great documentation as usual! You just seem to get it done so much easier than me or is it just the computer thing??:) Regards, Chris
|
|
D17 1958 (NFE), WD45 1954 (NFE), WD 1952 (NFE), WD 1950 (WFE), Allis F-40 forklift, Allis CA, Allis D14, Ford Jubilee, Many IH Cub Cadets, 32 Ford Dump, 65 Comet.
|
|
Larry Miller
Orange Level

Joined: 21 Nov 2009
Location: NWIL
Points: 896
|
Post Options
Thanks(0)
Quote Reply
Posted: 04 Sep 2019 at 7:22pm |
Lon - you have the oil line from the Distributor to the govenor?
Larry Miller
|
|
I used to be young and stupid, now I am not young anymore.
|
|
Lon(MN)
Orange Level
Joined: 11 Sep 2009
Location: Elk River,MN
Points: 1907
|
Post Options
Thanks(0)
Quote Reply
Posted: 05 Sep 2019 at 7:53am |
|
Yes I do
|
|
Larry Miller
Orange Level
Joined: 21 Nov 2009
Location: NWIL
Points: 896
|
Post Options
Thanks(0)
Quote Reply
Posted: 05 Sep 2019 at 9:05am |
Lon - good - it is the short oil line between the govenor post and the distributor that I need. How to do this - my zip is 61275 for ship cost - I can send you a check? My email lgm422@gmail.com may be better than in this string for details.
Larry Miller
|
|
I used to be young and stupid, now I am not young anymore.
|
|
littlemarv
Orange Level
Joined: 10 Jun 2013
Location: Wisconsin
Points: 1826
|
Post Options
Thanks(0)
Quote Reply
Posted: 06 Sep 2019 at 6:16pm |
Got the speedy sleeve. Good as new! PLUS, when you are done driving it on, the driver makes a swell little storage cup! Oil pump and rear main installed Got it mounted on the stand again, makes it a little easier to work with. Installed the rebuilt governor and put a little Lubriplate on the geartrain. Centered the front cover on the crank, took apart the cam thrust plate and scraped the gasket. Installed the seal, and the ball, springs, and thrust plate for the cam. On with the governor housing and the front pulley as well. Made sure all the rings were installed correctly, evenly space the gaps, and dunk them in oil. Can't get much more lubricated than that. Lubriplate the bearings, I also put a little on the side of the rods and caps. Tapped them home Flip it over, snugged up the caps hand tight, then tap them back and forth with a hammer to settle the caps in, then torque them down and install the thin jam nuts. I always make sure the rods have a little side play. In with the suction tube and the oil pickup. Trim the excess from the front cover gasket and put a little silicone in the four corners, where the joints are. One thing to be careful of at this point, if you turn the crankshaft now, the liners can push right up with the pistons. Oil pan on, new lockwashers, I only torque these to 15 foot pounds due to the cork gasket. New drain plug with a copper washer. So there, that's it for the bottom end, time to flip her over.
|
|
The mechanic always wins.
B91131, WC23065, WD89101, CA29479, B1, Early B10, HB212, 416H
|
|
Reindeer
Orange Level
Joined: 14 Sep 2009
Location: Calgary, AB
Points: 650
|
Post Options
Thanks(0)
Quote Reply
Posted: 06 Sep 2019 at 7:58pm |
|
Great photos and commentary!
If I have to do more work on my D15 this is a really wonderful resource. Thanks for taking the time to document and photograph each step. Much appreciated by all of us!
|
|
|
|
littlemarv
Orange Level
Joined: 10 Jun 2013
Location: Wisconsin
Points: 1826
|
Post Options
Thanks(0)
Quote Reply
Posted: 11 Oct 2019 at 9:08pm |
Unfortunately, the pictures get a little stingy here. I have been so busy with the kids I have been working on it about 10 minutes at a time for the last month! Got the engine reassembled and painted. Torqued the head bolts to 60 ft lbs, the rockers to 25 foot pounds. Set the valves to 0.015" Here is a Napa hose to replace the t-stat bypass hose. Got the flywheel and clutch bolted up. Pulled the chassis back up into the garage. Replaced the throwout bearing, take the front end loose, and back home the engine goes. Reassembled completely, filled all the fluids, and fired it up. Took it for a spin, there are some pretty good hills just outside of town, to make her work a little bit. I plumbed in a gauge to check the oil pressure. Starts great, runs good, no leaks, the brakes work good. I replaced the cobbled hydraulic valve with a four spool setup, wrapped the hoses with some good wrap. Made sure the spinout rims worked. Went in the back yard and got the snap coupler blade. Mounted my extensions. Time to clean this place up before winter. Grandpa Marvin needed 9 bales of straw, Uncle Eric needs his snow plowing machine back, and I need to stash a two bottom snap coupler plow in the bushes up at dads when he isn't looking. Made a pretty good load. Used the WD to stash the plow up at dads. And delivered the D14 back to its owner. Didn't get any pictures of that, cause it was pouring. Like usual. So there, hopefully the tractor outlasts him and I. I'm sure there will be small problems here and there, there always is. But the engine is fresh and the back half is sealed up. Learned a lot about the D series from the hand clutch back, that's for sure. Thanks to everyone that helped, and thanks for looking.
|
|
The mechanic always wins.
B91131, WC23065, WD89101, CA29479, B1, Early B10, HB212, 416H
|
|
Sugarmaker
Orange Level
Joined: 12 Jul 2013
Location: Albion PA
Points: 8168
|
Post Options
Thanks(0)
Quote Reply
Posted: 11 Oct 2019 at 9:17pm |
Ryan, Another happy tractor and happy ending! Enjoyed the thread! Very helpful for anyone with one of these D series! Regards, Chris
|
|
D17 1958 (NFE), WD45 1954 (NFE), WD 1952 (NFE), WD 1950 (WFE), Allis F-40 forklift, Allis CA, Allis D14, Ford Jubilee, Many IH Cub Cadets, 32 Ford Dump, 65 Comet.
|
|
ACinSC
Orange Level
Joined: 16 Dec 2015
Location: South Carolina
Points: 2579
|
Post Options
Thanks(0)
Quote Reply
Posted: 12 Oct 2019 at 5:22am |
|
Good job ! Thanks for taking the time to post .
|
|


 Topic Options