| Author |
 Topic Search Topic Search  Topic Options Topic Options
|
MACK 
Orange Level

Joined: 17 Nov 2009
Points: 7664
|
 Post Options Post Options
") Thanks(0) Thanks(0)
 Quote Quote  Reply Reply
 Posted: 23 Mar 2018 at 8:55am Posted: 23 Mar 2018 at 8:55am |
|
DON'T use a scotch pad on any thing that is not going to be washed before reassembly! Them thing are abrasive and not good for bearings or internal parts.
Use a inch lb torque wrench to tighten valve cover. May have to go around it several times before it is tightened down. MACK
|
 |
|
Sponsored Links
|
|
|
JimWenigOH
Orange Level
Joined: 12 Sep 2009
Location: NC Ohio
Points: 1198
|
Post Options
Thanks(0)
Quote Reply
Posted: 23 Mar 2018 at 10:06am |
 DrAllis wrote: DrAllis wrote:
Even after replacing a valve cover gasket, there will be a certain amount of bleeding that continues until the injector bores are completely dried out. DON'T PANIC WHEN U THINK IT'S STILL LEAKING. |
I assume the "bleeding" is from the oil and crud still down in the bore. Prior to removing the injectors I'd plan to use compressed air to blow any debris out of the bore and then loosen injectors, blow out again and remove injectors. Which leads to my question. Is there a safe way to clean the bores out and keep stuff from falling down into the cylinder?
|
|
calico190xt68
Orange Level

Joined: 12 Jan 2017
Location: Frankton, IN
Points: 870
|
Post Options
Thanks(0)
Quote Reply
Posted: 10 Apr 2018 at 11:22am |
An update on this process for those following it: 1) Before reinstalling the valve cover, I inspected the visible parts. Turns out that the front oil drain tube was sitting loose. None of the threads were connected. As shown below: 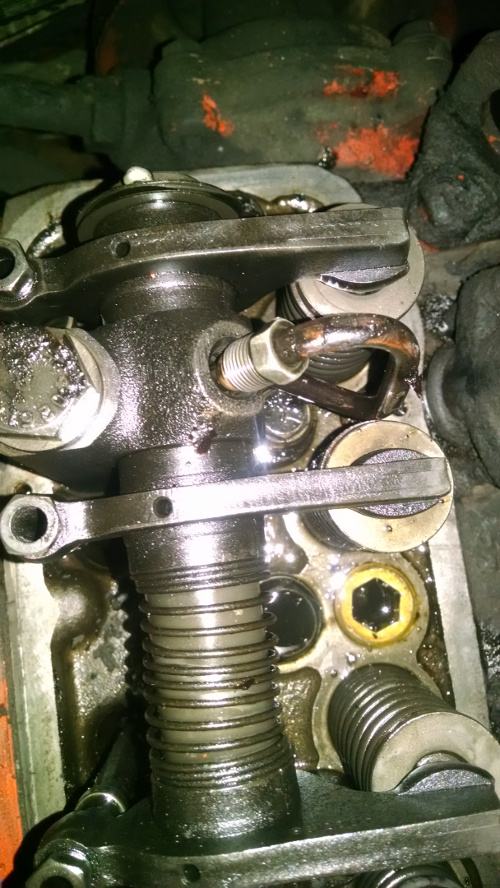 2) I am amazed it hadn't fallen out and got caught in something? I am guessing the oil was simply hitting the top of the valve cover instead of going down into the drain hole. Not sure if this would have caused any long-term engine damage or not? 3) It seems there is a small sleeve as shown in the picture below and I can't find it. Do I really need to get one of these or can I just put it back without the sleeve. Maybe the missing sleeve has always been missing and that's what caused it to loosen up? Otherwise, it is pulverized? 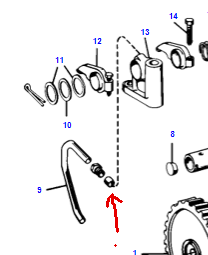 4) I made things difficult by selecting what I now think is the wrong glue to attach the gasket to the valve cover. I saw the Gorilla glue next to the gasket hitack at Autozone and thought it was meant for gluing the gasket. While it has glued it up and made it stick to the cover, it over expanded once dried. I couldn't find any 3M glue mentioned above. I also don't know about it's heat tolerance. I am considering forging ahead and if it leaks then I will start over. It also took hours to setup which I thought might be an advantage but in hindsight I had to keep babysitting the gasket. I stuck the old screws in the holes to keep it mostly aligned and turned it upside down and put weights on it overnight. 5) I used a plastic putty knife on the head edges along with brake cleaner to clean the top, but I have two spots that are not coming clean. Not sure what do about that yet. I think I will just keep scrubbing with plastic putty knife. 6) I ended up removing the hood and the turbocharger exhaust elbow directly above the valve cover to make it easier to reinstall, and more importantly to see what I was doing. I don't think you can do this job correctly without removing the hood in the long run and it really is easy. My cab created a bit of an issue because I had to lift the hood very high to pass by the turbo tube but I still got it. Without a cab, it is easy. 7) I did get some small pieces of oil and gasket crud on the head assembly. I am going to attempt to suck it out with a vacuum. It crumbles when you try to pick it up though. So, as always, it got more complicated. That sleeve doesn't come as a separate part so I will have to order the whole thing, if I really need it, and it is still available.
|
|
80 7010, 80 7020. 67 190XTD Series I w/500 Loader, AC 2000 Plow, Member Indiana A-C Partners, Member TAC
|
|
injpumpEd
Orange Level Access

Joined: 13 Sep 2009
Location: Walnut IL
Points: 5113
|
Post Options
Thanks(0)
Quote Reply
Posted: 10 Apr 2018 at 12:56pm |
|
the sleeve is the brass ferrule that i can see is on the line just below the nut. Just put it back in. The end of the tube may be crimped down to create a resistance, so the oil flows through the rocker arms, and not just out the drain tube.
|
|
210 "too hot to farm" puller, part of the "insane pumpkin posse". Owner of Guenther Heritage Diesel, specializing in fuel injection systems on heritage era tractors. stock rebuilds to all out pullers!
|
|
calico190xt68
Orange Level
Joined: 12 Jan 2017
Location: Frankton, IN
Points: 870
|
Post Options
Thanks(0)
Quote Reply
Posted: 10 Apr 2018 at 1:00pm |
|
Thanks Ed. That's why I like to include pictures in my posts. How tight should I make it to insure it doesn't come loose in the future?
|
|
80 7010, 80 7020. 67 190XTD Series I w/500 Loader, AC 2000 Plow, Member Indiana A-C Partners, Member TAC
|
|
injpumpEd
Orange Level Access
Joined: 13 Sep 2009
Location: Walnut IL
Points: 5113
|
Post Options
Thanks(0)
Quote Reply
Posted: 10 Apr 2018 at 1:54pm |
|
snug it down tight.
|
|
210 "too hot to farm" puller, part of the "insane pumpkin posse". Owner of Guenther Heritage Diesel, specializing in fuel injection systems on heritage era tractors. stock rebuilds to all out pullers!
|
|
Allis dave
Orange Level
Joined: 10 May 2012
Location: Northern IN
Points: 3073
|
Post Options
Thanks(0)
Quote Reply
Posted: 10 Apr 2018 at 2:32pm |
2. Good find, eventually you wouldn't work out your rocker arm and valves. They weren't really getting any oil. 5. Get one of those little scrapers with a razor blade on the end. You'll be able to really scrape good with that.
|
|
LeonR2013
Orange Level

Joined: 01 Jan 2013
Location: Fulton, Mo
Points: 3500
|
Post Options
Thanks(0)
Quote Reply
Posted: 10 Apr 2018 at 4:14pm |
|
You can get the ferrules at any good hardware store. The vacuum is a good idea. Just start it up before you start scraping and it will get all the fines before they have a chance to get into the engine. You should get a wire brush (a round one) that goes into the bore hole of the inj. and it will clean the side on the hole and the carbon in the bottom. Polish it real good. It will save tons of time.
|
|
FREEDGUY
Orange Level Access

Joined: 15 Apr 2017
Location: South West Mich
Points: 5396
|
Post Options
Thanks(0)
Quote Reply
Posted: 10 Apr 2018 at 7:50pm |
|
Calico, do you happen to know what model year your XT is? We have a severe leak on our valve cover and might pull the complete hood off to inspect closer. Thanks and good luck
|
|
calico190xt68
Orange Level
Joined: 12 Jan 2017
Location: Frankton, IN
Points: 870
|
Post Options
Thanks(0)
Quote Reply
Posted: 11 Apr 2018 at 9:02am |
|
It is an early 1968 based upon the serial number.
|
|
80 7010, 80 7020. 67 190XTD Series I w/500 Loader, AC 2000 Plow, Member Indiana A-C Partners, Member TAC
|
|
FREEDGUY
Orange Level Access
Joined: 15 Apr 2017
Location: South West Mich
Points: 5396
|
Post Options
Thanks(0)
Quote Reply
Posted: 11 Apr 2018 at 6:00pm |
|
Thanks for the info! I guess after this planting season we will take the entire hood off so we can get a better look at that pipe ourselves. The entire right side of engine is coated in an oily film,heavier towards the fuel pump end for sure.
|
|
calico190xt68
Orange Level
Joined: 12 Jan 2017
Location: Frankton, IN
Points: 870
|
Post Options
Thanks(0)
Quote Reply
Posted: 13 Apr 2018 at 9:26am |
|
Here is another status on this project:
1) I put hitack on the gasket, two coats and tried to install it. I got 7 screws loosely in place and the last screw would not start without attempting to crossthread. Much to my dismay, I had to remove all screws and lift up the valve cover and start that one screw in straight with the valve cover lifted. Then I was able to lower and start the other 7 screws. This probably compromised my hitack sealing by lifting the cover.
2) I did not order the special screws and use them. I forgot to do this before vacation and when I got back, I just wanted to finish this job.
3) I didn't want to over tighten the screws so I used an allen wrench and hand tightened with the short end, so I couldn't put a lot of leverage on the screws. After hand tightening many times, I gave each screw a quarter turn with a wrench. I plugged in my block heater and left it overnight. The next day they were all loose so the engine heat did something to loosen and I proceeded to tighten them again. I then started the engine and let it run to get the engine hot. I came back 30 minutes later and they were loose enough for me to hand tighten again so I tightened them. I left it sit overnight. Next day they were still tight so I felt like I had adequately tightened them but not too much.
4) I started the engine and let it run and revved to 2000 rpms. I ended up with a leak on each end of the valve cover. I tightened it a bit more on the ends. I will look at it again tonight, but I suspect I may have to start over.
5) This thread started out about a leaking injector. I had wiped clean the area around the injector on both the 1st and 6th injector. After running the tractor the last time, I inspected both injectors. The 1st injector had no fluid around it. The sixth injector had fluid around it. It is inconclusive if this is oil or fuel at this time, but the fluid doesn't seem to be thick like oil. I think the valve cover was leaking above the 1st injector and now that is fixed.
6) The valve cover was previously leaking on both ends. In fact that is where the vast majority of the gunk was on the engine. Especially the front of the engine. My leak doesn't appear to be as bad as it used to be, but I don't want any leaks.
7) If I start over, I am going to try 3M 847 Brown Nitrile gasket adhesive instead of gorilla glue. 3M says it is oil resistant and high heat. I have to order it. 3
Now that I know that one screw is a problem, I will start with it and shouldn't have to pull the cover off which I think screwed up my hitack and probably created a little space for the oil to leak out. I am wondering if I need to tighten the screws up more than I have the second time around since both ends are leaking a little?
I detailed this so that someone can correct my wrong doings, avoid my pitfalls or console me. :-) Thanks for any input.
|
|
80 7010, 80 7020. 67 190XTD Series I w/500 Loader, AC 2000 Plow, Member Indiana A-C Partners, Member TAC
|
|
DrAllis
Orange Level Access
Joined: 12 Sep 2009
Points: 22100
|
Post Options
Thanks(0)
Quote Reply
Posted: 13 Apr 2018 at 12:11pm |
|
I'll bet the gasket mooshed inward on each end from poor quality glue.
|
|
Allis dave
Orange Level
Joined: 10 May 2012
Location: Northern IN
Points: 3073
|
Post Options
Thanks(0)
Quote Reply
Posted: 13 Apr 2018 at 12:18pm |
Really what you use isn't important. I'd use #2 permatex, but there are tons of options. If you walk into an autoparts store and ask them, you'll probably leavge with something that will work. Just not gorilla glue... You also only need to put sealer on the top of the gasket to hold it to the valve cover. There's no need to also glue it to the head. You can put a decent amount of torque on the screws. Maybe 10-15 lbs? don't really smash the gasket but tighten it up good and evenly.
|
|
calico190xt68
Orange Level
Joined: 12 Jan 2017
Location: Frankton, IN
Points: 870
|
Post Options
Thanks(0)
Quote Reply
Posted: 13 Apr 2018 at 1:12pm |
|
I have to say that the Gorilla glue is really tough when it is cold. I don't think the gasket moved at first, but then once the engine got hot, maybe it did. I couldn't find it's heat tolerance listed. Regardless, it was a screw up using it.
I might have also misunderstood about the hitack between the gasket and the head. Of course, hitack instructions on the bottle said to do that.
I don't have much to lose at this point by tightening it up to the 15lbs suggested above versus the 4lbs listed in the manual that I tried to use. So, I will tighten and use the tractor over the weekend to drill some post holes and see what happens. It will look like FrankensteinXT with no hood on it, but not putting that back on until this is fixed!
|
|
80 7010, 80 7020. 67 190XTD Series I w/500 Loader, AC 2000 Plow, Member Indiana A-C Partners, Member TAC
|
|
calico190xt68
Orange Level
Joined: 12 Jan 2017
Location: Frankton, IN
Points: 870
|
Post Options
Thanks(0)
Quote Reply
Posted: 14 Apr 2018 at 10:05am |
Good news is that I tightened all of the screws some more and it appears that my leaks on the ends have stopped! I would say I am in the 10-15 lbs of torque area so that was good advice. I ran it for 15 minutes at 2000 rpm and didn't see any oil leaks. Bad news is however, I still have the injector closest to the cab which I think is 6th injector with fluid around it, which started this whole thread! The other injector that I saw fluid around does not have fluid around it any longer so that was a valve cover leak issue. See the pic below. Of course, the injector is so close to the valve cover, you can't see if any oil is leaking down. I tried to wipe away the fluid with a paper towel and smell it for diesel fuel but there is just not enough. I am starting to think my situation is in the 1% category that Dr Allis gave me for an injector leak. I am going to move onto other issues and use the tractor for awhile to see if the valve cover leaks after use and maybe I will be able to accumulate enough of the fluid to figure out what it is. Is there any kind of test that anyone would know of that would help me figure out what this fluid is? Thanks to all that responded. I couldn't do these repairs without the forum members that's for sure! 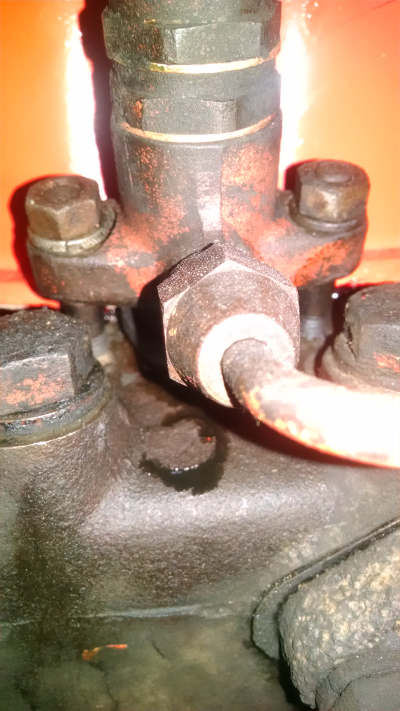
|
|
80 7010, 80 7020. 67 190XTD Series I w/500 Loader, AC 2000 Plow, Member Indiana A-C Partners, Member TAC
|
|
injpumpEd
Orange Level Access
Joined: 13 Sep 2009
Location: Walnut IL
Points: 5113
|
Post Options
Thanks(0)
Quote Reply
Posted: 14 Apr 2018 at 11:10am |
|
it will take a while for all the oil in that hole to dry up. It may ooze for several hours of use still.
|
|
210 "too hot to farm" puller, part of the "insane pumpkin posse". Owner of Guenther Heritage Diesel, specializing in fuel injection systems on heritage era tractors. stock rebuilds to all out pullers!
|
|
calico190xt68
Orange Level
Joined: 12 Jan 2017
Location: Frankton, IN
Points: 870
|
Post Options
Thanks(0)
Quote Reply
Posted: 14 Apr 2018 at 12:49pm |
|
Thanks Ed. I forgot about the possibility that oil could still seep for awhile. Dr. Allis also warned me on that. I will report back.
|
|
80 7010, 80 7020. 67 190XTD Series I w/500 Loader, AC 2000 Plow, Member Indiana A-C Partners, Member TAC
|
|
SteveM C/IL
Orange Level Access
Joined: 12 Sep 2009
Location: Shelbyville IL
Points: 8665
|
Post Options
Thanks(0)
Quote Reply
Posted: 12 Aug 2018 at 11:06pm |
|
Soooo.....where we at with this? Also note that you have to be careful not to catch the edge of rubber grommet around injector with with edge of cover.Can get just enough of that grommet to hold up against cover edge causing warp of gasket face.
|
|
calico190xt68
Orange Level
Joined: 12 Jan 2017
Location: Frankton, IN
Points: 870
|
Post Options
Thanks(0)
Quote Reply
Posted: 13 Aug 2018 at 7:55am |
|
Funny you should bring this up. I know we all discussed that it was probably the oil leaking around the valve cover gasket onto the injector. After reinstalling the valve cover this past winter, I have run the tractor a bunch since hay season started. I still have a leak around the first injector. I don't appear to have any oil leaks around that valve cover anywhere else though.
I am suspecting that I do have a leaking injector, but I was going to wait until hay season is over, and then I am going to deinstall the hood, since that is pretty easy, get up on top of the engine and see if any oil leaks around that valve cover onto the injector while it is running. It will still be tight to see it. Someone said I could use some oil dye as another idea to get to the bottom of it, but not sure about that.
I also think I should rebuild/replace the injectors regardless. I have done about everything else at this point anyway to the fuel system.
When I finally conclude the end to this leak, I will definitely report back my findings. Thanks for asking.
|
|
80 7010, 80 7020. 67 190XTD Series I w/500 Loader, AC 2000 Plow, Member Indiana A-C Partners, Member TAC
|
|


