190xt Injector Leak
Printed From: Unofficial Allis
Category: Allis Chalmers
Forum Name: Farm Equipment
Forum Description: everything about Allis-Chalmers farm equipment
URL: https://www.allischalmers.com/forum/forum_posts.asp?TID=148410
Printed Date: 23 Oct 2025 at 9:41am
Software Version: Web Wiz Forums 11.10 - http://www.webwizforums.com
Topic: 190xt Injector Leak
Posted By: calico190xt68
Subject: 190xt Injector Leak
Date Posted: 12 Mar 2018 at 10:48am
I completely cleaned up the engine and got all the gunk removed. After doing this and running the engine for about 30 minutes at various rpms, I noticed that my first and sixth fuel injector have a leak, and the other four do not. I think it is fuel and not oil. I also noticed that the rubber piece surrounding the first and sixth cylinder looks little more aged than the others. The tractor starts and runs good, so not real excited about tearing into it, but I thought I would gather comments on how to best stop these two leaks. I have never installed or de-installed a fuel injector on any motor, so details would be appreciated. See pic below. ------------- 80 7010, 80 7020. 67 190XTD Series I w/500 Loader, AC 2000 Plow, Member Indiana A-C Partners, Member TAC |
Replies:
Posted By: Dan (SE MI)
Date Posted: 12 Mar 2018 at 11:01am
| That rubber piece is just a seal to keep debris out of the injector bore. The combustion is sealed by a copper washer at the injector tip on a 190XT. You might want to start by checking the torque on the 2 mounting bolts. Are you sure it's fuel? If you pressure washed the area, you may have forced some fluid past the seal and it is now being pushed out by thermal expansion. Probably unlikely, but I have seen stranger things. |
Posted By: calico190xt68
Date Posted: 12 Mar 2018 at 11:10am
|
Thanks. I did pressure wash it. Although, I am pretty sure it was leaking before I did the cleanup, but I couldn't tell which cylinders. I will check the torque. That makes sense that the rubber didn't actually seal anything too. ------------- 80 7010, 80 7020. 67 190XTD Series I w/500 Loader, AC 2000 Plow, Member Indiana A-C Partners, Member TAC |
Posted By: DrAllis
Date Posted: 12 Mar 2018 at 12:04pm
| You won't believe it, but it is almost 99% sure it is a valve cover leaking oil. Injectors hardly ever leak down in the bore on that age tractor. |
Posted By: SteveM C/IL
Date Posted: 12 Mar 2018 at 12:20pm
| like Doc says,almost always the cover gasket tricking you.Cheap and easy first try.Could probably stand one anyway. |
Posted By: calico190xt68
Date Posted: 12 Mar 2018 at 3:09pm
|
I will see if I can confirm that it is the valve cover tonight, but it would be easy to try that fix with a new valve cover gasket. It probably does need a new gasket on valve cover anyway. So, no need to mess with the fuel injectors just yet. It seemed odd that it only leaks on the injector side of the motor and only directly above the first and 6th injectors. I see no other oil/fuel leaks at the top of the motor. You would think the gasket leaking would be elsewhere on the motor. If you look at the picture and the studs used to torque the injector you will see a leak spilling out across the right hand stud. Maybe the valve cover wasn't torqued tightly in those two spots because the return injector lines were in the way? I will report back what I find. Thanks for the suggestions. ------------- 80 7010, 80 7020. 67 190XTD Series I w/500 Loader, AC 2000 Plow, Member Indiana A-C Partners, Member TAC |
Posted By: darrel in ND
Date Posted: 12 Mar 2018 at 3:49pm
| Trust the Dr on this one. It worked for me. Darrel |
Posted By: allisorange
Date Posted: 12 Mar 2018 at 9:27pm
|
Listen to the Doc. Check that first. John Carlson |
Posted By: calico190xt68
Date Posted: 13 Mar 2018 at 8:07am
|
It appears that it is the valve cover leaking. I couldn't see very well behind the first injector but the 6th one had oil around edge of the cover. So, I am going to pursue replacement of valve cover gasket. I looked at the manual and found the torque specs, but I didn't see a pattern specified so I will just go side to side. Thanks for all who chimed in and thanks for heading me in the right direction Dr Allis! ------------- 80 7010, 80 7020. 67 190XTD Series I w/500 Loader, AC 2000 Plow, Member Indiana A-C Partners, Member TAC |
Posted By: DougG
Date Posted: 13 Mar 2018 at 5:44pm
| I start from the middle and work your way back and forth , tighten half way the first time then go back and repeat a final time , I always used HITACK sealant too, ususally works great |
Posted By: MACK
Date Posted: 13 Mar 2018 at 10:19pm
|
This the Philips head bolts away and use hex head bolts. Will have to retorque several times. Use a good 3M glue on valve cover, put gasket on valve cover, put valve cover on flat Surface with some weight to hold gasket in place. Next morning put valve cover on. MACK |
Posted By: Lonn
Date Posted: 14 Mar 2018 at 7:04am
|
I do what Mack says and also before installing I spray high tack on the gasket in two coats letting it dry to a tackiness for each coat. That is how we did it at the Allis dealer I used to work at. ------------- -- --- .... .- -- -- .- -.. / .-- .- ... / .- / -- ..- .-. -.. . .-. .. -. --. / -.-. .... .. .-.. -.. / .-. .- .--. .. ... - Wink I am a Russian Bot |
Posted By: calico190xt68
Date Posted: 14 Mar 2018 at 7:32am
|
Again thanks for all the input on how best to replace the valve cover gasket. I ordered the gasket yesterday so won't get to it for a few weeks, but I will report back. Interestingly enough, it appears that I currently have the hex head bolts, so if the phillips heads were original, then someone has done this before. ------------- 80 7010, 80 7020. 67 190XTD Series I w/500 Loader, AC 2000 Plow, Member Indiana A-C Partners, Member TAC |
Posted By: calico190xt68
Date Posted: 17 Mar 2018 at 1:59pm
|
I got the valve cover loose but it appears that I can't get it out without removing the hood? Would there be a trick that I don't know about? I also discovered that a couple of bolts were barely finger tight so surprised it wasn't leaking worse. ------------- 80 7010, 80 7020. 67 190XTD Series I w/500 Loader, AC 2000 Plow, Member Indiana A-C Partners, Member TAC |
Posted By: Joe(TX)
Date Posted: 17 Mar 2018 at 5:16pm
|
You don't have to remove the hood, but you will have to remove the pipe to the turbo. The valve cover gasket can be difficult. I cut the heads of some 1/4 screws to align the gasket before replacing the cover. ------------- 1970 190XT, 1973 200, 1962 D-19 Diesel, 1979 7010, 1957 WD45, 1950 WD, 1961 D17, Speed Patrol, D14, All crop 66 big bin, 180 diesel, 1970 170 diesel, FP80 forklift. Gleaner A |
Posted By: DrAllis
Date Posted: 17 Mar 2018 at 10:31pm
| Older sheet metal One-Nineties had taller one-piece side panels that could be removed to aid in some engine work. Newer (19001 and up) didn't have these, so raising of the hood at the front with a wood prop might be as good as hood removal (remove all hood bolts first). Air pipe over the top of valve cover and exhaust stack usually have to be removed to lift the hood at the front allowing it to rest at the dashboard. |
Posted By: Lynn Marshall
Date Posted: 18 Mar 2018 at 8:56am
| I would seriously consider the Agco bolt kit for that application. It's a set of shoulder bolts with spring washers that keeps constant pressure on the gasket. |
Posted By: Orange Blood
Date Posted: 18 Mar 2018 at 3:41pm
Times ten on what he said!!  You won't find in in the agco parts book looking specifically at the 190, but the kit is the same essentially for any of the 426, 301 engines, so look up say a 7020, or 7045 for example.
------------- Still in use: HD7 WC C CA WD 2-WD45 WD45LP WD45D D14 3-D17 D17LP 2-D19D D19LP 190XTD 190XTLP 720 D21 220 7020 7030 7040 7045 3-7060 Projects: 3-U UC 2-G 2-B 2-C CA 7-WC RC WDLP WF D14 D21 210 7045 N7 |
 Lynn Marshall wrote:
Posted By: Lonn
Date Posted: 18 Mar 2018 at 10:46pm
|
When removing the hood bolts you will find there are several hard to find bolts and I usually find someone else got a little lazy and didn't replace all the bolts. Don't forget the two bolts under the instrument cowl. I believe they are 3/8 bolts. ------------- -- --- .... .- -- -- .- -.. / .-- .- ... / .- / -- ..- .-. -.. . .-. .. -. --. / -.-. .... .. .-.. -.. / .-. .- .--. .. ... - Wink I am a Russian Bot |
Posted By: FREEDGUY
Date Posted: 20 Mar 2018 at 6:59pm
| Would someone be willing to look-up and post the torque specs for the valve cover? We have to do the exact same procedure. Thanks. |
Posted By: Allis Magoo
Date Posted: 20 Mar 2018 at 9:15pm
| Good suggestion above...one thing I noticed with my new gasket is if you over torque the cork gasket it roll and will leak. So you want it real tight but not really really right. Not scientific but it made a big differencw one mine |
Posted By: calico190xt68
Date Posted: 22 Mar 2018 at 8:56am
|
I want to document with pictures what I did on this. As predicted by DrAllis, my older XT has the higher side panels which means you don't have to jack the hood up as much. That was good news for me because I have a cab that limited how high I could go. Here is my starting picture. Notice that the hood bracket is definitely in the way so I loosed it and pushed upwards. I disconnected the blowby tube, but didn't remove it. I also did not want to disconnect the turbo line if at all possible. So, I thought I had room to pull it towards the front.  I disconnected and removed side panels to get working room. I disconnected all hood bolts although many were missing. You can see I put about 2 inches of wood spacers to get the room.  And I pushed up on valve cover and twisted it sideways, pulled it towards the front and out it came. Notice the two areas that I circled. This was definitely leaking oil. Ironically, I noticed the leaks on the other side next to the injectors as leaking worse. When I cleaned the gasket material off of the valve cover, there was a noticeable area where this was leaking on this side. On the injector side, it looked good. I am going to clean up and probably paint the valve cover since it is off, so it will be a little while before I can put it back on. According to the manual, it says 4 lbs of torque, which seems not very much. However, it didn't take a lot of pulling on the cover screws to get them loose. I haven't been able to locate those special screws off of the 7040 mentioned earlier. Seems they come in different models.  ------------- 80 7010, 80 7020. 67 190XTD Series I w/500 Loader, AC 2000 Plow, Member Indiana A-C Partners, Member TAC |
Posted By: Allis dave
Date Posted: 22 Mar 2018 at 9:24am
| Thanks for the topic. I was pretty sure the injectors were leaking on my 185, in addition to the valve cover, maybe mines just the valve cover too. I was worried about trying to pul the injectors and breaking one. |
Posted By: calico190xt68
Date Posted: 22 Mar 2018 at 9:58am
|
Allis Dave, It may be 3 weeks or more before I can report back on fixing this valve cover and if this stops all of my leaks. I am going to Florida for Spring Break so may not get this done before I leave. Hopefully, I will install it correctly the first time, but I have bad luck due to inexperience. :-) One of the wild cards that might have caused the leaks above the injectors to be somewhat newly acquired, is the fact that I pumped a bunch of diesel fuel into my crankcase oil when I reinstalled the rebuilt injection pump. One of the side affects is that my oil is extremely clean now, but did this diesel fuel affect the gasket? DrAllis gave it a one percent chance that the injector is leaking, so there is a chance the injectors are leaking, but he is pretty spot on on his recommendations for me. I don't want to mess with the injectors either on a perfectly running tractor so hoping the valve cover is the issue. I am hoping to paint it at some point, but need to stop all of the leaks before I do this. ------------- 80 7010, 80 7020. 67 190XTD Series I w/500 Loader, AC 2000 Plow, Member Indiana A-C Partners, Member TAC |
Posted By: Allis dave
Date Posted: 22 Mar 2018 at 10:25am
|
Found this when looking up a 7040. Is this the new style bolt with spring that you guys are talking about? Looks like a good fix if leaks tend to be an issue on these "Fastener Kit" p/n 74036977 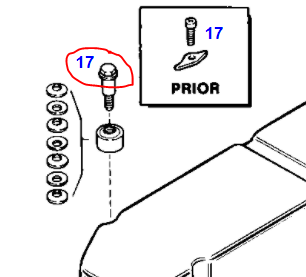
|
Posted By: Amos
Date Posted: 22 Mar 2018 at 11:26am
|
Dave that is the one!! They are great, I have changed all my tractors over to them.
|
Posted By: DrAllis
Date Posted: 22 Mar 2018 at 12:12pm
| Even after replacing a valve cover gasket, there will be a certain amount of bleeding that continues until the injector bores are completely dried out. DON'T PANIC WHEN U THINK IT'S STILL LEAKING. |
Posted By: LeonR2013
Date Posted: 22 Mar 2018 at 2:42pm
| As a good rule of thumb, tighten them as if you are using a large screwdriver to do it with, You won't over tighten that way. |
Posted By: calico190xt68
Date Posted: 22 Mar 2018 at 3:34pm
|
DrAllis, thanks for letting me know on the leaking that may occur because I would panic and cuss a lot. Just how long do I let the leak go before I do panic? leonR2013, thanks for that suggestion on Screwdriver tight. Another follow up question would be cleaning of the head surface. None of my gasket material stuck to the head which is good, and I was going to use brake cleaner to clean the metal head surface. Should I do anything else or use something else to clean the mating surface for the valve cover? I also wanted to clarify that I did not remove the exhaust stack nor air pre-filter to raise the hood. My stack hole was already tore up and the pre-filter was rigged up so I could just loosen it. I have another post on the pre-filter issue I discovered. Thanks everybody for feedback so far. ------------- 80 7010, 80 7020. 67 190XTD Series I w/500 Loader, AC 2000 Plow, Member Indiana A-C Partners, Member TAC |
Posted By: Allis dave
Date Posted: 23 Mar 2018 at 7:04am
|
I do one of 2 way. Use breakclean on the head and a rag. Keep scrubbing with a rag until you're sure that you've got it clean. If it's kinda gunky and you've got a die grinder, you can get one of those 3m scotch bright wheels to clean it up, then break clean. Make sure you dont' get the ones that have any grit in them or you'll start taking off material. Do get to crazy with wheels though, it's still possible to take off a little metal. Now that I typed that I thought.... You still have the hood on. You probably cant really get a die grinder in there anyway...
|
Posted By: MACK
Date Posted: 23 Mar 2018 at 8:55am
|
DON'T use a scotch pad on any thing that is not going to be washed before reassembly! Them thing are abrasive and not good for bearings or internal parts. Use a inch lb torque wrench to tighten valve cover. May have to go around it several times before it is tightened down. MACK |
Posted By: JimWenigOH
Date Posted: 23 Mar 2018 at 10:06am
I assume the "bleeding" is from the oil and crud still down in the bore. Prior to removing the injectors I'd plan to use compressed air to blow any debris out of the bore and then loosen injectors, blow out again and remove injectors. Which leads to my question. Is there a safe way to clean the bores out and keep stuff from falling down into the cylinder?
|
Posted By: calico190xt68
Date Posted: 10 Apr 2018 at 11:22am
|
An update on this process for those following it: 1) Before reinstalling the valve cover, I inspected the visible parts. Turns out that the front oil drain tube was sitting loose. None of the threads were connected. As shown below:  2) I am amazed it hadn't fallen out and got caught in something? I am guessing the oil was simply hitting the top of the valve cover instead of going down into the drain hole. Not sure if this would have caused any long-term engine damage or not? 3) It seems there is a small sleeve as shown in the picture below and I can't find it. Do I really need to get one of these or can I just put it back without the sleeve. Maybe the missing sleeve has always been missing and that's what caused it to loosen up? Otherwise, it is pulverized?  4) I made things difficult by selecting what I now think is the wrong glue to attach the gasket to the valve cover. I saw the Gorilla glue next to the gasket hitack at Autozone and thought it was meant for gluing the gasket. While it has glued it up and made it stick to the cover, it over expanded once dried. I couldn't find any 3M glue mentioned above. I also don't know about it's heat tolerance. I am considering forging ahead and if it leaks then I will start over. It also took hours to setup which I thought might be an advantage but in hindsight I had to keep babysitting the gasket. I stuck the old screws in the holes to keep it mostly aligned and turned it upside down and put weights on it overnight. 5) I used a plastic putty knife on the head edges along with brake cleaner to clean the top, but I have two spots that are not coming clean. Not sure what do about that yet. I think I will just keep scrubbing with plastic putty knife. 6) I ended up removing the hood and the turbocharger exhaust elbow directly above the valve cover to make it easier to reinstall, and more importantly to see what I was doing. I don't think you can do this job correctly without removing the hood in the long run and it really is easy. My cab created a bit of an issue because I had to lift the hood very high to pass by the turbo tube but I still got it. Without a cab, it is easy. 7) I did get some small pieces of oil and gasket crud on the head assembly. I am going to attempt to suck it out with a vacuum. It crumbles when you try to pick it up though. So, as always, it got more complicated. That sleeve doesn't come as a separate part so I will have to order the whole thing, if I really need it, and it is still available. ------------- 80 7010, 80 7020. 67 190XTD Series I w/500 Loader, AC 2000 Plow, Member Indiana A-C Partners, Member TAC |
Posted By: injpumpEd
Date Posted: 10 Apr 2018 at 12:56pm
|
the sleeve is the brass ferrule that i can see is on the line just below the nut. Just put it back in. The end of the tube may be crimped down to create a resistance, so the oil flows through the rocker arms, and not just out the drain tube. ------------- 210 "too hot to farm" puller, part of the "insane pumpkin posse". Owner of Guenther Heritage Diesel, specializing in fuel injection systems on heritage era tractors. stock rebuilds to all out pullers! |
Posted By: calico190xt68
Date Posted: 10 Apr 2018 at 1:00pm
|
Thanks Ed. That's why I like to include pictures in my posts. How tight should I make it to insure it doesn't come loose in the future? ------------- 80 7010, 80 7020. 67 190XTD Series I w/500 Loader, AC 2000 Plow, Member Indiana A-C Partners, Member TAC |
Posted By: injpumpEd
Date Posted: 10 Apr 2018 at 1:54pm
|
snug it down tight. ------------- 210 "too hot to farm" puller, part of the "insane pumpkin posse". Owner of Guenther Heritage Diesel, specializing in fuel injection systems on heritage era tractors. stock rebuilds to all out pullers! |
Posted By: Allis dave
Date Posted: 10 Apr 2018 at 2:32pm
|
2. Good find, eventually you wouldn't work out your rocker arm and valves. They weren't really getting any oil. 5. Get one of those little scrapers with a razor blade on the end. You'll be able to really scrape good with that.
|
Posted By: LeonR2013
Date Posted: 10 Apr 2018 at 4:14pm
| You can get the ferrules at any good hardware store. The vacuum is a good idea. Just start it up before you start scraping and it will get all the fines before they have a chance to get into the engine. You should get a wire brush (a round one) that goes into the bore hole of the inj. and it will clean the side on the hole and the carbon in the bottom. Polish it real good. It will save tons of time. |
Posted By: FREEDGUY
Date Posted: 10 Apr 2018 at 7:50pm
| Calico, do you happen to know what model year your XT is? We have a severe leak on our valve cover and might pull the complete hood off to inspect closer. Thanks and good luck |
Posted By: calico190xt68
Date Posted: 11 Apr 2018 at 9:02am
|
It is an early 1968 based upon the serial number. ------------- 80 7010, 80 7020. 67 190XTD Series I w/500 Loader, AC 2000 Plow, Member Indiana A-C Partners, Member TAC |
Posted By: FREEDGUY
Date Posted: 11 Apr 2018 at 6:00pm
| Thanks for the info! I guess after this planting season we will take the entire hood off so we can get a better look at that pipe ourselves. The entire right side of engine is coated in an oily film,heavier towards the fuel pump end for sure. |
Posted By: calico190xt68
Date Posted: 13 Apr 2018 at 9:26am
|
Here is another status on this project: 1) I put hitack on the gasket, two coats and tried to install it. I got 7 screws loosely in place and the last screw would not start without attempting to crossthread. Much to my dismay, I had to remove all screws and lift up the valve cover and start that one screw in straight with the valve cover lifted. Then I was able to lower and start the other 7 screws. This probably compromised my hitack sealing by lifting the cover. 2) I did not order the special screws and use them. I forgot to do this before vacation and when I got back, I just wanted to finish this job. 3) I didn't want to over tighten the screws so I used an allen wrench and hand tightened with the short end, so I couldn't put a lot of leverage on the screws. After hand tightening many times, I gave each screw a quarter turn with a wrench. I plugged in my block heater and left it overnight. The next day they were all loose so the engine heat did something to loosen and I proceeded to tighten them again. I then started the engine and let it run to get the engine hot. I came back 30 minutes later and they were loose enough for me to hand tighten again so I tightened them. I left it sit overnight. Next day they were still tight so I felt like I had adequately tightened them but not too much. 4) I started the engine and let it run and revved to 2000 rpms. I ended up with a leak on each end of the valve cover. I tightened it a bit more on the ends. I will look at it again tonight, but I suspect I may have to start over. 5) This thread started out about a leaking injector. I had wiped clean the area around the injector on both the 1st and 6th injector. After running the tractor the last time, I inspected both injectors. The 1st injector had no fluid around it. The sixth injector had fluid around it. It is inconclusive if this is oil or fuel at this time, but the fluid doesn't seem to be thick like oil. I think the valve cover was leaking above the 1st injector and now that is fixed. 6) The valve cover was previously leaking on both ends. In fact that is where the vast majority of the gunk was on the engine. Especially the front of the engine. My leak doesn't appear to be as bad as it used to be, but I don't want any leaks. 7) If I start over, I am going to try 3M 847 Brown Nitrile gasket adhesive instead of gorilla glue. 3M says it is oil resistant and high heat. I have to order it. 3 Now that I know that one screw is a problem, I will start with it and shouldn't have to pull the cover off which I think screwed up my hitack and probably created a little space for the oil to leak out. I am wondering if I need to tighten the screws up more than I have the second time around since both ends are leaking a little? I detailed this so that someone can correct my wrong doings, avoid my pitfalls or console me. :-) Thanks for any input. ------------- 80 7010, 80 7020. 67 190XTD Series I w/500 Loader, AC 2000 Plow, Member Indiana A-C Partners, Member TAC |
Posted By: DrAllis
Date Posted: 13 Apr 2018 at 12:11pm
| I'll bet the gasket mooshed inward on each end from poor quality glue. |
Posted By: Allis dave
Date Posted: 13 Apr 2018 at 12:18pm
|
Really what you use isn't important. I'd use #2 permatex, but there are tons of options. If you walk into an autoparts store and ask them, you'll probably leavge with something that will work. Just not gorilla glue... You also only need to put sealer on the top of the gasket to hold it to the valve cover. There's no need to also glue it to the head. You can put a decent amount of torque on the screws. Maybe 10-15 lbs? don't really smash the gasket but tighten it up good and evenly.
|
Posted By: calico190xt68
Date Posted: 13 Apr 2018 at 1:12pm
|
I have to say that the Gorilla glue is really tough when it is cold. I don't think the gasket moved at first, but then once the engine got hot, maybe it did. I couldn't find it's heat tolerance listed. Regardless, it was a screw up using it. I might have also misunderstood about the hitack between the gasket and the head. Of course, hitack instructions on the bottle said to do that. I don't have much to lose at this point by tightening it up to the 15lbs suggested above versus the 4lbs listed in the manual that I tried to use. So, I will tighten and use the tractor over the weekend to drill some post holes and see what happens. It will look like FrankensteinXT with no hood on it, but not putting that back on until this is fixed! ------------- 80 7010, 80 7020. 67 190XTD Series I w/500 Loader, AC 2000 Plow, Member Indiana A-C Partners, Member TAC |
Posted By: calico190xt68
Date Posted: 14 Apr 2018 at 10:05am
|
Good news is that I tightened all of the screws some more and it appears that my leaks on the ends have stopped! I would say I am in the 10-15 lbs of torque area so that was good advice. I ran it for 15 minutes at 2000 rpm and didn't see any oil leaks. Bad news is however, I still have the injector closest to the cab which I think is 6th injector with fluid around it, which started this whole thread! The other injector that I saw fluid around does not have fluid around it any longer so that was a valve cover leak issue. See the pic below. Of course, the injector is so close to the valve cover, you can't see if any oil is leaking down. I tried to wipe away the fluid with a paper towel and smell it for diesel fuel but there is just not enough. I am starting to think my situation is in the 1% category that Dr Allis gave me for an injector leak. I am going to move onto other issues and use the tractor for awhile to see if the valve cover leaks after use and maybe I will be able to accumulate enough of the fluid to figure out what it is. Is there any kind of test that anyone would know of that would help me figure out what this fluid is? Thanks to all that responded. I couldn't do these repairs without the forum members that's for sure!  ------------- 80 7010, 80 7020. 67 190XTD Series I w/500 Loader, AC 2000 Plow, Member Indiana A-C Partners, Member TAC |
Posted By: injpumpEd
Date Posted: 14 Apr 2018 at 11:10am
|
it will take a while for all the oil in that hole to dry up. It may ooze for several hours of use still. ------------- 210 "too hot to farm" puller, part of the "insane pumpkin posse". Owner of Guenther Heritage Diesel, specializing in fuel injection systems on heritage era tractors. stock rebuilds to all out pullers! |
Posted By: calico190xt68
Date Posted: 14 Apr 2018 at 12:49pm
|
Thanks Ed. I forgot about the possibility that oil could still seep for awhile. Dr. Allis also warned me on that. I will report back. ------------- 80 7010, 80 7020. 67 190XTD Series I w/500 Loader, AC 2000 Plow, Member Indiana A-C Partners, Member TAC |
Posted By: SteveM C/IL
Date Posted: 12 Aug 2018 at 11:06pm
| Soooo.....where we at with this? Also note that you have to be careful not to catch the edge of rubber grommet around injector with with edge of cover.Can get just enough of that grommet to hold up against cover edge causing warp of gasket face. |
Posted By: calico190xt68
Date Posted: 13 Aug 2018 at 7:55am
|
Funny you should bring this up. I know we all discussed that it was probably the oil leaking around the valve cover gasket onto the injector. After reinstalling the valve cover this past winter, I have run the tractor a bunch since hay season started. I still have a leak around the first injector. I don't appear to have any oil leaks around that valve cover anywhere else though. I am suspecting that I do have a leaking injector, but I was going to wait until hay season is over, and then I am going to deinstall the hood, since that is pretty easy, get up on top of the engine and see if any oil leaks around that valve cover onto the injector while it is running. It will still be tight to see it. Someone said I could use some oil dye as another idea to get to the bottom of it, but not sure about that. I also think I should rebuild/replace the injectors regardless. I have done about everything else at this point anyway to the fuel system. When I finally conclude the end to this leak, I will definitely report back my findings. Thanks for asking. ------------- 80 7010, 80 7020. 67 190XTD Series I w/500 Loader, AC 2000 Plow, Member Indiana A-C Partners, Member TAC |