| Author |
 Topic Search Topic Search  Topic Options Topic Options
|
MisterDRH 
Bronze Level


Joined: 30 Sep 2025
Location: Tennessee
Points: 25
|
 Post Options Post Options
") Thanks(0) Thanks(0)
 Quote Quote  Reply Reply
 Topic: 175 Hydraulic Remote Valve interchangeably Topic: 175 Hydraulic Remote Valve interchangeably
Posted: Yesterday at 12:56pm |
|
I have a 175 with a seized remote valve that is being stubborn. I’ve had in a press with 5 ton of pressure on it without breaking the valve loose. It has been soaking for a week in various penetrating oils. I am now looking at finding a used replacement and am wondering about remote valve off different models manufactured in the same period. Are the remote valves on 170s, 180s, 185s or 190s interchangeable with the remote valves on a 175? Thanks.
|
 |
|
Sponsored Links
|
|
|
MisterDRH
Bronze Level
Joined: 30 Sep 2025
Location: Tennessee
Points: 25
|
Post Options
Thanks(0)
Quote Reply
Posted: Yesterday at 2:34pm |
|
The section assembly number for the remote cylinder valve for the 170 and 175 is 242543-7. This is the part number for the complete remote valve assembly. Does anyone have a 180, 185, or 190 parts manual to check this number against? Thanks
|
|
DSeries4
Orange Level


Joined: 12 Sep 2009
Location: Ontario, Canada
Points: 7624
|
Post Options
Thanks(0)
Quote Reply
Posted: Yesterday at 2:41pm |
|
The valve sections are common with most of the other 100 series models. I got a new section around 10 years ago from my local hydraulic shop around 10 years ago.
|
|
'49 G, '54 WD45, '55 CA, '56 WD45D, '57 WD45, '58 D14, '59 D14, '60 D14, '63 D15D, '66 D15II, '66 D21II, '67 D17IV, '67 D17IVD, '67 190XTD, '73 620, '76 185, '77 175, '84 8030, '85 6080
|
|
DrAllis
Orange Level Access
Joined: 12 Sep 2009
Points: 22700
|
Post Options
Thanks(0)
Quote Reply
Posted: 19 hours 27 minutes ago at 6:45pm |
|
The last one I had that was stuck the problem was at the rear in the detent mechanism. People don't replace the rubber dust plug at the rear of each spool valve and then, over time, everything gets all rusted up. My spool wasn't stuck in the valve body. The detent/return springs were so rusted up the spool couldn't move. Take the two Allen bolts out and see if the spool won't slide out of the body.
|
|
MisterDRH
Bronze Level
Joined: 30 Sep 2025
Location: Tennessee
Points: 25
|
Post Options
Thanks(0)
Quote Reply
Posted: 3 hours 11 minutes ago at 11:01am |
|
Thanks for the replies. Yes the dust covers are all missing. And yes there is rust under the cover. Any advice on breaking the detention free without breaking the valve body?
|
|
DanielW
Silver Level

Joined: 19 Sep 2022
Location: Ontario
Points: 299
|
Post Options
Thanks(0)
Quote Reply
Posted: 2 hours 16 minutes ago at 11:56am |
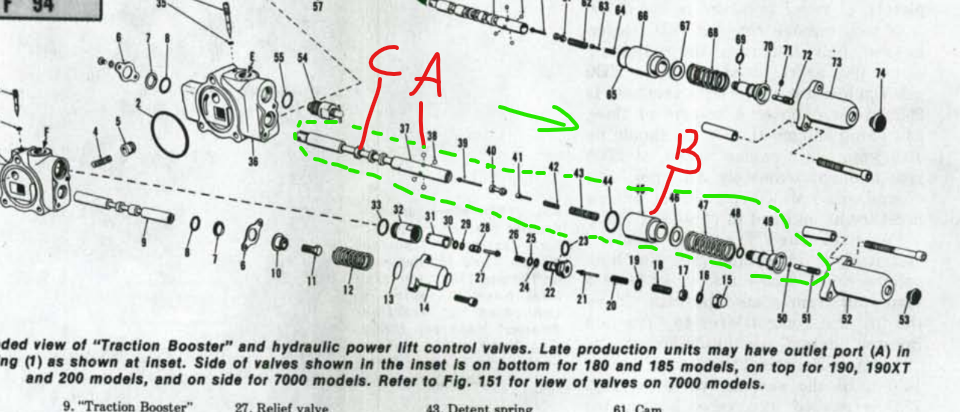
I've had the same problem as Doc a couple of times (detent seized/stuck). It's been a while, but you should be able to slide the whole spool and detent sleeve out the back as one unit like Doc says (everything in green). The detent balls (A) engage in internal detent grooves inside the sleeve (B). Thus, the sleeve (B) should slide out the back as one with the spool (C) (assuming it is indeed a stuck/seized detent). Once you have the whole kit/caboodle out, you're better able to soak it all in a penetrant or solvent bath - tapping the sleeve around to try and get the balls to drop into their holes on the spool so that you can slide the sleeve off. Which might still be strugglesome. A lot of tapping and trying to work the sleeve back and forth on the spool. Use o-ring friendly penetrants & solvents, because there's a little o-ring in there (#50) that you might not ever be able to get out.
Once the spool is sliding in the sleeve, you should be able to use a large flathead to unthread #49 from the spool (make sure you don't clamp on the polished sealing surfaces of the spool when holding it from turning). You technically don't even have to do that if you slide the sleeve off the front (it just makes it harder to slide back on without cutting the o-ring inside the sleeve). If you get this far, in 'theory' you should disassemble and clean/renew all the gubbins inside the spool (the adjustment set-screw, shuttle spool, etc. numbers 39, 40, 41, 42, 43, 50, 51). But if it were mine, I wouldn't bother. That adjusting set-screw (#51) is a PIA to remove and it's a pain to deal with everything inside the spool and get it back together sealed and adjusted right. At this age, you probably need heat to be able to unthread it, and even then it's so small (and likely rusted) that it'll be hard not to strip the head trying to remove it. And if you've used heat, you've likely wrecked o-ring #50. So then you're really screwed if you've wrecked the o-ring and you can't get the set-screw out to replace it.
If yours is as rusted as it sounds like, I'm guessing all the internal shuttle components (which I believe are all essentially just to make sure the detent unlatches when pressure is built) will be corroded/pooched anyway. I'd just keep the spool with everything in it untouched, remove the detent balls, lube it up, and reassemble. You won't have detent anymore, but it'll still work dandy. Be sure to replace o-rings #44 & #48 when you reassemble. You should theoretically replace the front o-ring as well (#8), but not quite as critical - the leading edge of the spool where the tangs are has a slightly broken leading edge (not a sharp machined edge) so as long as you polish and lube the spool prior to assembly you probably haven't hurt it. I'm 95% sure there's also an o-ring inside that sleeve that's not shown in this picture. That should be replaced as well, and you have to be careful when sliding the spool through it that the sharp machined edges don't catch & cut it. If you were able to unthread #49, slide the sleeve on the back of the spool, rather than sliding the spool all the way through the sleeve. If #49 is still on the spool, just be careful when sliding the spool through the sleeve and o-ring. And use lots of lube and be gentle.
It's been a while, so I might be misremembering. But pretty sure that's correct. Someone will chime in if anything I say is incorrect.
Edited by DanielW - 1 hour 54 minutes ago at 12:18pm
|
|
MisterDRH
Bronze Level
Joined: 30 Sep 2025
Location: Tennessee
Points: 25
|
Post Options
Thanks(0)
Quote Reply
Posted: 2 hours 13 minutes ago at 11:59am |
|
I finally got the valve disassembled. The detent adjustment screw is completely corrodedover where there's no more edges to grab to adjust the tension. Thanks again for the advice.
|
|
DrAllis
Orange Level Access
Joined: 12 Sep 2009
Points: 22700
|
Post Options
Thanks(0)
Quote Reply
Posted: 1 hour 44 minutes ago at 12:28pm |
|
Back to the missing rubber plugs on the end of that aluminum capsule.
|
|