| Author |
 Topic Search Topic Search  Topic Options Topic Options
|
plummerscarin 
Orange Level Access

Joined: 22 Jun 2015
Location: ia
Points: 4138
|
 Post Options Post Options
") Thanks(0) Thanks(0)
 Quote Quote  Reply Reply
 Topic: Reviving a WD45 Topic: Reviving a WD45
Posted: 30 Sep 2023 at 7:28am |
A while ago I mentioned in another thread that I was compelled to get my uncle's WD45 up and running again. This is a 57 model according to the serial number and has power steering. Last time I saw it run was maybe ten years ago and parked outside out of the way. I showed where the fuel tank had been removed, cleaned,flushed, then sealed. I also laid some fiberglass mesh on the bottom side where I opened up some pinholes after the cleaning, coating the mesh with sealer.  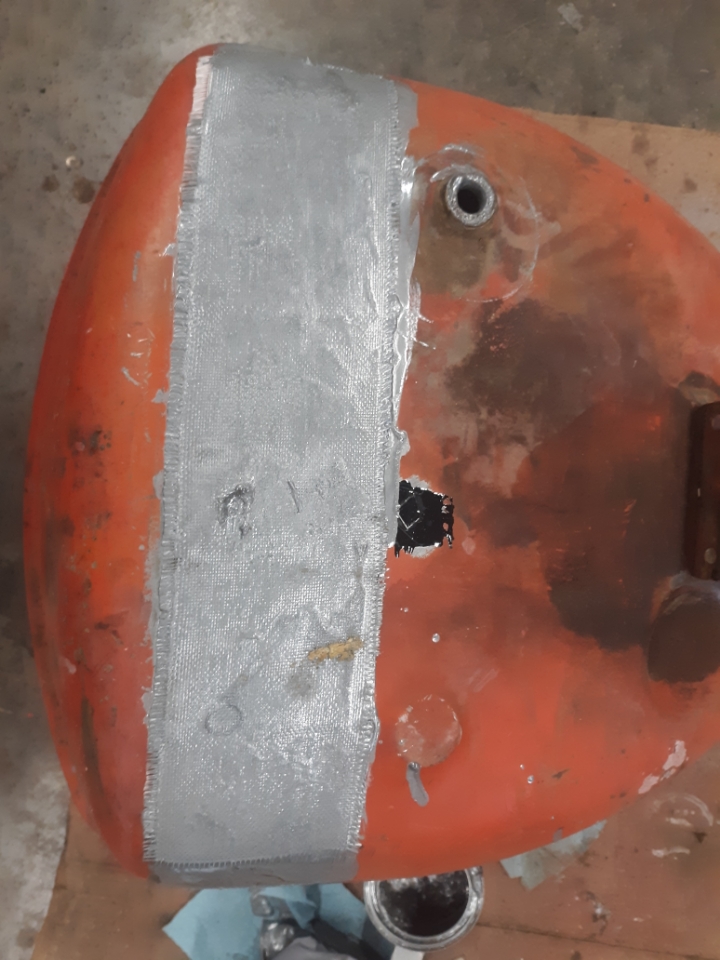 Tank is back in place. Carburetor was a mess so it has been cleaned and a new kit installed is back on. With these items done I grabbed a battery that gets used for various things and set that in. It doesn't fit the box so I went Roadkill and strapped it to the frame. Key on, push the button, clunk. At this point I decided to haul it home and put it in my shop. There I have tools, testing devices, inside and lighting for working at leisure after dark.
|
 |
|
Sponsored Links
|
|
|
plummerscarin
Orange Level Access
Joined: 22 Jun 2015
Location: ia
Points: 4138
|
Post Options
Thanks(0)
Quote Reply
Posted: 30 Sep 2023 at 8:14am |
|
Before I get to the electricals, I have a more pressing question. I dropped the oil from the pan and it seemed to flow very slowly considering the size of the opening. Stuck my finger in there and felt something laying over the hole. I can move it up maybe ¼ to ½ inch and it stops. Can't seem to move it side to side. Is this related to the oil pump pickup or did something drop. Spoiler alert, it runs and has oil pressure. Wondering if I need to drop the pan
|
|
DSeries4
Orange Level

Joined: 12 Sep 2009
Location: Ontario, Canada
Points: 7600
|
Post Options
Thanks(0)
Quote Reply
Posted: 30 Sep 2023 at 9:35am |
 plummerscarin wrote: plummerscarin wrote:
Before I get to the electricals, I have a more pressing question. I dropped the oil from the pan and it seemed to flow very slowly considering the size of the opening. Stuck my finger in there and felt something laying over the hole. I can move it up maybe ¼ to ½ inch and it stops. Can't seem to move it side to side. Is this related to the oil pump pickup or did something drop. Spoiler alert, it runs and has oil pressure. Wondering if I need to drop the pan |
Could be a ton of sludge in the pan. I would drop it, clean it good and have a look at the bottom end. It's only going to cost you a gasket.
|
|
'49 G, '54 WD45, '55 CA, '56 WD45D, '57 WD45, '58 D14, '59 D14, '60 D14, '63 D15D, '66 D15II, '66 D21II, '67 D17IV, '67 D17IVD, '67 190XTD, '73 620, '76 185, '77 175, '84 8030, '85 6080
|
|
Alvin M
Orange Level
Joined: 24 Jun 2018
Location: PA
Points: 818
|
Post Options
Thanks(0)
Quote Reply
Posted: 30 Sep 2023 at 11:03am |
|
Oil pump pickup screen that is where it is You are OK
|
|
plummerscarin
Orange Level Access
Joined: 22 Jun 2015
Location: ia
Points: 4138
|
Post Options
Thanks(0)
Quote Reply
Posted: 02 Oct 2023 at 10:23pm |
Well, I dropped the pan since Ds4 mentioned sludge which got me to thinking good idea. Also there is oil leaking front and rear of the pan. There was a bit of sludge on the bottom and I think because there is a high spot in the center   Otherwise looks reasonably clean. Alvin is correct on the pump pickup  The reprinted service manual I have shows a screen like the one on my G262. I did some research and found an old thread where these pumps would be replaced by newer D17 pumps so appears to be the case here? Thinking of renaming this thing "Snowball". I keep finding things that ought to be addressed but have to remember this started as a just get it running type project. But I did replace the shifter boot. It had a big split in it. Took it from the WD project and it will get the new one.
|
|
DrAllis
Orange Level Access
Joined: 12 Sep 2009
Points: 22588
|
Post Options
Thanks(0)
Quote Reply
Posted: 03 Oct 2023 at 1:46am |
|
I think like a lot of parts, old designs were eventually replaced with the "updated" or improved parts. Why continue to make the old stuff when the new stuff will work just as well.
|
|
IBWD MIke
Orange Level

Joined: 08 Apr 2012
Location: Newton Ia.
Points: 4240
|
Post Options
Thanks(0)
Quote Reply
Posted: 03 Oct 2023 at 8:43am |
|
I tore one 45 engine apart that had the updated pickup like that. Sadly, that block is still on the stand.
|
|
plummerscarin
Orange Level Access
Joined: 22 Jun 2015
Location: ia
Points: 4138
|
Post Options
Thanks(0)
Quote Reply
Posted: 04 Oct 2023 at 10:31pm |
The pan gasket set arrived today and the end gaskets are currently taking its new shape in a nut container. I had enough Plastigage to check clearance on two rod bearings. Measures out to .0015"-.002". Pushed the "dent" in the oil pan back out so will drain completely next time. Found these spring loaded loops hanging under the frame rails. 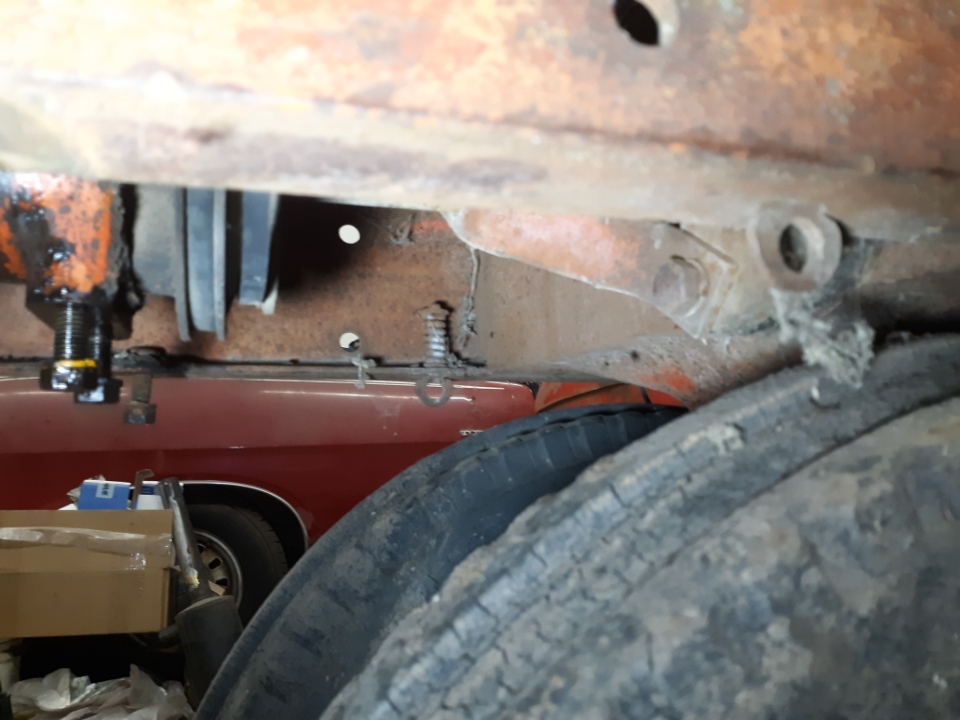 Any idea what these are for?
|
|
steve(ill)
Orange Level Access
Joined: 11 Sep 2009
Location: illinois
Points: 89994
|
Post Options
Thanks(0)
Quote Reply
Posted: 04 Oct 2023 at 10:45pm |
|
the bottom end of the engine is VERY CLEAN... Was it that way when you opened, or did you wash it ?
|
|
Like them all, but love the "B"s.
|
|
plummerscarin
Orange Level Access
Joined: 22 Jun 2015
Location: ia
Points: 4138
|
Post Options
Thanks(0)
Quote Reply
Posted: 04 Oct 2023 at 10:52pm |
|
That's as seen when I dropped the pan
|
|
Lon(MN)
Orange Level
Joined: 11 Sep 2009
Location: Merrill Wi
Points: 2044
|
Post Options
Thanks(0)
Quote Reply
Posted: 05 Oct 2023 at 5:42am |
|
There is a guard that is used on tractors with factory power steering narrow front ends. I have that part for sale if you are interested.
|
|
http://lonsallischalmers.com
|
|
plummerscarin
Orange Level Access
Joined: 22 Jun 2015
Location: ia
Points: 4138
|
Post Options
Thanks(0)
Quote Reply
Posted: 05 Oct 2023 at 6:49am |
|
Sent you a PM
|
|
plummerscarin
Orange Level Access
Joined: 22 Jun 2015
Location: ia
Points: 4138
|
Post Options
Thanks(0)
Quote Reply
Posted: 10 Oct 2023 at 12:57pm |
|
Got the oil pan back in place with the new gaskets in so that should be dryer now. Not an easy task when in frame and dodging the steering shaft. Which brings up the next item. U joint was pretty sloppy so that got replaced. Picked one up from the farm store. Having power steering set up made removing the shaft a little easier I think because I could separate the coupling from the PS unit and not have so much to work with. Still needed heat tho. Steering effort not much better yet. Looks like I need to focus attention on the steering wheel relocate kit. I realized the unit is a gear box with chain drive. Needs serious lubrication at minimum.
On to the electrics. I have a battery I use for various things. It is not enough to it turning over. Multimeter says 12.5 volts no load. Put a load test on and got 5.2 volts. Get a new battery. Now have one that fits in the box. Hook up the cables. Again, just a click. Get the test light out. I have power through the ammeter to the key switch. Turn the key on and the light goes out. What? Turns out, the battery cables are suspect. These are repair ends that clamp on to the cable. Rather than fight them I will replace them with molded ends
|
|
AC720Man
Orange Level

Joined: 10 Oct 2016
Location: Shenandoah, Va
Points: 5408
|
Post Options
Thanks(0)
Quote Reply
Posted: 10 Oct 2023 at 3:19pm |
|
I used 2/0 wielding cable and crimped ends on my D17 recently. Slipped heat shrink on after the crimp was done. Easy to work with and provides a great path for the amperage of the battery to do its job. Keep in mind the negative and positive post are different sizes, make sure you get the correct crimp for each. Negative is smaller, a lot of folks don’t realize that and wonder why their crimp doesn’t tighten up like it should.
|
|
1968 B-208, 1976 720 (2 of them)Danco brush hog, single bottom plow,52" snow thrower, belly mower,rear tine tiller, rear blade, front blade, 57"sickle bar,1983 917 hydro, 1968 7hp sno-bee, 1968 190XTD
|
|
plummerscarin
Orange Level Access
Joined: 22 Jun 2015
Location: ia
Points: 4138
|
Post Options
Thanks(0)
Quote Reply
Posted: 10 Oct 2023 at 6:41pm |
|
I've used crimp ring terminals for other batteries but have not seen what you describe for top post. Will keep a look out for them.
I had a suspicion there may be a problem with the starter so I took it apart and cleaned it up. Right or wrong i shined up the armature, brushes, and terminals and sprayed out the case with contact cleaner. This worked for the 170 last year when it turned over hard. On the bench it spins over good but I don't have a way to load test it. Back in it went and still no start. Next, the starter solenoid. I have a known good one but installed, it didn't help. I have 3 that all test good on the bench but no load. As with the battery cable, I have power through the solenoid when start button pushed and no cable to the starter. Attach starter cable, push button, power is lost. Put a new solenoid in. Will turn the engine over very well now.
My thinking here is since electricity takes the path of least resistance, the test light lit because under no load the current had no choice but to go through the light. And the connections and contacts were only good enough to pull that current away from the light and do nothing else when the circuit is complete. Hopefully you understand what I mean.
|
|
plummerscarin
Orange Level Access
Joined: 22 Jun 2015
Location: ia
Points: 4138
|
Post Options
Thanks(0)
Quote Reply
Posted: 12 Oct 2023 at 12:30pm |
|
So, new battery, battery cables, starter solenoid, cleaned up starter and the engine turns over.
Put a test light on power wire going to the distributor. I have power to and through the resistor and coil. On the distributor side of the coil there was no power until I cranked the engine over. Then the test light flashed on and off indicating the points were working. Opened the sediment valve, gas is flowing and she runs. I’m rather surprised since I’ve had to do so much up to this point. However the charging system and wiring need attention.
|
|
Ted J
Orange Level

Joined: 05 Jul 2010
Location: La Crosse, WI
Points: 18943
|
Post Options
Thanks(0)
Quote Reply
Posted: 13 Oct 2023 at 6:59pm |
|
I was thinking the starter button from the start. Sometimes after sitting so long they tend to go to ground instead of passing through to the starter, It's hard to pinpoint, but this is usually what happens. GOOD LUCK on the next steps... Sorry I didn't read this sooner!
|
|
"Allis-Express"
19?? WC / 1941 C / 1952 CA / 1956 WD45 / 1957 WD45 / 1958 D-17
|
|
plummerscarin
Orange Level Access
Joined: 22 Jun 2015
Location: ia
Points: 4138
|
Post Options
Thanks(0)
Quote Reply
Posted: 13 Oct 2023 at 7:23pm |
Remarkably the starter button has been reliable. It has a rubber cover on it not weather checked.  Battery cables, not so much. 12v negative ground system. Delco 10DN alternator. Appears to have been wired similar to the wiring on the 170 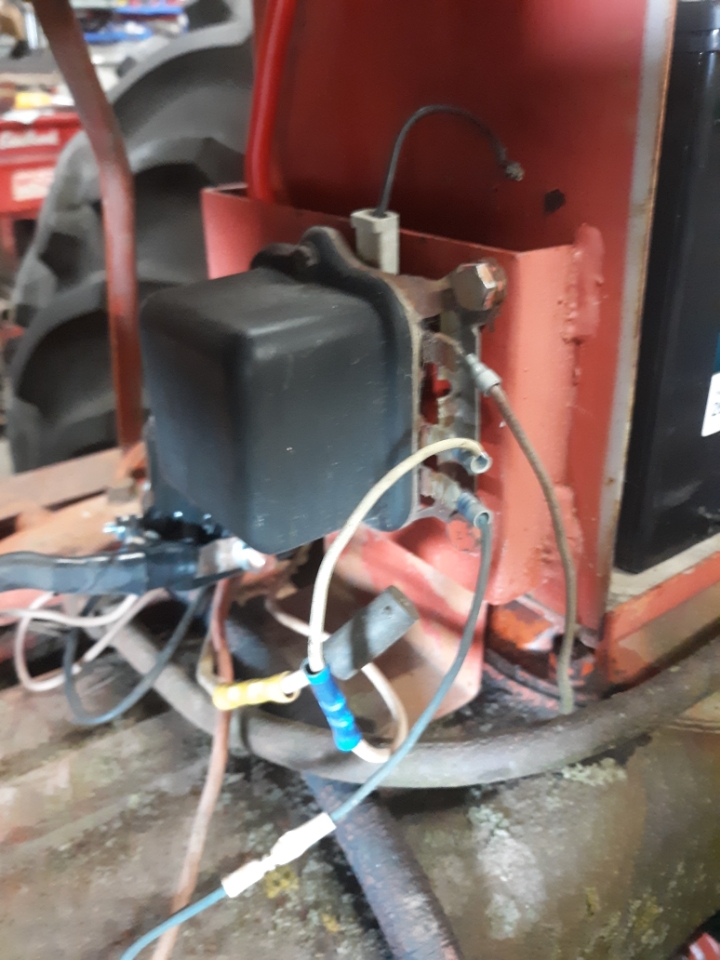 Couple broken wires. Assuming the top one goes to ground but don't see a terminal it could have been attached to. No ground wire found on the alternator ground lug. 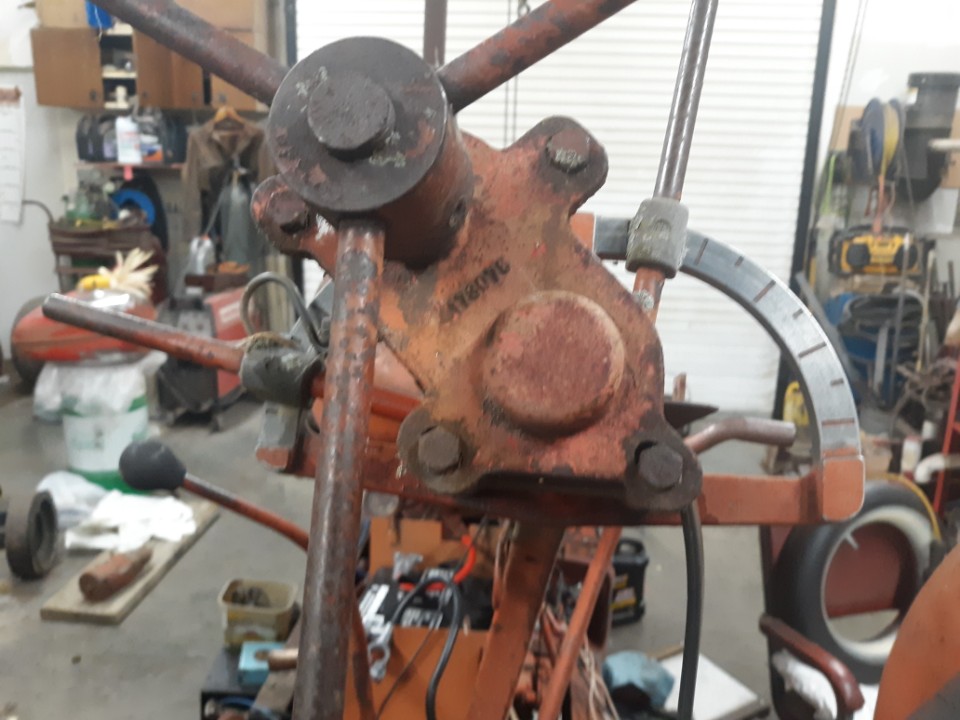 Steering relocate kit. Found an old thread on that. There's a chain inside all rusted up. Soaking in chain lube now
|
|
plummerscarin
Orange Level Access
Joined: 22 Jun 2015
Location: ia
Points: 4138
|
Post Options
Thanks(0)
Quote Reply
Posted: 19 Oct 2023 at 6:46pm |
Inside the relocate kit  This is one Dad apparently got for the WD and never installed it. Chain in both were pretty rusty. WD45 soaked a few days. Shaft openings are well worn but have no intention replacing at this time. Haven't made progress on the charging system but need to move out for a bit. So I fired it up and took it for a couple laps around the garden. I had freed up the pivot points on clutch and brake pedals. They work well and it seems to drive well. Hand clutch feels good.
|
|
steve(ill)
Orange Level Access
Joined: 11 Sep 2009
Location: illinois
Points: 89994
|
Post Options
Thanks(0)
Quote Reply
Posted: 19 Oct 2023 at 8:36pm |
|
I would dump that voltage regulator and the OLD style alternator and get a NEWER 10 SI or CS 130 Delco and install it... They have an INTERNAL regulator and much more reliable.
Edited by steve(ill) - 19 Oct 2023 at 8:39pm
|
|
Like them all, but love the "B"s.
|
|
steve(ill)
Orange Level Access
Joined: 11 Sep 2009
Location: illinois
Points: 89994
|
Post Options
Thanks(0)
Quote Reply
Posted: 19 Oct 2023 at 8:38pm |
I have power to and through the resistor and coil.
Resistor means it has an older 6 volt coil working on a 12 volt system.. OK if its working.. Keep in mind that if running problems ( no spark) occur , you should dump that coil and resistor and get a NEW 12 v coil with INTERNAL resistor.. Good longer term upgrade.
Edited by steve(ill) - 19 Oct 2023 at 8:38pm
|
|
Like them all, but love the "B"s.
|
|
plummerscarin
Orange Level Access
Joined: 22 Jun 2015
Location: ia
Points: 4138
|
Post Options
Thanks(0)
Quote Reply
Posted: 19 Oct 2023 at 9:42pm |
|
Yep, understood.
|
|
plummerscarin
Orange Level Access
Joined: 22 Jun 2015
Location: ia
Points: 4138
|
Post Options
Thanks(0)
Quote Reply
Posted: 20 Oct 2023 at 8:41pm |
So this showed up on my doorstep today. 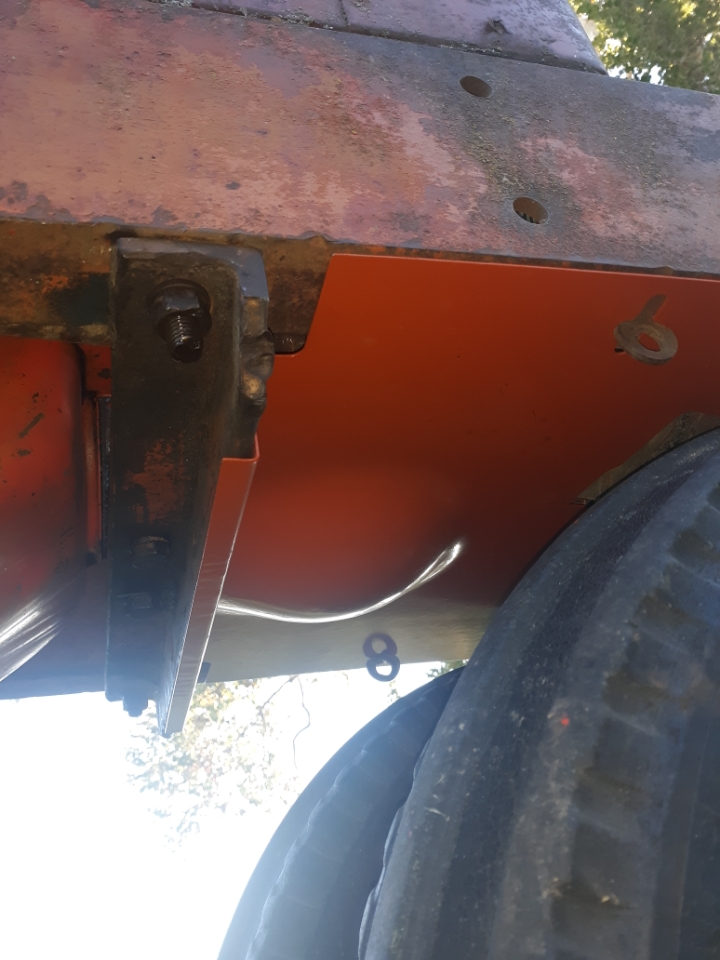 Had asked earlier what the spring loaded rings were for. Panel covers the belt area keeping out dirt and such from the NF tires Lon provided this for the project. Thanks much.
|
|
SteveM C/IL
Orange Level Access
Joined: 12 Sep 2009
Location: Shelbyville IL
Points: 8882
|
Post Options
Thanks(0)
Quote Reply
Posted: 21 Oct 2023 at 12:00am |
|
It's to keep MUD out of the belt and pulley. Dirt is not an issue.
|
|
Lon(MN)
Orange Level
Joined: 11 Sep 2009
Location: Merrill Wi
Points: 2044
|
Post Options
Thanks(0)
Quote Reply
Posted: 21 Oct 2023 at 5:32am |
|
Looks and fits real nice.
|
|
http://lonsallischalmers.com
|
|
Stan R
Orange Level Access
Joined: 03 Dec 2009
Location: MA
Points: 997
|
Post Options
Thanks(0)
Quote Reply
Posted: 21 Oct 2023 at 7:04am |
|
What's the purpose of the relocate kit? I don't see any gear reduction. For tall farmers???
|
|
SteveM C/IL
Orange Level Access
Joined: 12 Sep 2009
Location: Shelbyville IL
Points: 8882
|
Post Options
Thanks(0)
Quote Reply
Posted: 21 Oct 2023 at 9:47am |
|
Hard to to count but i'm sure the driver has one less tooth....gear reduction
|
|
plummerscarin
Orange Level Access
Joined: 22 Jun 2015
Location: ia
Points: 4138
|
Post Options
Thanks(0)
Quote Reply
Posted: 21 Oct 2023 at 3:19pm |
Stan R wrote:
What's the purpose of the relocate kit? I don't see any gear reduction. For tall farmers??? |
I came across an old thread on here. Supposedly to relocate for certain mounted picker. The seat would be located on the picker. My uncle however is quite tall and am sure it was much better to drive for him.
|
|
plummerscarin
Orange Level Access
Joined: 22 Jun 2015
Location: ia
Points: 4138
|
Post Options
Thanks(0)
Quote Reply
Posted: 27 Oct 2023 at 6:16am |
SteveM C/IL wrote:
Hard to to count but i'm sure the driver has one less tooth....gear reduction |
Tooth count is the same for both so no gear reduction. Just a method to raise and center the wheel over the platform. Seat is also moved to center and a padded seat added. I'll add a picture soon showing the offset.
|
|
DON G
Silver Level Access


Joined: 14 Feb 2014
Location: Lowpoint, IL
Points: 419
|
Post Options
Thanks(0)
Quote Reply
Posted: 27 Oct 2023 at 2:17pm |
plummerscarin wrote:
Stan R wrote:
What's the purpose of the relocate kit? I don't see any gear reduction. For tall farmers??? |
I came across an old thread on here. Supposedly to relocate for certain mounted picker. The seat would be located on the picker. My uncle however is quite tall and am sure it was much better to drive for him. |
In 1958 we put a Ford 2 row mounted corn picker on the WD . That was used to raise and center steering wheel.
|
|


