| Author |
 Topic Search Topic Search  Topic Options Topic Options
|
DPKII 
Bronze Level


Joined: 08 Mar 2023
Location: Texas
Points: 62
|
 Post Options Post Options
") Thanks(0) Thanks(0)
 Quote Quote  Reply Reply
 Posted: 05 Dec 2023 at 8:02am Posted: 05 Dec 2023 at 8:02am |
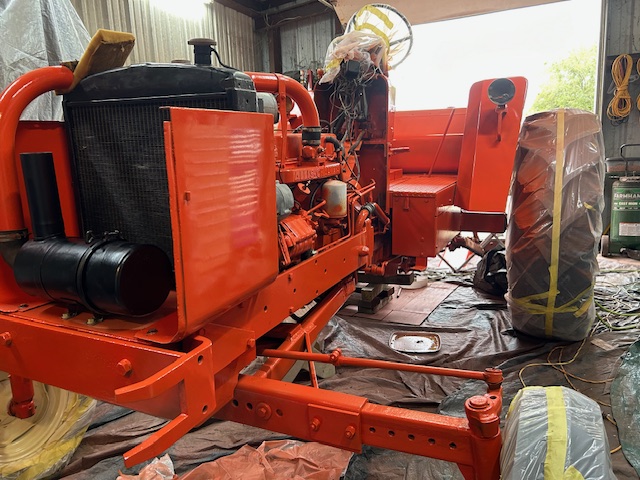
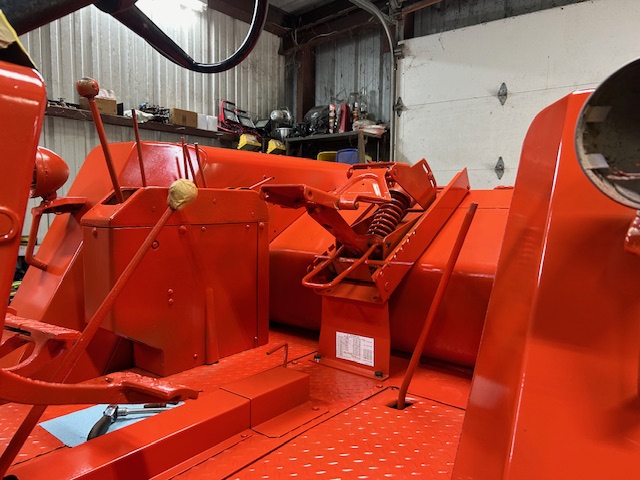
  Got the console off the deck and disassembled. Had to cut the shaft for the traction booster and depth control into 4 pieces to get it apart. The controls were siezed on to the shaft. It took heating to cherry red and driving the shaft with a heavy hammer and punch to remove. Actually took 2 applications of heat and lots of hammering on one of the controls. But all apart now...
|
 |
|
Sponsored Links
|
|
|
DrAllis
Orange Level Access

Joined: 12 Sep 2009
Points: 19507
|
Post Options
Thanks(0)
Quote Reply
Posted: 05 Dec 2023 at 8:13am |
|
"CONSOLE CONTROL" !! The first and finest grouping of tractor control levers ever designed !! especially the throttle lever location !!!
|
|
DPKII
Bronze Level
Joined: 08 Mar 2023
Location: Texas
Points: 62
|
Post Options
Thanks(0)
Quote Reply
Posted: 05 Dec 2023 at 12:21pm |
Yes sir! I agree 100% It just feels right, and the large deck lets you move your legs and feet around. Big help on a long day.
Allis Chalmers had so many new innovative ideas.
David
|
|
DPKII
Bronze Level
Joined: 08 Mar 2023
Location: Texas
Points: 62
|
Post Options
Thanks(0)
Quote Reply
Posted: 12 Jan 2024 at 12:47pm |
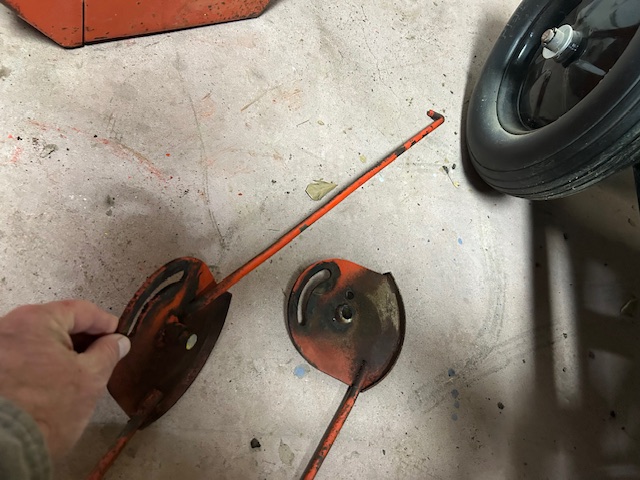
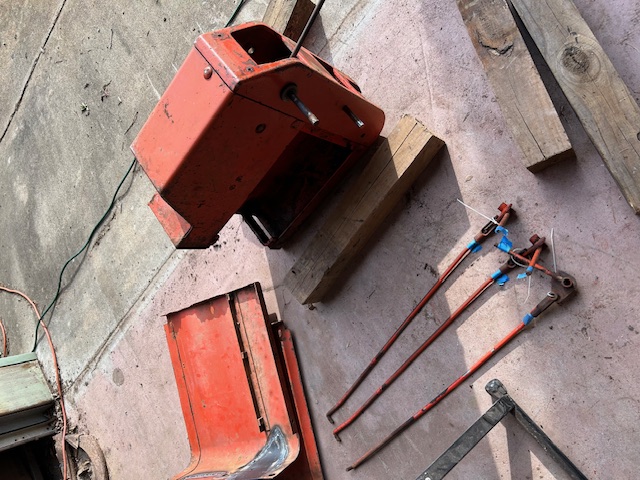
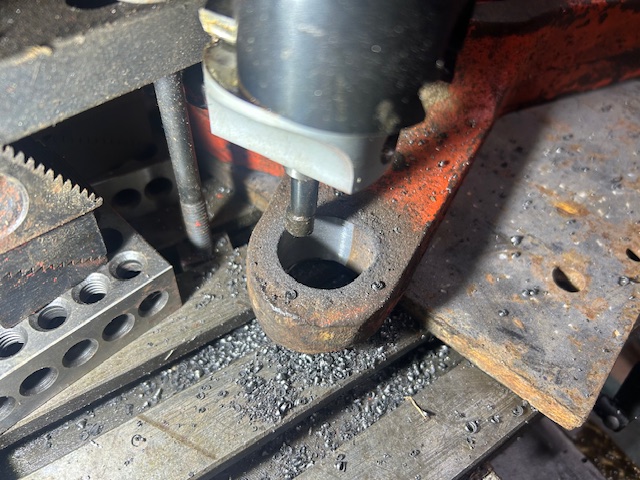
  Its been a while since I have updated this but I have had some time to work on the 190. Console and valves are back on the tractor. Traction boost and position controls free and working. All control rods ends brazed to fix wear from years of use.
The last thing is the feedback control from lift arm. It was frozen and the ear of the belcrank attached to the lift arm broken free. With heat and patience I was able to free the belcrank and remove from the shaft. Had to cut about an 1/8" off the tube to clear the trans housing to remove but that was much preferable to lifting the deck.
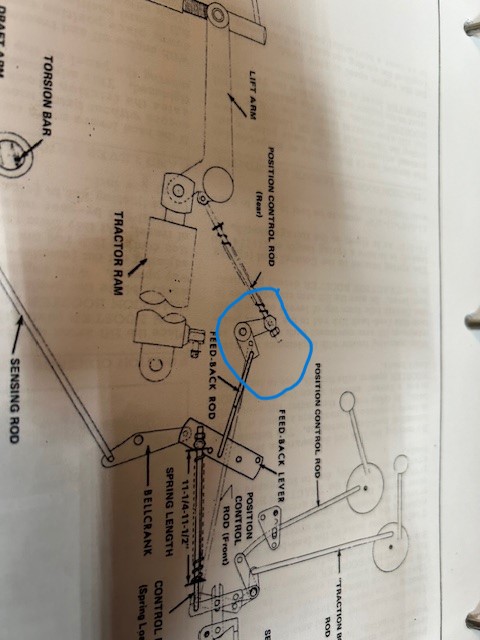
Now to repair the belcrank. I have the diagram pictured that shows it. I am wondering if the angle on the diagram is correct. If I position the 2 ears the same as diagram will I be close enough to work? I don't suppose anyone has the exact angle measurement for the 2 ears?
|
|
DPKII
Bronze Level
Joined: 08 Mar 2023
Location: Texas
Points: 62
|
Post Options
Thanks(0)
Quote Reply
Posted: 05 Feb 2024 at 10:17am |
|
|
|
DPKII
Bronze Level
Joined: 08 Mar 2023
Location: Texas
Points: 62
|
Post Options
Thanks(0)
Quote Reply
Posted: 07 Mar 2024 at 1:11pm |
With the warm weather here it is time to get back to painting. Cranked the 190 and backed it out of the shop. No muffler or pipe but surprisingly not all that loud.
Put the first coat of filler primer on the hood to see where I stand after sanding the welds. Actually looks ok, nothing that a little body filler will not correct.
|
|
AC7060IL
Orange Level
Joined: 19 Aug 2012
Location: central IL
Points: 3198
|
Post Options
Thanks(0)
Quote Reply
Posted: 07 Mar 2024 at 4:37pm |
|
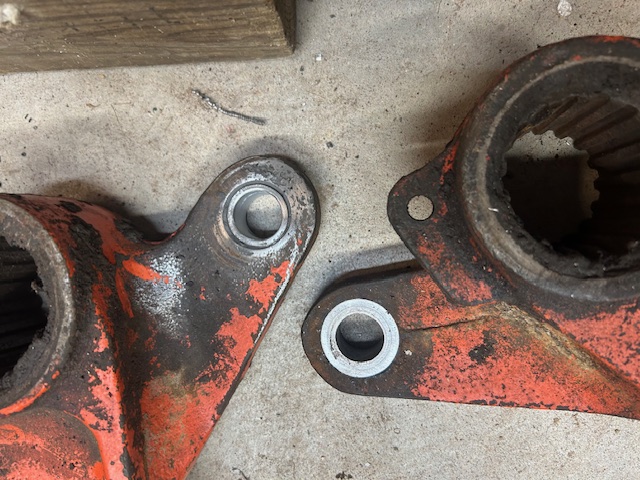
DPKII, your 3 point arm bushings look great. I think it’s wonderful you have a metal lathe in your shop to assist such fabrications.
Your 190’s hood came out really good. For what it’s worth, the AC factory hoods sometimes had in their flat top middle area, from grill to steering wheel console, 2 linear rows of spot-weld imperfections where under supports were positioned. My 190 series II has them anyway.
Looking forward to seeing it all complete. Imagine you are too?
|
|
DPKII
Bronze Level
Joined: 08 Mar 2023
Location: Texas
Points: 62
|
Post Options
Thanks(0)
Quote Reply
Posted: 08 Mar 2024 at 8:58am |
Yes, I am very much looking forward to getting the tractor completed.
I consider myself blessed to have a pretty good selection of shop tools/equipment. Most if not all were purchased used over the years. The lathe came from a shop a good friend works for that they were getting rid of. Grandpa and Dad had a good selection of hand tools but never had much in the way of shop equipment other than torches and a stick welder. My wife actually bought me my first piece of shop equipment (small table top hobby drill press) for Christmas when we were fist dating. I tell her that she was the one who started it all!
I know what you mean by spot welds but my hood didn't have any that showed through the top. AC must have changed their process for later builds.
David
|
|
DPKII
Bronze Level
Joined: 08 Mar 2023
Location: Texas
Points: 62
|
Post Options
Thanks(0)
Quote Reply
Posted: 18 Mar 2024 at 2:39pm |
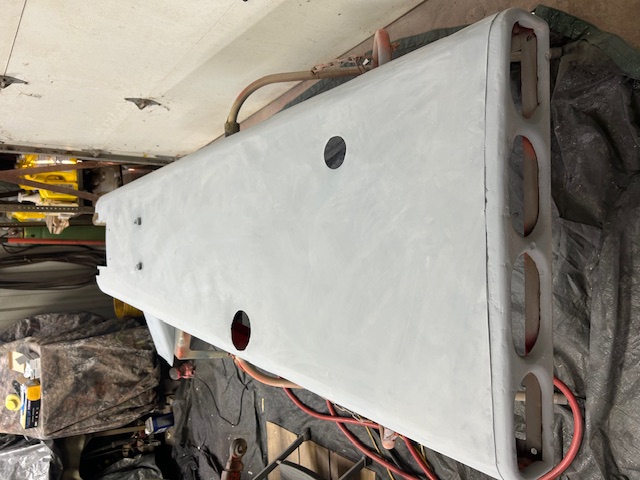
  I had last week off for spring break so I got to do quite a bit of work on the 190. First got sealer primer on it.
|
|
Allis dave
Orange Level
Joined: 10 May 2012
Location: Northern IN
Points: 2849
|
Post Options
Thanks(0)
Quote Reply
Posted: 19 Mar 2024 at 10:39am |
|
That's going to look great. Exciting project.
|
|
DPKII
Bronze Level
Joined: 08 Mar 2023
Location: Texas
Points: 62
|
Post Options
Thanks(0)
Quote Reply
Posted: 20 Mar 2024 at 8:20am |
|
|
|
AC7060IL
Orange Level
Joined: 19 Aug 2012
Location: central IL
Points: 3198
|
Post Options
Thanks(0)
Quote Reply
Posted: 20 Mar 2024 at 11:06am |
|
DPKII, your 190 is looking great! Thanks for sharing updates / photos. I assume you're using a paint gun? What brand of paint is your top coat?
|
|
DPKII
Bronze Level
Joined: 08 Mar 2023
Location: Texas
Points: 62
|
Post Options
Thanks(0)
Quote Reply
Posted: 20 Mar 2024 at 4:03pm |
AC7060IL
The topcoat is Dupont Imron 3.5 HG. I actually have had this paint since 2011. Had it mixed with the 190 in mind but it took until now for me to use it. The Imron was only a partial gallon as it was sold as a gallon once hardener was added. I didn't think it would still be good but it worked fine on a test panel so I am using it. I also just had a gallon of Nason (Dupont now Axalta) Fullthane (urethane similar to Imron) mixed in case I did not have enough of the Imron. My thinking was I would do a final coat with the Nason if needed but the Imron is covering very well and I think a gallon will do me.
Yes, I am spraying. I am using a full size gun and a small HVLP for the engine belly, and wheels. The small gun works well as I can turn down the paint and narrow the fan and shoot the paint into tight spots with out getting runs. Makes it easier to control. I also am using disposable paint cups on both guns. They may cost a bit but I find it is so much easier to clean up the gun and since they are sealed you don't have to worry about a drip coming from the lid of the cup and ruining all the hard work. Very well worth the cost.
The Imron is fairly slow to dry and stays tacky for a few hours. I tried a test painting outside but we have lots of bugs (knats) this time of year and they are always attracted to wet paint. So I am painting in the shop with tarps over everything I don't want overspray on.
David
|
|
AC7060IL
Orange Level
Joined: 19 Aug 2012
Location: central IL
Points: 3198
|
Post Options
Thanks(0)
Quote Reply
Posted: 21 Mar 2024 at 6:55am |
Good quality paints. Please post a photo of the disposable paint cup. That sounds like a splendid idea. So,,, do you have your AC One-Ninety “arrow” hood decals at the ready? Here’s a prior post where Grinder220 gives a good breakdown of decals per serial numbers. https://www.allischalmers.com/forum/new-project-190xt-diesel_topic150966.html
Edited by AC7060IL - 21 Mar 2024 at 6:57am
|
|
DPKII
Bronze Level
Joined: 08 Mar 2023
Location: Texas
Points: 62
|
Post Options
Thanks(0)
Quote Reply
Posted: 21 Mar 2024 at 12:33pm |
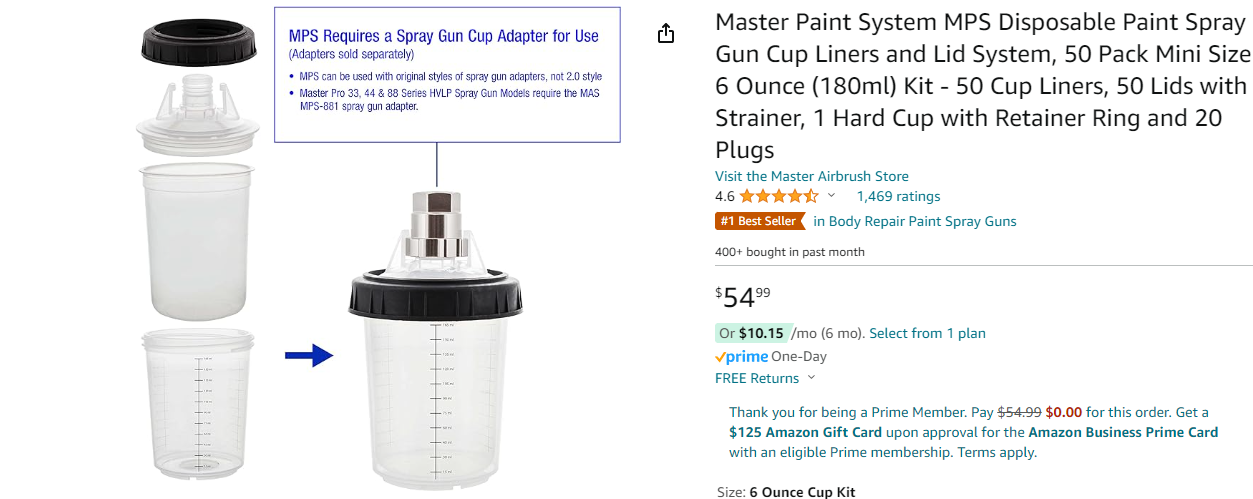
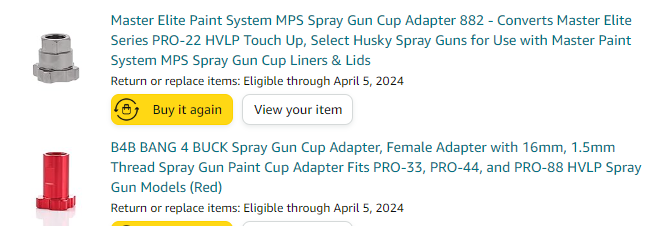
AC7060IL Here are the disposable cups that I am using. One is a 20oz and the small a 6oz. Basically you have a hard plastic outer shell that you insert the disposable liner into. The strainer lid is snapped into the inner liner and plastic outer shell and then threaded ring. You will also need an adapter for your gun like the ones shown depending on the gun/thread size. Those are the two types that fit my guns. The 3M mix ratio sheets slip in between the liner and hard plastic cup for the 20oz size and allow mixing right in the cup for smaller batches. Those are reusable unless you mess up and get paint in between the liner and shell. On that note the only critical point I have found is that it is possible to push the inner liner out of place when snapping in the strainer lid. I use my thumb nail to hold the lip of the liner in place as I work around pushing in the lid. If you mess up you will know it as soon as you turn the cup over as paint will leak around the edge.
When you are done painting simply remove the inner liner and strainer together and dispose. The only cleanup is the gun itself. I have also capped the strainer top and stored paint in the shop fridge if I didn't use all I had mixed and still had more to paint the following day. It will stay good for a day or so in the fridge before hardening. You can also add this to a new batch of paint the following day. Make sure to let come to room temp before using.
Since the liners are soft and collapse as you spray the system is sealed. This allows you to hold the gun at any angle without spilling paint. I love this feature.
|
|
DPKII
Bronze Level
Joined: 08 Mar 2023
Location: Texas
Points: 62
|
Post Options
Thanks(0)
Quote Reply
Posted: 21 Mar 2024 at 12:47pm |
AC7060IL
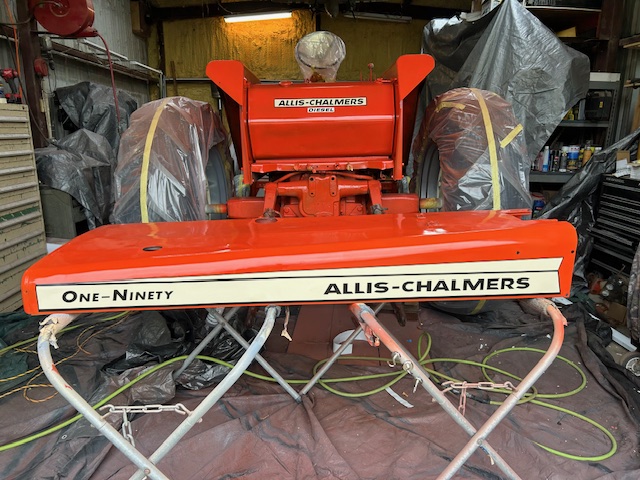
Thanks for the decal information as it was timely. I just could not resist seeing what it would look like and just got the decals for the hood and tank applied.
I didn't realize that AC had earlier versions with small slanted lettering. Those probably would have been what this tractor came with but as far as I remember it had this style.
Dad overhauled the engine on this tractor in the early 1980s and did a quick paint job at the time. He used paint either from TSC or maybe the AC dealer but I do remember it being a simple oil based paint with no hardener. At the time I wanted new decals too. Dad said they were really too expensive but I talked him into them. I remember getting them from the AC dealer. They came in a really small box all rolled up and cost around $250. Lots of money at that time! I think the hood decals were two piece if I remember correctly and they did have the larger straight letters.
I didn't like the diesel decal (thought it was to close to the AC decal) so I removed it and replaced it a little lower centered between the AC and tank bend after I took this picture. Glad I had an extra diesel one.
|
|
Darb210
Orange Level

Joined: 10 Jan 2011
Location: Ohio
Points: 792
|
Post Options
Thanks(0)
Quote Reply
Posted: 21 Mar 2024 at 8:55pm |
|
great progress! Thanks so much for sharing!
|
|
AC7060IL
Orange Level
Joined: 19 Aug 2012
Location: central IL
Points: 3198
|
Post Options
Thanks(0)
Quote Reply
Posted: 22 Mar 2024 at 5:15am |
|
Your decals make it pop! Angled or straight AC letters~never mind, I just like the “arrow” design. Takes me back to being a kid & seeing them all gussied up at our local fair & the grand Daddy Illinois State Fair.
And look at the hood paint finish - very smooth! Fantastic job!
Edited by AC7060IL - 22 Mar 2024 at 5:18am
|
|
DPKII
Bronze Level
Joined: 08 Mar 2023
Location: Texas
Points: 62
|
Post Options
Thanks(0)
Quote Reply
Posted: 22 Mar 2024 at 8:18am |
Thanks for the compliment. I am happy with the results so far. Its not perfect as would be needed for a auto or a tractor that will sit in a museum but plenty good for a tractor that will be used. The hood was lots of work but the cool thing to me is that I will be looking over the same hood that came with the tractor and that Grandpa looked over many hours back in the day. I always think of him when I am running the 190. He used to come pick me up every morning in the summer, stop for goodies at the store and then on to the hay fields where at the time I ran a rake on a D 17. I was too small to reach the pedals but I could slide down off the seat, straddle the trans to use the clutch and gear shift. Then the hand clutch/power director made it easy to drive from the seat. One summer of work bought me my first rifle, the next summer a scope. Lots of good memories!
I am also a fan of the arrow hood decals and the orange and cream colors are just perfect together! David
|
|
DPKII
Bronze Level
Joined: 08 Mar 2023
Location: Texas
Points: 62
|
Post Options
Thanks(1)
Quote Reply
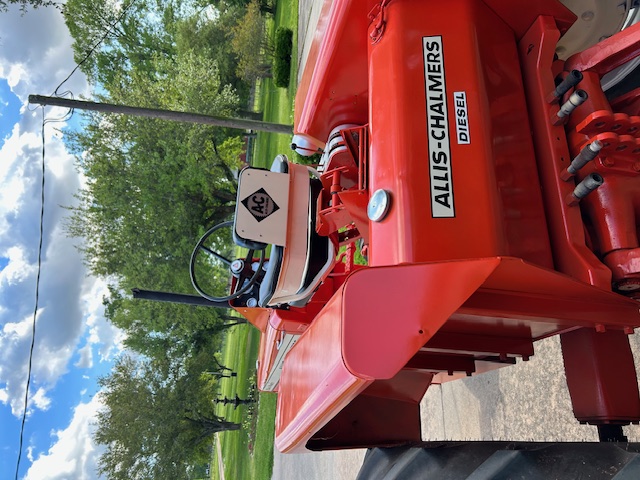
Posted: 25 Mar 2024 at 2:30pm |
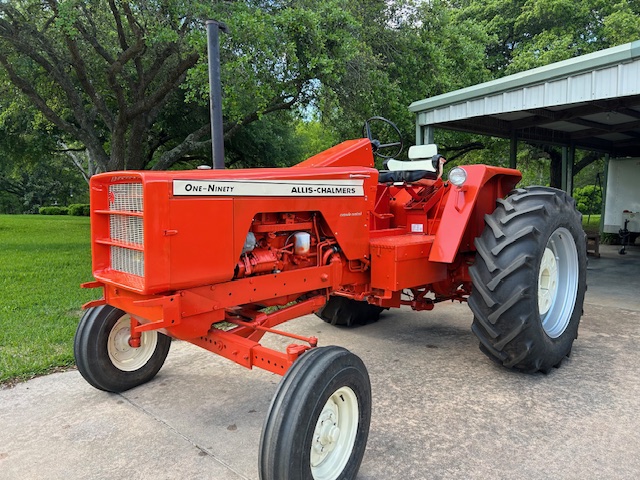
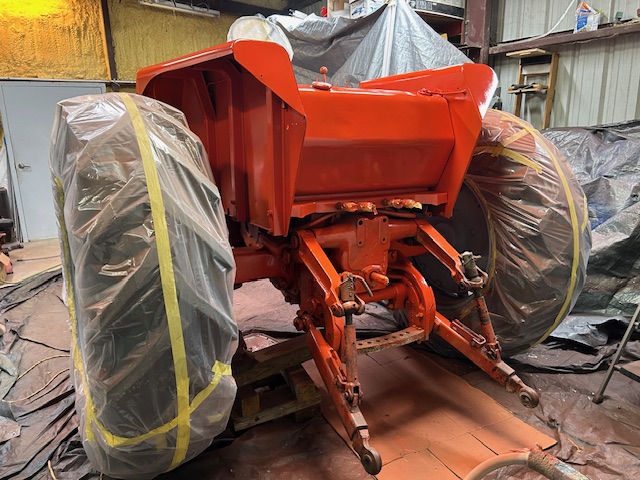
Got the hood on and the tractor out in the sunshine for the first time!
|
|
IBWD MIke
Orange Level

Joined: 08 Apr 2012
Location: Newton Ia.
Points: 3445
|
Post Options
Thanks(0)
Quote Reply
Posted: 26 Mar 2024 at 9:26am |
|
Nice!
|
|
DPKII
Bronze Level
Joined: 08 Mar 2023
Location: Texas
Points: 62
|
Post Options
Thanks(0)
Quote Reply
Posted: 04 Apr 2024 at 1:15pm |
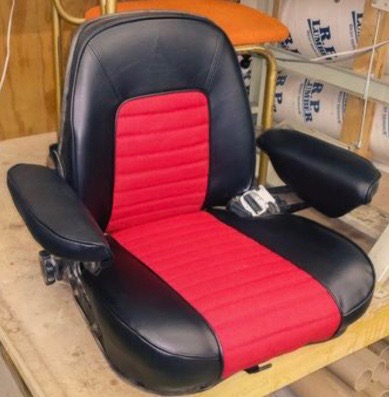
Well she is getting close to complete! I got all the sheet metal on after fighting with fitment for a day or so. Finally figured out the two side panels that hold the radiator needed to be raised 1/4". Used 1/4" rubber and then had good alignment with hood and the rest of the panels. Did the 190s come with rubber spacers on the radiator mount side panels? This one didn't have anything there but they would have rotted years ago. I can see where the hood bolts elongated the mounting holes as the hood pulled forward and slightly down at the nose over time. Got the seat assembled and on. This 190 didn't come with the super deluxe but my old pan was gone and I got the super deluxe off a salvage tractor. If Grandpa had the choice at purchase he would have ordered it with the super deluxe I am sure. Used cream and old style decal for the seat as that is what the original smaller seat was like. Ran it some and found I have a valve cover leak on injector side rear. I did change the gasket when I started this project but must have missed something. I did some research and ordered the new style mounting bolts. Maybe that will fix my issue and I wont have to pull the cover again. I just hate the thought of pulling the newly painted sheet metal to get to it!
|
|
plummerscarin
Orange Level Access
Joined: 22 Jun 2015
Location: ia
Points: 3124
|
Post Options
Thanks(0)
Quote Reply
Posted: 04 Apr 2024 at 3:18pm |
|
Nice!!!
|
|
AC7060IL
Orange Level
Joined: 19 Aug 2012
Location: central IL
Points: 3198
|
Post Options
Thanks(0)
Quote Reply
Posted: 04 Apr 2024 at 5:32pm |
|
DPKII, Awesome job! That’s a great family keepsake that you get to continue to operate. Leaky valve cover? Try tightening its mounting cap screws a little at a time while engine is running. Ie.. tighten a quarter turn, wipe up leaking oil, wait & watch. Repeat as needed without crushing/distorting valve cover.
|
|
IBWD MIke
Orange Level
Joined: 08 Apr 2012
Location: Newton Ia.
Points: 3445
|
Post Options
Thanks(0)
Quote Reply
Posted: 05 Apr 2024 at 8:59am |
 plummerscarin wrote: plummerscarin wrote:
Nice!!! |
X-2!
|
|
DPKII
Bronze Level
Joined: 08 Mar 2023
Location: Texas
Points: 62
|
Post Options
Thanks(0)
Quote Reply
Posted: 08 Apr 2024 at 8:41am |
I tried tightening the valve cove bolts this weekend as suggested. Helped some but still had one pretty good leak after running a while and warming up.
Pulled the valve cover and did not really see anything wrong but could see where oil was seeping under the gasket on the injector side. I was able to get the valve cover off without removing the hood. Just took off the side panels, moved breather tube out of the way, and slid the fire wall partially out. The valve cover will come out the intake side towards the rear.
Since I had a new gasket and new style mounting hardware I decided to replace gasket. Glued the gasket to the valve cover and while drying was wiping up the head to clean off and get ready to install the cover. Got to thinking about the breather and decided to blow through with the compressor. Breather tube was plugged solid. Prolly a mud dabber. I am sure I was basically pushing oil out and the valve cover was the weakest leak. The leaking valve cover was the catalyst that started this project as it had been leaking and getting worse for the last couple years.
So long story short, put the valve cover back on. I used 3-bond between the gasket and head this time instead of RTV.
Warmed the tractor up yesterday evening and the valve cover is staying dry!
David
|
|
GeneD14
Silver Level

Joined: 17 Sep 2009
Location: TN
Points: 235
|
Post Options
Thanks(0)
Quote Reply
Posted: 08 Apr 2024 at 10:41am |
David,
Your 190 looks GREAT!  |
|
DPKII
Bronze Level
Joined: 08 Mar 2023
Location: Texas
Points: 62
|
Post Options
Thanks(0)
Quote Reply
Posted: 08 Apr 2024 at 1:45pm |
Thanks!
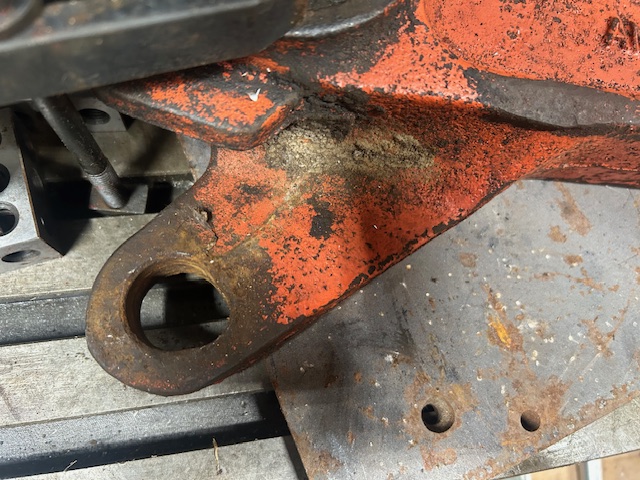
I realized I didn't show my solution to mounting the factory 3 point with my snap coupler draw bar. As I stated earlier grandpa had mounted a 3 point adapter. It was not all that great and moved around pulling 3 point equipment and with a square baler. Dad tried modifying the adapter with more braces, welding the mounting arms solid, and adding top mounting for 2 of the bolts in the top 3 point mount. This eventually stripped the threads. It looks like Dad had re-drilled and tapped a couple of times.
I made a couple treaded inserts out of bolts. One side took 3/4" and the other a 7/8". I am glad AC put plenty of meat in the housing.
My drawbar is also twice as thick as original because the original snapped years ago. Dad or Grandpa welded another on top essentially doubling the thickness. Therefore a standard drawbar hanger will not work. I thought about making a drawbar hanger with a double wide slot but ended up with a simpler solution of adding another cross piece under the drawbar with a 1/2" spacer. Should have used a 5/8" as I had to add a washer to give enough clearance. One day maybe Ill make some 5/8" spacers and get rid of the washers.
|
|
Allis dave
Orange Level
Joined: 10 May 2012
Location: Northern IN
Points: 2849
|
Post Options
Thanks(0)
Quote Reply
Posted: 08 Apr 2024 at 2:51pm |
|
Very nice, that's a beautiful tractor
|
|


 Next, and finally some Orange! I really like the Persian Orange #2.