190 Preservation
Printed From: Unofficial Allis
Category: Allis Chalmers
Forum Name: Farm Equipment
Forum Description: everything about Allis-Chalmers farm equipment
URL: https://www.allischalmers.com/forum/forum_posts.asp?TID=197999
Printed Date: 08 May 2024 at 3:55pm
Software Version: Web Wiz Forums 11.10 - http://www.webwizforums.com
Topic: 190 Preservation
Posted By: DPKII
Subject: 190 Preservation
Date Posted: 31 Oct 2023 at 11:46am
|
I am in the process of preserving my 190. It is a fairly early model at serial #1129D. I say preserving, not restoration because I do not plan to strip the entire tractor down. My plan is to repair rusted sheet metal, clean, and paint the tractor. Mechanically everything functions without issues. The 190 was purchased new by my grandpa in 1964 from a dealer in Rosenburg TX. I have an earlier post asking about the front mounted toolbar that came with the tractor. Below is a picture from a couple years ago when I replaced the rubber. I did not take a recent picture when I started the preservation. When this picture was taken the front tires were new and right rear leaking. Rears were replaced after this picture. If there is interest I will continue to post progress on the tractor as I work on it. Just let me know. Thanks, David https://www.allischalmers.com/FORUM/uploads/23710/190_side_view.jpg" rel="nofollow">  |
Replies:
Posted By: plummerscarin
Date Posted: 31 Oct 2023 at 12:34pm
| I think most enjoy the photos and steps one takes to keep these machines operating. I have two projects going myself. One is a total tear down and the other is a keep it working to avoid becoming scrap. I say keep ‘‘em coming |
Posted By: Ben (MI)
Date Posted: 31 Oct 2023 at 4:04pm
|
A great piece of family history. Please keep the updates coming. ------------- Part time farming with a 1980 7060 and 1984 F3 hydro. |
Posted By: Leadoff
Date Posted: 31 Oct 2023 at 5:10pm
|
DPKII Great looking 190 after all these years. Please keep us posted on your progress Good luck with your project ------------- 1963 D17D Series III. 1965 D15 Series II. 1965 D17 Series IV. 1975 185. 1978 716H. 1979 716H. 1965 780 Harvester/1R&DC. 1957 Model 73 SC 4 Furrow Plow |
Posted By: RedHeeler79
Date Posted: 31 Oct 2023 at 7:35pm
| Yep, progress pics are always fun to look at. Looks like a good project you have going there! |
Posted By: DrAllis
Date Posted: 31 Oct 2023 at 11:12pm
| It goes to show that with some care and only 77 non-turbocharged HP, the driveline was adequate, where the "XT" version just destroyed everything behind the engine on prior to 9001 serial number chassis. Fix her up !!! |
Posted By: DPKII
Date Posted: 01 Nov 2023 at 9:19am
|
Thanks for the interest! The 190 was always my favorite tractor of all the classic non-cab models I have driven over the years. My uncles ran all green and working for them in high school and afterwards I drove different John Deere models. Was not impressed with the 4020 compared to the 190 but loved when they got 4840s. Grandpa started with Farmall Super Cs and still had one left that he "gave" to me when I was about 6 years old. It was still used sporadically and I had permission to drive it when ever I wanted. It had a weak battery and if it didn't start on the first couple turns - no go. I got it started most times and used it as a toy riding all over the farm. The working tractors at that time were two diesel D17s and the 190. Grandpa had had a gas D17 earlier but traded it in. At that time Grandpa farmed mainly hay and my job was pulling a rake with a D17. I drove the fastest of the 2 of course. For some reason it made about a 100rpm more than the other. Every summer from me being about 6 years old I raked hay for Grandpa. I was too small to reach the foot clutch or brake without sliding off the seat but the power director made it easy. He passed when I was in junior high school and Dad and my uncle took over the hay business for Grandma in their spare time. I did most of the cutting and baling with the 190 through junior high and high school.
For 77 hp the 190 pulled very well! Used it for pulling an offset disk and light tandem in the hay fields. As a kid I worked it very hard. Dad said run in 3rd gear on the offset but once I was alone I was shifting up as high as it would pull. Many hours with black smoke rolling out the pipe. Ran it in 6th gear on the haybine with lots of clover leaf turns to the left. Brakes were always bad so it was very hard on the front end. Broke the front right spindle once and both sides of the front end rear pivot frame at different times. At one time Grandpa loaned the 190 to a friend with the offset and he broke a bull gear. I remember it getting loaded up and taken back to the dealer for repair. It still has the small axels but I suspect they are the new hardened version. I typically don't take pictures of projects until I am finished for some reason, but for this one I will do my best to document and post. Thanks, David |
Posted By: DrAllis
Date Posted: 01 Nov 2023 at 9:31am
| It would be interesting to compare your engine s/n (2D-xxxx) to the chassis s/n and see how close they are together. As time went on, there were always more engines built than tractors because they were used in other applications. |
Posted By: DPKII
Date Posted: 01 Nov 2023 at 9:48am
|
Dr. Alllis, I will look this evening. The data plate is still on the engine but no color left on it. I will see if I can read the stamping on it. Thanks, David
|
Posted By: DPKII
Date Posted: 01 Nov 2023 at 3:21pm
Here are some pictures of the hood with the new pieces tacked in. Im not the best welder but I think it will work ok. I didn't take any pictures of the fully welded piece yet.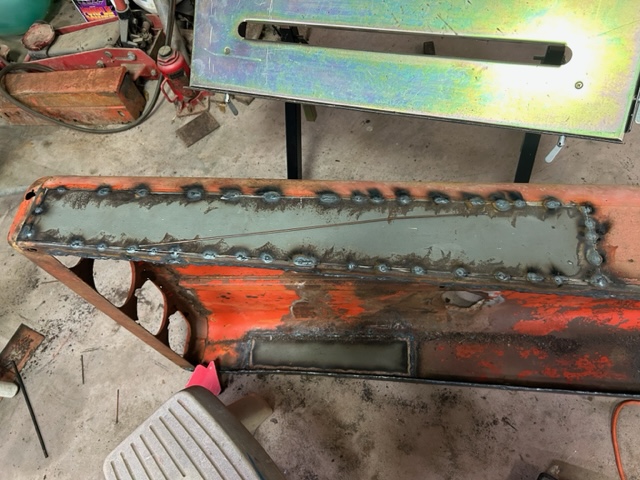  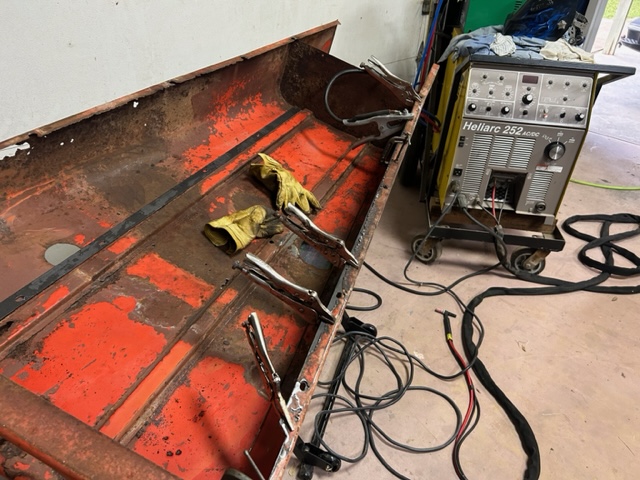 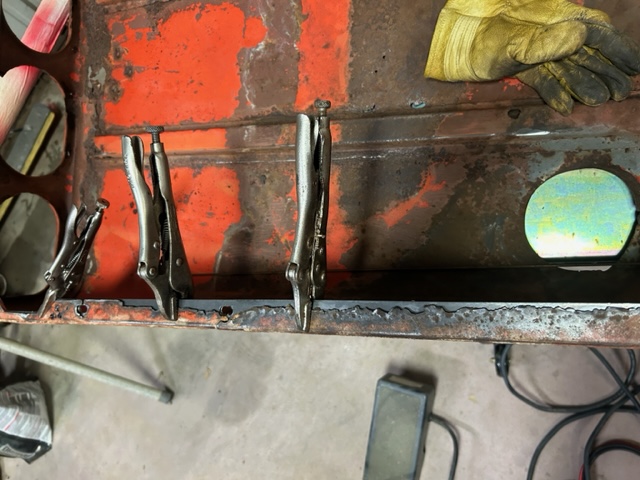  |
Posted By: DrAllis
Date Posted: 01 Nov 2023 at 7:13pm
| I hope you're good at body work. I would have looked for a better used hood with the salvage yards I have around me. |
Posted By: plummerscarin
Date Posted: 02 Nov 2023 at 5:54am
| That is ambitious. Those large flat panels will require extreme care to avoid warping. Good luck |
Posted By: DPKII
Date Posted: 02 Nov 2023 at 8:12am
|
Yes, I would love to have another hood and front grill. Unfortunately there are no salvage yards down here. We are about 50 miles from the coast and the climate is not kind to equipment. The 190 sat outside all but the last 6 years or so and for about 10 years it was barely run. I now have a place to keep it in an open ended building at least. Also, there were not nearly as many Allis Chalmers tractors down here as up north. I see a D17 around here every once in a while, and we still have one of Grandpa's but not any 190s. I am doing my best to keep the warping down. Fingers crossed.... David
|
Posted By: IBWD MIke
Date Posted: 02 Nov 2023 at 8:21am
|
Colfax tractor in Iowa will ship, might give them a call; 515-674-3001. |
Posted By: DPKII
Date Posted: 02 Nov 2023 at 8:23am
I checked the engine data plate yesterday evening. If I am reading everything correctly. The tractor is number 129 off the line and the engine is number 1231 (2D01231). |
Posted By: Lynn Marshall
Date Posted: 02 Nov 2023 at 8:26am
| I've got a nice pair of the side tins for sale, if interested. |
Posted By: DrAllis
Date Posted: 02 Nov 2023 at 8:30am
| Engine s/n's start at 1001, so it's pretty close, isn't it ?? |
Posted By: DPKII
Date Posted: 02 Nov 2023 at 9:03am
|
Yes pretty close I think. The tractor is 190 1129D and engine at 2D-01231 would put them 102 units apart. Lynn thank you for the offer of the side tins. I have the pair that goes with my 190. They just have not been on the tractor in years. I think they are in pretty good shape other than a little metal fatigue around some of the corner bolt holes. The tins survived better than the rest of the sheet metal because every time Grandpa and Dad would pull the hood to replace muffler, pipe, ect. the side panels never got reinstalled. I liked them on the tractor and put them on a couple times back in the day but the panels have been stored inside for the past 20 years. If mine dont work out I will surely let you know... Thanks, David |
Posted By: DPKII
Date Posted: 02 Nov 2023 at 9:06am
|
Mike, thanks for the phone number. If my hood doesn't work out to my satisfaction I will give them a call. Thanks again, David |
Posted By: injpumpEd
Date Posted: 02 Nov 2023 at 9:11am
|
Seeing this takes me back to my childhood in the 70's in the rio grande valley, the climate there is not kind to anything. We had a 190D Dad bought new in 70 and in just a few years it was already rusting through the hood, muffler rotted, charging and starting systems always giving fits! Man I don't miss that salty humidity! Sheet metal for these are readily available. ------------- 210 "too hot to farm" puller, part of the "insane pumpkin posse". Owner of Guenther Heritage Diesel, specializing in fuel injection systems on heritage era tractors. stock rebuilds to all out pullers! |
Posted By: AC7060IL
Date Posted: 02 Nov 2023 at 3:45pm
|
DPK11, try to spot weld your 190's sheet metal with your Heliarc welder. That is how Allis-Chalmers built them at their factory in 1964. Spot welds don't create excessive heat in sheet metal like a weld. So a spot weld usually will not warp the metal? Your Heliarc welder was popular during WWII era. It's spot weld capability improved our US airplanes build factory's previous riveting methods. Heliarc means it initially used Helium as a shield gas. Hence the name. Here is a youtube link to a 2.5 minute video that demonstrates how to do that with a tig welder. fyi: There is no audio in the spot weld video, just captions. http://www.youtube.com/watch?v=q2CYL-1W7Fw" rel="nofollow - http://www.youtube.com/watch?v=q2CYL-1W7Fw Edit: Looking more closely at your previous photos that contain welds, makes me think you're inserting new sheet metal and butt welding old to new? If that's correct, try this technique of spot welding a butt joint by placing an additional "backing sheet metal strip" from behind (opposite/out of site) the new&old pieces. In your 190's hood case, maybe use a backing sheet that is 1-1.5" wider than new insert? That way it adds strength across both seams & will make this technique a little easier. The backing will add some more weight to the hood, but only you'll know its there. Assuming you're using 18-20 gauge sheet metal, then not much weight added. If you're using thicker like 16 gauge, just try to spot weld butt joint without any backing. So if using a backing, place all 3 pieces of sheet metal in place(new butted to old/ laying over backing) spot weld the 3 pieces over the butt seam. Then add additional spot welds on each surface pieces (old) (new) to their backing piece about an inch either side of the butt seam. Here's another video "walking the cup" that shows tig 101 for beginners. It covers tig welding methods for thicker metal stock. Dude in the video does a great job of informing & demonstrating a tig's potential. You know you got one cool Heliarc welder - right? http://www.youtube.com/watch?v=ByClpaoVcjA" rel="nofollow - http://www.youtube.com/watch?v=ByClpaoVcjA Congratulations on owning, preserving a very cool AC 190 tractor. Thanks for sharing your journey & history stories.
|
Posted By: DPKII
Date Posted: 03 Nov 2023 at 8:03am
|
Ed, Its been a long while but I have been down to the Rio Grande valley a few times. As you confirmed the the south wind and humidity off the gulf plus the intense summer heat is really bad for anything sitting outside. You can clean up a piece of metal and it will rust overnight if you don't oil or paint it. From your bio it looks like you are the man to contact when I need injector pump work? I like your avatar! That must be your 200? AC 7060, Thanks for the tips. Yes on the side panels I am butt welding the new metal in. I think it is either 16 or 18 gauge for the panels and the strips for the mounting holes on the bottom lip is 1/8". I will try the backing and spot weld method on the top sheet metal. So far it is coming out ok. The welder is fairly new to me. I got it a couple years ago. I happened to see it on Craigs List and picked it up from a really nice guy in College Station TX. He owns a company that makes all the brass signs, emblems, paper weights ect for Texas A&M university. He had purchased the welder new for a project but had no more need for it. I got a smoking good deal on the welder. He was asking $550 which was a great deal but when I handed him the cash he handed me $50 bucks back. I had a lincoln square wave 175 before that I now gave to my brother. I am no expert, but I do enjoy Tig welding more than any other process that I have tried. Thanks, David |
Posted By: injpumpEd
Date Posted: 03 Nov 2023 at 8:27am
|
It is a 10 year old pic of my 210 puller lol! It has changed a little since then. I do run my own small fuel injection and turbo shop, yes. I have done some work for quite a few members on this board. I do work on all brands of tractor fuel systems though. Glad youre resurecting the 190, the one dad bought new in 70 was the first tractor I drove at the age of 7, so 190's are kinda special to me, plus kinda rare compared to the popularity of the 190XT's, which we also had and we had lots of trouble with it, so it got traded for a new 7000 lol! I often wonder if any of our old tractors are still around anywhere, but likely not due to that rough environment down there. ------------- 210 "too hot to farm" puller, part of the "insane pumpkin posse". Owner of Guenther Heritage Diesel, specializing in fuel injection systems on heritage era tractors. stock rebuilds to all out pullers! |
Posted By: AC7060IL
Date Posted: 03 Nov 2023 at 10:46am
If your environment is salty humid as your describe, then you may
not want to use any backing panels as I mentioned earlier. To that end,
my guess is that the OEM riveted support members under your 190's hood
have somewhat more rust than areas not supported? If that is the case,
then using a backing panel may only increase their area's surfaces for
accumulated humidity to create more rust. Just keep spot or butt welding
new pieces into hood as you've already done. Maybe try to "stitch"
butts by doing consecutive spot welds along the butt seam, instead of
welding seam. Remember, excessive heat is your enemy on sheet metal. By the way, awesome purchase price on the Heliarc. |
 DPKII wrote:
Posted By: DPKII
Date Posted: 03 Nov 2023 at 4:06pm
|
AC7060, Yes definitely more rust on the sheet metal over the hat channels and front frame assembly. I will keep doing the butt welding and plan to try and pour some rust treatment down the hat channels form the underside. Watched the videos you suggested which led me down a rabbit hole on tig welding. Learned I have not been paying nearly enough attention to the tungston shape, cleanliness etc. thanks, David |
Posted By: DPKII
Date Posted: 06 Nov 2023 at 8:11am
 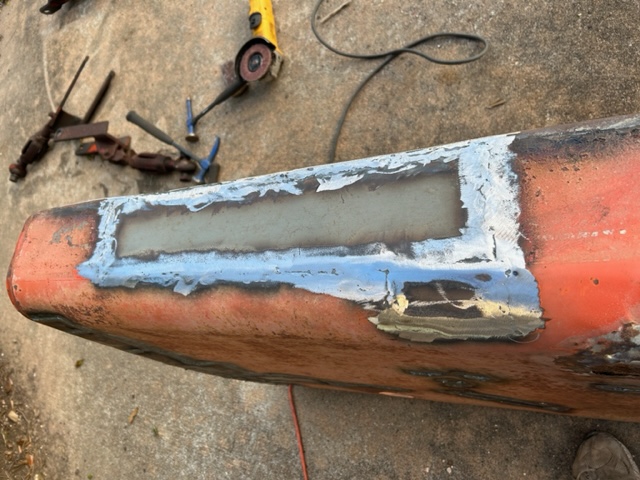 More progress on the hood this weekend. After over 35 hours into it I have pretty much all the welding done. Hit it with grinder and I am satisfied that its going to look ok when done. I had a few warps here and there but a little work with body hammer and dolly and they came out pretty good. Gave me a chance to use the hammer and dolly set that I have had for years and never used. Actually purchased it years ago with the 190 in mind. I plan to try the aluminum reinforced filler on the weld seams and low spots. More progress on the hood this weekend. After over 35 hours into it I have pretty much all the welding done. Hit it with grinder and I am satisfied that its going to look ok when done. I had a few warps here and there but a little work with body hammer and dolly and they came out pretty good. Gave me a chance to use the hammer and dolly set that I have had for years and never used. Actually purchased it years ago with the 190 in mind. I plan to try the aluminum reinforced filler on the weld seams and low spots.David  |
Posted By: DPKII
Date Posted: 13 Nov 2023 at 12:49pm
Made more progress. Pulled the side panels and plate under radiator. Pictures show badly rusted over the years. I made a new bottom plate and have begun welding up new metal in the side panel radiator mounts.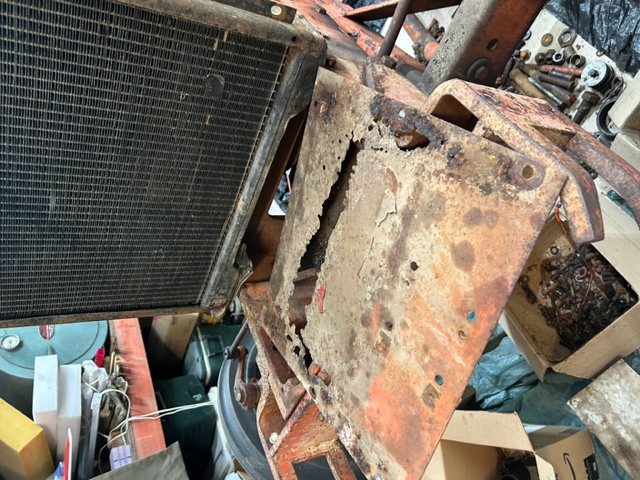 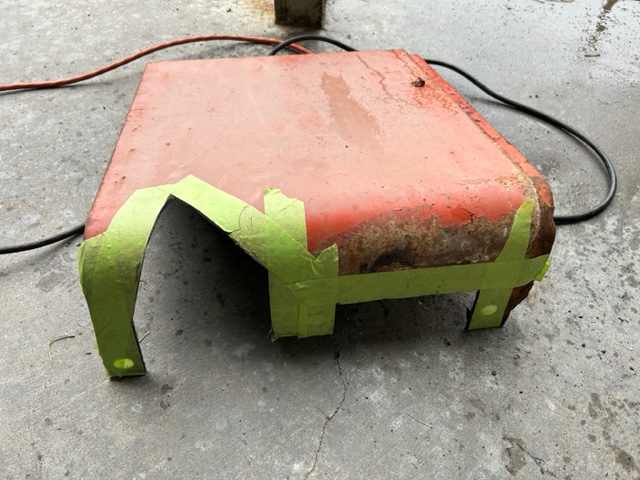 |
Posted By: AC7060IL
Date Posted: 13 Nov 2023 at 1:53pm
Thanks for sharing your work. Please keep updating.
|
Posted By: DPKII
Date Posted: 13 Nov 2023 at 2:37pm
|
AC7060, You are correct on all points. The water pump has failed multiple times over the life of the tractor. And it was run with a leaking water pump front seal more than once to finish a job. Coolant (antifreeze) is supposed to be a rush inhibitor but my guess is that the fan spraying under the hood, then drying over time and possibly softening paint accelerated the rust in those areas. The pattern of rust underneath definitely suggests that. Thanks for the compliment on the hood. My welds have improved through this process. That is about par for me. I do this type of work so infrequently that I forget most of what I learned before doing it again! David |
Posted By: DPKII
Date Posted: 01 Dec 2023 at 11:11am
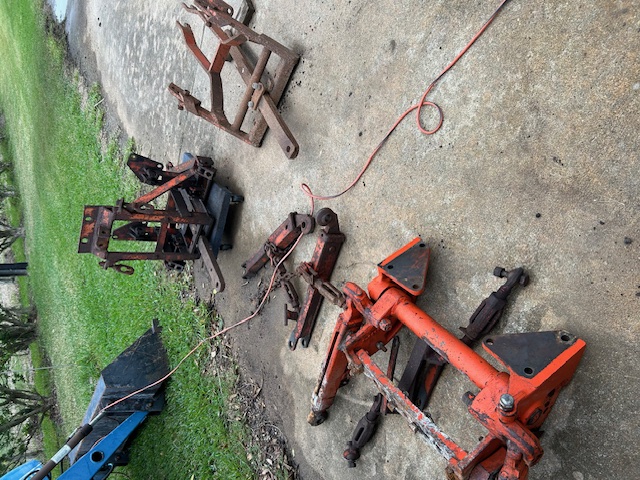 A tale of 3 hitches. I am still making progress on the 190. Most of the welding is done but I still have lots of work to do to smooth everything out. After the suggestion of salvage yards, I did some searching and found a yard with a 190XT only 2.5 hours from me. Pictures online looked awesome and the tach only shows 3559 hours. Found out it was a tractor salvaged via the TERP program. It looked very good in the pictures but unfortunately all the sheet metal, and engine was long gone. TERP requires knocking holes in the block and cutting the frames. Sad to see such a nice tractor destroyed. All that was left was torque tube back. I did get the 3 point hitch assembly, hydro valve stack, power director valve, and steering motor. My 190 has the snap coupler system and grandpa installed the 3 point adapter in the picture. The adapter was pretty wonky and not very stable. It looks like it was designed to swing with the spring on the snap coupler so the traction booster would function with it. When he was row cropping I remember grandpa having problems with too much side to side play so Dad tried welding the unit solid and adding mounting bolts up top. This didn't work all that well and only stripped out the treads and broke bolts for the top mount. More bracing was added which only broke again. Grandpa quit row cropping and did all hay and only used the drawbar from about 1980 on. I use the 190 mainly for box blading and 3 point shredder. My plan is to install the 3 point unit and hopefully still use the snap coupler drawbar. I am not sure if I will hook up the traction booster linkage to the 3 point or not. The traction booster and depth limit levers have been frozen in the full down position as long as I can remember. Also the spring block is installed on the coupler disabling the traction booster. My plan is to see what I can make work again and go from there.
|
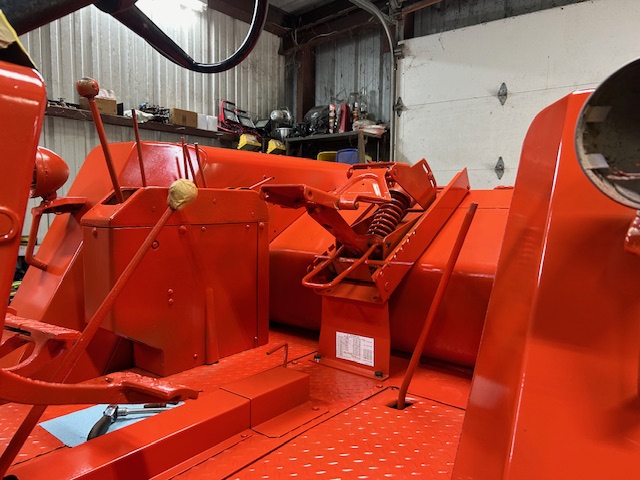
Posted By: DPKII
Date Posted: 05 Dec 2023 at 8:02am
  Got the console off the deck and disassembled. Had to cut the shaft for the traction booster and depth control into 4 pieces to get it apart. The controls were siezed on to the shaft. It took heating to cherry red and driving the shaft with a heavy hammer and punch to remove. Actually took 2 applications of heat and lots of hammering on one of the controls. But all apart now...
|
Posted By: DrAllis
Date Posted: 05 Dec 2023 at 8:13am
| "CONSOLE CONTROL" !! The first and finest grouping of tractor control levers ever designed !! especially the throttle lever location !!! |
Posted By: DPKII
Date Posted: 05 Dec 2023 at 12:21pm
|
Yes sir! I agree 100% It just feels right, and the large deck lets you move your legs and feet around. Big help on a long day. Allis Chalmers had so many new innovative ideas. David |
Posted By: DPKII
Date Posted: 12 Jan 2024 at 12:47pm
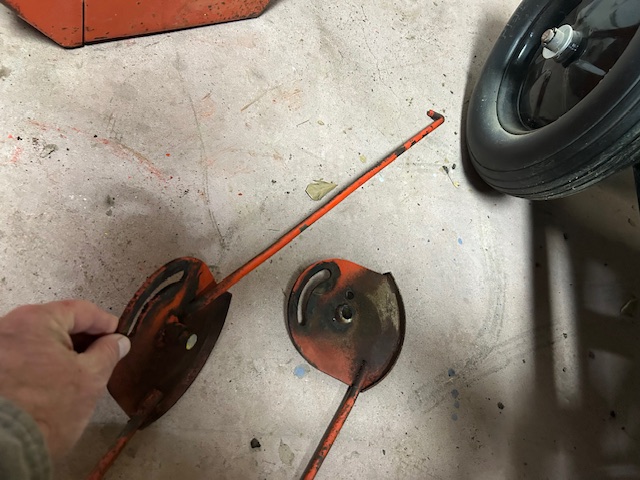
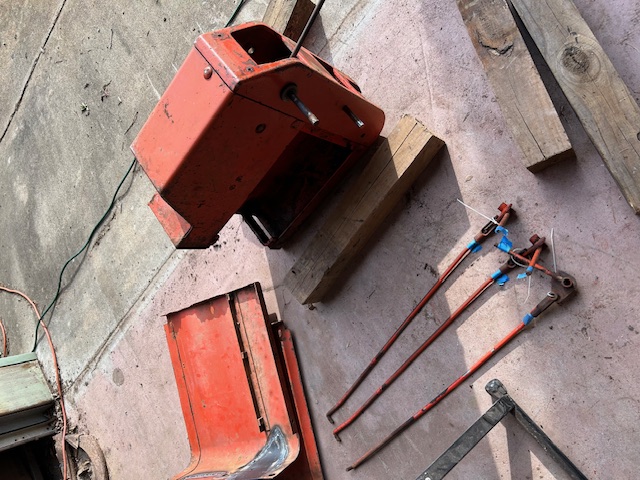
 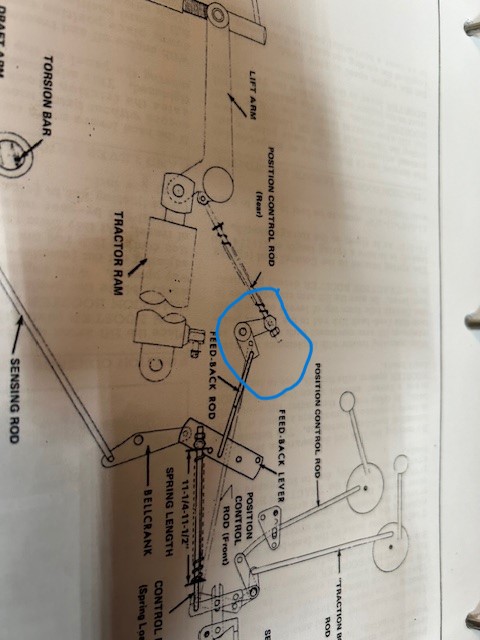 Its been a while since I have updated this but I have had some time to work on the 190. Console and valves are back on the tractor. Traction boost and position controls free and working. All control rods ends brazed to fix wear from years of use. Its been a while since I have updated this but I have had some time to work on the 190. Console and valves are back on the tractor. Traction boost and position controls free and working. All control rods ends brazed to fix wear from years of use.The last thing is the feedback control from lift arm. It was frozen and the ear of the belcrank attached to the lift arm broken free. With heat and patience I was able to free the belcrank and remove from the shaft. Had to cut about an 1/8" off the tube to clear the trans housing to remove but that was much preferable to lifting the deck. Now to repair the belcrank. I have the diagram pictured that shows it. I am wondering if the angle on the diagram is correct. If I position the 2 ears the same as diagram will I be close enough to work? I don't suppose anyone has the exact angle measurement for the 2 ears?  |
Posted By: DPKII
Date Posted: 05 Feb 2024 at 10:17am
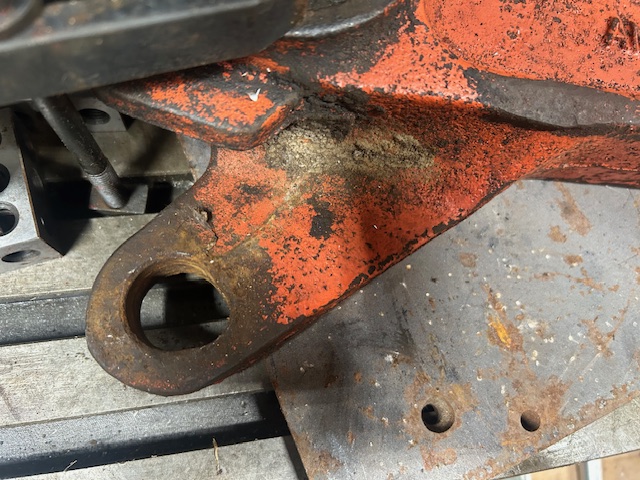 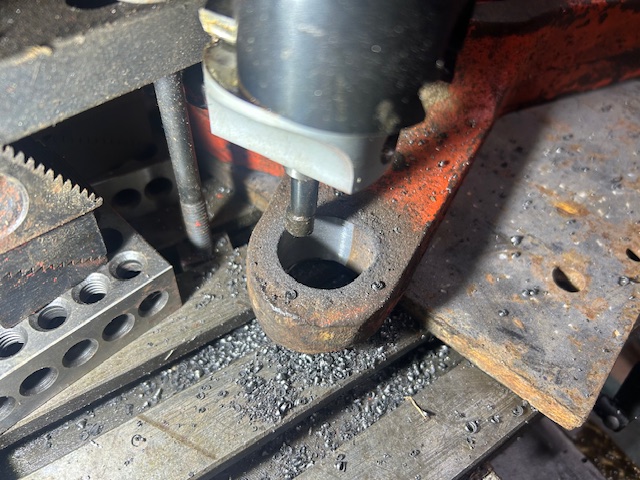   I have all the linkages for traction boost and draft control installed and working. Time to install lift cylinders and arms. Found that the bushings were worn on the 3 point style lift arms that iI got from the donar tractor. Interestingly my old snap coupler arms have almost no wear. The right arm had the bushing worn through and hole elongated. I just couldn't install it like that so spent all day boring the hole round and making new bushings. Got arms installed and they fit well.
|
Posted By: DPKII
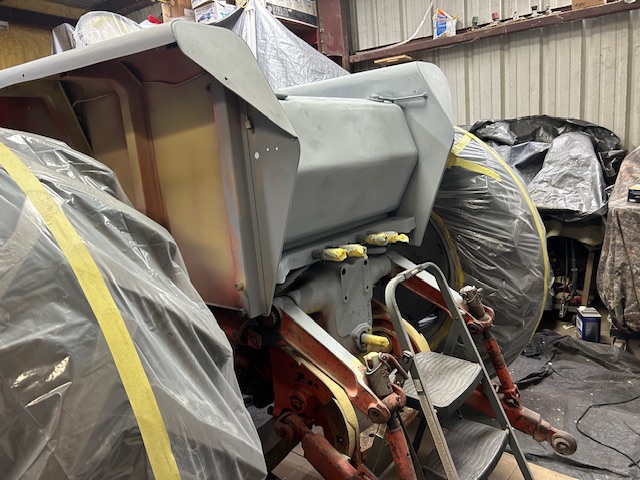
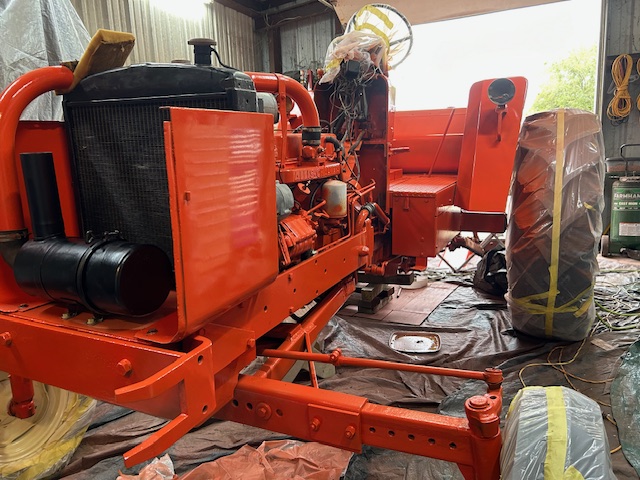
Date Posted: 07 Mar 2024 at 1:11pm
|
With the warm weather here it is time to get back to painting. Cranked the 190 and backed it out of the shop. No muffler or pipe but surprisingly not all that loud. Put the first coat of filler primer on the hood to see where I stand after sanding the welds. Actually looks ok, nothing that a little body filler will not correct.  |
Posted By: AC7060IL
Date Posted: 07 Mar 2024 at 4:37pm
|
DPKII, your 3 point arm bushings look great. I think it’s wonderful you have a metal lathe in your shop to assist such fabrications. Your 190’s hood came out really good. For what it’s worth, the AC factory hoods sometimes had in their flat top middle area, from grill to steering wheel console, 2 linear rows of spot-weld imperfections where under supports were positioned. My 190 series II has them anyway. Looking forward to seeing it all complete. Imagine you are too? |
Posted By: DPKII
Date Posted: 08 Mar 2024 at 8:58am
|
Yes, I am very much looking forward to getting the tractor completed. I consider myself blessed to have a pretty good selection of shop tools/equipment. Most if not all were purchased used over the years. The lathe came from a shop a good friend works for that they were getting rid of. Grandpa and Dad had a good selection of hand tools but never had much in the way of shop equipment other than torches and a stick welder. My wife actually bought me my first piece of shop equipment (small table top hobby drill press) for Christmas when we were fist dating. I tell her that she was the one who started it all! I know what you mean by spot welds but my hood didn't have any that showed through the top. AC must have changed their process for later builds. David
|
Posted By: DPKII
Date Posted: 18 Mar 2024 at 2:39pm
  I had last week off for spring break so I got to do quite a bit of work on the 190. First got sealer primer on it. I had last week off for spring break so I got to do quite a bit of work on the 190. First got sealer primer on it.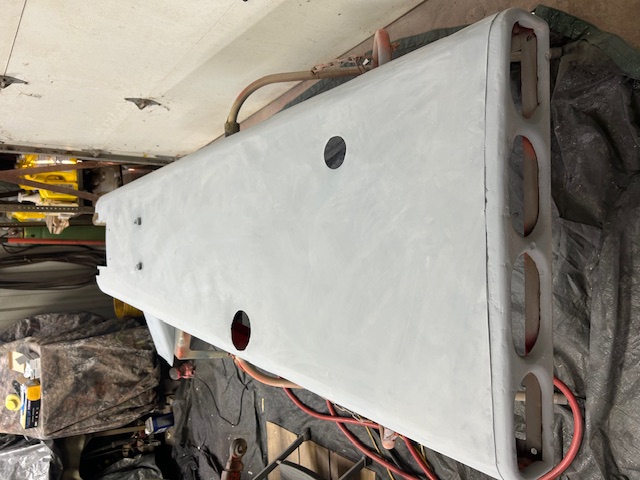 |
Posted By: Allis dave
Date Posted: 19 Mar 2024 at 10:39am
| That's going to look great. Exciting project. |
Posted By: DPKII
Date Posted: 20 Mar 2024 at 8:20am
 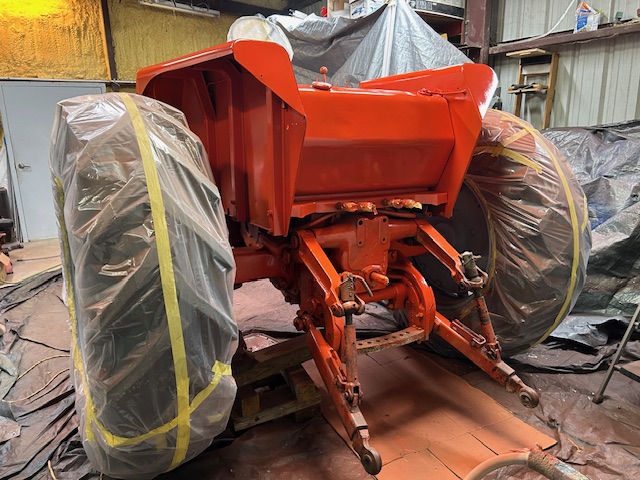   Next, and finally some Orange! I really like the Persian Orange #2. Next, and finally some Orange! I really like the Persian Orange #2.
|
Posted By: AC7060IL
Date Posted: 20 Mar 2024 at 11:06am
|
DPKII, your 190 is looking great! Thanks for sharing updates / photos. I assume you're using a paint gun? What brand of paint is your top coat? |
Posted By: DPKII
Date Posted: 20 Mar 2024 at 4:03pm
|
AC7060IL The topcoat is Dupont Imron 3.5 HG. I actually have had this paint since 2011. Had it mixed with the 190 in mind but it took until now for me to use it. The Imron was only a partial gallon as it was sold as a gallon once hardener was added. I didn't think it would still be good but it worked fine on a test panel so I am using it. I also just had a gallon of Nason (Dupont now Axalta) Fullthane (urethane similar to Imron) mixed in case I did not have enough of the Imron. My thinking was I would do a final coat with the Nason if needed but the Imron is covering very well and I think a gallon will do me. Yes, I am spraying. I am using a full size gun and a small HVLP for the engine belly, and wheels. The small gun works well as I can turn down the paint and narrow the fan and shoot the paint into tight spots with out getting runs. Makes it easier to control. I also am using disposable paint cups on both guns. They may cost a bit but I find it is so much easier to clean up the gun and since they are sealed you don't have to worry about a drip coming from the lid of the cup and ruining all the hard work. Very well worth the cost. The Imron is fairly slow to dry and stays tacky for a few hours. I tried a test painting outside but we have lots of bugs (knats) this time of year and they are always attracted to wet paint. So I am painting in the shop with tarps over everything I don't want overspray on. David |
Posted By: AC7060IL
Date Posted: 21 Mar 2024 at 6:55am
| Good quality paints. Please post a photo of the disposable paint cup. That sounds like a splendid idea. So,,, do you have your AC One-Ninety “arrow” hood decals at the ready? Here’s a prior post where Grinder220 gives a good breakdown of decals per serial numbers. https://www.allischalmers.com/forum/new-project-190xt-diesel_topic150966.html" rel="nofollow - https://www.allischalmers.com/forum/new-project-190xt-diesel_topic150966.html |
Posted By: DPKII
Date Posted: 21 Mar 2024 at 12:33pm
|
AC7060IL Here are the disposable cups that I am using. One is a 20oz and the small a 6oz. Basically you have a hard plastic outer shell that you insert the disposable liner into. The strainer lid is snapped into the inner liner and plastic outer shell and then threaded ring. You will also need an adapter for your gun like the ones shown depending on the gun/thread size. Those are the two types that fit my guns. The 3M mix ratio sheets slip in between the liner and hard plastic cup for the 20oz size and allow mixing right in the cup for smaller batches. Those are reusable unless you mess up and get paint in between the liner and shell. On that note the only critical point I have found is that it is possible to push the inner liner out of place when snapping in the strainer lid. I use my thumb nail to hold the lip of the liner in place as I work around pushing in the lid. If you mess up you will know it as soon as you turn the cup over as paint will leak around the edge. When you are done painting simply remove the inner liner and strainer together and dispose. The only cleanup is the gun itself. I have also capped the strainer top and stored paint in the shop fridge if I didn't use all I had mixed and still had more to paint the following day. It will stay good for a day or so in the fridge before hardening. You can also add this to a new batch of paint the following day. Make sure to let come to room temp before using. Since the liners are soft and collapse as you spray the system is sealed. This allows you to hold the gun at any angle without spilling paint. I love this feature.    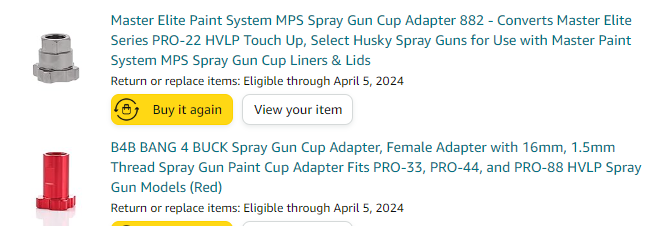 |
Posted By: DPKII
Date Posted: 21 Mar 2024 at 12:47pm
|
AC7060IL Thanks for the decal information as it was timely. I just could not resist seeing what it would look like and just got the decals for the hood and tank applied. I didn't realize that AC had earlier versions with small slanted lettering. Those probably would have been what this tractor came with but as far as I remember it had this style. Dad overhauled the engine on this tractor in the early 1980s and did a quick paint job at the time. He used paint either from TSC or maybe the AC dealer but I do remember it being a simple oil based paint with no hardener. At the time I wanted new decals too. Dad said they were really too expensive but I talked him into them. I remember getting them from the AC dealer. They came in a really small box all rolled up and cost around $250. Lots of money at that time! I think the hood decals were two piece if I remember correctly and they did have the larger straight letters. I didn't like the diesel decal (thought it was to close to the AC decal) so I removed it and replaced it a little lower centered between the AC and tank bend after I took this picture. Glad I had an extra diesel one. 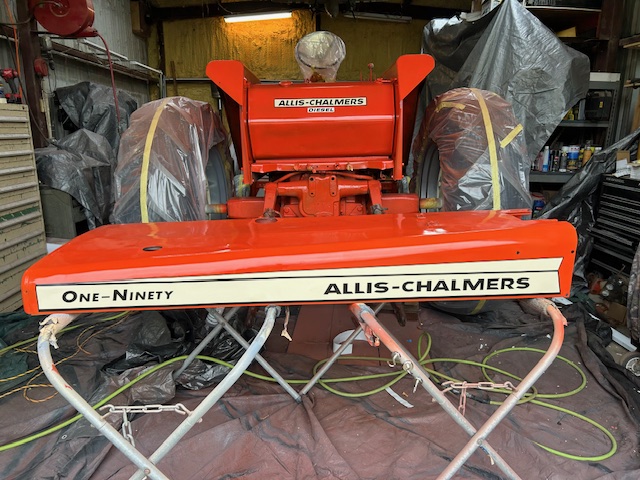 |
Posted By: Darb210
Date Posted: 21 Mar 2024 at 8:55pm
| great progress! Thanks so much for sharing! |
Posted By: AC7060IL
Date Posted: 22 Mar 2024 at 5:15am
|
Your decals make it pop! Angled or straight AC letters~never mind, I just like the “arrow” design. Takes me back to being a kid & seeing them all gussied up at our local fair & the grand Daddy Illinois State Fair. And look at the hood paint finish - very smooth! Fantastic job! |
Posted By: DPKII
Date Posted: 22 Mar 2024 at 8:18am
|
Thanks for the compliment. I am happy with the results so far. Its not perfect as would be needed for a auto or a tractor that will sit in a museum but plenty good for a tractor that will be used. The hood was lots of work but the cool thing to me is that I will be looking over the same hood that came with the tractor and that Grandpa looked over many hours back in the day. I always think of him when I am running the 190. He used to come pick me up every morning in the summer, stop for goodies at the store and then on to the hay fields where at the time I ran a rake on a D 17. I was too small to reach the pedals but I could slide down off the seat, straddle the trans to use the clutch and gear shift. Then the hand clutch/power director made it easy to drive from the seat. One summer of work bought me my first rifle, the next summer a scope. Lots of good memories! I am also a fan of the arrow hood decals and the orange and cream colors are just perfect together! David |
Posted By: DPKII
Date Posted: 25 Mar 2024 at 2:30pm
Got the hood on and the tractor out in the sunshine for the first time! |
Posted By: IBWD MIke
Date Posted: 26 Mar 2024 at 9:26am
| Nice! |
Posted By: DPKII
Date Posted: 04 Apr 2024 at 1:15pm
|
Well she is getting close to complete! I got all the sheet metal on after fighting with fitment for a day or so. Finally figured out the two side panels that hold the radiator needed to be raised 1/4". Used 1/4" rubber and then had good alignment with hood and the rest of the panels. Did the 190s come with rubber spacers on the radiator mount side panels? This one didn't have anything there but they would have rotted years ago. I can see where the hood bolts elongated the mounting holes as the hood pulled forward and slightly down at the nose over time. Got the seat assembled and on. This 190 didn't come with the super deluxe but my old pan was gone and I got the super deluxe off a salvage tractor. If Grandpa had the choice at purchase he would have ordered it with the super deluxe I am sure. Used cream and old style decal for the seat as that is what the original smaller seat was like. Ran it some and found I have a valve cover leak on injector side rear. I did change the gasket when I started this project but must have missed something. I did some research and ordered the new style mounting bolts. Maybe that will fix my issue and I wont have to pull the cover again. I just hate the thought of pulling the newly painted sheet metal to get to it!  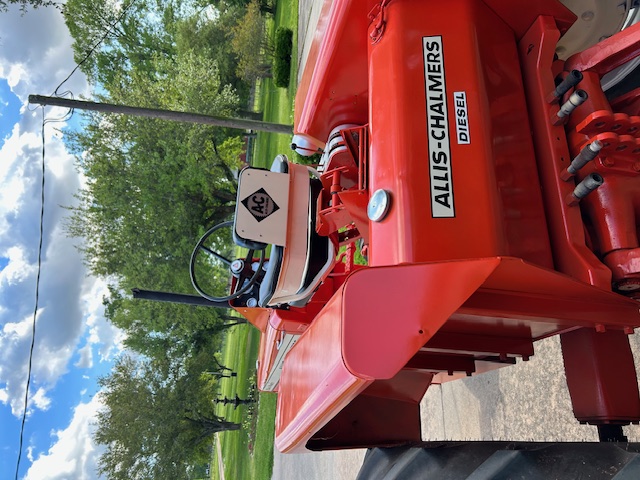  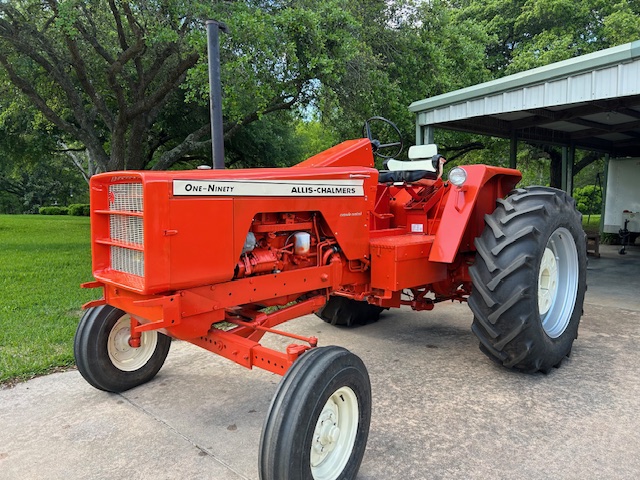  |
Posted By: plummerscarin
Date Posted: 04 Apr 2024 at 3:18pm
| Nice!!! |
Posted By: AC7060IL
Date Posted: 04 Apr 2024 at 5:32pm
| DPKII, Awesome job! That’s a great family keepsake that you get to continue to operate. Leaky valve cover? Try tightening its mounting cap screws a little at a time while engine is running. Ie.. tighten a quarter turn, wipe up leaking oil, wait & watch. Repeat as needed without crushing/distorting valve cover. |
Posted By: IBWD MIke
Date Posted: 05 Apr 2024 at 8:59am
X-2!
|
Posted By: DPKII
Date Posted: 08 Apr 2024 at 8:41am
|
I tried tightening the valve cove bolts this weekend as suggested. Helped some but still had one pretty good leak after running a while and warming up. Pulled the valve cover and did not really see anything wrong but could see where oil was seeping under the gasket on the injector side. I was able to get the valve cover off without removing the hood. Just took off the side panels, moved breather tube out of the way, and slid the fire wall partially out. The valve cover will come out the intake side towards the rear. Since I had a new gasket and new style mounting hardware I decided to replace gasket. Glued the gasket to the valve cover and while drying was wiping up the head to clean off and get ready to install the cover. Got to thinking about the breather and decided to blow through with the compressor. Breather tube was plugged solid. Prolly a mud dabber. I am sure I was basically pushing oil out and the valve cover was the weakest leak. The leaking valve cover was the catalyst that started this project as it had been leaking and getting worse for the last couple years. So long story short, put the valve cover back on. I used 3-bond between the gasket and head this time instead of RTV. Warmed the tractor up yesterday evening and the valve cover is staying dry! David |
Posted By: GeneD14
Date Posted: 08 Apr 2024 at 10:41am
|
David, Your 190 looks GREAT!
 |
Posted By: DPKII
Date Posted: 08 Apr 2024 at 1:45pm
|
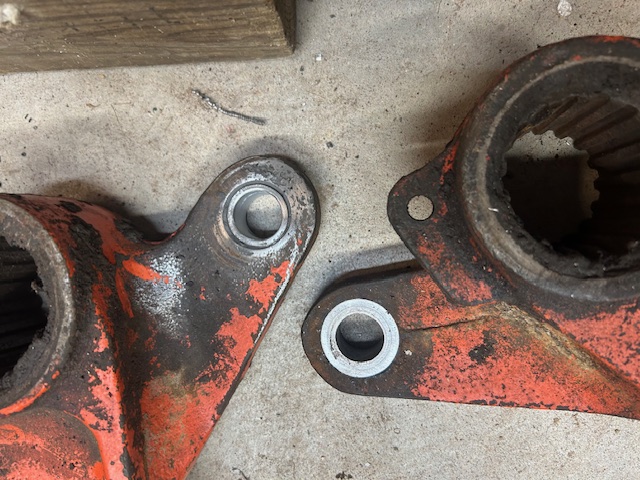
Thanks! I realized I didn't show my solution to mounting the factory 3 point with my snap coupler draw bar. As I stated earlier grandpa had mounted a 3 point adapter. It was not all that great and moved around pulling 3 point equipment and with a square baler. Dad tried modifying the adapter with more braces, welding the mounting arms solid, and adding top mounting for 2 of the bolts in the top 3 point mount. This eventually stripped the threads. It looks like Dad had re-drilled and tapped a couple of times. I made a couple treaded inserts out of bolts. One side took 3/4" and the other a 7/8". I am glad AC put plenty of meat in the housing. My drawbar is also twice as thick as original because the original snapped years ago. Dad or Grandpa welded another on top essentially doubling the thickness. Therefore a standard drawbar hanger will not work. I thought about making a drawbar hanger with a double wide slot but ended up with a simpler solution of adding another cross piece under the drawbar with a 1/2" spacer. Should have used a 5/8" as I had to add a washer to give enough clearance. One day maybe Ill make some 5/8" spacers and get rid of the washers.     |
Posted By: Allis dave
Date Posted: 08 Apr 2024 at 2:51pm
| Very nice, that's a beautiful tractor |