| Author |
 Topic Search Topic Search  Topic Options Topic Options
|
Ranse 
Orange Level


Joined: 11 Mar 2016
Location: Tennessee
Points: 782
|
 Post Options Post Options
") Thanks(0) Thanks(0)
 Quote Quote  Reply Reply
 Topic: Using bondo on a Tractor Topic: Using bondo on a Tractor
Posted: 19 Oct 2017 at 9:25am |
|
I'm certainly no body man, but I've been working on a few rough spots on the B lately. I think I've done a pretty decent job, although it's far from perfect. I can only do so much with a hammer. I don't really know how body shop people make sheet metal look new. I believe I could use a little bondo and smooth things up (probably still wouldn't be perfect). I just wondered if that's a good ideal? I believe I could live with the little imperfections better than I could bondo cracking and coming loose later on. After all, I've seen plenty of nicely restored tractors with little dents, dings, and ripples in the sheet metal. Some people say it gives them character. What's your opinion?
|
 |
|
Sponsored Links
|
|
|
HoughMade
Orange Level

Joined: 22 Sep 2017
Location: Valparaiso, IN
Points: 714
|
Post Options
Thanks(0)
Quote Reply
Posted: 19 Oct 2017 at 9:37am |
Done correctly, body filler is not in real danger of cracking and falling off. This means a properly prepared base and thin coats as it is really supposed to be used for very final finishing, not for filling in big dents.
That being said, if you are going for a good-looking tractor you are going to use and these are truly small dings, I'd go without. If I was going for perfection, I'd not fear a good filler used in layers under 1/8th inch thick on metal that was sanded with 80 grit...then mostly sanded off.
|
|
1951 B
|
|
CrestonM
Orange Level
Joined: 08 Sep 2014
Location: Oklahoma
Points: 8479
|
Post Options
Thanks(0)
Quote Reply
Posted: 19 Oct 2017 at 10:21am |
|
I saw a tractor at Hutch once that looked great on top, but look under the fender and you could tell they used a TON of bondo on the top!
|
|
TimNearFortWorth
Orange Level

Joined: 12 Dec 2009
Points: 2014
|
Post Options
Thanks(0)
Quote Reply
Posted: 19 Oct 2017 at 10:23am |
Even with the proper set of hammers/dollies, anyone will quickly appreciate what the experts can do when reshaping. I picked up a "spare" D15II grill cowling from Austin's some years ago while travelling through as my original had some pretty good damage near the top around the center contour where the logo plate is attached. I have straightened some panels over the years but hung that cowling up on the shop wall as it was more than I dared try. Finally getting things lined up to fix some leaks when front pump for 415 loader is mounted and took my original cowling to a friend's body shop as it is faded the same as the rest of the tractor and I decided it will not be painted. Pulled it out of the truck and asked him if he wanted a challenge for the day as I wanted to use it. I was truly amazed as this fella worked that metal back into shape in less than ten minutes. Perfect? No, but with a little more work including filler, he advised you would not be able to tell if I wanted it back to original if that tractor does get painted some day. He chuckled and said it was nice to work some good older metal vs. the "tin foil" he works with on newer vehicles these days. Best part is it only cost me a 12 pack of "hydraulic sandwiches".
|
|
Stan IL&TN
Orange Level

Joined: 13 Sep 2009
Location: Elvis Land
Points: 6730
|
Post Options
Thanks(0)
Quote Reply
Posted: 19 Oct 2017 at 10:27am |
Works just fine if you keep it at a skim coat. It cracks when you start using a whole gallon can on just the hood. 
|
|
1957 WD45 dad's first AC
1968 one-seventy
1956 F40 Ferguson
|
|
jaybmiller
Orange Level Access
Joined: 12 Sep 2009
Location: Greensville,Ont
Points: 25262
|
Post Options
Thanks(0)
Quote Reply
Posted: 19 Oct 2017 at 3:46pm |
|
use small strand fibreglas not 'bondo'. it'll bond better, sands as easy, stronger( this is a working tractor right ??!!).key to using any 'filler' is metal prep ! CLEAN it well BEFORE putting on the filler.Run a paper towel in alcohol over the area until NOTHING comes off THEN it's clean enough to add filler.
Done right filler will bond and be good for 20 years, done wrong, it'll pop off 2 dayze later !
Jay
|
|
3 D-14s,A-C forklift, B-112
Kubota BX23S lil' TOOT( The Other Orange Tractor)
Never burn your bridges, unless you can walk on water
|
|
Ranse
Orange Level
Joined: 11 Mar 2016
Location: Tennessee
Points: 782
|
Post Options
Thanks(0)
Quote Reply
Posted: 19 Oct 2017 at 7:09pm |
|
I wouldn't need it an 1/8th thick, just a little something between the ripples to smooth things out. I was thinking about using that bondo glazing putty that comes in a tube. I've used it to fix the fiberglass roof on the cab of one of my tractors that I busted. It worked well, but its started to crack now. This was to fill open cracks between broken pieces of plastic. It might hold up better on solid metal.
|
|
Dakota Dave
Orange Level

Joined: 12 Sep 2009
Location: ND
Points: 3974
|
Post Options
Thanks(0)
Quote Reply
Posted: 19 Oct 2017 at 7:24pm |
|
Take your torch and start heating around the outside edge of the dent work your way towards the center it should look like a cherry red spot in the middle. Use the hammer and dolly to flatten the cherry red hump int the middle this is shrinking metal. It can be done with a good propane torch but it's a lot faster with a oxy gas torch.
|
|
steve(ill)
Orange Level Access

Joined: 11 Sep 2009
Location: illinois
Points: 90834
|
Post Options
Thanks(0)
Quote Reply
Posted: 19 Oct 2017 at 7:26pm |
|
check the stuff in the TUBE... It is GLAXING PUTTY, not FILLER... You need the BASE and a HARDENER to do the job right. Mix it and you have 3-4 minutes to spread out a thin layer.. Use a BIG sander to spread the load out and get if FLAT. ...... I like to rough the metal up with a die grinder or 36 grit wheel prior to putty.. that REALLY makes it stick.
|
|
Like them all, but love the "B"s.
|
|
Stan R
Orange Level Access
Joined: 03 Dec 2009
Location: MA
Points: 999
|
Post Options
Thanks(0)
Quote Reply
Posted: 19 Oct 2017 at 7:44pm |
|
Enjoy the dents. Adds character. Don't want dents? Buy a new one and keep it garaged!
|
|
Gary Burnett
Orange Level Access

Joined: 11 Sep 2009
Location: Virginia
Points: 3200
|
Post Options
Thanks(0)
Quote Reply
Posted: 20 Oct 2017 at 3:28am |
 Stan R wrote: Stan R wrote:
Enjoy the dents. Adds character. Don't want dents? Buy a new one and keep it garaged! |
I agree I view them as Battle Scars.
|
|
drobCA
Orange Level

Joined: 20 Jun 2017
Location: Perris, CA
Points: 292
|
Post Options
Thanks(0)
Quote Reply
Posted: 20 Oct 2017 at 6:41am |
it's a variation on the age old "as used" versus "as built" restoration.
for classic cars, I'm in the "as new" camp since dings and dents are (theoretically) not normal for cars. but for tractors, I prefer "as used" including any owner-engineered adaptations (that aren't too klugey).
thus I vote for skip the imperfections and spend your saved time looking for the next project tractor.
|
|
3 Ford 8N's I loan to neighbors, but the '52CA, '41B and little B1 I do not.
|
|
Gary Burnett
Orange Level Access
Joined: 11 Sep 2009
Location: Virginia
Points: 3200
|
Post Options
Thanks(0)
Quote Reply
Posted: 20 Oct 2017 at 8:05am |
drobCA wrote:
it's a variation on the age old "as used" versus "as built" restoration.
for classic cars, I'm in the "as new" camp since dings and dents are (theoretically) not normal for cars. but for tractors, I prefer "as used" including any owner-engineered adaptations (that aren't too klugey).
thus I vote for skip the imperfections and spend your saved time looking for the next project tractor. |
Yep a WD without some beats and bangs in the back of the fenders just doesn't look normal to me(LOL)
|
|
Sugarmaker
Orange Level

Joined: 12 Jul 2013
Location: Albion PA
Points: 8661
|
Post Options
Thanks(0)
Quote Reply
Posted: 20 Oct 2017 at 7:49pm |
I try to get the metal work as straight as I can then use thin layers of filler and lots of priming and sanding. At some point I would like to try the high fill primers that will completely fill small hail damage dents and then be able to be block sanded to a flat surface. ON a WD hood. The key here was to pound out dents then build a buck to attach the hood too it. I also added a stiffener rib under the length of the hood to support the flimsy sheet metal. Then filled the low spots, sanded and refilled to get it as good as I can do. still not perfect but acceptable.  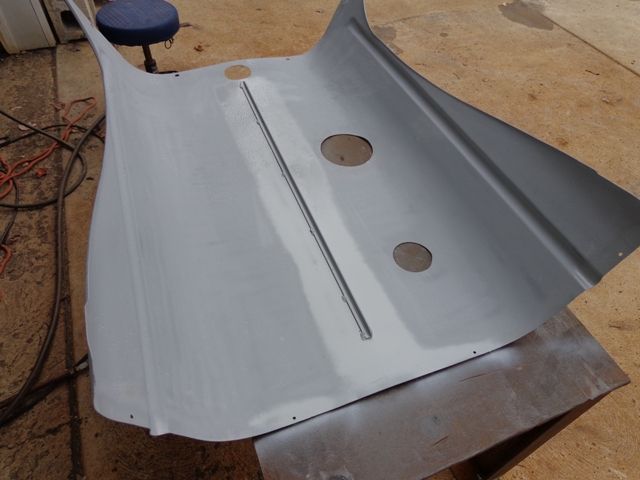 Yes the buck is a old sewing machine, repurposed; 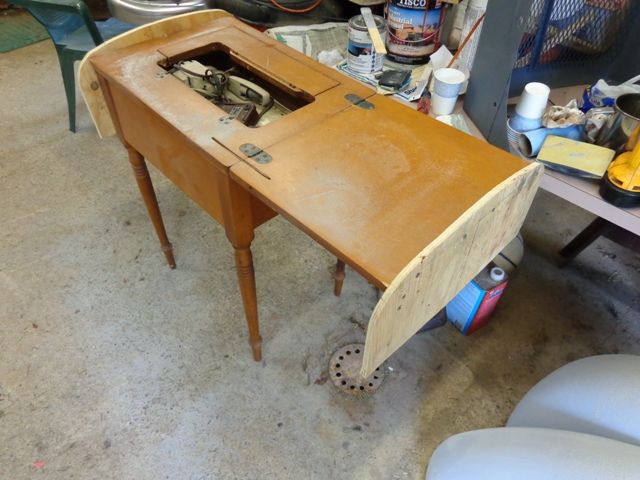  exhaust hole had to be repaired too. some primer.  some color: 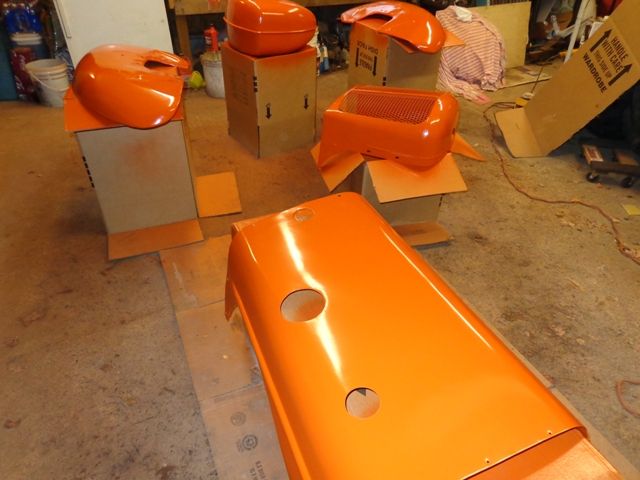 These fender I paid $6 for. they were really in bad shape. lots of dings needed pounded out and thin filler added.   Regards, Chris
|
|
D17 1958 (NFE), WD45 1954 (NFE), WD 1952 (NFE), WD 1950 (WFE), Allis F-40 forklift, Allis CA, Allis D14, Ford Jubilee, Many IH Cub Cadets, 32 Ford Dump, 65 Comet, 66 F100.
|
|
AC720Man
Orange Level

Joined: 10 Oct 2016
Location: Shenandoah, Va
Points: 5474
|
Post Options
Thanks(0)
Quote Reply
Posted: 20 Oct 2017 at 9:06pm |
Nice job Chris. I also use some filler when necessary. The hood, fenders, Side panels, and grill were beat up pretty bad on my 190XT. Really wasn’t for sure if I could save the fenders and grill. But as everyone knows that’s done a 190, those parts are really expensive used let alone new. I worked on the fenders and hood while I asked a friend of mine to work on the grill. He is a excellent body man. He worked wonders on the grill, cutting out some pieces, and adding new metal in. It turned out great. He also touched up a few places on the hood and fenders for me after looking over my work. The key is getting as much of the dent out as possible and using a thin layer of filler. As said above, cleaning the metal properly is key to good lasting job. 
|
|
1968 B-208, 1976 720 (2 of them)Danco brush hog, single bottom plow,52" snow thrower, belly mower,rear tine tiller, rear blade, front blade, 57"sickle bar,1983 917 hydro, 1968 7hp sno-bee, 1968 190XTD
|
|
JohnCO
Orange Level

Joined: 11 Sep 2009
Location: Niwot Colo
Points: 8992
|
Post Options
Thanks(0)
Quote Reply
Posted: 20 Oct 2017 at 11:36pm |
|
That's sure a nice looking 190, AC720!
I went to auto body school back in High School but that was 50 years ago. One thing I remember was to not have bondo more then 1/4 inch deep at the most, put it on in layers and grind the metal with really rough grinder, like 36 grit.
Remembered a story of a couple brothers who were taking over an excavating business from their dad. Went to sale in Southern California and bought a Cat scraper that looked really good for a very reasonable price. Got it home and took it to a job, dropped the bowl and scoped up a load of dirt, along with yellow paint and a couple gallons of bondo. Guess the floor was about as thick as car sheet metal!
|
|
"If at first you don't succeed, get a bigger hammer"
Allis Express participant
|
|
rustydollar
Orange Level
Joined: 07 Aug 2017
Location: Manitoba
Points: 456
|
Post Options
Thanks(0)
Quote Reply
Posted: 20 Oct 2017 at 11:44pm |
JohnCO wrote:
That's sure a nice looking 190, AC720!
I went to auto body school back in High School but that was 50 years ago. One thing I remember was to not have bondo more then 1/4 inch deep at the most, put it on in layers and grind the metal with really rough grinder, like 36 grit.
Remembered a story of a couple brothers who were taking over an excavating business from their dad. Went to sale in Southern California and bought a Cat scraper that looked really good for a very reasonable price. Got it home and took it to a job, dropped the bowl and scoped up a load of dirt, along with yellow paint and a couple gallons of bondo. Guess the floor was about as thick as car sheet metal!
|
Bought a made in China 14x40 metal lathe, they used loads of filler similar to bondo to fill in their imperfect bed casting.
|
|
AC720Man
Orange Level
Joined: 10 Oct 2016
Location: Shenandoah, Va
Points: 5474
|
Post Options
Thanks(0)
Quote Reply
Posted: 21 Oct 2017 at 6:14pm |
|
Thanks John, a lot of fun and hard work went into getting her to look like that. About 9 months of work on weekends and after work.
|
|
1968 B-208, 1976 720 (2 of them)Danco brush hog, single bottom plow,52" snow thrower, belly mower,rear tine tiller, rear blade, front blade, 57"sickle bar,1983 917 hydro, 1968 7hp sno-bee, 1968 190XTD
|
|
Sugarmaker
Orange Level
Joined: 12 Jul 2013
Location: Albion PA
Points: 8661
|
Post Options
Thanks(0)
Quote Reply
Posted: 21 Oct 2017 at 7:07pm |
|
Awesome looking 190. Doing body work is a challenge.
If you want to learn more check out www.Metalmeet forum.
Regards,
Chris
|
|
D17 1958 (NFE), WD45 1954 (NFE), WD 1952 (NFE), WD 1950 (WFE), Allis F-40 forklift, Allis CA, Allis D14, Ford Jubilee, Many IH Cub Cadets, 32 Ford Dump, 65 Comet, 66 F100.
|
|


