| Author |
 Topic Search Topic Search  Topic Options Topic Options
|
wjohn 
Orange Level


Joined: 19 Jan 2010
Location: KS
Points: 2256
|
 Post Options Post Options
") Thanks(0) Thanks(0)
 Quote Quote  Reply Reply
 Topic: 1951 WD Topic: 1951 WD
Posted: 21 Sep 2024 at 10:48pm |
I ordered another set of Reliance .030 rod bearings again today. I reviewed more instructions on here and in the manuals about the bearing crush, and snugged up one cap bolt and then the second just past finger tight and measured the gap with feeler gauges. That was 0.010", which if split between the 2 sides would have been 0.005" crush. The spec is 0.0015".
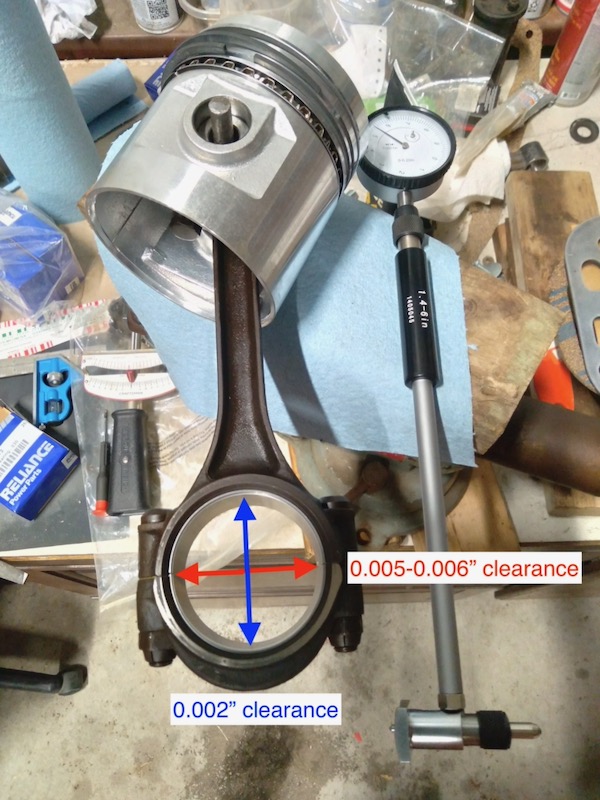
I filed down the inserts roughly equally and got down to 0.0015" crush. Measuring in the same direction as piston travel gives me 0.002" clearance to the crank, but measuring perpendicularly (near but not on the parting lines/edges of bearing inserts) gives me 0.005-0.006". Spec clearance is 0.001-0.003", so not ideal, but it's at least not in the direction of the piston travel. Thoughts?
|
|
1939 B, 1940 B, 1941 WC, 1951 WD, 1952 CA, 1956 WD-45
|
 |
|
Sponsored Links
|
|
|
wjohn
Orange Level
Joined: 19 Jan 2010
Location: KS
Points: 2256
|
Post Options
Thanks(0)
Quote Reply
Posted: 21 Jul 2024 at 3:18pm |
I stuck the crank in and plastigaged it just for a sanity check. It confirmed my dial bore indicator readings. I can't say I'm too impressed with the quality of these bearings from Reliance. I'm off to find name brand ones and hope they don't come from the same supplier Reliance used, or they're at least from a better batch.
|
|
1939 B, 1940 B, 1941 WC, 1951 WD, 1952 CA, 1956 WD-45
|
|
wjohn
Orange Level
Joined: 19 Jan 2010
Location: KS
Points: 2256
|
Post Options
Thanks(0)
Quote Reply
Posted: 19 Jul 2024 at 9:42pm |
Thanks for dropping by! I measured the mains last night and it's the same situation - .005-.006" clearance in the direction perpendicular to the mating surfaces. I may sand/file those inserts down a bit tomorrow, pull some shims, and see what happens. I will be buying a new set of rod bearings at a minimum and hopefully I can get Mahle/Clevite or another name brand.
Good luck at the pull this weekend.
|
|
1939 B, 1940 B, 1941 WC, 1951 WD, 1952 CA, 1956 WD-45
|
|
Sugarmaker
Orange Level

Joined: 12 Jul 2013
Location: Albion PA
Points: 8544
|
Post Options
Thanks(0)
Quote Reply
Posted: 17 Jul 2024 at 8:52pm |
John, You are making headway. May not seem like it but your figuring it out. I did not have to tune or rework any of my rods, so I cant help you much. Sounds like your getting some good measurements to get your next plan on the engine rebuild. I put a lot of time into that old WD45 engine to freshen it a couple years ago. Will be testing it again this weekend at our local tractor pulls. I think it will be a good test as this pull attacks a lot of good local tractors. Keep up the good work! Regards, Chris and Cheryl
|
|
D17 1958 (NFE), WD45 1954 (NFE), WD 1952 (NFE), WD 1950 (WFE), Allis F-40 forklift, Allis CA, Allis D14, Ford Jubilee, Many IH Cub Cadets, 32 Ford Dump, 65 Comet.
|
|
wjohn
Orange Level
Joined: 19 Jan 2010
Location: KS
Points: 2256
|
Post Options
Thanks(0)
Quote Reply
Posted: 16 Jul 2024 at 6:37pm |
I got one rod bearing worked down to be in spec with 2 shims in place. The second one I did is going to end up with zero shims. I'm not experienced at this and very puzzled.
I'm leaning towards ordering a set of Mahle/Clevite .030 rod bearings if I can find those, in hopes that the Reliance bearings are the issue.
I need to check the mains first in case I end up having to order another set of those too.
|
|
1939 B, 1940 B, 1941 WC, 1951 WD, 1952 CA, 1956 WD-45
|
|
wjohn
Orange Level
Joined: 19 Jan 2010
Location: KS
Points: 2256
|
Post Options
Thanks(0)
Quote Reply
Posted: 13 Jul 2024 at 6:31pm |
I dug out the parts set of rods and measured them. They're pretty close to 2.500" and nicely concentric.
The bearing bores of the rods from this WD are 2.501-2.506" 2.494-2.499", with the 2.506 2.494 being at the top/bottom of the cap/rod. I think this is the issue. EDIT: The heat got to me and I wasn't reading the dial indicator correctly... Smaller, not larger.
I would use the parts set of rods, but someone in the past appears to have pounded them out from the bottom (stuck pistons?) and dinged them up where the inserts sit. The old bearing shells I removed had burnout spots right where those dings are... Go figure. That's why it's important to have good contact between the bearing shell and the rod/cap.
I think I'll have to file the aftermarket bearing inserts down slightly since they won't close up any smaller, and maintain the proper crush. It's always an adventure. I figured I'd have the bottom end of the engine all done by now.
Edited by wjohn - 14 Jul 2024 at 12:53am
|
|
1939 B, 1940 B, 1941 WC, 1951 WD, 1952 CA, 1956 WD-45
|
|
IBWD MIke
Orange Level

Joined: 08 Apr 2012
Location: Newton Ia.
Points: 4120
|
Post Options
Thanks(0)
Quote Reply
Posted: 09 Jul 2024 at 8:05am |
|
It's nice to have a dial-bore gauge to check these things with. Of course, then you need a set of gauge blocks to set the gauge.....
|
|
CTuckerNWIL
Orange Level

Joined: 11 Sep 2009
Location: NW Illinois
Points: 22825
|
Post Options
Thanks(0)
Quote Reply
Posted: 08 Jul 2024 at 4:30pm |
|
Are the rods ROUND, when the cap is torqued up? Never mind the bearing, and check the ID of the rods at LEAST 3 different ways. You can't tell if they are round, by taking one measurement from top to bottom.
|
|
|
|
wjohn
Orange Level
Joined: 19 Jan 2010
Location: KS
Points: 2256
|
Post Options
Thanks(0)
Quote Reply
Posted: 07 Jul 2024 at 4:05pm |
 DrAllis wrote: DrAllis wrote:
In all honesty, a properly reground crankshaft and perfect quality bearings with new shim stacks should fit perfectly and be in the correct oil clearance range. |
Since the crank is dead nuts where it should be, I think either something is off with my rods/caps or the new aftermarket bearing inserts. Not sure what else I could be missing.
I do have another set of rods now that I think about it. It's probably worth cleaning those up and trying bearings in one or two to see where the ID comes out at.
|
|
1939 B, 1940 B, 1941 WC, 1951 WD, 1952 CA, 1956 WD-45
|
|
DrAllis
Orange Level Access
Joined: 12 Sep 2009
Points: 22113
|
Post Options
Thanks(0)
Quote Reply
Posted: 07 Jul 2024 at 11:15am |
|
In all honesty, a properly reground crankshaft and perfect quality bearings with new shim stacks should fit perfectly and be in the correct oil clearance range.
|
|
wjohn
Orange Level
Joined: 19 Jan 2010
Location: KS
Points: 2256
|
Post Options
Thanks(0)
Quote Reply
Posted: 07 Jul 2024 at 11:12am |
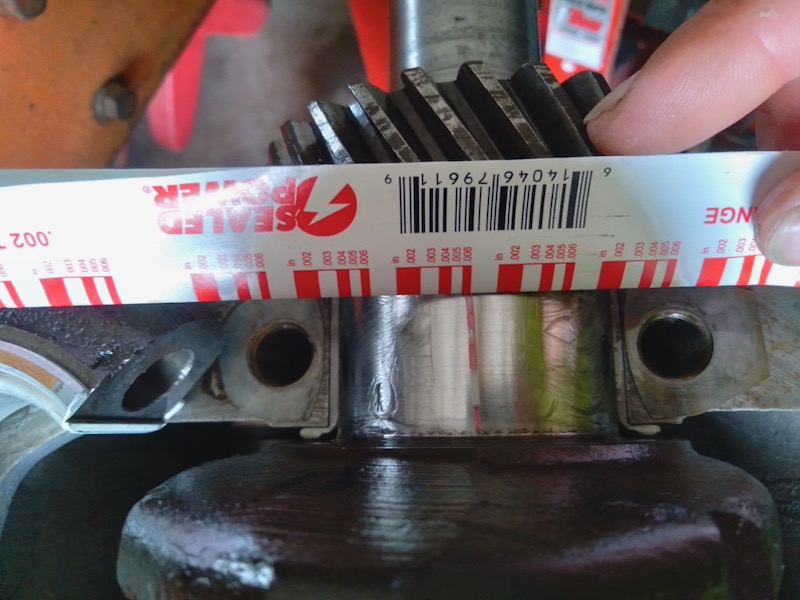
Fitting the rod bearings has been fun so far. It's my first time doing it, but the Reliance .030 rod bearings I got seem to have too much clearance on initial installation. I've checked two different rods so far.
The journals on the crank are spot for .030 undersize at on 2.3443 - 2.3447 (AC service manual says 2.374 - 2.375 for STD).
The bearings are measuring 2.3515-2.3525 with the shim packs and bolts torqued to spec. The manual says .001-.003" clearance and I have more like .006-.007". I pulled one thin shim and it tightened things up just a tad but not much, so it looks like I will have to file down the edges of the bearing inserts slightly.
Anything I could be missing before I start removing material? The bores of the caps and backs of the inserts are clean. I'm suspecting the new bearing inserts are just a little tall/large.
|
|
1939 B, 1940 B, 1941 WC, 1951 WD, 1952 CA, 1956 WD-45
|
|
wjohn
Orange Level
Joined: 19 Jan 2010
Location: KS
Points: 2256
|
Post Options
Thanks(0)
Quote Reply
Posted: 08 Jun 2024 at 11:11pm |
Mike, if/when I get the time to clean it up, I'll do a separate thread for it. I may be missing something but it sure seems like it should be handy for the counterbores. Then I also got to wondering if I could cut out where the liner o-rings seal, and buy sleeves already made from somewhere. Then I'd have my original block fixed back up. I need to do some research first to see how that sleeving process works. I know guys over on the red forum have that done now and then.
I got the block back from the machine shop about a month earlier than they had told me to expect, so that was a nice surprise. I need to double check the liner protrusion and then clean it up again, and finally start assembly.
|
|
1939 B, 1940 B, 1941 WC, 1951 WD, 1952 CA, 1956 WD-45
|
|
IBWD MIke
Orange Level
Joined: 08 Apr 2012
Location: Newton Ia.
Points: 4120
|
Post Options
Thanks(0)
Quote Reply
Posted: 04 Jun 2024 at 7:48am |
|
wjohn, keep us updated on how this goes for you. Looks like a fun toy to have in the shop.
|
|
wjohn
Orange Level
Joined: 19 Jan 2010
Location: KS
Points: 2256
|
Post Options
Thanks(0)
Quote Reply
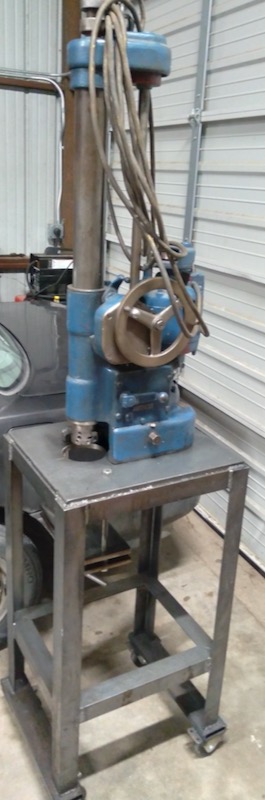
Posted: 03 Jun 2024 at 11:15pm |
I couldn't find a shop that would do the counterbores for less than $500, so I picked one and dropped the block (and liners - thanks SteveM) off the other day with the .002-.004" protrusion spec from the AC service manual. The dollars sure are adding up.
Then I ran across this for sale for not much over $500:
It's a dinosaur of a Kwik-Way boring bar, but I'm hoping that for under $1000 invested I can get it cleaned up a little and get the right cutter tips to do counterbores. That would pay back after doing 2 blocks. I can't deck blocks in my shop so I will still have to farm that out, but that's not too expensive. After that gets done, if needed it would be great to cut the counterbores myself. Plus I have a number of small engines to do and none of the shops seem too interested in messing with those.
We'll see how many years it takes me to actually get this thing all set up, ha.
|
|
1939 B, 1940 B, 1941 WC, 1951 WD, 1952 CA, 1956 WD-45
|
|
SteveM C/IL
Orange Level Access
Joined: 12 Sep 2009
Location: Shelbyville IL
Points: 8667
|
Post Options
Thanks(0)
Quote Reply
Posted: 02 May 2024 at 10:01pm |
|
I would take liners and sleeves to machine shop and have counterbores set where they belong.
|
|
wjohn
Orange Level
Joined: 19 Jan 2010
Location: KS
Points: 2256
|
Post Options
Thanks(0)
Quote Reply
Posted: 02 May 2024 at 7:40pm |
Good to see you checking in Chris! I know you have been busy. Yes, the machine shop decked the block, and we discussed the counterbores at the time. They were not extremely familiar with wet sleeve engines but are a very competent race shop in our area. I decided I would machine the sleeves down after the fact instead, but maybe in hindsight I should've given them the sleeves so they could've checked and counterbored at that time.
I am off to go scrape those counterbores some more and figure out how much I need to take off the top of each liner. If I can't figure out a good way with my tools then I am sure they will do them for a reasonable amount since I had them do my block work.
Thanks, and go get at that CA! |
|
1939 B, 1940 B, 1941 WC, 1951 WD, 1952 CA, 1956 WD-45
|
|
Sugarmaker
Orange Level
Joined: 12 Jul 2013
Location: Albion PA
Points: 8544
|
Post Options
Thanks(0)
Quote Reply
Posted: 02 May 2024 at 2:30am |
John, Sounds to me like your making good progress! Scraping the seats for the liners, Yes I remember doing that on the WD45 block. Don Bradley was coaching me over the phone on that build. He kept telling me that I needed to scrape the seat more, and he was correct. I kept getting material from that area. I think I ended up at .004. My block may not have been machined. I would think the machine shop would have bored the seats .005 deeper? Maybe this thread will get me motivated to work on my CA puller? Thanks! Regards, Chris and Cheryl
|
|
D17 1958 (NFE), WD45 1954 (NFE), WD 1952 (NFE), WD 1950 (WFE), Allis F-40 forklift, Allis CA, Allis D14, Ford Jubilee, Many IH Cub Cadets, 32 Ford Dump, 65 Comet.
|
|
wjohn
Orange Level
Joined: 19 Jan 2010
Location: KS
Points: 2256
|
Post Options
Thanks(0)
Quote Reply
Posted: 01 May 2024 at 11:17pm |
I found a picture of a NOS regulating arm for the hydraulic pump linkage online, so between that and the part book illustration I'll take a stab and hopefully the alignment will be close enough.
I've been working on the block. It's all washed out (again) and I've put some of the small fittings etc. in, and dropped the first liner in tonight. Protrusion came out to ~.010". The machine shop said they took .005" off when they decked the block, and spec is .002-.004" so I figured I may have to take a little off the tops of the liners. However I may need to keep on scraping the seats in the block based on looking back at some of the posts on here.
The AC manual says to use a file to take material off the top of the sleeves. I'm hoping I can come up with something better than that.
|
|
1939 B, 1940 B, 1941 WC, 1951 WD, 1952 CA, 1956 WD-45
|
|
wjohn
Orange Level
Joined: 19 Jan 2010
Location: KS
Points: 2256
|
Post Options
Thanks(0)
Quote Reply
Posted: 22 Apr 2024 at 5:06pm |
Mikez that sure is an unloading valve! Neat to see that there's at least one NOS one still around. I am hoping mine is fine but I put in a new ball to be as sure as I can. There's no visible damage, at least.
70224506 would be the PN of the regulating shaft assembly, in case you have one loose and can show how the hole in the shaft is oriented relative to the plate it is pressed into. Otherwise I might be SWAGing it based off of what I can see in the parts book diagram... which is not very scientific.
|
|
1939 B, 1940 B, 1941 WC, 1951 WD, 1952 CA, 1956 WD-45
|
|
SteveM C/IL
Orange Level Access
Joined: 12 Sep 2009
Location: Shelbyville IL
Points: 8667
|
Post Options
Thanks(0)
Quote Reply
Posted: 22 Apr 2024 at 7:39am |
|
That's it!!
|
|
Mikez
Orange Level Access

Joined: 16 Jan 2013
Location: Usa
Points: 8740
|
Post Options
Thanks(0)
Quote Reply
Posted: 22 Apr 2024 at 7:34am |
Is this what your looking for
|
|
IBWD MIke
Orange Level
Joined: 08 Apr 2012
Location: Newton Ia.
Points: 4120
|
Post Options
Thanks(0)
Quote Reply
Posted: 22 Apr 2024 at 5:47am |
|
Sorry, don't have one loose. Hopefully someone else will.
|
|
wjohn
Orange Level
Joined: 19 Jan 2010
Location: KS
Points: 2256
|
Post Options
Thanks(0)
Quote Reply
Posted: 21 Apr 2024 at 1:34pm |
Right! It continues...
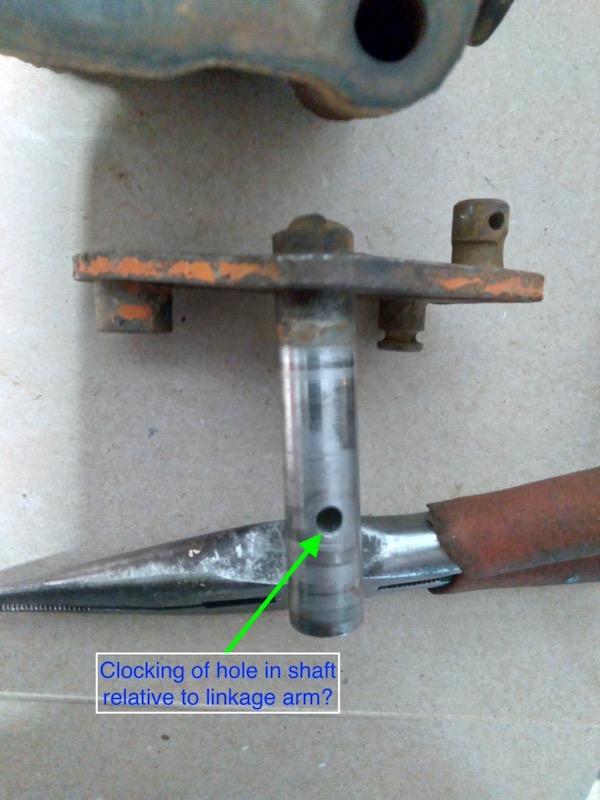
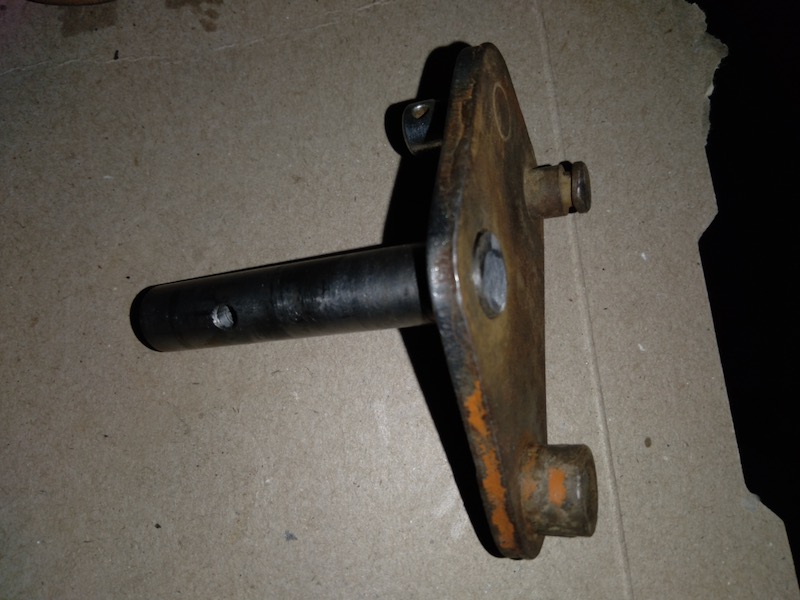
I am hoping someone can help me with this linkage from the drawbar - anybody have one loose laying around their shop that can take a measurement of where the hole for the crosspin should be located?
The shaft came loose from the external arm at some point in the tractor's life and they (poorly) welded it back on, and the welds broke. I have the shaft out, cleaned up, and ready to weld back in but I don't want to mess up the hole orientation. The way the crosspin holds the internal linkage to the shaft seems like it would be important. The first pic shows how it was when I removed it, and I suspect that is not correct.
EDIT: Second pic shows the shaft backwards. Luckily it is not welded yet, ha.
Edited by wjohn - 21 Apr 2024 at 1:35pm
|
|
1939 B, 1940 B, 1941 WC, 1951 WD, 1952 CA, 1956 WD-45
|
|
IBWD MIke
Orange Level
Joined: 08 Apr 2012
Location: Newton Ia.
Points: 4120
|
Post Options
Thanks(0)
Quote Reply
Posted: 21 Apr 2024 at 6:21am |
|
You know what they say, necessity is the mother of invention!
|
|
wjohn
Orange Level
Joined: 19 Jan 2010
Location: KS
Points: 2256
|
Post Options
Thanks(0)
Quote Reply
Posted: 20 Apr 2024 at 10:41pm |
I'm crashing onwards with the pump. Everything is cleaned up and I picked up most of the parts I needed. Just waiting on a few that my dealer didn't have in stock.
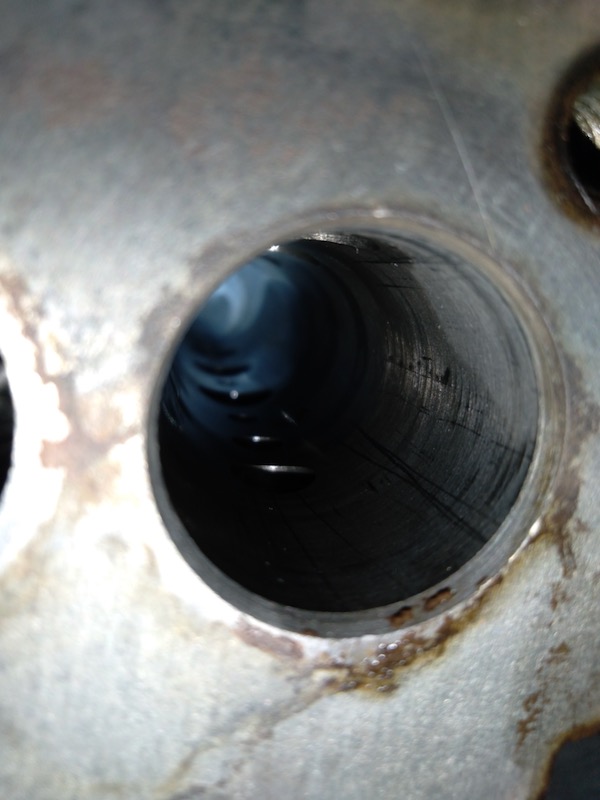
I ended up doing some light filing plus Scotch-brite work to clean up the worst scores in the bore, and some damage to the rearmost control valve sleeve. I noticed two small mangled pieces of metal in the parts washer today that probably caused the damage. I'm not sure where they were hiding at, but that's why it's always good to thoroughly clean everything, right? Files in control valve bores like this is a huge no-no but I figured I didn't have anything to lose on this pump. We'll see if it works out.
There were 7 shims on the unloading valve. I decided to leave all of them in. I need to get a 5000 psi gauge so I can check pressure once I have the tractor back together.
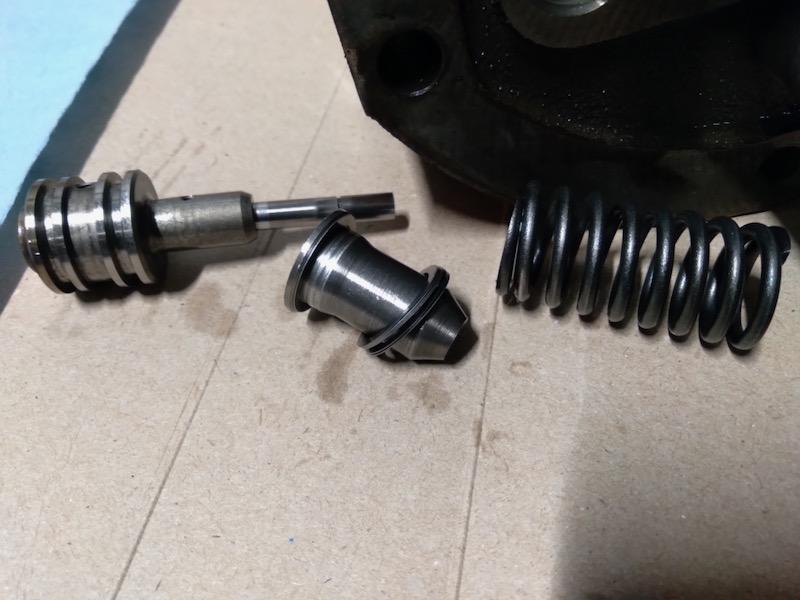
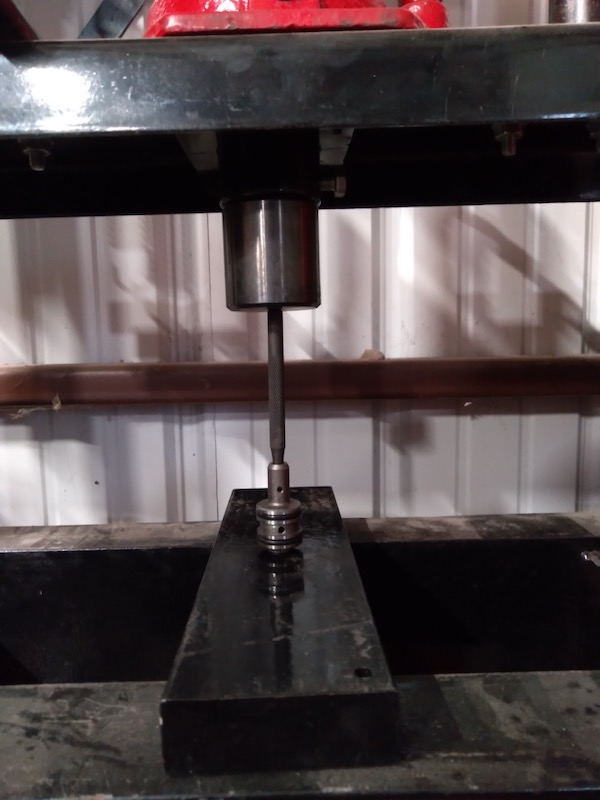
The AC service manual says you should replace the unloading valve as an assembly. However they are no longer available in 2024. They also provide a procedure "for emergencies" for reusing an old unloading valve with a new ball. You are supposed to press the ball into the seat with 5000 pounds of force and then clean up any deformation in the hole afterwards. I pressed gently with a 20 ton hydraulic press - maybe I only actually got 1 or 2000 lbs. of force on it, but I didn't want to overdo it since I don't have a pressure gauge on my press.
|
|
1939 B, 1940 B, 1941 WC, 1951 WD, 1952 CA, 1956 WD-45
|
|
wjohn
Orange Level
Joined: 19 Jan 2010
Location: KS
Points: 2256
|
Post Options
Thanks(0)
Quote Reply
Posted: 15 Apr 2024 at 11:25pm |
Over a year later  I did switch focus and get an IH Super M going in the meantime, and it has become my main tractor. I have to get these ACs operational and earning their keep.
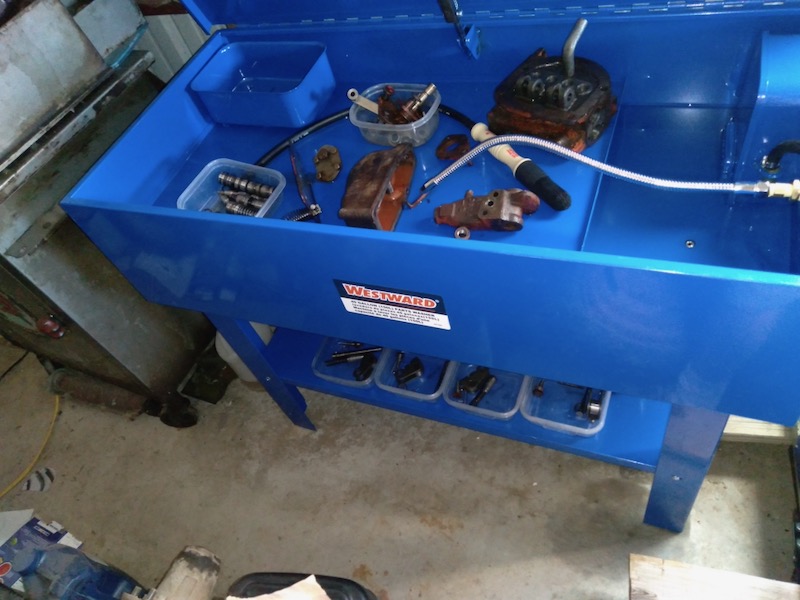
I got a parts washer and I hate to think how many days of cleaning up parts over my life I could have saved. The WD's hydraulic pump has been the first big cleanup job in it.
Overall the pump was in far better shape than I expected - not much moisture had been sitting in it. However, I did find some scoring in one of the bores of the pump body. I can catch my fingernail on one of them. I will do my best to polish this out with Scotch-Brite or similar, unless I'm wasting my time?
|
|
1939 B, 1940 B, 1941 WC, 1951 WD, 1952 CA, 1956 WD-45
|
|
wjohn
Orange Level
Joined: 19 Jan 2010
Location: KS
Points: 2256
|
Post Options
Thanks(0)
Quote Reply
Posted: 12 Feb 2023 at 9:05pm |
Thanks to all for the block advice. I picked up another block from a forum member before Christmas. Just got it back from the machine shop where it was dry stripped/blasted, decked, and cleaned. They said they had to take 0.005" off, so I'm anticipating I'll have to take a little off the tops of new the sleeves in order to have the right protrusion above the deck.
They did point out some tiny cracks around one of the 3/8" stud holes for the cylinder head. It looks like there's still a broken off piece of stud way down in the bottom of it so I'll carefully set this up in the drill press and take care of that. The shop wasn't concerned about the cracks and I'm not really either, but I may get a pic of it later this week. No cracks in between the cylinders anywhere.
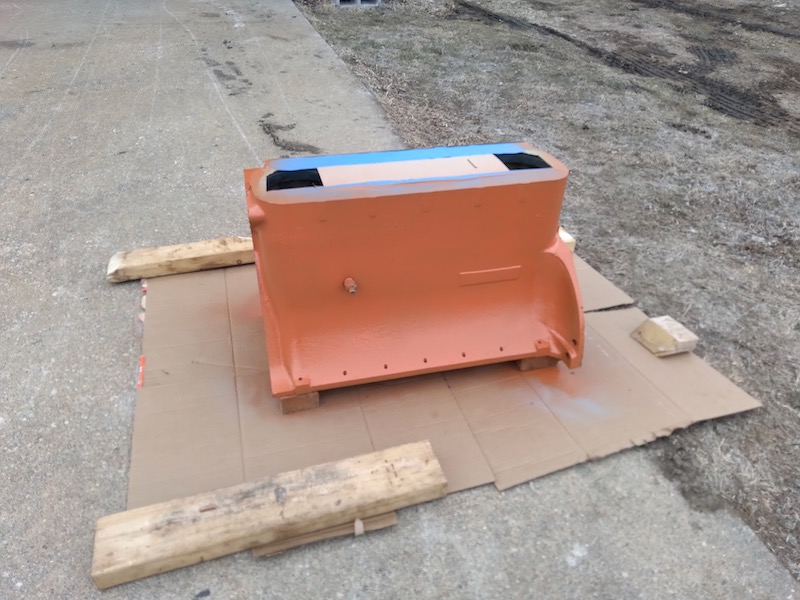
I was not planning on putting any new paint on this tractor but since I had the block stripped, I had to put something on to keep it from rusting. Cans of PO #1 are almost $20 each from AGCO now.
|
|
1939 B, 1940 B, 1941 WC, 1951 WD, 1952 CA, 1956 WD-45
|
|
SteveM C/IL
Orange Level Access
Joined: 12 Sep 2009
Location: Shelbyville IL
Points: 8667
|
Post Options
Thanks(0)
Quote Reply
Posted: 04 Oct 2022 at 10:36am |
|
Sleeving the bores would beat any metal build up process. Not cost effective. Get another block.
|
|
Sugarmaker
Orange Level
Joined: 12 Jul 2013
Location: Albion PA
Points: 8544
|
Post Options
Thanks(0)
Quote Reply
Posted: 04 Oct 2022 at 7:29am |
John, Just another long shot. very long shot! What about spray weld, or spray metal? Yes would then have to be rebored. The shop I have do do engine work has the capibility. But would not be close by. Regards, Chris
|
|
D17 1958 (NFE), WD45 1954 (NFE), WD 1952 (NFE), WD 1950 (WFE), Allis F-40 forklift, Allis CA, Allis D14, Ford Jubilee, Many IH Cub Cadets, 32 Ford Dump, 65 Comet.
|
|
IBWD MIke
Orange Level
Joined: 08 Apr 2012
Location: Newton Ia.
Points: 4120
|
Post Options
Thanks(0)
Quote Reply
Posted: 01 Oct 2022 at 7:01am |
|
wjohn, I think a good used block is in order. If you were to repair that one, Belzona would probably outlast the rest of the tractor. Problem is, you would need to apply it then re-bore the cylinders.
|
|