| Author |
|
BrettPhillips 
Orange Level


Joined: 11 Sep 2009
Location: Strasburg, VA
Points: 808
|
 Post Options Post Options
") Thanks(0) Thanks(0)
 Quote Quote  Reply Reply
 Topic: Snow Plow on a B, PICTURES! Topic: Snow Plow on a B, PICTURES!
Posted: 14 Dec 2010 at 9:58pm |
Two recent threads have been about mounting snow plows on B tractors, and I had promised to get some pictures of my recently rebuilt setup. The fellow I bought this plow from said that he thought it was made by Allis-Chalmers, but I rather doubt it. The mounts look a lot like pictures from Meyer catalogs and the drawings on Rod Thompson's website, but the plow trip spring setup doesn't look like a Meyer, so maybe it is someone else's product. At any rate, I'm pretty sure it was a factory built unit. You'll have to excuse the tractor, one of its' previous owners thought that it would look better in gray... 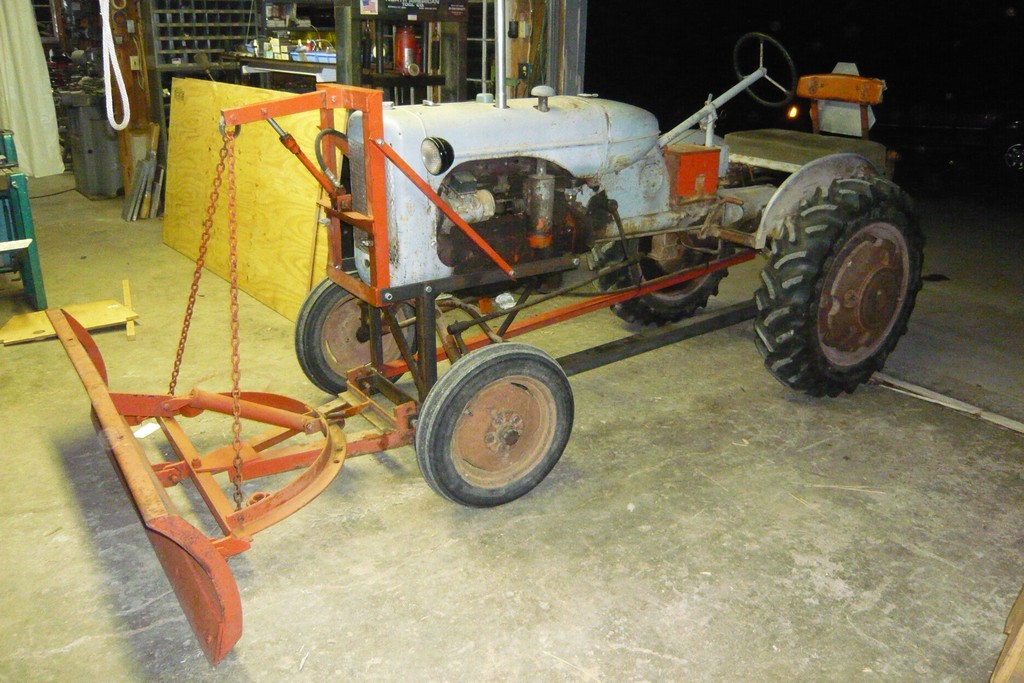
When I got the plow, most of the actual mounts were in poor condition. It had obviously seen a lot of use and abuse in upstate New York where it came from. I ended up building new bars to mount along the engine block, a new "yoke" that mounts below the grill, and I made one new angle to go between the "yoke" and the drawbar.
I changed the engine side bars some from the original design. It was more like what Rod Thompson shows on his site, but I was concerned that it was not rigid enough to protect the grill if the yoke was inadvertently run up on a rock or a stump. Rather than have the side bars merely perched on top of the front engine mount, I welded tabs to the side bars with holes that allow them to be bolted to the engine mount using the same holes that are used for the front of the side weights. 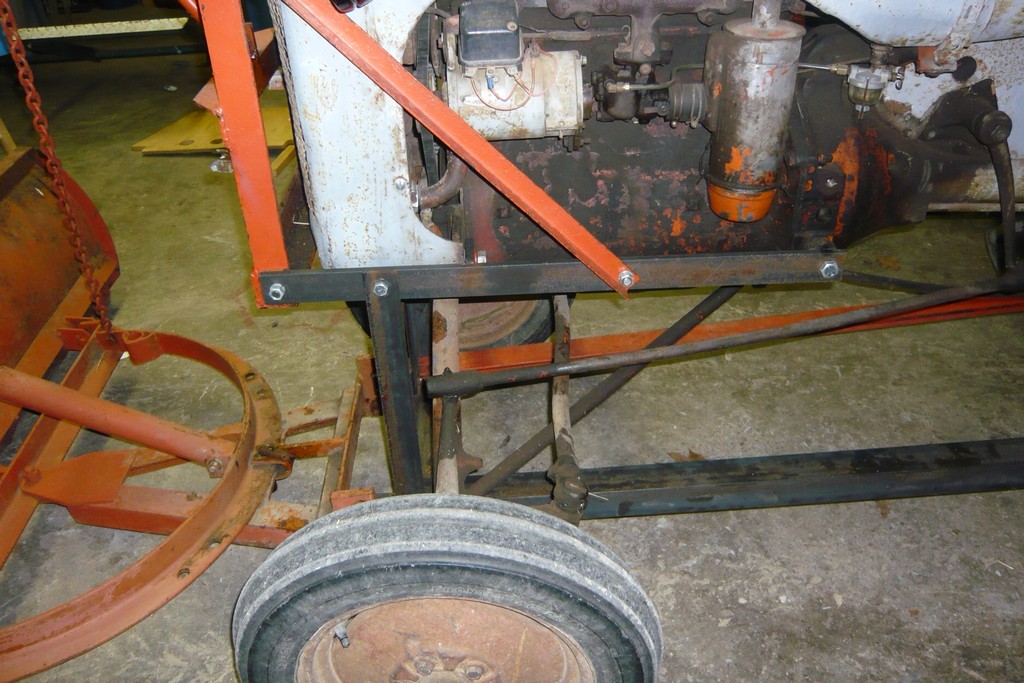
A front view of the "Yoke". I'm not really sure what the original yoke looked like, or how it was mounted. The original had been badly hacked up, and was bent to the point that it would barely work. Hopefully my replacement will do the job. I really need to get some real pins to mount the plow, the bolts with cotter pins are left over from the previous owner: 
Here's a view from the rear, I left the rockshaft cylinder in place and plugged its' hose with a plastic Caplug: 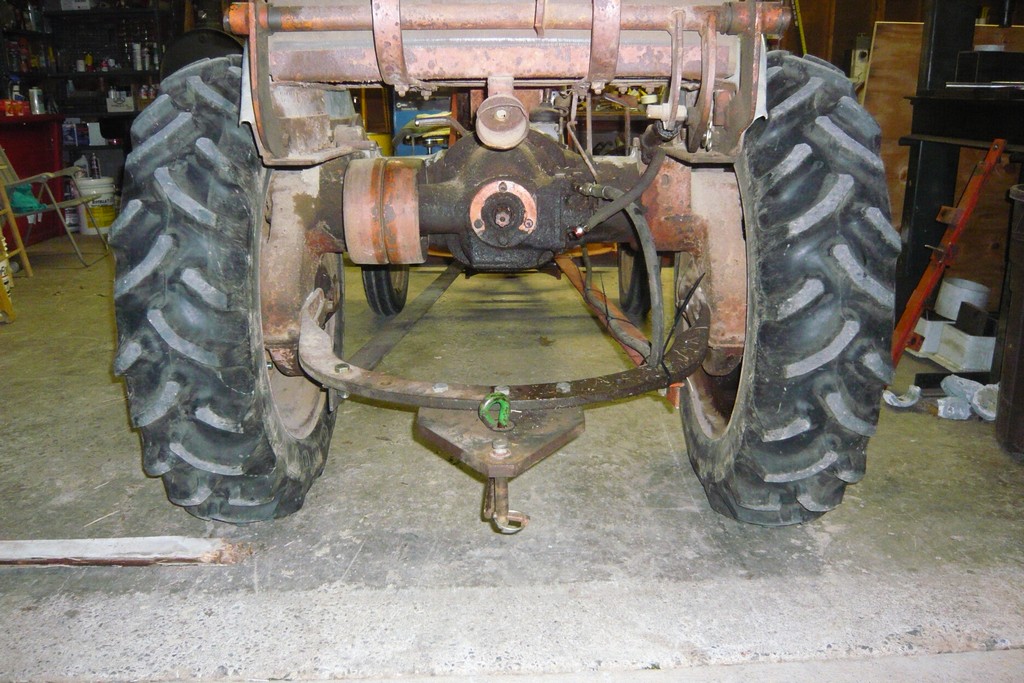
Lift height is not great at 12", but it could be a lot worse. Unfortunately, it does get worse when the blade is angled (~9"). 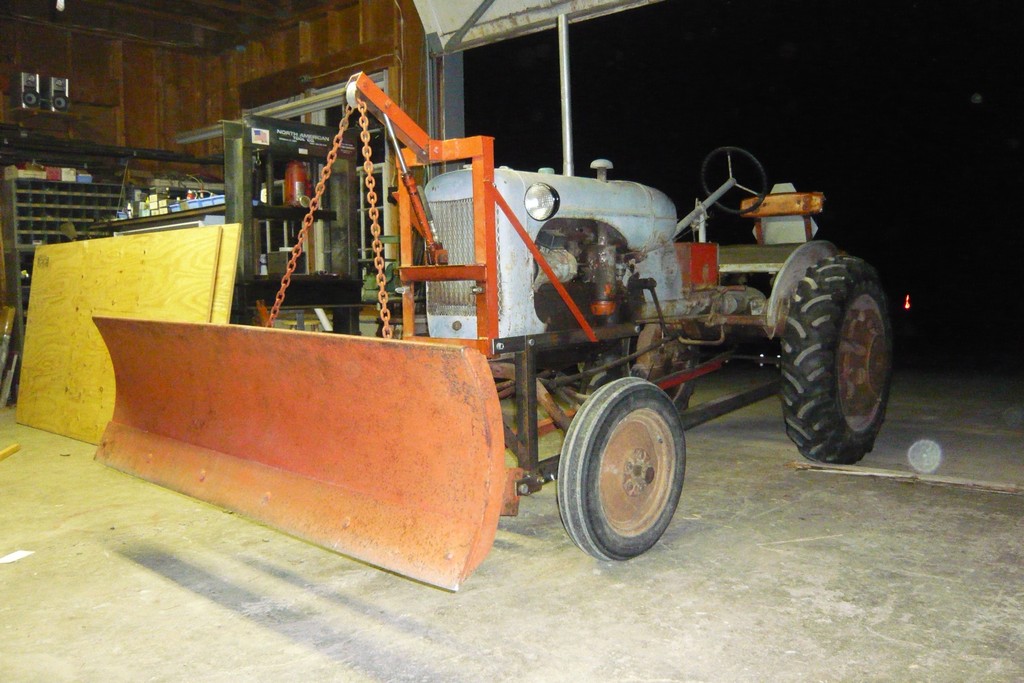
|
 |
|
Sponsored Links
|
|
|
Chuck(ONT)
Orange Level

Joined: 11 Sep 2009
Location: Ontario
Points: 1055
|
Post Options
Thanks(0)
Quote Reply
Posted: 15 Dec 2010 at 6:41am |
|
Thanks for the pictures, looks like a project for next summer. What size angle did you use for the yoke?
|
|
Never take life too seriously.
Nobody gets out alive anyway!
1C 1 WD45 1 AC180
|
|
JohnThomas
Orange Level

Joined: 14 Sep 2009
Location: Traverse City
Points: 332
|
Post Options
Thanks(0)
Quote Reply
Posted: 15 Dec 2010 at 6:58am |
|
Looks workable Brett but I'd like to offer one suggestion...I would put a brace/tie between the two angle irons running to the hitch to help spread any sudden loads to both members. That's a long span there as it is. . Only other problem you may have is riding up onto the plow with a sudden hit. The blade does not have a trip mechanism like a Meyers plow blade would so you'll need to watch for this. I'd also run a bolt thru the chain up at the eye to keep the blade from sagging on one side or the other.
Good Luck..& have fun!
|
|
Life is short...Make haste to be kind
|
|
BrettPhillips
Orange Level
Joined: 11 Sep 2009
Location: Strasburg, VA
Points: 808
|
Post Options
Thanks(0)
Quote Reply
Posted: 15 Dec 2010 at 10:32am |
Chuck: I believe the vertical members are 2 X 2 X 5/16, and the horizontal member is 3 X 3 X 1/2 angle. The mounting tabs and the diagonal brace are 1/2 x 2 flat bar. John: I agree that it's a long span, but the Meyer blades used something very similar (of course their span looks to have been a little more than a foot shorter). Here's a picture that forum member "AC WD45" posted a couple of days ago: Regarding the spring trip function, my plow does have a spring trip, but instead of being a pair of extension springs, it is a compression spring that is enclosed in the tube at the center of the blade. Your point about using a bolt to keep one side of the blade from sagging is well taken. Anything to improve the transport clearance will be helpful! Thanks!
|
|
morton(pa)
Orange Level

Joined: 11 Sep 2009
Location: Lancaster, PA
Points: 1234
|
Post Options
Thanks(0)
Quote Reply
Posted: 15 Dec 2010 at 10:38am |
|
FINALLY someone has pictures! Brett, thank you so much!!!!!! It's always easier to LOOK at something then to try to picture it in your head. I think it makes for a better end result too. Thanks a lot.
|
|
Russ-MI
Bronze Level

Joined: 13 Sep 2009
Location: Corunna, MI
Points: 12
|
Post Options
Thanks(0)
Quote Reply
Posted: 15 Dec 2010 at 2:31pm |
|
Thanks that is what i was looking for also. Looks like it's all bolted together. Thats good cause i don't know how to weld.
|
|
AC WD45
Orange Level

Joined: 28 Sep 2009
Location: Mid Michigan
Points: 2078
|
Post Options
Thanks(0)
Quote Reply
Posted: 15 Dec 2010 at 6:43pm |
|
Welding isn't as hard as you'd expect, I'm 16 and I taught my self. It's an acquired skill though, not something you'll learn overnight.
|
|
German Shepherd dad
1957 Allis Chalmers WD45
#WD234847
1951 Allis Chalmers WD
#WD88193
|
|
CTuckerNWIL
Orange Level

Joined: 11 Sep 2009
Location: NW Illinois
Points: 22825
|
Post Options
Thanks(0)
Quote Reply
Posted: 15 Dec 2010 at 7:07pm |
|
Brett, If you have plenty of lift force, you could relocate the top cylinder connection toward the pivot point for more travel. You might experiment with it but when done you might have to reinforce the top channel. Nice looking out fit and I hope you don't need it much for snow this winter. Charlie
|
|
|
|
BrettPhillips
Orange Level
Joined: 11 Sep 2009
Location: Strasburg, VA
Points: 808
|
Post Options
Thanks(0)
Quote Reply
Posted: 15 Dec 2010 at 7:15pm |
Charlie: I've thought of that, and I may yet try it. Right now I really need to change the transmission oil to something thinner so the hydraulic pump will work a little faster! Thanks for the compliment, BTW! Russ: There is still a fair amount of welding! Especially in the yoke and the cylinder mounting frame.
|
|
Ted J
Orange Level

Joined: 05 Jul 2010
Location: La Crosse, WI
Points: 18962
|
Post Options
Thanks(0)
Quote Reply
Posted: 16 Dec 2010 at 6:29am |
|
Hi Brett,
Never mind the gray, it looks like it is gray PRIMER. Someone was gonna paint it Persian #1 and didn't get around to it. I agree with JohnThomas on the supports that are needed, the safety trip and chains on the outboard of the plow to keep it level. As CTucker said the lift on the blade would be more if you moved the bar up for the bottom of the piston. That would shorten up the distance between the upper and lower and that in turn would lengthen the throw of the piston. That would enable the plow to lift higher.
Looks great though and I expect you will have a ball using it in the near future. Great job!! I sure could use something like this in WI right now. Tooooo much show already and it isn't even winter yet! Merry Christmas, Ted
|
|
"Allis-Express"
19?? WC / 1941 C / 1952 CA / 1956 WD45 / 1957 WD45 / 1958 D-17
|
|
RockyBottomFarm
Orange Level

Joined: 16 Oct 2011
Location: Fall Creek WI
Points: 253
|
Post Options
Thanks(0)
Quote Reply
Posted: 22 Nov 2011 at 2:30pm |
|
bump
|
|
38 & 41 B, sickle mower, 2 way plows, rear field cultivator, 2 row drill planter
40 Combine
66 Combine
Roto Baler
|
|
Bob-Maine
Orange Level

Joined: 11 Sep 2009
Location: Central Maine
Points: 922
|
Post Options
Thanks(0)
Quote Reply
Posted: 22 Nov 2011 at 3:52pm |
|
Brett, Charlie got it right. If you move the pin at the top of the cylinder closer to the pivot point of the lever, you will have more movement at the end where the chains attach. It just might require a stronger lever. The all you would have to do is change the chain length to have the plow resting in the ground when the cylinder is retracted.
Nice looking outfit. I built a plow for my B many years ago and I wouldn't dare put up a picture after seeing yours. Couldn't take the grief I'd get. :>) Bob@allisdowneast
|
|
I used to think I was indecisive, but now I'm not sure.
|
|
Don(MI)
Orange Level
Joined: 15 Sep 2009
Location: Michigan
Points: 3920
|
Post Options
Thanks(0)
Quote Reply
Posted: 22 Nov 2011 at 4:40pm |
Brett, wow thats nice! Let us know how it did last winter for you!
I wouldn't worry about the blade height either. Also, those rear tires on that B look good. Grandad has a set on the B at the farm, I like em.
|
|
Galatians 5:22-24
"I got a pig at home in a pen and corn to feed him on, All I need is a pretty little girl to feed him when I'm gone!"
|
|


 Topic Options