| Author |
 Topic Search Topic Search  Topic Options Topic Options
|
Sugarmaker 
Orange Level


Joined: 12 Jul 2013
Location: Albion PA
Points: 8661
|
 Post Options Post Options
") Thanks(0) Thanks(0)
 Quote Quote  Reply Reply
 Topic: Plow project for WD Topic: Plow project for WD
Posted: 15 Jun 2015 at 11:35am |
|
Folks,
I have two sets of plows that I drug home last year.
Both need some work.
My goal is to make a decent set of plows from the parts. I was not planning to restore both.
I will get some pictures loaded and am looking for suggestions or opinions on this project.
What I have:
- Set if 3 bottom 14 inch snap coupler type plows with two pretty good moldboards, pretty good coulters and the screw adjuster in the top center is free. This set has the front moldboard broken and has been welded.
- Set of 2 bottom 14 inch plows with the front moldboard worn through and the shins worn out. Coulter not very good. and the screw frozen.
Because I have WD's and not 45's with increased HP, I was thinking I would take off the entire assembly of the two rear moldboards and move them over to the two bottom plow? Move the good coulter over also and maybe even the center adjusting assembly??
Regards,
Chris
|
|
D17 1958 (NFE), WD45 1954 (NFE), WD 1952 (NFE), WD 1950 (WFE), Allis F-40 forklift, Allis CA, Allis D14, Ford Jubilee, Many IH Cub Cadets, 32 Ford Dump, 65 Comet, 66 F100.
|
 |
|
Sponsored Links
|
|
|
Gerald J.
Orange Level
Joined: 12 Sep 2009
Location: Hamilton Co, IA
Points: 5636
|
Post Options
Thanks(0)
Quote Reply
Posted: 15 Jun 2015 at 12:45pm |
|
Explore the plow frame parts book and the plow bottoms book referenced in Plows Parts 101 up top and you can see what parts interchange. Plow bottoms tend to interchange only a whole assemblies of frog, share, moldboard, landside, and sometime shin. Some shares fit several bottoms and the number of unique landsides are few so are shared with most bottoms.
If you can identify the bottoms by finding a part number on one of the parts, there are vendors who can supply new parts.
Gerald J.
|
|
john(MI)
Orange Level

Joined: 12 Sep 2009
Location: SE MI
Points: 9262
|
Post Options
Thanks(0)
Quote Reply
Posted: 15 Jun 2015 at 4:51pm |
|
On the 3 bottom take the wear parts off of the second bottom and move them to the first bottom. Take off the entire second and third bottoms, frame and all. Take the third bottom frame and all and connect it to the first bottom. You should have a good useable two bottom S/C plow/
|
|
D14, D17, 5020, 612H, CASE 446
|
|
Sugarmaker
Orange Level
Joined: 12 Jul 2013
Location: Albion PA
Points: 8661
|
Post Options
Thanks(0)
Quote Reply
Posted: 15 Jun 2015 at 9:02pm |
Thanks guys, Here is what I have drug up near the house. Cheryl said something about me needing a Allis-Chalmers hat tonight. Guess the AC yard art is starting to grow on her:)! 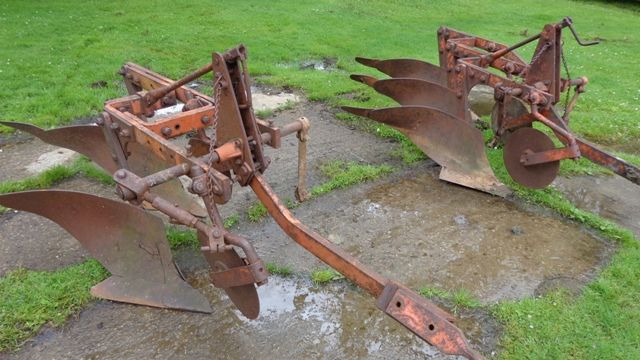 Two bottom with very worn out front moldboard. Rear bottom shin is worn too. 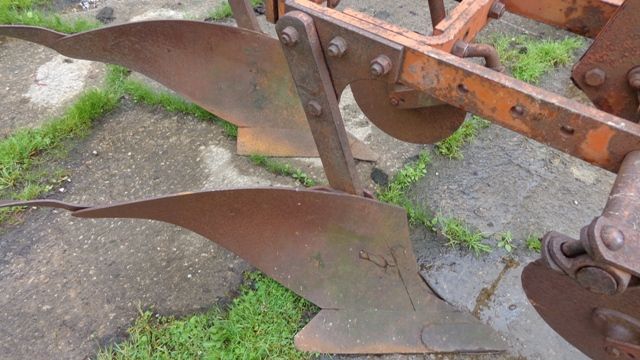 Three bottom with broken (repaired/ welded) front moldboard. Rear two assemblies look pretty good. 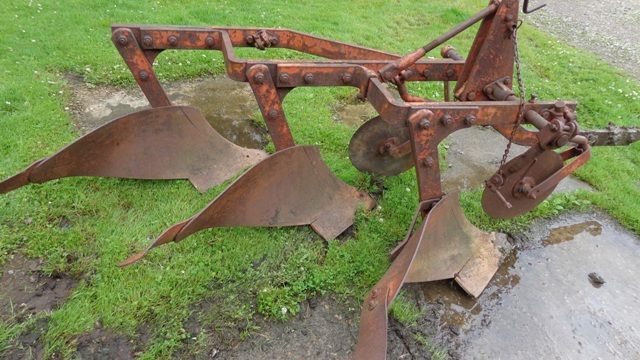  Note the different coulter shank style on the two plows. I was just going to take the good coulter blade and bracket and move them to the two bottom plow? 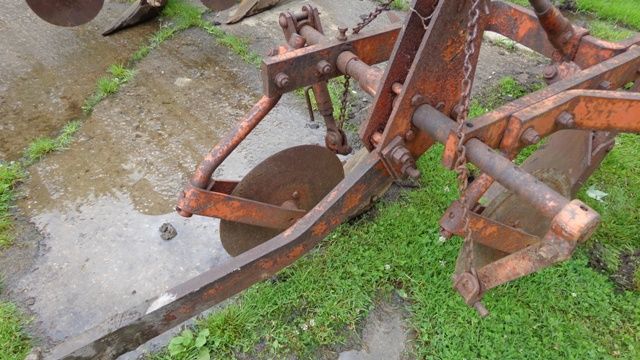 Two bottom coulter. 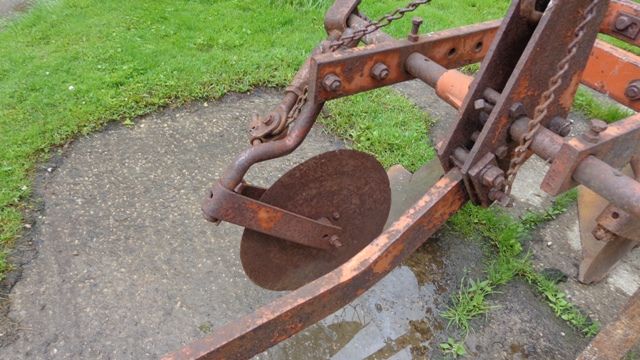 And as mentioned I was going to take the two rear plow assemblies off the three bottom and put them on the two bottom. I am sure it wont be that easy. Also To get these to really be set up correct I think I may have to change the rear wheel (spinout) to get the first furrow the right width? I have some things to learn about getting them set up correct. And I would like to get all the plow adjustments working. Also If I did want to plow with a pin set up tractor instead of a snap coupler.? What piece do I need for the front of the plow? Hey I just remembered I think I do have a plow book here somewhere. Time to dig that out! If I did get these set up I might plow a little next spring at the daughter place. Just for fun. Regards, Chris
Edited by Sugarmaker - 15 Jun 2015 at 9:04pm
|
|
D17 1958 (NFE), WD45 1954 (NFE), WD 1952 (NFE), WD 1950 (WFE), Allis F-40 forklift, Allis CA, Allis D14, Ford Jubilee, Many IH Cub Cadets, 32 Ford Dump, 65 Comet, 66 F100.
|
|
Gerald J.
Orange Level
Joined: 12 Sep 2009
Location: Hamilton Co, IA
Points: 5636
|
Post Options
Thanks(0)
Quote Reply
Posted: 15 Jun 2015 at 10:25pm |
|
Look like model 72 and 73 plow frames. Coulters like bottoms were sold independently from the plow frames and seem to have been universal fits by virtue of the clamp of the shank allowing a considerable range of adjustment.
Pin hitch without lift links requires wheels on the plow frame to keep the plows from headinig to china. The plow frames book I referenced earlier has the available hitch variations. The other most common variation from snap coupler would be three point.
Gerald J.
|
|
Sugarmaker
Orange Level
Joined: 12 Jul 2013
Location: Albion PA
Points: 8661
|
Post Options
Thanks(0)
Quote Reply
Posted: 16 Jun 2015 at 7:35am |
|
Gerald,
Thanks! You seem to be the plow man so, I may be consulting with you and your information. Thanks for letting me know the model.
I was not clear on the pin hitch set up. I would be hanging the weight of the plows with the lift arms and would need to change from snap coupler "eye" to a early pin type WD hitch where the draw bar attaches to the draft.
Regards,
Chris
Edited by Sugarmaker - 16 Jun 2015 at 7:35am
|
|
D17 1958 (NFE), WD45 1954 (NFE), WD 1952 (NFE), WD 1950 (WFE), Allis F-40 forklift, Allis CA, Allis D14, Ford Jubilee, Many IH Cub Cadets, 32 Ford Dump, 65 Comet, 66 F100.
|
|
Mike Plotner
Orange Level
Joined: 02 Apr 2014
Location: Central Ohio
Points: 1577
|
Post Options
Thanks(0)
Quote Reply
Posted: 16 Jun 2015 at 9:14am |
|
my '52 WD has no problem with a 3 bottom. not too many 2 bottoms around unless someone had a CA. we even hit clay when you go down about 4 inches. id stick with the 3 bottom
|
|
2001 Gleaner R42, 1978 7060, 1977 7000, 1966 190 XT, 1966 D-17 Series IV and 1952 WD and more keep my farm running!
|
|
Gerald J.
Orange Level
Joined: 12 Sep 2009
Location: Hamilton Co, IA
Points: 5636
|
Post Options
Thanks(0)
Quote Reply
Posted: 16 Jun 2015 at 9:42am |
|
I described plow frame identification and accessories in great detail in AC Plows Parts 101 that stays up top. Its based on my having and working through the plow frames parts book and the plow bottoms book that are available free on line. I have them in print for faster manual searching. The frames were made without hitches and the hitches effectively sold separately so they can be swapped if you can find or make the appropriated pieces. Except for the gussets and the lift bars, the frames were mostly bent out of sturdy rectangular bar stock. Reuse of part details was in their design.
Gerald J.
|
|
Sugarmaker
Orange Level
Joined: 12 Jul 2013
Location: Albion PA
Points: 8661
|
Post Options
Thanks(0)
Quote Reply
Posted: 16 Jun 2015 at 7:31pm |
 Mike Plotner wrote: Mike Plotner wrote:
my '52 WD has no problem with a 3 bottom. not too many 2 bottoms around unless someone had a CA. we even hit clay when you go down about 4 inches. id stick with the 3 bottom |
Mike and Gerald, Thanks for the suggestions and information. I was concerned that the WD's may not pull the three bottoms in our clay soil. These do not have loaded tires at this time. I just hated to get the three bottoms set up and find that the old WD's struggled. I did find the plow book and it is for WD-52 and WD-53 Pick Up Plows. These are similar but have vertical stub bars holding the moldboard assembly, vs the angled stub bars on the plows I have. Ok I am in thinking mode now! I could move the rear moldboard off the two bottom over to the three bottom front spot where the moldboard is broken? That might make more sense. I see it says set the tractor tread width to 56 inches for 14 inch plows. Where is this measured from? Center to center of tires or over all width? Currently these tractors are set at about 78-80 inches outside to outside of rear tread. Regards, Chris
Edited by Sugarmaker - 16 Jun 2015 at 7:32pm
|
|
D17 1958 (NFE), WD45 1954 (NFE), WD 1952 (NFE), WD 1950 (WFE), Allis F-40 forklift, Allis CA, Allis D14, Ford Jubilee, Many IH Cub Cadets, 32 Ford Dump, 65 Comet, 66 F100.
|
|
Gerald J.
Orange Level
Joined: 12 Sep 2009
Location: Hamilton Co, IA
Points: 5636
|
Post Options
Thanks(0)
Quote Reply
Posted: 16 Jun 2015 at 8:50pm |
The plow book you want is: http://www.grandpastractor.com/manuals/ac/equipment/plows/AC-Moldboard-plows.pdfand the plow bottoms book is: http://www.grandpastractor.com/manuals/ac/equipment/plows/Plow-Bottoms-AC-Book.pdfI should add these up top. The 50 family plow frames have the vertical shanks. You have 70s with angle shanks, no spring trips, and with adjustable width frames. The right tractor wheels are most critical. For a 14" bottom their inner face should be 14" from the line of the landside of the front bottom, so they can ride against the left side of the furrow and the front bottom cuts its rated 14" wide. Then the left rear wheel ought to be an equal distance from the center of the plow earth contacting parts to pull straightest. This theoretical distance is messed up by the different traction in furrow and on land. But if the in furrow wheel pulls better the front wheel in the furrow against the furrow wall keeps the tractor going straight. A differential lock is really handy when plowing. Both my tractors have that feature and it got used every furrow. Gerald J.
|
|
Sugarmaker
Orange Level
Joined: 12 Jul 2013
Location: Albion PA
Points: 8661
|
Post Options
Thanks(0)
Quote Reply
Posted: 17 Jun 2015 at 7:54am |
Gerald, (interesting side note: My uncle that owned these plows and WD's was named Gerald too.) Thanks for the links and set up info. I am now considering that the three bottoms will be the set that gets rebuilt. I will try to post some pictures as I get into this plow clean up project. I just remembered that I did have some pictures of the plows as I found them. 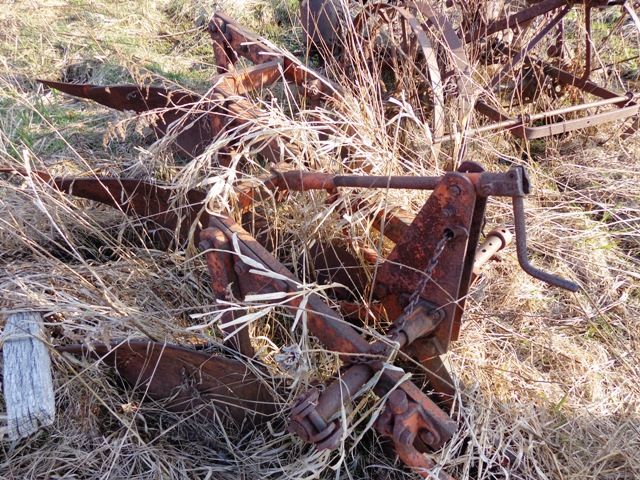   Regards, Chris
|
|
D17 1958 (NFE), WD45 1954 (NFE), WD 1952 (NFE), WD 1950 (WFE), Allis F-40 forklift, Allis CA, Allis D14, Ford Jubilee, Many IH Cub Cadets, 32 Ford Dump, 65 Comet, 66 F100.
|
|
Sugarmaker
Orange Level
Joined: 12 Jul 2013
Location: Albion PA
Points: 8661
|
Post Options
Thanks(0)
Quote Reply
Posted: 18 Jun 2015 at 7:41am |
|
Folks,
Rain here again.
I was considering removing the coulters on the three bottom and taking the frame assembly to get the frame and plows sand blasted? Any concerns with sandblasting the moldboards? They are pretty rusty now and I don't think it will hurt them?
Lots of nooks and crannies to try to get into and clean up.
I did take the decent moldboard off the rear of the two bottoms. It will work Ok to replace the welded moldboard on the three bottom.
Regards,
Chris
|
|
D17 1958 (NFE), WD45 1954 (NFE), WD 1952 (NFE), WD 1950 (WFE), Allis F-40 forklift, Allis CA, Allis D14, Ford Jubilee, Many IH Cub Cadets, 32 Ford Dump, 65 Comet, 66 F100.
|
|
Mike Plotner
Orange Level
Joined: 02 Apr 2014
Location: Central Ohio
Points: 1577
|
Post Options
Thanks(0)
Quote Reply
Posted: 18 Jun 2015 at 8:09am |
|
I wouldn't see why a sand blaster would hurt moldboards. every time we pick up a new plow, we got to spend some time with a wire brush or flap disc on a grinder to get it really shined up
|
|
2001 Gleaner R42, 1978 7060, 1977 7000, 1966 190 XT, 1966 D-17 Series IV and 1952 WD and more keep my farm running!
|
|
D17JIM2
Orange Level

Joined: 01 Jan 2013
Location: Brazil, In
Points: 246
|
Post Options
Thanks(0)
Quote Reply
Posted: 18 Jun 2015 at 12:32pm |
|
Muriatic acid. Available at hardware stores . cleans rust right off. plumbers use it.
|
|
Gerald J.
Orange Level
Joined: 12 Sep 2009
Location: Hamilton Co, IA
Points: 5636
|
Post Options
Thanks(0)
Quote Reply
Posted: 18 Jun 2015 at 5:20pm |
|
The rust is soft. The moldboard surface is hard unless its worn a lot. I've polished plows with a flap wheel. The rust left quickly, the hard steel didn't.
Plowing fast in sand is reputed to polish plows too.
Gerald J.
Edited by Gerald J. - 18 Jun 2015 at 5:21pm
|
|
Sugarmaker
Orange Level
Joined: 12 Jul 2013
Location: Albion PA
Points: 8661
|
Post Options
Thanks(0)
Quote Reply
Posted: 18 Jun 2015 at 5:44pm |
|
Thanks guys for the cleaning suggestions!
Sand blasting might be the most costly but quickest. I am getting lazy
and don't feel like taking them all apart and running through the
Electrolysis tank! Very cost effective but slow. There are so many nooks and crannies! And I would have $50.00 in hardware at least.
I have never tried the muratic acid.
I would like these to look decent if I am going to take them to the show. Would you consider painting the moldboards silver after cleaning? With the frame PO#1? Coulters silver too? Getting a little ahead of myself here but have to keep thinking and planning. It just might happen.
Regards,
Chris
|
|
D17 1958 (NFE), WD45 1954 (NFE), WD 1952 (NFE), WD 1950 (WFE), Allis F-40 forklift, Allis CA, Allis D14, Ford Jubilee, Many IH Cub Cadets, 32 Ford Dump, 65 Comet, 66 F100.
|
|
In. Fred
Silver Level


Joined: 22 Apr 2012
Location: Cromwell, In
Points: 58
|
Post Options
Thanks(0)
Quote Reply
Posted: 18 Jun 2015 at 6:44pm |
|
Chris, You may do as you wish, but I have been told not to sandblast the face of a plow moldboard. It makes dimples in the surface and it takes a long time to wear the moldboard smooth. When I repainted my plow, I used a flapper wheel on the front, and I did sandblast the backside of the moldboard, but I used a high build primer on the backside. Also, measure the length of your stub beams, from plow to plow. If both plows are the same length, all it takes is to take out the 2 bolts holding the stub beams to the frame, and move around any way you like. Also FYI the second bolt down on the stub beams is a shear bolt. My 2 cents. Fred.
|
|
Sugarmaker
Orange Level
Joined: 12 Jul 2013
Location: Albion PA
Points: 8661
|
Post Options
Thanks(0)
Quote Reply
Posted: 19 Jun 2015 at 10:47am |
|
Fred,
Thanks! I did not know about the shear bolt. But does make sense.
Both these plows seam to be 70 series plows, so as you mentioned the parts are interchangeable.
I worked on removing the Coulter assemblies and am in the process of repairing/ cleaning those. Years of wear have bent the steel that supported rod at the back of the coulter frame pivot point. I have those straightened and will weld them today.
Coulter hubs have been removed from the dics. To be cleaned and new grease fittings installed along with new bolts.
I will need to swap parts from one to another to make a set of plows, and it looks like parts match.
******
Help! I am still on the fence about which set to restore?
-I don't really have any ground that I have to plow anyway. So The three bottoms would look good on the WFE WD for the show. My gut says the two bottoms migh pull a lot better if I did want to plow a little.
-Knowing how I do stuff ,these may be show plows for a long time, and not get much action!:)
-I will have about the same amount of work on either set of plows.
- Concerned with pulling three bottoms with the WD, even the one with the larger pistons.
-I dont have loaded tires ( at least not yet).
-Is this a "go big or go home" thing?
I have a day or two to decide. :)
****
On the moldboard clean up. They have some pitting now. I think I may finish them by sanding till smooth then see how they look. More to come on that.
On the three bottom I need a part. The rear support from the moldboard to the land slide. This is a adjustable threaded item ( two pieces) about 10 inches long. (this is assuming I am going to restore this set:)) If any one have a spare let me know.
Fred, Thanks for giving me permission to do as I wish:) Seems I do that pretty well, but I do value all the forum folks input! I would like to see pictures of your plows if you have any?
Misplaced the camera again. When I find it I will get some plow progress pictures.
Regards,
Chris
Edited by Sugarmaker - 19 Jun 2015 at 10:50am
|
|
D17 1958 (NFE), WD45 1954 (NFE), WD 1952 (NFE), WD 1950 (WFE), Allis F-40 forklift, Allis CA, Allis D14, Ford Jubilee, Many IH Cub Cadets, 32 Ford Dump, 65 Comet, 66 F100.
|
|
Jim Hancock
Orange Level

Joined: 11 Sep 2009
Location: EL Reno, Ok.
Points: 1112
|
Post Options
Thanks(0)
Quote Reply
Posted: 19 Jun 2015 at 11:00am |
Hi Chris. Here's some input: The big piston WD will pull the 3 bottom in 2nd (or 3rd if the soil is loose). Just have your traction booster set.
|
|
How blessed we are by HIS GRACE!
|
|
Gerald J.
Orange Level
Joined: 12 Sep 2009
Location: Hamilton Co, IA
Points: 5636
|
Post Options
Thanks(0)
Quote Reply
Posted: 19 Jun 2015 at 11:34am |
|
The plow surfaces cleaned to bare steel by plowing or sanding WILL RUST. When I plowed every year, I painted them with cheap spray paint, any handy color as soon as I was done plowing. Kept inside used oil or chassis grease can last a year, but sometimes they rust anyway. Cheap paint works better. Some implement makers have sold a soft paint for the purpose that scrubs off when plowing a little quicker than a good paint job. The cheap spray paints have worked for me and scrubbed off fast enough.
I'd be inclined for show purposes to paint the working surfaces with silver or aluminum, the back sides of those parts black, and the frame orange. Probably keep the hardware zinc plated, not painted. I'm pretty sure the factory painted the parts and the dealer or the customer put them together well after the orange paint was applied.
Gerald J.
|
|
Sugarmaker
Orange Level
Joined: 12 Jul 2013
Location: Albion PA
Points: 8661
|
Post Options
Thanks(0)
Quote Reply
Posted: 19 Jun 2015 at 7:56pm |
|
Guys thanks again.
I may consider painting the backs of the moldboards black. I had no clue about the original color schemes. How did these plows arrive at the Allis dealership? Was it a painted frame and a bunch of parts, that the dealer assembled? Any pictures out there of other plow restorations?
Regards,
Chris
|
|
D17 1958 (NFE), WD45 1954 (NFE), WD 1952 (NFE), WD 1950 (WFE), Allis F-40 forklift, Allis CA, Allis D14, Ford Jubilee, Many IH Cub Cadets, 32 Ford Dump, 65 Comet, 66 F100.
|
|
Sugarmaker
Orange Level
Joined: 12 Jul 2013
Location: Albion PA
Points: 8661
|
Post Options
Thanks(0)
Quote Reply
Posted: 19 Jun 2015 at 8:15pm |
Jim Hancock wrote:
Hi Chris. Here's some input: The big piston WD will pull the 3 bottom in 2nd (or 3rd if the soil is loose). Just have your traction booster set. |
Jim, That helps. Leaning towards the three bottoms again:) I remember the traction booster gauge on the 45's. The WD's don't have that feature. Not sure if the hydraulics still work the same on both tractor types, with or with out that gauge as a visual guide? Basically we raised the plows, adding more weight to the rear wheels when there was wheel slippage. In some clay ground the 45's had the front wheels off the ground as much as they were on the ground! Also plowing at night the 45's exhaust was glowing red! Regards, Chris
|
|
D17 1958 (NFE), WD45 1954 (NFE), WD 1952 (NFE), WD 1950 (WFE), Allis F-40 forklift, Allis CA, Allis D14, Ford Jubilee, Many IH Cub Cadets, 32 Ford Dump, 65 Comet, 66 F100.
|
|
Gerald J.
Orange Level
Joined: 12 Sep 2009
Location: Hamilton Co, IA
Points: 5636
|
Post Options
Thanks(0)
Quote Reply
Posted: 19 Jun 2015 at 8:31pm |
|
The moldboards and shares came from heat treating that made them blue/black. Not paint. Plowing wore it off the working surface so those surfaces need protection while not being used. Hence paint or grease.
I don't know but I think the plow frames were delivered as a kit with the plow bottoms as separate kits of parts. Hitches were another kit. I believe ordering required choosing the frame, then the hitch, then the bottoms, and the coulters separately. There wasn't a package of all the pieces with one order number. Bottoms varied by soil conditions and farmer preferences. Even the materials of the bottoms varied from chilled iron to hardened steel and soft center steel. The chilled iron probably wore the best but broke the quickest when it hit rocks. Fully hardened steel wore almost as good, took a bit more shock but still shattered when it hit big rocks. Soft center steel wore good for a while until it wore through the hard surface, but bounced off rocks without much damage. Then the shares were offered in several shapes for each bottom. Short shares, long shares, shares with normal suck and shares with deep suck (snort nose, and long nose turned down). Each farmer and region liked different options and AC supplied them but I don't think had a standard package to deliver a given frame, hitch, and bottoms. Coulters came in a few varieties and fit most every plow. Rubber mounted, spring mounted, and rigidly mounted with different diameters of the blades. All could be on one order but each order was almost unique.
Assembly of the plow frame wouldn't be very complicated and the frame shipped in pieces would have fit in a lot smaller crate than an assembled plow that would have had 87+% air space in the crate limiting the number in the truck or freight car load.
Gerald J.
|
|
Sugarmaker
Orange Level
Joined: 12 Jul 2013
Location: Albion PA
Points: 8661
|
Post Options
Thanks(0)
Quote Reply
Posted: 20 Jun 2015 at 2:53pm |
|
Gerald,
Great information on the plows.
Folks,
Well the suspense is over!
I have decided which set of plows will be restored. It was really a no brainer. Came to me last night. Tomorrow is Fathers Day (Happy Fathers day to all) The set of three bottoms was Dads set of plows that Jack bought from him. Seems appropriate to clean up the three bottom 14's and get them in working order again. Maybe even some fresh paint too. I plowed many acres with those too!
To bring you upto date I have both sets of plows stripped to just about the frames. Looks like I will have enough parts to put one together. Getting the round cross bars and the vertical plates that hold the tongue loose took most of the morning.
Question: On these 70 series plows the attachment to the tractor on the left side is fixed length. In the book I have for the 50 series they have adjustable arm on both sides. I was considering putting adjustment arms on both sides since I have the spare one? On these 3 bottoms some one had shortened that non adjusting link by several inches. Not sure why? That would had made the plows be raised up more on that left side.
I should have some pictures of the tear down soon. A few parts have been cleaned repaired and altered and or fixed too.
Will have to take a trip to Tractor supply in Meadville for some plow bolts. Our new TSC in Edinboro wont have any plow bolts till fall??????
Ok. Another question. If I get all the adjustments working, why cant I slide the plows to the right more instead of being centered? I think this would compensate for wide tractor wheel spacing I think?
Regards,
Chris
|
|
D17 1958 (NFE), WD45 1954 (NFE), WD 1952 (NFE), WD 1950 (WFE), Allis F-40 forklift, Allis CA, Allis D14, Ford Jubilee, Many IH Cub Cadets, 32 Ford Dump, 65 Comet, 66 F100.
|
|
sandman2234
Orange Level
Joined: 21 Feb 2013
Location: Jax
Points: 2547
|
Post Options
Thanks(0)
Quote Reply
Posted: 20 Jun 2015 at 4:17pm |
|
I would hook the up to the tractor and go plow some dirt roads if you don't have a plot that you could turn. Any rust that is removed will be that much less that you have to mess with using a flapper wheel, and it is a whole lot more fun sitting on the tractor than kneeling on your knees running a flapper wheel. Just my thoughts, it is your plows!
Happy Fathers Day right back at you!
David from jax
|
|
A proud member of the Allis Express movement!
Northeast Florida
|
|
Mike Plotner
Orange Level
Joined: 02 Apr 2014
Location: Central Ohio
Points: 1577
|
Post Options
Thanks(0)
Quote Reply
Posted: 20 Jun 2015 at 7:08pm |
|
nice! 3 bottom plows are great!
|
|
2001 Gleaner R42, 1978 7060, 1977 7000, 1966 190 XT, 1966 D-17 Series IV and 1952 WD and more keep my farm running!
|
|
Gerald J.
Orange Level
Joined: 12 Sep 2009
Location: Hamilton Co, IA
Points: 5636
|
Post Options
Thanks(0)
Quote Reply
Posted: 20 Jun 2015 at 8:03pm |
|
The lift arms need to be adjusted so the plow is level when the tractor is tipped to the right with the right wheels in the previous furrow. That usually means the right lift arm is shorter.
The draft position needs to be so the landsides are in line with the line of motion. The dirt will still thrust them against their individual furrow walls.
If the center of the plow draft isn't in line with the center of the tractor, the plow will tend to turn the tractor presuming the two drive wheels on the tractor have equal traction. That's hardly ever the case though because the wheel in furrow gets a better grip on freshly exposed dirt while the left wheel is on grass and stubble or straw. The important thing is that the landside of the front bottom is one plow width from the inside face of the right side tires, then it will work just right, not too hard or too easy.
Gerald J.
|
|
Sugarmaker
Orange Level
Joined: 12 Jul 2013
Location: Albion PA
Points: 8661
|
Post Options
Thanks(0)
Quote Reply
Posted: 20 Jun 2015 at 8:58pm |
|
Guys,
We had massive plow diss assembly today. All the moldboards, shins, points and land slides are removed. This may make clean up a little easier? Picked up a bunch of plow bolts at Tractor Supply this afternoon.
It looks like I will be able to get all the adjustment working so that may help set the plows up easier.
Now that I have all the plow parts off is there some one or company that is still making these parts? Tractor supply had some parts but I would need to take my old ones and match them up.
I have a bunch of pictures of rusty plow parts just too pooped to post:)
This would be the time to replace the points and shins at least.
All the Dad's, have a great day tomorrow!
Regards,
Chris
|
|
D17 1958 (NFE), WD45 1954 (NFE), WD 1952 (NFE), WD 1950 (WFE), Allis F-40 forklift, Allis CA, Allis D14, Ford Jubilee, Many IH Cub Cadets, 32 Ford Dump, 65 Comet, 66 F100.
|
|
BPM75
Orange Level

Joined: 11 Jun 2011
Location: Greenup IL
Points: 1050
|
Post Options
Thanks(0)
Quote Reply
Posted: 20 Jun 2015 at 9:46pm |
|
There are guys on this forum that have parts for those old plows, when done my sc plow I got some from davetheplowman, and I got the shares from johnny but you need to know what bottom you have or find the part #s on your parts.
|
|
59 D17 gas nf, 66 XT 190, 69 220.
|
|
Sugarmaker
Orange Level
Joined: 12 Jul 2013
Location: Albion PA
Points: 8661
|
Post Options
Thanks(0)
Quote Reply
Posted: 21 Jun 2015 at 8:47am |
BPM75 wrote:
There are guys on this forum that have parts for those old plows, when done my sc plow I got some from davetheplowman, and I got the shares from johnny but you need to know what bottom you have or find the part #s on your parts. |
Thanks BPM75! Ok I need to look for part numbers, any idea where the main numbers are located? I have determined the plow is a model 73. But that may not detail the shares and shins? I will search out the folks you mentioned. Regards, Chris
|
|
D17 1958 (NFE), WD45 1954 (NFE), WD 1952 (NFE), WD 1950 (WFE), Allis F-40 forklift, Allis CA, Allis D14, Ford Jubilee, Many IH Cub Cadets, 32 Ford Dump, 65 Comet, 66 F100.
|
|


