| Author |
 Topic Search Topic Search  Topic Options Topic Options
|
Ranse 
Orange Level


Joined: 11 Mar 2016
Location: Tennessee
Points: 775
|
 Post Options Post Options
") Thanks(0) Thanks(0)
 Quote Quote  Reply Reply
 Topic: Painting woes Topic: Painting woes
Posted: 03 Sep 2019 at 9:45pm |
If I'm going to paint an entire tractor, I've got to get a lot better. With the prep, primer, and painting three times, I spent the better part of five days on this one hood.  I got the tent idea from Sugarmaker. The results were mixed. Less wind and fewer bugs, space was a problem. Light was ok, but not as good as outside. I had a lot of trouble with my paint. I got a quart from the New Holland dealer. They said it was ready to spray. I never could get to lay down smooth, no matter how I tried to adjust my gun. It looked rough dumpy and textured. I took it up the road to a little body shop and asked for some advice. They said it looked like it needed some reducer. I said it was supposed to be ready to spray. They said it may still need reducer. IMO if it needs reducer, it's not ready to spray. Nevertheless, I sanded the hood down and painted it again with reducer in the paint. It was much better, but not good. Plus I got a big run in it the second time. So I sanded it down again and decided to put the spray gun away. The 3rd painting I used three cans of this.  The problem rattle cans on something this large is the spray fan is to small. It went down smooth and looked ok, but I had some light and dark streaks and some orange peal in places. You can't really see it in this photo but it's there.  A guy at work said I should wet sand it. I never done that before, but I watched a few youtube videos on it and gave it a try. I have to say I was pretty pleased with the results. The wet sanding blended the streaks very well. A lot of polish and two coats of wax and the old girl looks good enough for me. 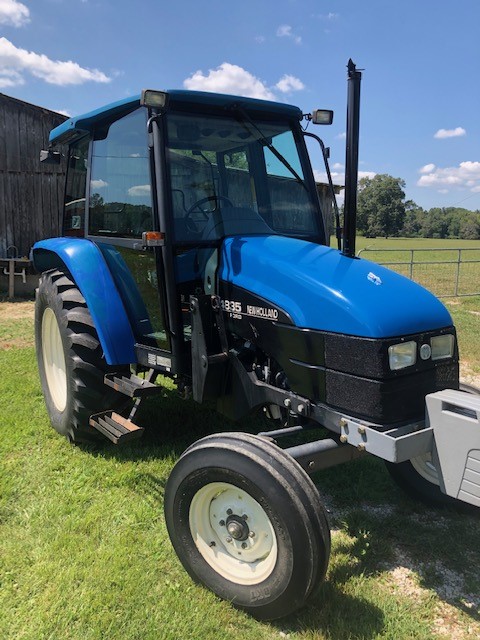 It's still not what I would call a professional job, but I'm happy with it. It just took to long and more work than necessary. I'm not sure if it was the paint, my gun, the hot weather, or just me. I'm going to go back to the PPG paint on my next job. It was easier to work with, I think it's worth it.
|
 |
|
Sponsored Links
|
|
|
DiyDave
Orange Level Access

Joined: 11 Sep 2009
Location: Gambrills, MD
Points: 54334
|
Post Options
Thanks(0)
Quote Reply
Posted: 04 Sep 2019 at 4:39am |
Problem (usually) with rattle cans is there is no hardener in it. Usually shows up as chip out, later... 
|
|
Source: Babylon Bee. Sponsored by BRAWNDO, its got what you need!
|
|
jaybmiller
Orange Level Access
Joined: 12 Sep 2009
Location: Greensville,Ont
Points: 24761
|
Post Options
Thanks(0)
Quote Reply
Posted: 04 Sep 2019 at 5:40am |
re: Krylon... the tapered top cans are low VOC paint, square tops are 'old skool' ie: real good paint. This from the Krylon guy at HQ, told me this when I said it wasn't covering like before....... I've stopped buying it, gone to Rustoleum at $5 a can up here. GREAT coverage,goes on smooth, dries fast. Just time it right(read the label...) and put 2-3-4 coats on then let it harden overnight BEFORE turning wrenches.
Using any 'auto type' spray paint takes a lot of time and patience to 'dial in' and get everything correct. Heat,humidity, pressure,distance, technique. The pros make it look easy since they do it everyday.......
I still use a brush to paint enamel onto rider decks and trailers, no runs...
Jay
|
|
3 D-14s,A-C forklift, B-112
Kubota BX23S lil' TOOT( The Other Orange Tractor)
Never burn your bridges, unless you can walk on water
|
|
ACinSC
Orange Level
Joined: 16 Dec 2015
Location: South Carolina
Points: 3035
|
Post Options
Thanks(0)
Quote Reply
Posted: 04 Sep 2019 at 6:44am |
|
Interesting post . I use Rust-Oleum implement spray paint on my D 15 . Looks good to me . Never painted anything as big as a hood though . Thanks
|
|
B26240
Orange Level
Joined: 21 Nov 2009
Location: mn
Points: 3866
|
Post Options
Thanks(0)
Quote Reply
Posted: 04 Sep 2019 at 6:45am |
i think you are on the right track to next time go to the PPG dealer. From start to finish whatever you put on has to work together as a system. Becuz I am no "expert" I go to the PPG store and tell them what I intend to paint and ask what I need. Example there are about three diferent drying speed reducers for different temps. Also read the directions on the can some will need sanding between coats especially if time is more than 24 hrs between coats etc. HTH Mark
|
|
Sugarmaker
Orange Level

Joined: 12 Jul 2013
Location: Albion PA
Points: 8542
|
Post Options
Thanks(0)
Quote Reply
Posted: 04 Sep 2019 at 9:03am |
Ranse, I think you did real good. But following anything I do will probably get you in trouble!:) I always think that I can paint but the paint has a whole different idea. Like about anything the pros make it look real easy! I think your hood turned out real good! Looks "factory" to me! Thanks for the tip on the blue I worked all day on a much smaller, much older, blue tractor. Debating about the paint. I love rattle cans for the convenience factor. I do not like how it dries and or top coating with automotive paint can give many mixed results.
I may try PPG paints if I ever do another large project?
Paint booth would be great to help control the finishing environment during paint. I dont have one. You only need it for about 1/10 of the total time to do the item.
I think your doing well and thanks for sharing your techniques. I wet sanded a lot of panels when I did our 55 Ford years ago. I have not wet sanded much on these tractors. I am probably getting finishes similar to what they got in the factory. Mine could always be better and I am always tough on my finished work! Continue to improve is the best we can do!
I need to go get some Krylon primer too. Have a panel on the truck to repair. Regards, Chris
Edited by Sugarmaker - 04 Sep 2019 at 9:06am
|
|
D17 1958 (NFE), WD45 1954 (NFE), WD 1952 (NFE), WD 1950 (WFE), Allis F-40 forklift, Allis CA, Allis D14, Ford Jubilee, Many IH Cub Cadets, 32 Ford Dump, 65 Comet.
|
|
Dakota Dave
Orange Level

Joined: 12 Sep 2009
Location: ND
Points: 3971
|
Post Options
Thanks(0)
Quote Reply
Posted: 04 Sep 2019 at 10:40am |
|
get some plastic staple to your rafters, hang you parts from the rafters with safety wire, put a couple furnace filters in on end and a big box fan blowing out on the other end. wet the floor and use a cheep HVLP gun I got mine at Menards. set a large piece of card board next to one of your plastic walls and set your sprayer coverage using it. make sure you use the correct mask for the type your spraying. I've been using Valspar one gallon pain 1 quart reducer 1 pint hardener. you should get a flow meter. it a little funnel with a calibrated hole. takes 10 seconds for a full cup to drain out. always thin your paint to the same consistency every time.
Edited by Dakota Dave - 04 Sep 2019 at 10:41am
|
|
allis g
Silver Level

Joined: 10 Jan 2012
Location: Templeton
Points: 415
|
Post Options
Thanks(0)
Quote Reply
Posted: 04 Sep 2019 at 11:52am |
|
I smuggle my paint in from free America the paint in CA is worthless.
|
|
plummerscarin
Orange Level Access
Joined: 22 Jun 2015
Location: ia
Points: 3960
|
Post Options
Thanks(0)
Quote Reply
Posted: 04 Sep 2019 at 12:10pm |
|
From the photos it looks good. And if your happy with it even better. An ad for automotive paints say the key to a good finish is ninety five percent prep and five percent paint. As noted the reducer in many cases is temperature sensitive. As well as humidity. Also you did not say if you sanded between coats. I have either wet sanded the primer with 400 grit or dry with 320. The color coat will reveal the surface through the paint when dry so a smooth primer surface is important. As with any skill, practice practice practice.
|
|
Ranse
Orange Level
Joined: 11 Mar 2016
Location: Tennessee
Points: 775
|
Post Options
Thanks(0)
Quote Reply
Posted: 04 Sep 2019 at 8:12pm |
|
I appreciate all the comments guys. I admit I got frustrated with my painting and resorted to rattle cans. I won't apologize for it because I'm happy with the paint job right now. Maybe by the time it starts to peal and flake I won't care as much as I do now, hopefully.
I confess I like to vent on this forum from time to time. My gripe is the guys at the dealership told me the paint I bought was ready to spray. I had doubts the moment I opened the can. It looked as thick as house paint. No way it was ready to spray, but yet I tried it anyway because that's what they told me. I learned two things from this project. One, get paint advice from people who know paint. Not people from a tractor store. The other is the beauty of wet sanding. Now I know if you screw up, it's not necessarily a do over.
BTW; The paint I got from the dealership was Valspar acrylic enamel factory approved 1963-1999. Color wise, the Krylon Ford blue was almost a perfect match, almost. The only way I could tell a difference is to spray some of the Krylon on a piece of metal I already painted with the Valspar. I thought I would throw that in for what it's worth.
|
|
plummerscarin
Orange Level Access
Joined: 22 Jun 2015
Location: ia
Points: 3960
|
Post Options
Thanks(0)
Quote Reply
Posted: 04 Sep 2019 at 9:21pm |
|
Spray out a test panel is a good idea. You can compare colors side by side as well as check your spray pattern from the rattle can or gun. That way you get to make adjustments before actually painting your project
|
|
WF owner
Orange Level
Joined: 12 May 2013
Location: Bombay NY
Points: 5049
|
Post Options
Thanks(0)
Quote Reply
Posted: 05 Sep 2019 at 4:54am |
I recently had my local AGCO dealer order me some Persian Orange (79023273 Qt. Low V.O.C.) AGCO (Valspar) paint.
When I asked the dealer to order the hardener, there is a minimum order quantity of six and it was almost $80 each. I didn't want six ! I was able to order the correct thinner and hardener from a John Deere online store ( https://www.greenpartstore.com/search.asp?keyword=renew+paint+hardener) The following was copied and pasted from the ACGO Paint PDF:
8:1:1 (Paint: AGCO Thinner:
Renew Hardener
Part No. 79022595)
Spray Application:
Reduce with AGCO Thinner up to 8:1, reduction may vary with
types of equipment and atmospheric conditions. Spray a mist
or tack coat, followed by a full wet coat to avoid runs and sags.
Start at the top of equipment and work down to eliminate dry
spray which dulls the finish.
There is a lot of info on the PDF.
Edited by WF owner - 05 Sep 2019 at 5:01am
|
|


