| Author |
 Topic Search Topic Search  Topic Options Topic Options
|
IBWD MIke 
Orange Level


Joined: 08 Apr 2012
Location: Newton Ia.
Points: 4049
|
 Post Options Post Options
") Thanks(0) Thanks(0)
 Quote Quote  Reply Reply
 Topic: New engine for the 45 Topic: New engine for the 45
Posted: 30 Mar 2015 at 12:18pm |
I've been working on rebuilding an engine for my 45 for quite a while now. The one in it still runs great but leaks oil like a sieve. My plan is to pull it and replace then do a rear-main, pan gasket, front seal job on it. Thought I would post some pics of the progress. A shot of the block after hot-tank. Wasn't real impressed with the lack of cleaning.  I wound up having to use a WD block. couple shots after I finished the clean-up.   Here's a shot of the crank going in. This was quite a process. The block had no shims in it. I thought, cool, been line-bored. Wrong, just had all the shims removed. Spent a coupe of weeks making shims and measuring to get where I was happy with the clearance.  The rotating assembly finally together.  Being a WD block, the main bolts were lock-wired. I worried about this for quite a while then decided to just buy some pliers and wire and learn to do it. 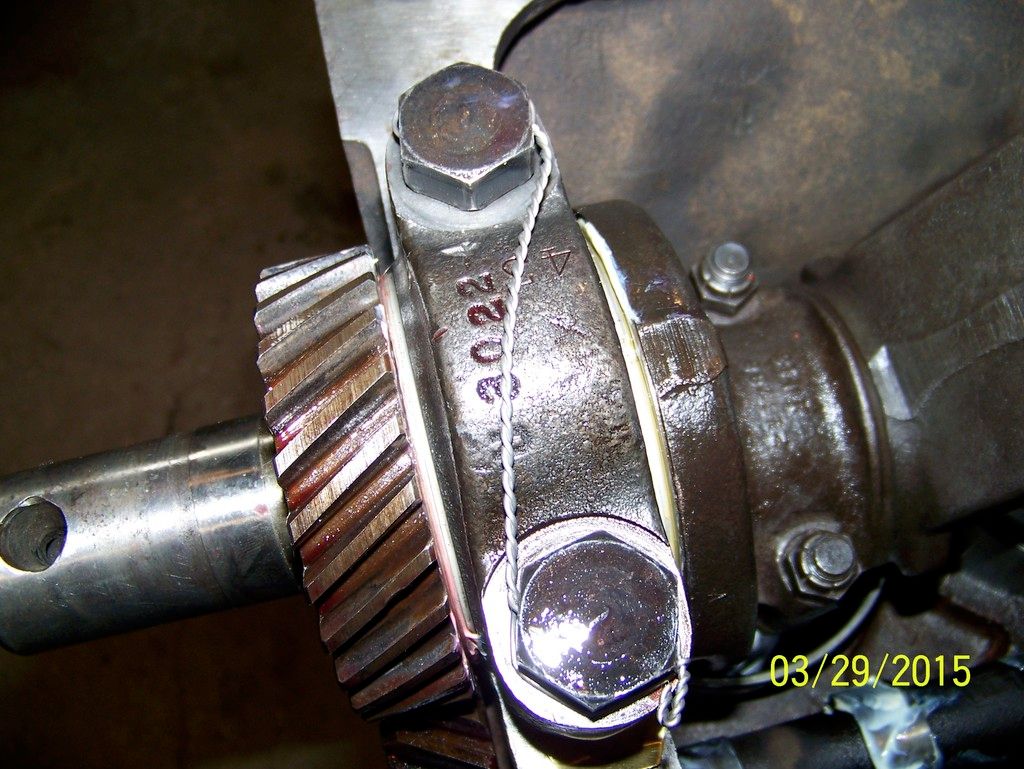 Not as good as the guys on U-tube but a whole lot better than what I found when I pulled the pan. Made a few 'bones' learning the process.  Oil pump and timing cover on.  That's all for now. Will update as I make progress, Mike.
|
 |
|
Sponsored Links
|
|
|
1terrygladys
Silver Level


Joined: 03 Oct 2013
Location: SW Iowa
Points: 261
|
Post Options
Thanks(0)
Quote Reply
Posted: 30 Mar 2015 at 12:36pm |
Thanks for your pictures. I'm impressed. Terry
|
|
WD-45, WD, Unstyled WC, SC Disk, JD 4430D, JD 4010D, JD B, Iowa pastor & disciple of Jesus Christ
|
|
nella(Pa)
Orange Level Access
Joined: 11 Sep 2009
Location: Allentown, Pa.
Points: 3119
|
Post Options
Thanks(0)
Quote Reply
Posted: 30 Mar 2015 at 1:39pm |
|
The engine you are rebuilding, is it a WD or a WD45?
|
|
Dick L
Orange Level

Joined: 12 Sep 2009
Location: Edon Ohio
Points: 5087
|
Post Options
Thanks(0)
Quote Reply
Posted: 30 Mar 2015 at 2:21pm |
I don't have a lot of knowledge about the difference between WC, WD, WD45 blocks. I was under the impression that the block I have with the side plate over the pushrods was a WC only. I would guess that the internals are interchangeable???? Very nice clean job. It looks like you have covered the details. Nice clear pictures also. 
|
|
Mike Plotner
Orange Level
Joined: 02 Apr 2014
Location: Central Ohio
Points: 1577
|
Post Options
Thanks(0)
Quote Reply
Posted: 30 Mar 2015 at 2:43pm |
|
nope, WD's had pushrod covers on the side of the block too. WD-45's didnt
|
|
2001 Gleaner R42, 1978 7060, 1977 7000, 1966 190 XT, 1966 D-17 Series IV and 1952 WD and more keep my farm running!
|
|
IBWD MIke
Orange Level
Joined: 08 Apr 2012
Location: Newton Ia.
Points: 4049
|
Post Options
Thanks(0)
Quote Reply
Posted: 30 Mar 2015 at 3:02pm |
|
Thanks guys. It is a 45, everything but the block. The 45 block I have is not good. The sleeve standout was all over the place. I haven't junked that block yet but probably will. Wanted to get the motor done in time to change it this spring. I had a tired wd motor so decided to use the block. Looking for another 45 block would have set me back at least a few weeks.
|
|
Don(MO)
Orange Level
Joined: 12 Sep 2009
Location: Bates City MO.
Points: 6862
|
Post Options
Thanks(0)
Quote Reply
Posted: 30 Mar 2015 at 7:15pm |
|
Looks like you are going at it the right way, keep up the good work. I don't understand all the broken wire. lol
|
|
3 WD45's with power steering,G,D15 fork lift,D19, W-Speed Patrol, "A" Gleaner with a 330 corn head,"66" combine,roto-baler, and lots of Snap Coupler implements to make them work for their keep.
|
|
Ted J
Orange Level

Joined: 05 Jul 2010
Location: La Crosse, WI
Points: 18943
|
Post Options
Thanks(0)
Quote Reply
Posted: 30 Mar 2015 at 7:28pm |
|
Nice job. What did you do to clean up that block after it came out the first time? Looks really good!
|
|
"Allis-Express"
19?? WC / 1941 C / 1952 CA / 1956 WD45 / 1957 WD45 / 1958 D-17
|
|
j.w.freck
Orange Level

Joined: 16 Sep 2009
Location: karnack texas
Points: 1153
|
Post Options
Thanks(0)
Quote Reply
Posted: 30 Mar 2015 at 7:52pm |
|
like the aircraft safety job,had to have a pair of safety wire twisters.....
|
|
IBWD MIke
Orange Level
Joined: 08 Apr 2012
Location: Newton Ia.
Points: 4049
|
Post Options
Thanks(0)
Quote Reply
Posted: 31 Mar 2015 at 12:51am |
|
Don, not broken. Just not happy with the fit so I cut it off and tried again until I was satisfied. Yes the safety wire twisting pliers make quick work of the process.
|
|
B26240
Orange Level
Joined: 21 Nov 2009
Location: mn
Points: 3865
|
Post Options
Thanks(0)
Quote Reply
Posted: 31 Mar 2015 at 6:34am |
|
Nice job !! Better to go slow and get it right the first time.
|
|
IBWD MIke
Orange Level
Joined: 08 Apr 2012
Location: Newton Ia.
Points: 4049
|
Post Options
Thanks(0)
Quote Reply
Posted: 31 Mar 2015 at 8:22am |
 Ted J wrote: Ted J wrote:
Nice job. What did you do to clean up that block after it came out the first time? Looks really good!
|
Ted, I just wire brushed and scraped with a putty knife. A 4 inch electric and a die grinder did most of the work.
|
|
IBWD MIke
Orange Level
Joined: 08 Apr 2012
Location: Newton Ia.
Points: 4049
|
Post Options
Thanks(0)
Quote Reply
Posted: 01 Apr 2015 at 1:27pm |
|
I will try to keep this updated through the process. I am ready to put the pan on now, Thanks to Don for the demo and video. Without that it would have been interesting trying to get it sealed up. Still could be but I feel like I've got a fighting chance.
|
|
Don(MO)
Orange Level
Joined: 12 Sep 2009
Location: Bates City MO.
Points: 6862
|
Post Options
Thanks(0)
Quote Reply
Posted: 01 Apr 2015 at 5:20pm |
|
Did you change the cam bearings too.
|
|
3 WD45's with power steering,G,D15 fork lift,D19, W-Speed Patrol, "A" Gleaner with a 330 corn head,"66" combine,roto-baler, and lots of Snap Coupler implements to make them work for their keep.
|
|
REEDE
Silver Level
Joined: 24 Apr 2010
Points: 286
|
Post Options
Thanks(0)
Quote Reply
Posted: 01 Apr 2015 at 8:08pm |
|
Thanks for sharing the pictures.
|
|
Hubnut
Orange Level

Joined: 30 Jul 2014
Location: Gainesville, FL
Points: 1817
|
Post Options
Thanks(0)
Quote Reply
Posted: 01 Apr 2015 at 8:13pm |
|
Very nice job. Thanks for sharing the pictures and comments.
|
|
IBWD MIke
Orange Level
Joined: 08 Apr 2012
Location: Newton Ia.
Points: 4049
|
Post Options
Thanks(0)
Quote Reply
Posted: 02 Apr 2015 at 12:57am |
|
Yes, new cam bearings. When I started on this, i didn't really set a budget. Probably a good thing. Got some pics of the head I will post soon. I think the only things that are not new is the casting and the valve springs.
|
|
IBWD MIke
Orange Level
Joined: 08 Apr 2012
Location: Newton Ia.
Points: 4049
|
Post Options
Thanks(0)
Quote Reply
Posted: 02 Apr 2015 at 12:35pm |
The pan is finally on. Been a little apprehensive about this, fingers crossed she seals up. 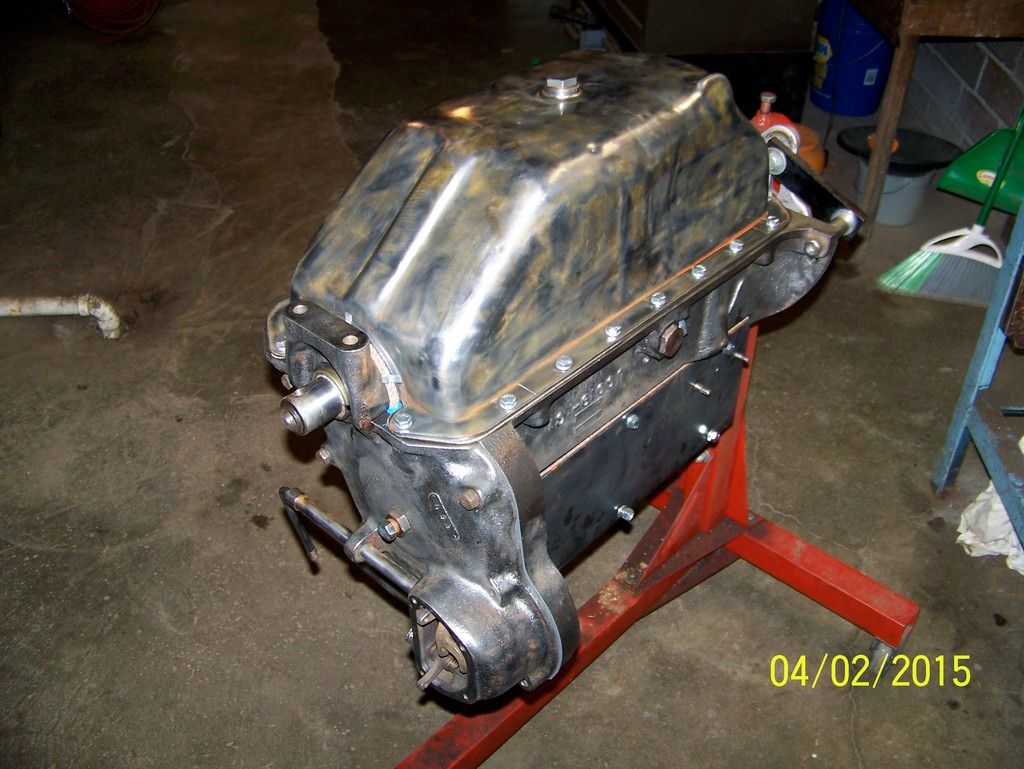 Up-rite and headed in the right direction.  There have been several people who helped a lot with this project. Thanks to Don and Rick from Mo. and Reede at the Central Ia. Farm Store. I bought the crank from Rick and got a nice clutch set-up from him too. Pics of that later, Mike.
|
|
IBWD MIke
Orange Level
Joined: 08 Apr 2012
Location: Newton Ia.
Points: 4049
|
Post Options
Thanks(0)
Quote Reply
Posted: 03 Apr 2015 at 4:54pm |
|
|
|
Don(MO)
Orange Level
Joined: 12 Sep 2009
Location: Bates City MO.
Points: 6862
|
Post Options
Thanks(0)
Quote Reply
Posted: 03 Apr 2015 at 5:14pm |
|
Mike you might turn the oil filter housing over.
|
|
3 WD45's with power steering,G,D15 fork lift,D19, W-Speed Patrol, "A" Gleaner with a 330 corn head,"66" combine,roto-baler, and lots of Snap Coupler implements to make them work for their keep.
|
|
IBWD MIke
Orange Level
Joined: 08 Apr 2012
Location: Newton Ia.
Points: 4049
|
Post Options
Thanks(0)
Quote Reply
Posted: 03 Apr 2015 at 10:30pm |
|
Thanks Don, I might have caught that before it goes in the tractor. At least I hope I would have.
|
|
Don(MO)
Orange Level
Joined: 12 Sep 2009
Location: Bates City MO.
Points: 6862
|
Post Options
Thanks(0)
Quote Reply
Posted: 04 Apr 2015 at 10:08am |
|
Mike you are doing a good rebuilding the WD/WD45 engine that it's hard to find stuff to pic on you. lol kip up the good work and post more pics.
|
|
3 WD45's with power steering,G,D15 fork lift,D19, W-Speed Patrol, "A" Gleaner with a 330 corn head,"66" combine,roto-baler, and lots of Snap Coupler implements to make them work for their keep.
|
|
Stan IL&TN
Orange Level

Joined: 13 Sep 2009
Location: Elvis Land
Points: 6730
|
Post Options
Thanks(0)
Quote Reply
Posted: 04 Apr 2015 at 10:33am |
|
Nice work Mike. You are doing great.
|
|
1957 WD45 dad's first AC
1968 one-seventy
1956 F40 Ferguson
|
|
IBWD MIke
Orange Level
Joined: 08 Apr 2012
Location: Newton Ia.
Points: 4049
|
Post Options
Thanks(0)
Quote Reply
Posted: 04 Apr 2015 at 8:16pm |
|
Thanks, I've got some more pics and will take more as I progress. Got the oil filter situation straightened out today but that was all. Had to go to the farm and get the planter ready to go. This spring has been a lot better than last year.
|
|
TedBuiskerN.IL.
Orange Level

Joined: 11 Sep 2009
Location: Davis, IL.
Points: 1959
|
Post Options
Thanks(0)
Quote Reply
Posted: 04 Apr 2015 at 10:54pm |
|
Are there any secrets to get that oil filter housing sealed? I think all of mine leak.
|
|
Most problems can be solved with the proper application of high explosives.
|
|
DaveKamp
Orange Level Access
Joined: 12 Apr 2010
Location: LeClaire, Ia
Points: 6063
|
Post Options
Thanks(0)
Quote Reply
Posted: 05 Apr 2015 at 9:03am |
TedBuiskerN.IL. wrote:
Are there any secrets to get that oil filter housing sealed? I think all of mine leak. |
Yes, they all leak.  From what I've experienced, I see two major issues: 1 Cork gasket shot 2 Aluminum base warped from someone overtightening the bolts trying to accomodate #1. Worst one I had was warped bad enough that I had to take it off, get it really, really clean. Then I filled the voids on the back side with hard-setting epoxy, then milled the face flat, then reinstalled it onto the tractor with a gasket I made out of neoprene gasket material. It doesn't leak... yet... 
|
|
Ten Amendments, Ten Commandments, and one Golden Rule solve most every problem. Citrus hand-cleaner with Pumice does the rest.
|
|
IBWD MIke
Orange Level
Joined: 08 Apr 2012
Location: Newton Ia.
Points: 4049
|
Post Options
Thanks(0)
Quote Reply
Posted: 19 Apr 2015 at 12:52pm |
Time for a little update. I had quite a time with the rocker arms. Tip for anyone else doing this, head, rocker-arm support stand, stud, and valve cover are all specific to 3 or 4 inch head. This engine has the four inch head from a 45, the wd engine I got the block from had the three inch. Long story short, I spent a lot of time getting all the parts to match.  Here's one of my time killers. Had the wrong valve cover ready for paint. The right one wasn't. I had one adjusting screw that wouldn't turn. Did a total tear down to change it, put new corks in while apart.  Just about ready for paint. 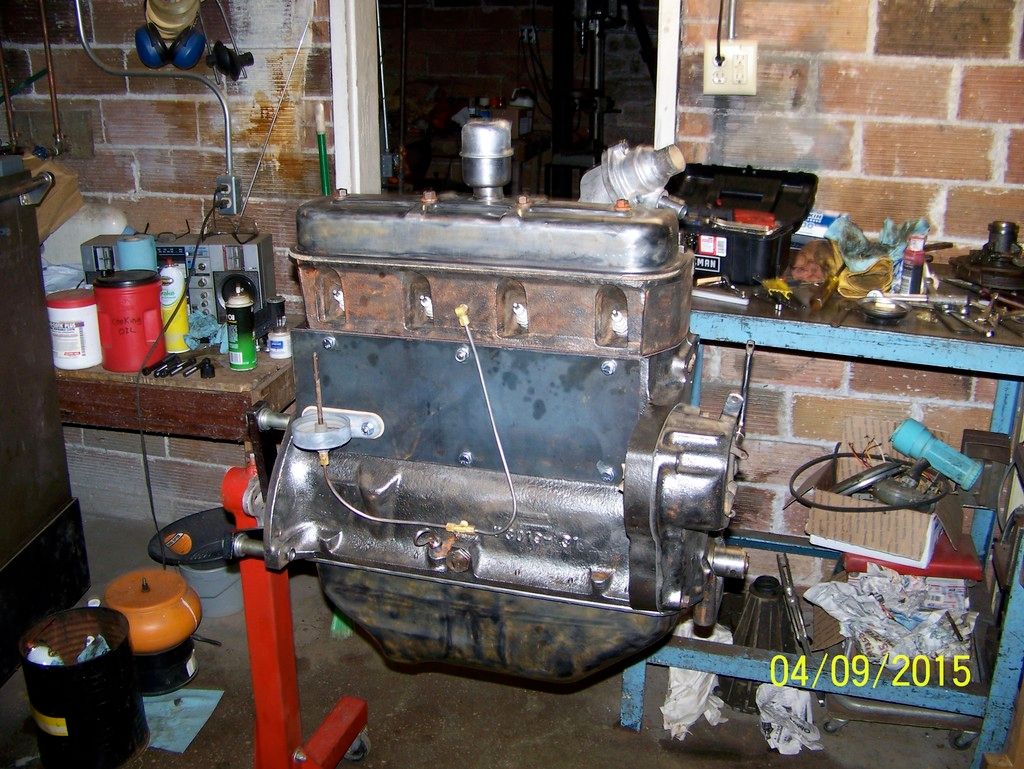 When I installed the governor spring and cover I discovered I had plumed the oil lines incorrectly. Got that straightened out and masked everything off.   The primer laid down real nice.   Since I had the tall valve cover naked, went ahead and primed it too. Thought about painting it but not sure if I will use it or sell it. Can always paint later.  And painted, three coats of pure misery for me. If I ever learn how to paint without runs I will be one happy guy. 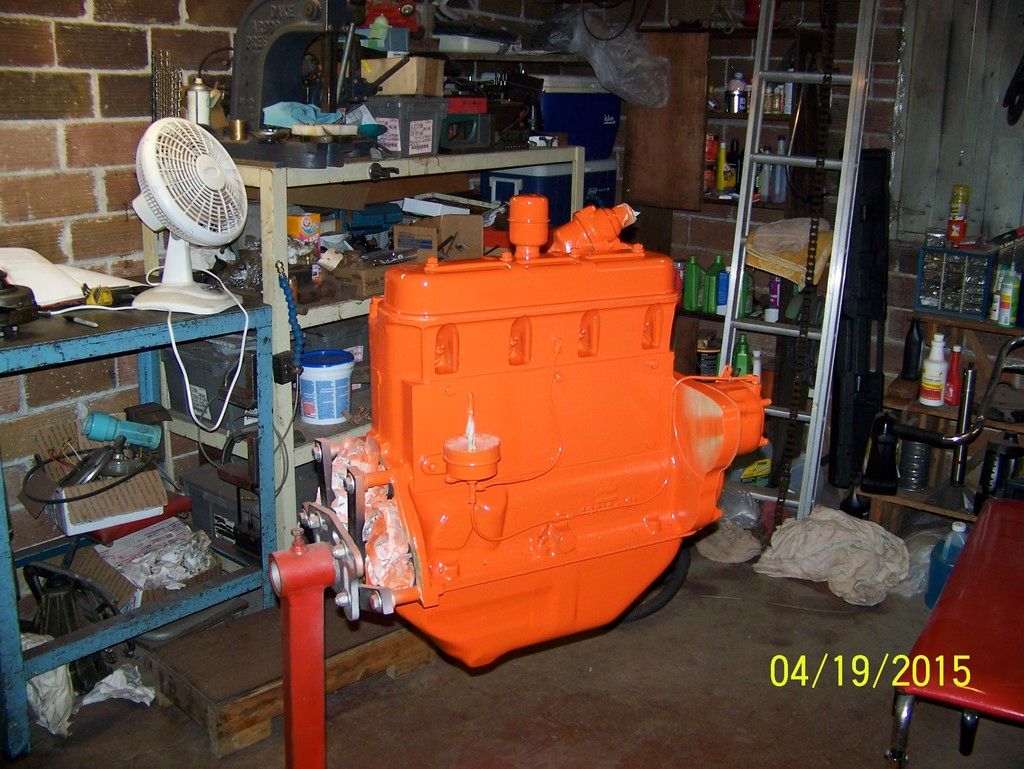 
|
|
IBWD MIke
Orange Level
Joined: 08 Apr 2012
Location: Newton Ia.
Points: 4049
|
Post Options
Thanks(0)
Quote Reply
Posted: 19 Apr 2015 at 12:56pm |
I missed the shot of the two valve covers. Probably spent two hours cleaning that thing prepping for paint. 
|
|
bigcountry48
Orange Level

Joined: 28 Aug 2011
Location: Georgia
Points: 1100
|
Post Options
Thanks(0)
Quote Reply
Posted: 19 Apr 2015 at 1:05pm |
|
What ended up happening to the other block? Was it any good?
|
|
1950 B, 1952 pulling wd, and 1954 wd45
|
|
IBWD MIke
Orange Level
Joined: 08 Apr 2012
Location: Newton Ia.
Points: 4049
|
Post Options
Thanks(0)
Quote Reply
Posted: 19 Apr 2015 at 1:18pm |
While I have the tractor apart I,m going to replace the hand clutch. Upgrading to a three disc. Got a NOS spring (with red stripe) and the unit off e-bay.  I set this up according to the manual, clearance checked right on when done. Hopefully I don't have to adjust it after installation. Also have a freshly surfaced flywheel, new ring gear, (real bargain on e-bay) and 9 spring clutch and pressure plate from Rick.  Thought I had a pic of the clutch but can't find it. Found it. 
Edited by IBWD MIke - 19 Apr 2015 at 1:28pm
|
|


