| Author |
 Topic Search Topic Search  Topic Options Topic Options
|
WDman1951 
Orange Level

Joined: 18 Jul 2015
Location: Fargo ND
Points: 1208
|
 Post Options Post Options
") Thanks(0) Thanks(0)
 Quote Quote  Reply Reply
 Posted: 09 Jan 2016 at 11:50pm Posted: 09 Jan 2016 at 11:50pm |
|
I'll have to make the trip up there sometime and see it not often I get to see tractors that old cool looking unit quiet the big beast it'll be cool to see here breathe new life.
|
|
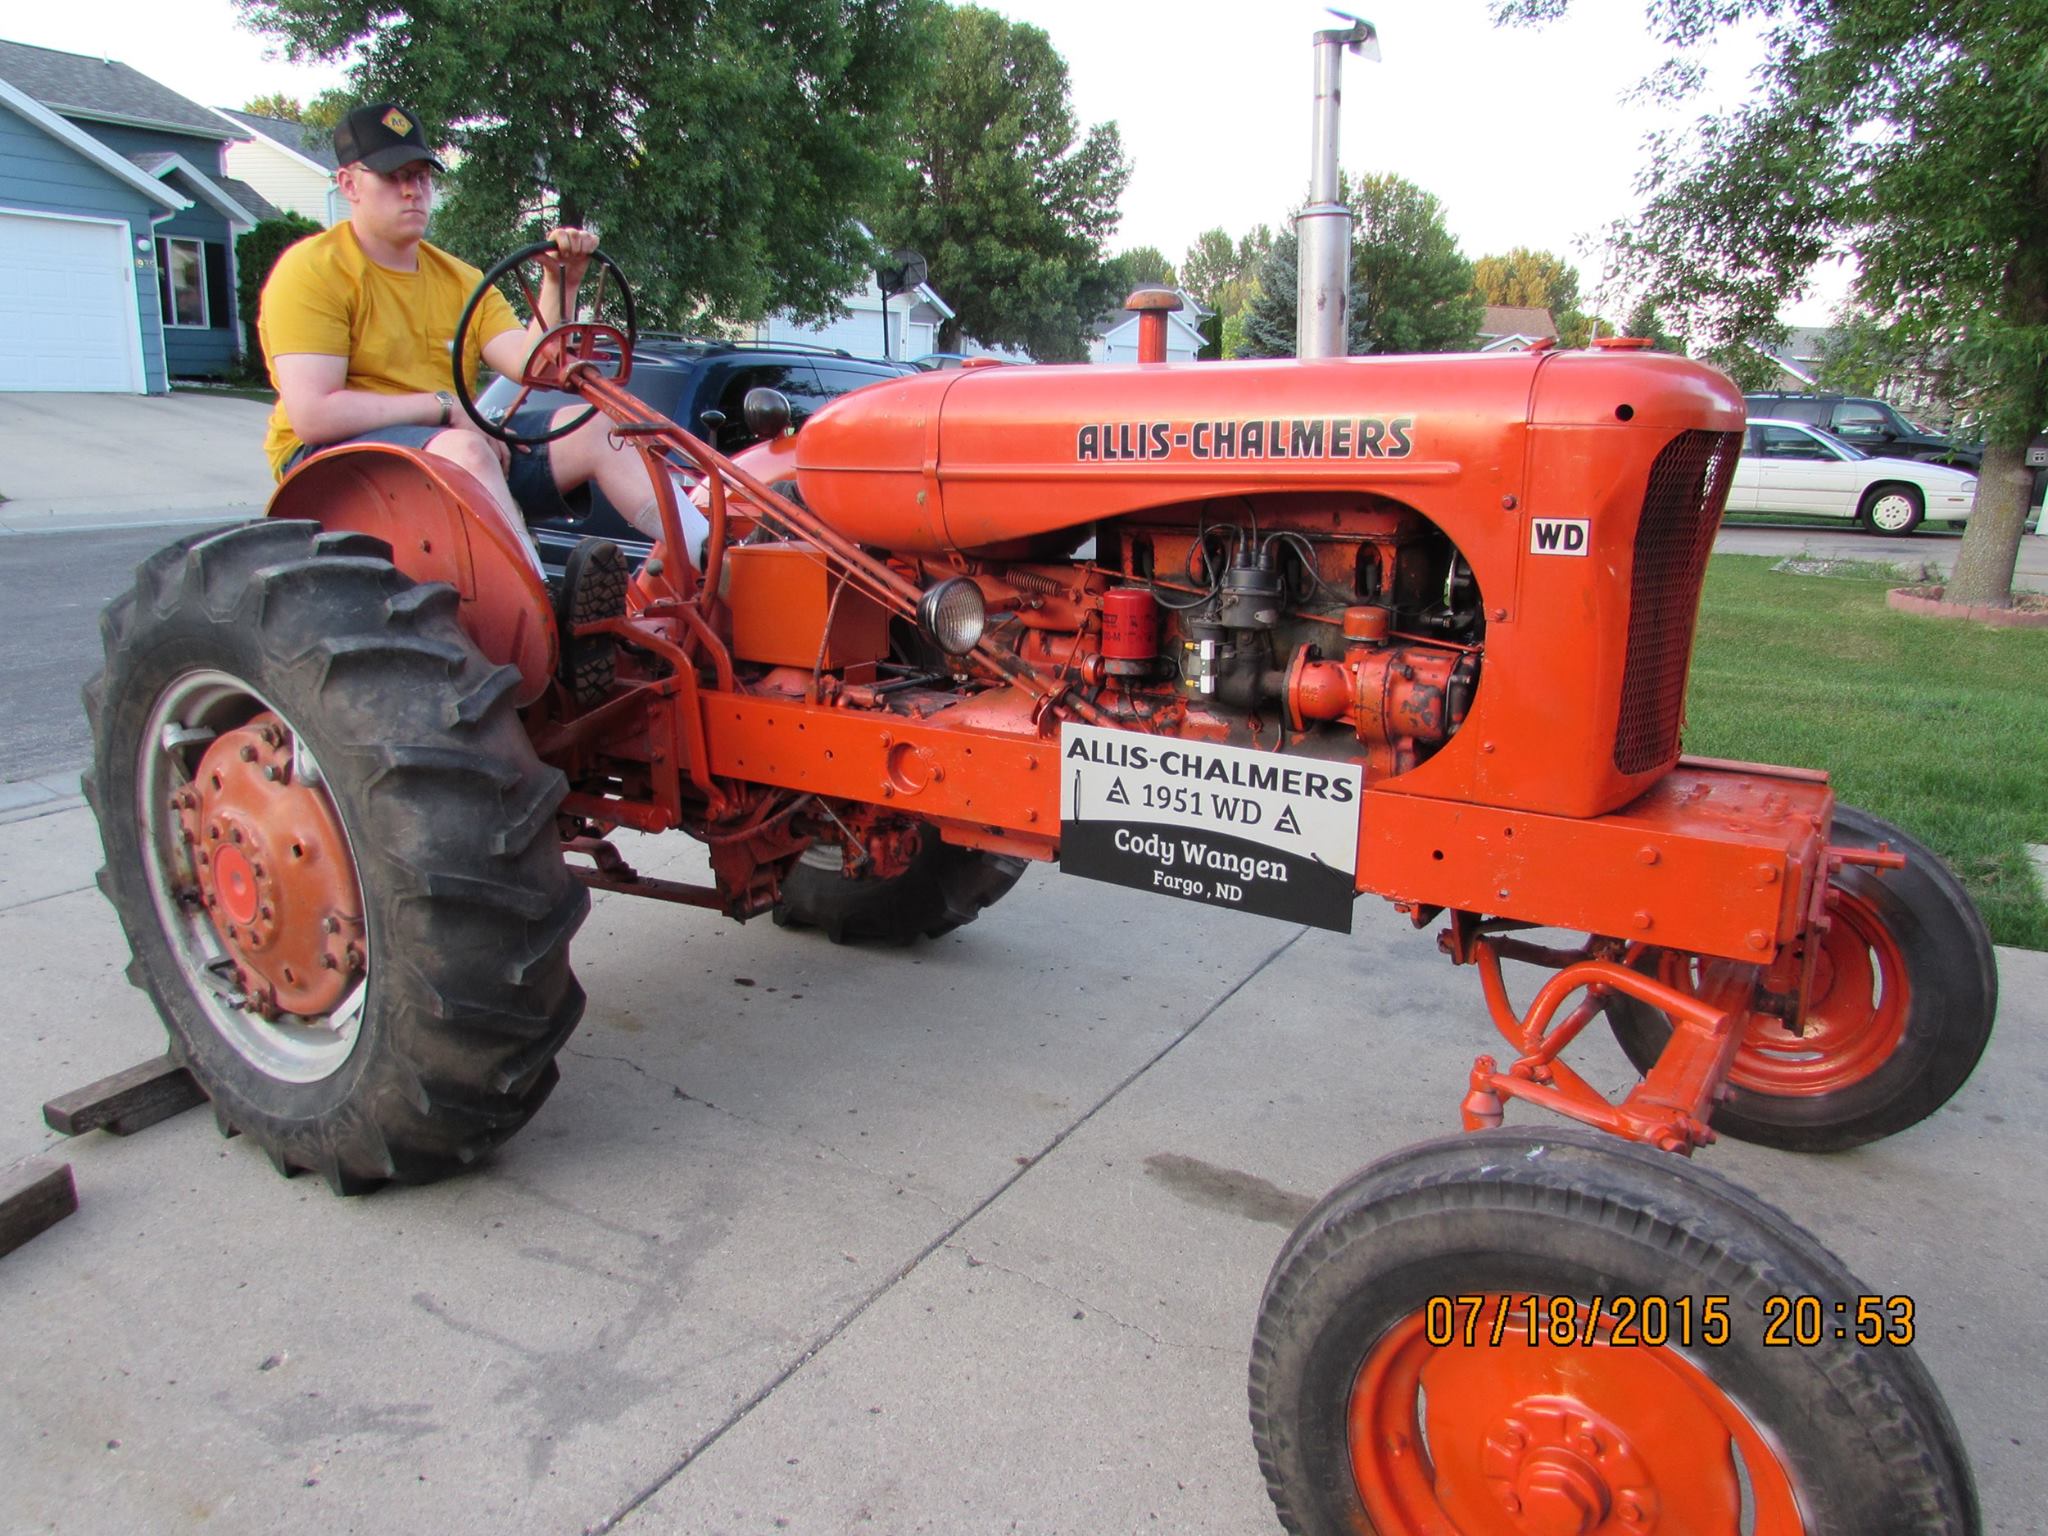
1951 WD 1945 C 1936 WC
|
 |
|
Sponsored Links
|
|
|
Sugarmaker
Orange Level

Joined: 12 Jul 2013
Location: Albion PA
Points: 8485
|
Post Options
Thanks(0)
Quote Reply
Posted: 10 Jan 2016 at 9:03am |
|
Jacob,
Great documentation on the work you have done on Big AL! Great that you are working on this with your dad too. One thing I did not hear was "we are done" or "this is now Yard art"! You have a positive attitude and I am sure the 25-30 with run and drive again.
Good luck with the rebuild!
Regards,
Chris
|
|
D17 1958 (NFE), WD45 1954 (NFE), WD 1952 (NFE), WD 1950 (WFE), Allis F-40 forklift, Allis CA, Allis D14, Ford Jubilee, Many IH Cub Cadets, 32 Ford Dump, 65 Comet.
|
|
Alberta Phil
Orange Level

Joined: 13 Sep 2009
Location: Alberta, Canada
Points: 3917
|
Post Options
Thanks(0)
Quote Reply
Posted: 10 Jan 2016 at 9:50am |
Good to see you're making progress on the 'ol girl.  I'll be watching this thread with interest as the 20-35's are my favorite Allis!
|
|
HudCo
Orange Level

Joined: 29 Jan 2013
Location: Plymouth Utah
Points: 3896
|
Post Options
Thanks(0)
Quote Reply
Posted: 10 Jan 2016 at 10:08am |
|
that is going to be somthing very proud of especalily getting to do it with dad , i realy enjoy watching your progress
|
|
Jacob (WI,ND)
Orange Level

Joined: 11 Sep 2009
Location: Kenmare, ND
Points: 1248
|
Post Options
Thanks(0)
Quote Reply
Posted: 14 Feb 2016 at 3:05pm |
Hi all!
A few little updates on the 20-35. Dad dropped off the new set of valves, new sleeve seals, flywheel, used lifters, and new crank seals at the machine shop on Saturday. Things are coming along nicely with the engine work. They have all the old sleeves bored out. The crank has been turned down and the original babbitt bearings are being fit to it now. I plan on making a quick trip home to WI the end of this week, so HOPEFULLY the short block will be ready to pick up by then. The heads might not be quite done, but that is ok. They still need to machine the valve guides and new valve seats to the new valves. But the heads both checked out ok, so that was great news! Thanks again Phil for selling me the '27 head I was needing for this project!
I finished disassembling the Carb and got it all cleaned up.
Unfortunately I broke the Venturi removing it.
So the venturi and the wore out throttle shaft are at the local machine shop being looked at. They think they can make some new parts for me, I should hear more next week.
Matt Scott has my mag and is rebuilding it for me
Unfortunately he discovered that the main housing was damaged beyond repair, so he is locating another housing for me. Those are the little surprises you encounter with a machine this old. He'll get it good as new though!
I have some of the broken cast parts with a friend in welding school. She is going to try her best to fix them up. Cross your fingers.
All in all progress has been slow but steady. I keep joking that by spring all we'll have to do is bolt it together and start it up. Easy as that right? 
As usual, a bunch more pics added to my Google Photo account.
Edited by Jacob (WI,ND) - 25 Mar 2018 at 7:30pm
|
|
Jacob Swanson
1920 6-12; 1925,1926 20-35 longfenders; 1925,1926 15-25's; 1927,1929 20-35 shortfenders; C; B's; IB; WC's; WD; WD45
|
|
Jacob (WI,ND)
Orange Level
Joined: 11 Sep 2009
Location: Kenmare, ND
Points: 1248
|
Post Options
Thanks(0)
Quote Reply
Posted: 27 Feb 2016 at 8:47pm |
Hi all,
Got some more updates if anyone is interested.
I made a quick trip back home to WI last weekend. The machine shop was done with my engine, so Dad and I made a trip down to pick it up!
So with the sleeves bored, the crank ground, cam polished, the bearings all gone through and refit, and the rotating assembly all final assembled, we have the engine back in our garage. We can take over from here!
The heads were not quite done yet, so we'll have to get them another trip. But with the engine we can at least start getting things put back together.
Had the new set of used lifters resurfaced.
Back here in Kenmare, ND I got the parts back from the local machine shop for my carb. I am fighting a cold so I haven't gotten around to putting it back together yet, but I did make it to the hardware store and round up some seals for the shafts. Cross your fingers what I found works.
And a quick flashback to when I got it back in July
I think we're doing pretty good for being about 7 months into this project now. And that is with me being 10 hours away from the tractor! But spring is coming soon, and I still have a lot to do.....
I'm still on the hunt for that elusive '27 throttle quadrant at this time. I've rounded up about everything else, or have arranged to get it in the near future.
As usual, more new pics posted on my Google Photos:
Edited by Jacob (WI,ND) - 25 Mar 2018 at 7:36pm
|
|
Jacob Swanson
1920 6-12; 1925,1926 20-35 longfenders; 1925,1926 15-25's; 1927,1929 20-35 shortfenders; C; B's; IB; WC's; WD; WD45
|
|
Jacob (WI,ND)
Orange Level
Joined: 11 Sep 2009
Location: Kenmare, ND
Points: 1248
|
Post Options
Thanks(0)
Quote Reply
Posted: 06 Mar 2016 at 12:11pm |
Good Morning everyone!
I have a couple little updates to add. I ordered up some brake lining material from McMaster-Carr And shortly after it was delivered back home, Dad text me some pics showing me he had it installed on the original brake band. That was a nice surprise!
Meanwhile, here in the prairie, I got around to assembling the carb with its new parts. I'm 99% done with it now. I just have to order up that brass tube that was cracked. A bunch of people suggested soldering it up, but with so many cracks and it being so small, I decided to just replace it with a new piece. Again, I found it on McMaster, those people have EVERYTHING!
Things are coming right along, I'll have to go start on another part now...
Edited by Jacob (WI,ND) - 25 Mar 2018 at 7:41pm
|
|
Jacob Swanson
1920 6-12; 1925,1926 20-35 longfenders; 1925,1926 15-25's; 1927,1929 20-35 shortfenders; C; B's; IB; WC's; WD; WD45
|
|
Dan73
Orange Level

Joined: 04 Jun 2015
Location: United States
Points: 6054
|
Post Options
Thanks(0)
Quote Reply
Posted: 06 Mar 2016 at 1:06pm |
|
Mcmaster is great Granger also has a lot of that same type of stuff. Looks like you are making great progress. I love all the updates.
|
|
Sugarmaker
Orange Level
Joined: 12 Jul 2013
Location: Albion PA
Points: 8485
|
Post Options
Thanks(0)
Quote Reply
Posted: 06 Mar 2016 at 3:24pm |
|
Nice work on the restoration! Engine looks great! Yea you just have to bolt it together this spring!:)
Regards,
Chris
|
|
D17 1958 (NFE), WD45 1954 (NFE), WD 1952 (NFE), WD 1950 (WFE), Allis F-40 forklift, Allis CA, Allis D14, Ford Jubilee, Many IH Cub Cadets, 32 Ford Dump, 65 Comet.
|
|
Hubnut
Orange Level

Joined: 30 Jul 2014
Location: Gainesville, FL
Points: 1817
|
Post Options
Thanks(0)
Quote Reply
Posted: 06 Mar 2016 at 4:43pm |
|
Man, I really love looking at your progress. You're doing a cracking good job. Simply brilliant! Keep the posts coming.
Best,
Steve
|
|
1940 B "Lucy"
1941 B w/ Woods L59 "Flavia"
1942 B w/ finish mower "Dick"
1941 C w/ 3-point "Maggie"
1947 C SFW w/ L306 "Trixie"
1972 314H
|
|
Jacob (WI,ND)
Orange Level
Joined: 11 Sep 2009
Location: Kenmare, ND
Points: 1248
|
Post Options
Thanks(0)
Quote Reply
Posted: 06 Mar 2016 at 8:22pm |
Even the small victories are worth noting. This afternoon I tackled the radiator cap.
I ended up drilling the old screws out and cleaning up the threads, because of course the old screws snapped off, why wouldn't they?
Made a new gasket, and metal plate, a couple new screws and bingo, we have a finished radiator cap!
It's worth noting that the '27 radiator cap is different than the '28 and '29 20-35's. It has two screws, where the later ones have one rivet in the center to hold the metal plate.
What next?
Edited by Jacob (WI,ND) - 25 Mar 2018 at 8:20pm
|
|
Jacob Swanson
1920 6-12; 1925,1926 20-35 longfenders; 1925,1926 15-25's; 1927,1929 20-35 shortfenders; C; B's; IB; WC's; WD; WD45
|
|
Jacob (WI,ND)
Orange Level
Joined: 11 Sep 2009
Location: Kenmare, ND
Points: 1248
|
Post Options
Thanks(0)
Quote Reply
Posted: 06 Mar 2016 at 8:36pm |
Suppose I can tackle the Fan Hub.
I have the Hyatt bearing style fan hub. There are three different variations of the fan hubs over the years.
I have the bearing and washers taken out
But am wondering what the trick is to get the sleeve out that the bearing rides in? It is a split sleeve and has three holes in it, one on either side of the slit, and one opposite. Is there a special tool to get this out? It needs to be removed so the new seal can be installed, which is located behind (or at the bottom in these pics) the sleeve.
Thanks!
Edited by Jacob (WI,ND) - 25 Mar 2018 at 8:25pm
|
|
Jacob Swanson
1920 6-12; 1925,1926 20-35 longfenders; 1925,1926 15-25's; 1927,1929 20-35 shortfenders; C; B's; IB; WC's; WD; WD45
|
|
Jacob (WI,ND)
Orange Level
Joined: 11 Sep 2009
Location: Kenmare, ND
Points: 1248
|
Post Options
Thanks(0)
Quote Reply
Posted: 12 Mar 2016 at 8:48pm |
Got the fan hub the rest of the way apart, cleaned up, new seal and put back together today. One more thing that is done!
A little trick, a piece of 1 1/2 PVC is the perfect size to drive the sleeve back into the hub
And done!
Edited by Jacob (WI,ND) - 25 Mar 2018 at 8:28pm
|
|
Jacob Swanson
1920 6-12; 1925,1926 20-35 longfenders; 1925,1926 15-25's; 1927,1929 20-35 shortfenders; C; B's; IB; WC's; WD; WD45
|
|
Jacob (WI,ND)
Orange Level
Joined: 11 Sep 2009
Location: Kenmare, ND
Points: 1248
|
Post Options
Thanks(0)
Quote Reply
Posted: 20 Mar 2016 at 2:52pm |
Couple more things done on Big Al.
Got the new brass tube soldered in the carb plug to replace the original cracked up one.
So the carb is all done now, yippee!
Also finished cleaning up the water manifold, water elbow, and intake manifold. Got a round wire wheel to put on the drill to get inside the tubes all the way. Also wire wheeled the ends where the hoses go and smeared some JB Weld in the pits. Once dried overnight I filed and sanded the ends smooth. Very nice! Smoothed the gasket surfaces on the sander too.
Moving right along, and getting antsy to get home again...
Edited by Jacob (WI,ND) - 25 Mar 2018 at 8:33pm
|
|
Jacob Swanson
1920 6-12; 1925,1926 20-35 longfenders; 1925,1926 15-25's; 1927,1929 20-35 shortfenders; C; B's; IB; WC's; WD; WD45
|
|
Dan73
Orange Level
Joined: 04 Jun 2015
Location: United States
Points: 6054
|
Post Options
Thanks(0)
Quote Reply
Posted: 20 Mar 2016 at 5:38pm |
|
It always amazes me to see these postings. The amount of detail you are putting into this old girl with all these repairs that are fabrication work I don't think i would know where to start on most of then. Very well done and keep us updated it gives me hope that I can fix up mu old stuff once I get the funds.
|
|
Dave H (NE)
Silver Level

Joined: 11 Sep 2009
Location: Western NE
Points: 288
|
Post Options
Thanks(0)
Quote Reply
Posted: 20 Mar 2016 at 6:12pm |
|
Jacob You asked for info. on the radiator shroud. The shroud you show is for a 1926 or older, the screen was used on it. At serial no. 8070 and up the shroud was changed and no screen was used.
|
|
Jacob (WI,ND)
Orange Level
Joined: 11 Sep 2009
Location: Kenmare, ND
Points: 1248
|
Post Options
Thanks(0)
Quote Reply
Posted: 20 Mar 2016 at 6:22pm |
 Dan73 wrote: Dan73 wrote:
It always amazes me to see these postings. The amount of detail you are putting into this old girl with all these repairs that are fabrication work I don't think i would know where to start on most of then. Very well done and keep us updated it gives me hope that I can fix up mu old stuff once I get the funds. |
Thank you Dan! It is good to hear others appreciate these posts. I know I like to read them, and see how others solved problems. Especially with pictures, hence why I try to take a ton of them.
The trick is to take it piece by piece. Once I got the old boy all apart I made a point to take a few little pieces back home with me each trip. I only focused on these few pieces until they were done, and then move on to the next. It keeps a guy from getting overwhelmed! Another trick is to work on a tractor you REALLY want to be working on. I have not been good about this in the past. I have many unfinished projects in the barn, but the difference is I picked most of them up because the price was too go not to drag them home, and I bought them because of that and NOT because I HAD to have them. This I can see now was a mistake. But live and learn, I'll get to them someday. Or I might just sell them eventually if someone comes along and is willing to make me a good offer.
Now my 20-35 on the other hand is a tractor I have wanted for years! There are many posts on this site that can prove that, were I have said over and over that "I will have one of them someday." So once I got one, I pulled out all the stops and knew I would get this one done no matter what! It helps that I have been tucking away some fun money for a project like this for a number of years as I looked for it. Because we all know it does take $ even if we are doing most of the work our selves, LOL! And for years I was in the no fun money boat, don't get me wrong. I'm still on the borderline of being there, LOL!
I also consider this my third life (not old enough for mid life yet) crisis of sorts. I'm going to be 31 on the 29th and I kinda had to prove to myself that I can finish a big project like this, because I have started many, but finished none in years.
I'll end this by saying, if I can do this, so can most anyone else. Just takes a LOT of time, and a LOT of patience. And a huge attention to detail, which I have to a fault most days.... That and set realistic goals. Lots of little realistic goals, to reach the big goals you set in life. Like having a 20-35 all mechanically restored at Hutch before the year 2022, huh Kyle? (inside bet me and Kyle have going that we set back in 2012) You better get after your 20-35 Kyle, times a ticking, and your WC will look really good in my barn if you don't get 'er done by then.... BAhahaha!
|
|
Jacob Swanson
1920 6-12; 1925,1926 20-35 longfenders; 1925,1926 15-25's; 1927,1929 20-35 shortfenders; C; B's; IB; WC's; WD; WD45
|
|
Jacob (WI,ND)
Orange Level
Joined: 11 Sep 2009
Location: Kenmare, ND
Points: 1248
|
Post Options
Thanks(0)
Quote Reply
Posted: 20 Mar 2016 at 6:47pm |
Dave H (NE) wrote:
Jacob You asked for info. on the radiator shroud. The shroud you show is for a 1926 or older, the screen was used on it. At serial no. 8070 and up the shroud was changed and no screen was used.
|
Thanks Dave, but respectfully I have to disagree a little bit  . I've been doing a lot of research on these old ones, and I have found that you are correct in that they were changed at 8070 (the first short fender 20-35 in 1927). But the one I have is indeed for an early '27. The '26 and earlier (longfenders) had a different shroud altogether, because of course the radiators were different. The early '27's had this shroud with the 90 degree lip and four square nuts, but I have found NO proof they ever came with a screen, so you are correct there. I have spoke with others on this and we speculate that it was just a tie over from how the sheet metal guys were making them on earlier tractors. At least by '28 (maybe even sometime in '27) the shroud was changed again to have a rolled lip over a piece of wire, instead of the 90 degree lip. I have personally found (or talked with people who have) at least four other '27's besides mine with this style of 90 degree shroud, so I am confident about this.
It's amazing the ton of little nuances you find once you start really looking It really is fun discovering them. Thanks!
|
|
Jacob Swanson
1920 6-12; 1925,1926 20-35 longfenders; 1925,1926 15-25's; 1927,1929 20-35 shortfenders; C; B's; IB; WC's; WD; WD45
|
|
K.Novak
Bronze Level

Joined: 03 Aug 2012
Location: Pulaski, WI
Points: 100
|
Post Options
Thanks(0)
Quote Reply
Posted: 22 Mar 2016 at 8:15pm |
Jacob (WI,ND) wrote:
Like having a 20-35 all mechanically restored at Hutch before the year 2022, huh Kyle? (inside bet me and Kyle have going that we set back in 2012) You better get after your 20-35 Kyle, times a ticking, and your WC will look really good in my barn if you don't get 'er done by then....BAhahaha! |
Don't you worry my good buddy! I WILL NOT BE PONYING UP A WC! I suggest you start thinking about the terms of our next bet since it's your turn to pick. Perhaps we ought to enlist the help of the forum?!?!
Edited by K.Novak - 22 Mar 2016 at 8:16pm
|
|
1934 WC SN# 2123,Factory WFE
1935 25-40 SN# 25557, TS
1938 WF SN# 506, Full Steel
1967 I400 SN# 1302
|
|
Jacob (WI,ND)
Orange Level
Joined: 11 Sep 2009
Location: Kenmare, ND
Points: 1248
|
Post Options
Thanks(0)
Quote Reply
Posted: 22 Mar 2016 at 8:47pm |
K.Novak wrote:
Jacob (WI,ND) wrote:
Like having a 20-35 all mechanically restored at Hutch before the year 2022, huh Kyle? (inside bet me and Kyle have going that we set back in 2012) You better get after your 20-35 Kyle, times a ticking, and your WC will look really good in my barn if you don't get 'er done by then....BAhahaha! |
Don't you worry my good buddy! I WILL NOT BE PONYING UP A WC! I suggest you start thinking about the terms of our next bet since it's your turn to pick. Perhaps we ought to enlist the help of the forum?!?! |
Ha! Good to hear that! The quicker we get this bet completed, the quicker we can start the next... And don't you worry yourself with what it might be, I've been thinking LONG and HARD about what it might-could-be, hehehe... This short fender bet was almost too easy. Might have to kick it up a notch next go-round. I know we both like a good challenge.... (although the old piggy bank might start getting scared...  )
Oh yeah everyone, peer pressure is also an excellent motivation to finishing projects as well! What else are friends for? 
|
|
Jacob Swanson
1920 6-12; 1925,1926 20-35 longfenders; 1925,1926 15-25's; 1927,1929 20-35 shortfenders; C; B's; IB; WC's; WD; WD45
|
|
K.Novak
Bronze Level
Joined: 03 Aug 2012
Location: Pulaski, WI
Points: 100
|
Post Options
Thanks(0)
Quote Reply
Posted: 23 Mar 2016 at 1:41am |
Jacob (WI,ND) wrote:
K.Novak wrote:
Jacob (WI,ND) wrote:
Like having a 20-35 all mechanically restored at Hutch before the year 2022, huh Kyle? (inside bet me and Kyle have going that we set back in 2012) You better get after your 20-35 Kyle, times a ticking, and your WC will look really good in my barn if you don't get 'er done by then....BAhahaha! |
Don't you worry my good buddy! I WILL NOT BE PONYING UP A WC! I suggest you start thinking about the terms of our next bet since it's your turn to pick. Perhaps we ought to enlist the help of the forum?!?! |
Ha! Good to hear that! The quicker we get this bet completed, the quicker we can start the next... And don't you worry yourself with what it might be, I've been thinking LONG and HARD about what it might-could-be, hehehe... This short fender bet was almost too easy. Might have to kick it up a notch next go-round. I know we both like a good challenge.... (although the old piggy bank might start getting scared... )
Oh yeah everyone, peer pressure is also an excellent motivation to finishing projects as well! What else are friends for? |
Seems to me you're hinting around at a Long Fender........ Boy you weren't kidding about "kicking it up a notch"!!! How long would this bet be? Because the only long fender "near" me that I know about may take me the better part of a lifetime to own! 
|
|
1934 WC SN# 2123,Factory WFE
1935 25-40 SN# 25557, TS
1938 WF SN# 506, Full Steel
1967 I400 SN# 1302
|
|
Jacob (WI,ND)
Orange Level
Joined: 11 Sep 2009
Location: Kenmare, ND
Points: 1248
|
Post Options
Thanks(0)
Quote Reply
Posted: 16 Apr 2016 at 8:17pm |
Time for an update on a few things. Some small, some giant steps.
Dad got a new square headed bolt for the rear pivot of the front axle.
Kyle has been fixing up my governor for me. He's gotten it all disassembled to replace the two worn pins and to install a new bearing. The pins were blind pinned in place, so they had to be drilled to be removed. So once he got the new ones in it could be put back together. He's checking over everything very well, so it will be good for another 90 years when it's done. Keep up the great work buddy, thanks!
I made a quick trip home last weekend. I brought home the parts I had previously finished, then brought back some more to clean up and fix.
While there I made time to remove the clutch from the tractor, and amazingly got the clutch housing all cleaned up! Man was that a dirty mess!
Question for you, I assume there should be grease zerks on both ends of the clutch fork shaft? Mine are ugly, not sure what they did to it? Plugged on the left end and goobered up on the right end.
OH, the good news is my heads are finally done at the machine shop! I'll get them back sometime next week, so that is exciting.
I'll keep you all posted on what I get done here now that I have some parts to work on! Thanks!
Edited by Jacob (WI,ND) - 25 Mar 2018 at 8:43pm
|
|
Jacob Swanson
1920 6-12; 1925,1926 20-35 longfenders; 1925,1926 15-25's; 1927,1929 20-35 shortfenders; C; B's; IB; WC's; WD; WD45
|
|
Jacob (WI,ND)
Orange Level
Joined: 11 Sep 2009
Location: Kenmare, ND
Points: 1248
|
Post Options
Thanks(0)
Quote Reply
Posted: 01 May 2016 at 4:43pm |
Hi all!
Well, I got the clutch shaft all fixed up. Drilled and tapped out the bad end for a 5/8" bolt, put a bolt in with some locktite. Cut flush, drilled through and tapped for a grease zerk and good as new!
The other end I was more lucky, just got the old mashed up grease zerk out and the threads were ok, just chased them with a tap and good to go.
So that part of the project is done.
Edited by Jacob (WI,ND) - 25 Mar 2018 at 8:46pm
|
|
Jacob Swanson
1920 6-12; 1925,1926 20-35 longfenders; 1925,1926 15-25's; 1927,1929 20-35 shortfenders; C; B's; IB; WC's; WD; WD45
|
|
Jacob (WI,ND)
Orange Level
Joined: 11 Sep 2009
Location: Kenmare, ND
Points: 1248
|
Post Options
Thanks(0)
Quote Reply
Posted: 01 May 2016 at 4:50pm |
On to the clutch.
Shot of how the break works in the clutch area. Pull back on the clutch handle engages the clutch, clutch handle in the center the clutch is disengaged. Push the handle all the way forward and it engages the break, which stops the transmission, which stops the tractor.
first take the gear off.
Then the rest of the assembly can come off the shaft.
The the snap ring can be removed so the bearing can come out.
And the rest of the pins and linkages can be disassembled.
Edited by Jacob (WI,ND) - 25 Mar 2018 at 8:53pm
|
|
Jacob Swanson
1920 6-12; 1925,1926 20-35 longfenders; 1925,1926 15-25's; 1927,1929 20-35 shortfenders; C; B's; IB; WC's; WD; WD45
|
|
Jacob (WI,ND)
Orange Level
Joined: 11 Sep 2009
Location: Kenmare, ND
Points: 1248
|
Post Options
Thanks(0)
Quote Reply
Posted: 01 May 2016 at 4:57pm |
Ok, now I'm looking for advice or ideas.
The clutch collar and shifter are rather worn. There is about a 1/4" of play front to back, where I assume there should be almost none?
good side of shifter.
bad side.
showing the amount of wear between the two parts.
Most of the wear appears to be on the shifter. The bronze should be worn more than the steel though. I'm assuming the collar has been replaced in the past? What is the best fix? weld up the shifter and have it turned down to size again? Turn true and install a spacer?
Anyone tackled this issue? Thanks for any advice.
Edited by Jacob (WI,ND) - 25 Mar 2018 at 8:56pm
|
|
Jacob Swanson
1920 6-12; 1925,1926 20-35 longfenders; 1925,1926 15-25's; 1927,1929 20-35 shortfenders; C; B's; IB; WC's; WD; WD45
|
|
Sugarmaker
Orange Level
Joined: 12 Jul 2013
Location: Albion PA
Points: 8485
|
Post Options
Thanks(0)
Quote Reply
Posted: 01 May 2016 at 5:12pm |
|
Jacob,
Great documentation on the 25-30 restoration work. I'm surprised that you figured out there was a grease fitting in the end that was peened over! Amazing how the inside of the clutch hosing cleaned up. You have done a lot of good work on this project!
Regards,
Chris
|
|
D17 1958 (NFE), WD45 1954 (NFE), WD 1952 (NFE), WD 1950 (WFE), Allis F-40 forklift, Allis CA, Allis D14, Ford Jubilee, Many IH Cub Cadets, 32 Ford Dump, 65 Comet.
|
|
SteveM C/IL
Orange Level Access
Joined: 12 Sep 2009
Location: Shelbyville IL
Points: 8613
|
Post Options
Thanks(0)
Quote Reply
Posted: 01 May 2016 at 7:51pm |
|
I would guess the hole in the flange was once in the center of the width.Don't know how you would build that flange up since I'm guessing it's cast iron.I'll bet you figure something out.The up side is,it will work in the condition it's in.
|
|
Dan73
Orange Level
Joined: 04 Jun 2015
Location: United States
Points: 6054
|
Post Options
Thanks(0)
Quote Reply
Posted: 01 May 2016 at 7:58pm |
|
I would probably have it turned down then build a 2 peice spacer. Braze the spacer onto the cast then turn it down smooth. Thought about it all afternoon and that is the best solution I could come up with.
|
|
Dan73
Orange Level
Joined: 04 Jun 2015
Location: United States
Points: 6054
|
Post Options
Thanks(0)
Quote Reply
Posted: 01 May 2016 at 8:02pm |
https://www.italiantractorparts.com/tractor-repair.htmlThat is off color but a good discussion about repairing cast parts.
|
|
Thad in AR.
Orange Level Access

Joined: 12 Sep 2009
Location: Arkansas
Points: 9653
|
Post Options
Thanks(0)
Quote Reply
Posted: 01 May 2016 at 8:07pm |
|
Jacob this has been the best post in a long time. I really enjoy reading on your progress. I know it takes time away from your work to take pics and document things but this is an awesome job all the way around.
|
|


