| Author |
 Topic Search Topic Search  Topic Options Topic Options
|
dt1050 
Orange Level

Joined: 05 Jul 2011
Location: central pa
Points: 1078
|
 Post Options Post Options
") Thanks(0) Thanks(0)
 Quote Quote  Reply Reply
 Topic: hmmm should this wire be like this? Topic: hmmm should this wire be like this?
Posted: 27 Dec 2017 at 8:41am |
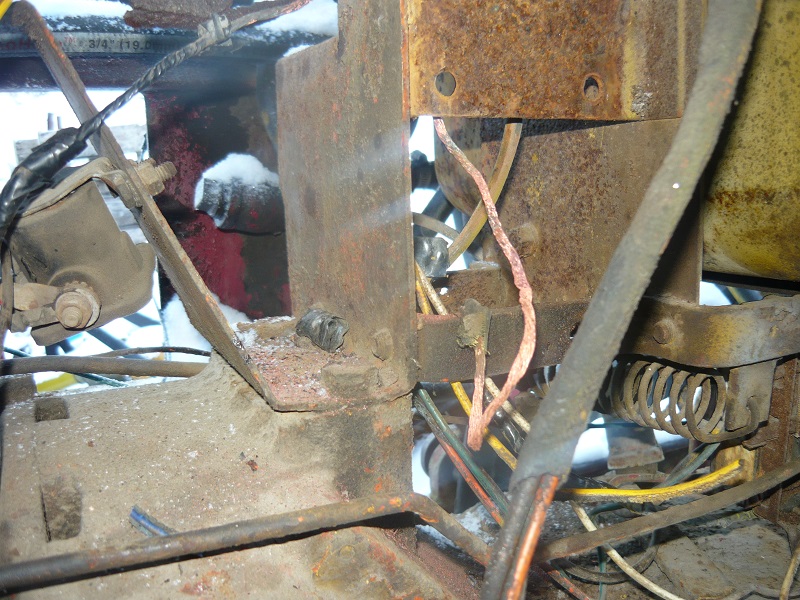
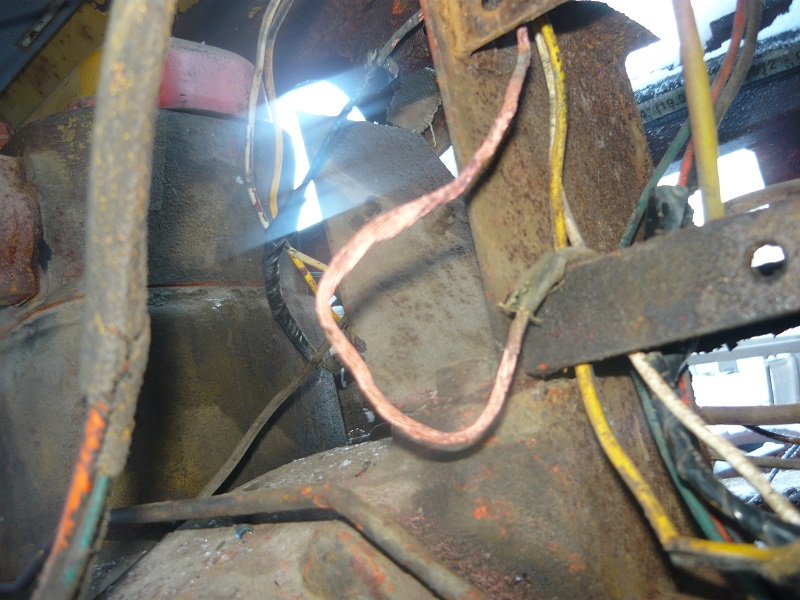
had a bad wire to the ingition switch on the d17 so I thought I'd replace it. in single digit temps? when I pulled the crap off the wires I found this bare copper wire going from the selnoid to the alt meter.....it's bear for about 8 inches....glad the old gal didn't catch fire!!! every wire I touch the insulation just cracks, looks like I'm fixing more than one wire...
|
|
Just cause it's orange don't make it a tractor, there's only one..Allis Chalmers
|
 |
|
Sponsored Links
|
|
|
DougS
Orange Level

Joined: 03 Nov 2011
Location: Iowa
Points: 2490
|
Post Options
Thanks(0)
Quote Reply
Posted: 27 Dec 2017 at 9:39am |
|
If that wire is bare because the insulation hardened and cracked off, I’d replace all the wiring. That doesn’t look like OEM wiring.
|
|
dt1050
Orange Level
Joined: 05 Jul 2011
Location: central pa
Points: 1078
|
Post Options
Thanks(0)
Quote Reply
Posted: 27 Dec 2017 at 9:52am |
|
OEM, nope, the one piece I replaced already was old cloths line. the green stuff with metal wire in it?
|
|
Just cause it's orange don't make it a tractor, there's only one..Allis Chalmers
|
|
Alberta Phil
Orange Level

Joined: 13 Sep 2009
Location: Alberta, Canada
Points: 3985
|
Post Options
Thanks(0)
Quote Reply
Posted: 27 Dec 2017 at 10:05am |
|
Looks like it's more than time to order a new wiring harness from Steve at B&B.!!
|
|
jaybmiller
Orange Level Access
Joined: 12 Sep 2009
Location: Greensville,Ont
Points: 25264
|
Post Options
Thanks(0)
Quote Reply
Posted: 27 Dec 2017 at 11:27am |
|
gee it's only 50,60 years old ! should be in better shape, though at 64 I have to admit I ain't as flexible as I once was.....
yes, replace 100% of the wiring, she'll purr like a kitten and be good shpape for the grandkins to fight over !
Jay
|
|
3 D-14s,A-C forklift, B-112
Kubota BX23S lil' TOOT( The Other Orange Tractor)
Never burn your bridges, unless you can walk on water
|
|
Dakota Dave
Orange Level

Joined: 12 Sep 2009
Location: ND
Points: 3974
|
Post Options
Thanks(0)
Quote Reply
Posted: 27 Dec 2017 at 11:40am |
|
I replaced all the wireing on each of my tractors when I converted to 12 volts. I don't think there's 30 feet of wire total in a tractor. I bought five 100 foot rolls of differant color wires and have done four tractors. I think the only one I'm getting short on is the black. Should have got a much shorter roll of the 10 ga white and black stripe. You only need enough to reach from the starter to ampmeter and alternator. The rest are 14 ga.
|
|
Steve in NJ
Orange Level Access
Joined: 12 Sep 2009
Location: Andover, NJ
Points: 12071
|
Post Options
Thanks(0)
Quote Reply
Posted: 27 Dec 2017 at 8:24pm |
|
Hooo weee! There's a fire ready to happen. As the guys said, better change all the wiring in the Tractor. Its overdue.
Steve@B&B
|
|
39'RC, 43'WC, 48'B, 49'G, 50'WF, 65 Big 10, 67'B-110, 75'716H, 2-620's, & a Motorhead wife
|
|
jbirnsch
Bronze Level

Joined: 02 Jun 2010
Location: Egg Harbor, WI
Points: 82
|
Post Options
Thanks(0)
Quote Reply
Posted: 27 Dec 2017 at 9:23pm |
|
When I put a battery on the WC after swapping the motor out I saw an orange glow under the fuel tank where all the wires ran to. Pulled off the feed wire to the starter that went to the gauge. When I took the tank off and looked at the wires there wasn’t any insulation left on any of the wires. One big short. As stated above it doesn’t take much wire for the old tractors. To replace every wire.
|
|
dt1050
Orange Level
Joined: 05 Jul 2011
Location: central pa
Points: 1078
|
Post Options
Thanks(0)
Quote Reply
Posted: 28 Dec 2017 at 2:58am |
spent all day yesterday going out to the tractor, take a wire off, into the garage and cut the apropriate color/gauge wire, run into the house warm up, put ends on wires, back to tractor, install wire, take off another wire....over and over again!!! as I said it was single digit temps...today 10-15 below with wind chill....most of wires are replaced, probly ain't doing any today...
the d14's wiring is really good condition, I guess it musta had a better life...2 years must make a huge differance...lol the d14 is a 1960, the d17 is a 1958
edit: 2 of the wires were black taped from one end to the other, no insulation at all.. bit off topic, but funny. A friend bought a dodge demon that was rewired...all with the same color wire...lol
Edited by dt1050 - 28 Dec 2017 at 3:04am
|
|
Just cause it's orange don't make it a tractor, there's only one..Allis Chalmers
|
|
DougS
Orange Level
Joined: 03 Nov 2011
Location: Iowa
Points: 2490
|
Post Options
Thanks(0)
Quote Reply
Posted: 28 Dec 2017 at 4:48am |
That looks like household Romex wire. Certainly not what you want on a tractor. Get a spool each of several colors of automotive wire. #14 should be good for everything other than the alternator/generator circuits.
|
|
Don(MO)
Orange Level
Joined: 12 Sep 2009
Location: Bates City MO.
Points: 6862
|
Post Options
Thanks(0)
Quote Reply
Posted: 28 Dec 2017 at 5:35am |
|
I have stopped building wiring harnesses if I can get the right one that fits the tractor it is faster and looks nice just like when the tractor was new. Most new wiring harnesses are not just cramped on they use heat shink on the terminal ends, PVC covered wire or the older looking cotton covered wire and wires are inside a nice looking loom and the best part for the next time someone working on the wiring the right color wires are the same as the wiring chart.
|
|
3 WD45's with power steering,G,D15 fork lift,D19, W-Speed Patrol, "A" Gleaner with a 330 corn head,"66" combine,roto-baler, and lots of Snap Coupler implements to make them work for their keep.
|
|
LeonR2013
Orange Level

Joined: 01 Jan 2013
Location: Fulton, Mo
Points: 3500
|
Post Options
Thanks(0)
Quote Reply
Posted: 28 Dec 2017 at 6:07am |
|
I've done a lot of wiring on over the road tractors and trailers. My best successes has been with 12ga wire. More durable and carries currant better and doesn't cost that much more per tractor which doesn't use that much wire. I also like to use a heavier ground wire.
|
|
jaybmiller
Orange Level Access
Joined: 12 Sep 2009
Location: Greensville,Ont
Points: 25264
|
Post Options
Thanks(0)
Quote Reply
Posted: 28 Dec 2017 at 6:16am |
|
couple of tricks to make cables last..
1)after cutting and stripping, tin the end to join all the starnds into one
2) crimp, using proper tool
3) solder the exposed wire's end to the terminal.
Doing this ensures NO moisture can 'wick' into the 'core' of the copper wire. Once water finds it's way in, it'll oxidize the copper( turning it blue/green) and sooner than later the wire will fail.
I've got some harnesses that are 50 years old and still perfect doing this.
Jay
|
|
3 D-14s,A-C forklift, B-112
Kubota BX23S lil' TOOT( The Other Orange Tractor)
Never burn your bridges, unless you can walk on water
|
|
dt1050
Orange Level
Joined: 05 Jul 2011
Location: central pa
Points: 1078
|
Post Options
Thanks(0)
Quote Reply
Posted: 28 Dec 2017 at 7:02am |
it is nice to buy a wiring harness and probly a lot easier, but there is a satisfaction I get from doing things myself. I have spools of wire from working on vehicles and the wires I have replaced are the same color as the original....or I guess the color I took off...lol.
ends are crimped and soldered. I noticed when I went to start the d17 that the battery from the d14 wouldn't turn it over very well and I had to use a deep cycle battery from the camper? pretty sure I know why now..probly grounding out in places...this is by far the worst harness I have ever seen!!!
besides, why buy a harness when speaker wire, cloths line wire and black tape are so cheap!!  |
|
Just cause it's orange don't make it a tractor, there's only one..Allis Chalmers
|
|
Gerald J.
Orange Level
Joined: 12 Sep 2009
Location: Hamilton Co, IA
Points: 5636
|
Post Options
Thanks(0)
Quote Reply
Posted: 28 Dec 2017 at 9:46am |
|
Soldering crimp connectors onto stranded wire is NOT a good idea. Yes it makes a good connection, but the solder wicks into the stranded wire away from the connection and makes it stiff and eventually from flexing and vibration it will break the wire. That has been known to military and aircraft equipment builders for at least half a century.
A proper crimp cold welds to the strands and is a good connection for a long time. An almost proper crimp will fail from corrosion.
Gerald J.
|
|
trevorno
Bronze Level

Joined: 05 Sep 2017
Location: Cheney WA
Points: 22
|
Post Options
Thanks(0)
Quote Reply
Posted: 29 Dec 2017 at 1:40pm |
|
I'm getting ready to try some rewiring myself. I had to hold a bunch of wires up that runs from the ignition panel forward just to keep it running. Lots of breaks in the insulation!
Should I go with all 14 gauge wire? I am headed to Napa later to pick up some wire and a few odds and ends.
Edited by trevorno - 29 Dec 2017 at 1:41pm
|
|
jaybmiller
Orange Level Access
Joined: 12 Sep 2009
Location: Greensville,Ont
Points: 25264
|
Post Options
Thanks(0)
Quote Reply
Posted: 29 Dec 2017 at 1:52pm |
|
Gerald
gee,someone must use a LOT of solder to join wire end to crimp connector to have it wick more than 1/4" AND it's gotta be really really hot past the crimp to get the solder to flow as far as you say.
When I do it, I use mininal heat as the idea is to 'solder seal' the end of the wire on the fork or eyelet side of the crimp. Also I use about an inch ( 2 finger widths) of heat shink tubing to seal the 'wire side' as well as add mechanical support. I've never had any fail due to vibration. Course the vibrational stresses on trucks and tractors are the same as planes.
Any moisture wicking into the wire is bad news. It takes quite awhile to occour but over time the wire won't pass the current or signal through it. I suppose some 'dielectric grease' will do the same, but it's messy !
|
|
3 D-14s,A-C forklift, B-112
Kubota BX23S lil' TOOT( The Other Orange Tractor)
Never burn your bridges, unless you can walk on water
|
|
DougS
Orange Level
Joined: 03 Nov 2011
Location: Iowa
Points: 2490
|
Post Options
Thanks(0)
Quote Reply
Posted: 29 Dec 2017 at 2:14pm |
 trevorno wrote: trevorno wrote:
I'm getting ready to try some rewiring myself. I had to hold a bunch of wires up that runs from the ignition panel forward just to keep it running. Lots of breaks in the insulation!
Should I go with all 14 gauge wire? I am headed to Napa later to pick up some wire and a few odds and ends. |
#14 should work fine for most circuits. Go with the higher temperature plastic insulation - not the cheaper, fatter rubber-type. For your generator/alternator I'd go with #10. It will easily handle 30 AMPS, which is all your battery will be getting if you assume the normal voltage drop. If you have to buy a spool of #10, but can buy #8 by the foot, go with #8. Edit: While you're at it buy a good terminal crimper and a box/bag of assorted wire terminals, if you don't already have such. Yes, spend a little money, but do it right.
Edited by DougS - 29 Dec 2017 at 2:18pm
|
|
trevorno
Bronze Level
Joined: 05 Sep 2017
Location: Cheney WA
Points: 22
|
Post Options
Thanks(0)
Quote Reply
Posted: 29 Dec 2017 at 2:36pm |
|
Thanks!
|
|
Sugarmaker
Orange Level

Joined: 12 Jul 2013
Location: Albion PA
Points: 8661
|
Post Options
Thanks(0)
Quote Reply
Posted: 29 Dec 2017 at 4:08pm |
Yes that looks like 60 year old wiring. I have had a couple like that (WD's) and was glad when they were updated with new wires and ends. I need to go through my D17 sometime too. But would really like to convert it to a alternator with neg ground system. Good luck in your wiring project. These can be tough to get to the terminal ends without taking half the tractor apart. Regards, Chris
|
|
D17 1958 (NFE), WD45 1954 (NFE), WD 1952 (NFE), WD 1950 (WFE), Allis F-40 forklift, Allis CA, Allis D14, Ford Jubilee, Many IH Cub Cadets, 32 Ford Dump, 65 Comet, 66 F100.
|
|
Gerald J.
Orange Level
Joined: 12 Sep 2009
Location: Hamilton Co, IA
Points: 5636
|
Post Options
Thanks(0)
Quote Reply
Posted: 29 Dec 2017 at 5:27pm |
Minimal heat while soldering does not guarantee solder sticking to the copper like you wish. Soldering requires cleanliness and HEAT and soldering flux to protect the metals as the temperature rises. A well done crimp cold welds the strands together and to the connector. An almost done crimp doesn't accomplish that well. I have a web page on soldering http://www.geraldj.networkiowa.com/soldering.html There are 118 minutes of youtube videos linked. The first one is really good on fundamentals. Gerald J.
|
|
DougS
Orange Level
Joined: 03 Nov 2011
Location: Iowa
Points: 2490
|
Post Options
Thanks(0)
Quote Reply
Posted: 29 Dec 2017 at 6:29pm |
|
If it was a crimp connector, I had to crimp it and use the proper die for that connector and wire size. If it was a solder-type connector, I had to solder it. So said the FAA. The FAA generally frowned on solder connectors.
|
|
trevorno
Bronze Level
Joined: 05 Sep 2017
Location: Cheney WA
Points: 22
|
Post Options
Thanks(0)
Quote Reply
Posted: 30 Dec 2017 at 5:17pm |
|
I did my wiring and now there's no juice to the starter or lights. Does anyone have a picture or description of the wiring to the starter solenoid?
|
|
DougS
Orange Level
Joined: 03 Nov 2011
Location: Iowa
Points: 2490
|
Post Options
Thanks(0)
Quote Reply
Posted: 30 Dec 2017 at 5:35pm |
Do you have a key switch? It sounds as if that is wired incorrectly. The "hot" wire may be on the wrong terminal.
|
|
trevorno
Bronze Level
Joined: 05 Sep 2017
Location: Cheney WA
Points: 22
|
Post Options
Thanks(0)
Quote Reply
Posted: 30 Dec 2017 at 7:53pm |
|
I do have a key switch. I changed out one wire at a time, so I think I managed to get it right. Is there one wire at the top, side, and bottom of the solenoid? I think I might have tw
o on the bottom post.
Anyone have a picture of their starter?
Edited by trevorno - 30 Dec 2017 at 8:29pm
|
|
DougS
Orange Level
Joined: 03 Nov 2011
Location: Iowa
Points: 2490
|
Post Options
Thanks(0)
Quote Reply
Posted: 30 Dec 2017 at 8:33pm |
What are the terminals on the switch labeled as? Do you have an ohmmeter? If so, from the common terminal which terminal is energized in the run position and which in the start position? The lights really shouldn't go through the key switch, but it might be energizing a power bus relay.
Edited by DougS - 30 Dec 2017 at 8:43pm
|
|
polarbear
Silver Level

Joined: 05 Jul 2016
Location: addieville il
Points: 331
|
Post Options
Thanks(0)
Quote Reply
Posted: 31 Dec 2017 at 6:42pm |
|
Brillmann.com
|
|
trevorno
Bronze Level
Joined: 05 Sep 2017
Location: Cheney WA
Points: 22
|
Post Options
Thanks(0)
Quote Reply
Posted: 05 Jan 2018 at 6:21pm |
|
Sorry for the delay on this, I have two little ones and a sick wife so it's hard to get outside to monkey with it.
So it turns out my 5 post switch is missing the acc terminal. I used a multimeter and determined that there is power running through the switch. I also checked the continuity of all my wires and they seem to be holding up.
I have a push button start. I have attempted to run the solenoid wire from the switch to the push button to the post on the side of the starter solenoid. No luck.
Prior to this project the tractor would start with the key switch in the on position and the push button starter.
I also have some sort of electrical box that the two generator wires run to. One wire runs from this box back to the instrument panel.
Based on all this, where would you start. I am pretty close to 5 gallons of gas and a road flare at this point.
|
|
DougS
Orange Level
Joined: 03 Nov 2011
Location: Iowa
Points: 2490
|
Post Options
Thanks(0)
Quote Reply
Posted: 05 Jan 2018 at 7:53pm |
Does the starter solenoid have one or two small studs for the start circuit? If it has one then simply applying power to that terminal should engage this solenoid. If it has two then one of the terminals should be permanently grounded and voltage applied to the other. Single stud solenoids can be configured several different ways - some needing voltage; some needing ground. The 'ghost' terminal of some one-stud solenoids are tied to ground inside the solenoid and some are tied to one of the two heavy battery studs. I know how to determine one from the other using an ohmmeter, but trying to explain here would be cumbersome. First of all ensure that voltage is applied to the solenoid when the start switch is pressed.
|
|
trevorno
Bronze Level
Joined: 05 Sep 2017
Location: Cheney WA
Points: 22
|
Post Options
Thanks(0)
Quote Reply
Posted: 06 Jan 2018 at 8:05pm |
|
I had some help today and we figured out my solenoid was bad. My buddy figures the switch is probably bad too. I got a new solenoid annoyed today and we'll try it tomorrow. No luck on finding a switch in town yet so I will try to make it run with just the new solenoid.
|
|