| Author |
 Topic Search Topic Search  Topic Options Topic Options
|
donw 
Bronze Level


Joined: 27 Dec 2009
Location: Washington
Points: 43
|
 Post Options Post Options
 Thanks(0) Thanks(0)
 Quote Quote  Reply Reply
 Topic: HD3 track adjustment/link removal Topic: HD3 track adjustment/link removal
Posted: 23 Jan 2010 at 12:10pm |
< ="-" ="text/; =utf-8">< name="ProgId" ="Word.">< name="Generator" ="Microsoft Word 11">< name="Originator" ="Microsoft Word 11">
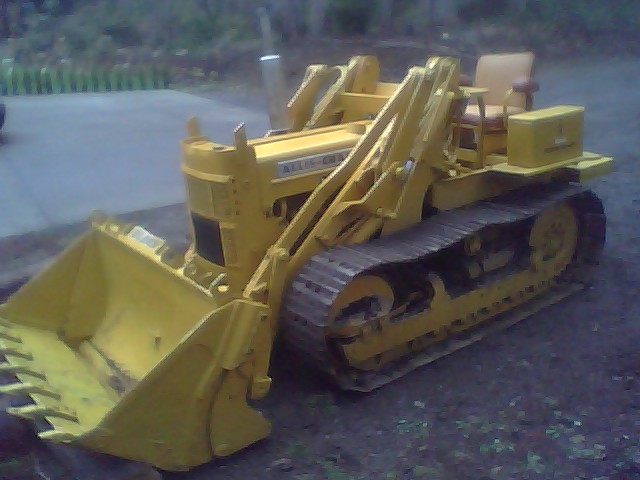
The HD3 I purchased a few
weeks ago has a few issues to be resolved. One of the items on my list was to
adjust the tracks. The other issue has to do with rebuilding the shuttle shift,
which I’ll do this summer. I have a small powdercoat shop and will powdercoat
the entire undercarriage before it’s reassembled at that time.
Before I began the track
adjustment, this is what I started with:
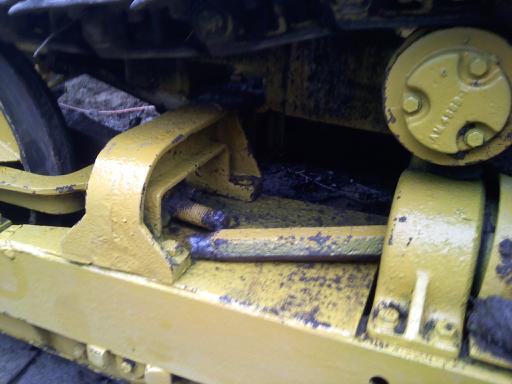
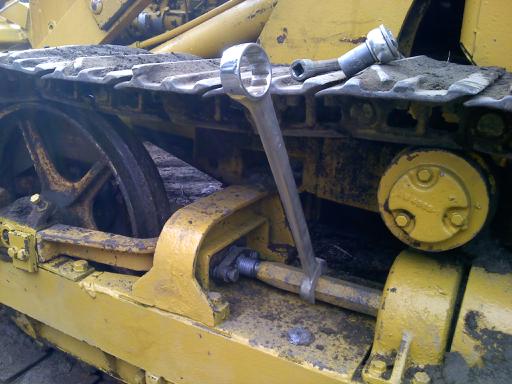
After buying a 1 1-2"
wrench from NAPA,
I put a pipe on the end of the wrench for leverage and promptly broke the track
adjuster in half thanks to a poor weld from the previous owner. Unfortunately
the same thing happened to both sides…
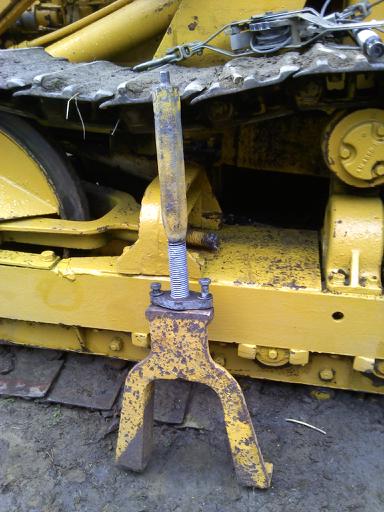
I picked up two used yolks
and track adjusters from a local yard for $250.00. I plan on turning down two
new track adjusters on the lathe and powdercoating them for resale to recoup
some of the expense of buying these.
After I removed the track, I
inspected the rollers and front idler for wear. All the rollers were in great
shape, but one of the front idlers needed to be rebuilt. For another $250 I
picked up a used one from the same yard. Like the yolks, I’ll rebuild my old
one, powdercoat it and resell it later to recoup some funds.
I’m getting ahead of myself…
After the track adjusters
twisted in half, I started really sizing things up and knew that I would have
to remove a section of track if I had any hope of adjusting them more than a
half inch or so. Here’s the front idler before I started. You can see how the
track is adjusted almost to the limits but is still sloppy.
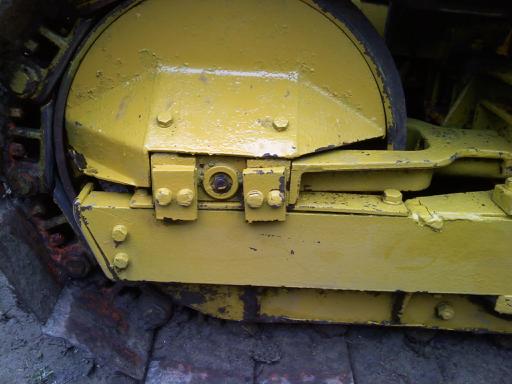
The previous owner had
welded the master pin in place. Thankfully he used the same poor quality
welding that he used on the track adjusters and I easily ground the weld down.
I read somewhere that all a person had to do was beat on the master pin with a sledge
and it would move. This machine is as stubborn as a mule and I couldn’t get the
pin to budge. I read on line about track presses and wondered what it would
take to make one, knowing I would only use it four times; twice now to remove a
section of track on both sides and then again this summer when I removed the
final drive and torque tube to rebuild the shuttle shift. I have a ball joint
press that I bought at Harbor Freight Tools when I replaced the ball joints on
my Superduty and it fit the chain and pin perfectly!
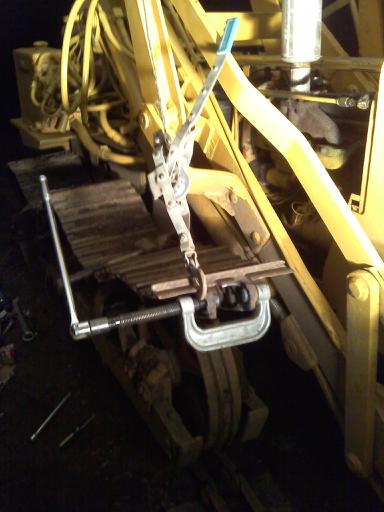
On the first side, I used my
cutting torch and cut the old link out and then pressed the pin pieces out. I
didn’t need to cut the pin and it ended up taking longer than needed. All I had
to do was heat it and press it out. I also positioned the master pin near the
front idler. The trouble with doing this work over the front idler is the track
flops around when I was cranking down on the ball joint press. The other side,
I broke the track on the rear sprocket. This kept the track from flopping
around but I had to remove one of the track pads to allow the ball joint press
to fit.
I heated the pin up and
pressed it out in 10 minutes. The other pin of the same link took only 15
minutes.
Once the track was split, I
was back working on the front idler and yolk. I removed the rock guard to allow
the yolk to be removed. With the threaded rod still rusted in the yolk end, I
needed more working room to wiggle the yolk out.
I put my new used yolk and
track adjusters in and drove ahead a couple feet so I could put the track back
together. I used a combination of come-alongs and chain binders to pinch the
track back together so I could put the master pin back in.
Once the track was back
together and the new used yolk was in place, adjusting was easy.
Once the track is adjusted
to the right tension, tighten the two bolts on the track adjuster to snug.
I finished by reinstalling
the rock guard and by putting a tack weld on the master pins. Note how far back
the front idler sits now.
The finished product!
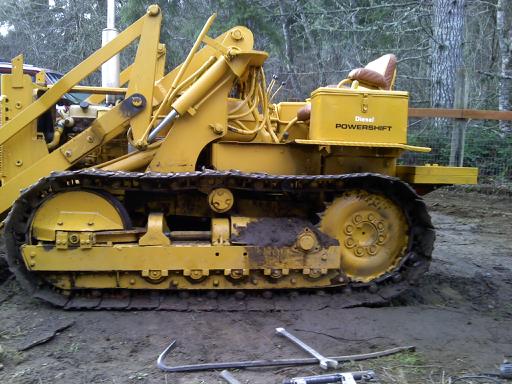 Total time invested? 3-4 hours over the course of two days. The press is available online for $50 from Harbor Fright Tools. I'm sure you can find one similar at any auto parts store.
|
 |
|
Sponsored Links
|
|
 |
DiyDave 
Orange Level Access


Joined: 11 Sep 2009
Location: Gambrills, MD
Points: 54976
|
 Post Options Post Options
 Thanks(0) Thanks(0)
 Quote Quote  Reply Reply
 Posted: 23 Jan 2010 at 1:39pm Posted: 23 Jan 2010 at 1:39pm |
|
Won't cutting a link out effectively lengthen the track's pitch, causing it to pop off the drive sprocket occasionally, increasing wear on the sprocket? I've heard different stories about this.
|
 |
dadsdozerhd5b 
Orange Level


Joined: 27 Sep 2009
Location: lansdale pa.
Points: 537
|
 Post Options Post Options
 Thanks(0) Thanks(0)
 Quote Quote  Reply Reply
 Posted: 23 Jan 2010 at 6:14pm Posted: 23 Jan 2010 at 6:14pm |
|
taking out a link does not change the pitch. the pitch is the dimension between the links. one less pin means just one less link. did the pin fit through the ball joint press? seems like the pin would be too large for the hole in the press.great idea though, i will have to use it on my hd5
|
 |
donw 
Bronze Level


Joined: 27 Dec 2009
Location: Washington
Points: 43
|
 Post Options Post Options
 Thanks(0) Thanks(0)
 Quote Quote  Reply Reply
 Posted: 23 Jan 2010 at 8:05pm Posted: 23 Jan 2010 at 8:05pm |
|
The pin fit perfectly through the ball joint press. Almost like it was made for it.
|
 |
ChuckLuedtkeSEWI 
Orange Level

Joined: 11 Sep 2009
Location: Jackson, WI
Points: 1826
|
 Post Options Post Options
 Thanks(0) Thanks(0)
 Quote Quote  Reply Reply
 Posted: 23 Jan 2010 at 9:06pm Posted: 23 Jan 2010 at 9:06pm |
|
Nice job Don. I will have to get one of those presses from Harbor Freight. For my track and my superduty as well! I still have to call on the lead you gave me. I'll try to do it this week.
|
 |
Coke-in-MN 
Orange Level Access

Joined: 12 Sep 2009
Location: Afton MN
Points: 42191
|
 Post Options Post Options
 Thanks(0) Thanks(0)
 Quote Quote  Reply Reply
 Posted: 23 Jan 2010 at 9:46pm Posted: 23 Jan 2010 at 9:46pm |
Better back up one step , what you have done is changed the PITCH LENGTH, this is measured from one link to the next link as the on center distance between pins.
What you did is change the position of the bushing to the sprocket tooth location.
When a track is to long to adjust one has to bring the pitch length back to specification by remove and reposition the pins and bushing. These can be turned 180 deg. to bring new wear surfaces into contact both internally and externally .
If you feel the bushing you will notice it is worn on one side, if the bottom side (which now contacts sprocket teeth) is worn so it is not round then that surface can be turned up . As the pin and inside of bushing also wear these surfaces also need new contact points . this part you can not see until a track press is used to remove bushing from side link.
What will now happen is your contact spot on the bushing and sprocket has changed and sprocket wear will accelerate. Also more strain is put on worn parts and faster wear will occur.
If side link height is good so pin was not hitting roller flanges, then new pins and bushings could have been installed into present link, or the 180 deg turn used to bring back into specification. I have had new pin and bushings put in used links and have also bought new track, and the 180 turn used on several machines.
The last time i shortened a track by a link was to move a machine from job-site to the shop and order new track.
It only solves the problem of moving machine but in the long run it is false economy.
Find out the measurement for the track pitch length and now measure what you have .
Look at the master pin you removed and also the inside of that bushing and measure wear. You will be surprised at how much elongated the hole in bushing is and how much wear is on pin if the track pitch had grown enough to be at end of adjuster.
Lets say you had 3" of adjustment and used it all , that would mean track was 6" longer than normal. 1/2 on top and 1/2 on bottom of adjuster. Now if you had 12 ft of track , 6" of extra length is a lot of wear.
Edited by Coke-in-MN - 23 Jan 2010 at 9:48pm
|
|
Life lesson: If you’re being chased by a lion, you’re on a horse, to the left of you is a giraffe and on the right is a unicorn, what do you do? You stop drinking and get off the carousel.
|
 |
dadsdozerhd5b 
Orange Level


Joined: 27 Sep 2009
Location: lansdale pa.
Points: 537
|
 Post Options Post Options
 Thanks(0) Thanks(0)
 Quote Quote  Reply Reply
 Posted: 24 Jan 2010 at 5:10am Posted: 24 Jan 2010 at 5:10am |
what you did was take the slack out of the links, which must be significantly worn to need a link taken out. this will efectively put the chain "out of time" with the sprockets creating extra wear. by the looks of the pics, the sprockets are pretty worn also, kinda pointy so if you were to get new tracks or pins and bushings, new sprockets are a must as the old sprockets will wear the new pins excessively. you have solved the problem of loose tracks but they will wear at an excessive rate by normal standards. if you are just using this around the farm or odd jobs, i would run it until it is shot totally. you will still get alot of hours out of it as is. if you run it alot, new undercarriage is in your future. the rails and pads look so-so, new pins and bushings may save you in the short term but cost in the long term. really depends on the amount of use. you get about half of the life again having the pins and bushings turned and still need a new sprocket at turn time. if you go too far before turning, they wear too thin and crack at turn time so you may as well run them out. i suspect this would be your case. track chain is no different than roller chain, when it is worn, you replace sprockets and chain at the same time.
|
 |
DiyDave 
Orange Level Access


Joined: 11 Sep 2009
Location: Gambrills, MD
Points: 54976
|
 Post Options Post Options
 Thanks(0) Thanks(0)
 Quote Quote  Reply Reply
 Posted: 24 Jan 2010 at 5:18am Posted: 24 Jan 2010 at 5:18am |
|
I knew there was something wrong with that short cut, just didn't know the specific terms. Had a neighbor do the remove-a-link trick on a HD7G, ended up having to replace the sprockets. At best he gained a season on the whole under carriage rebuild.
|
 |
donw 
Bronze Level


Joined: 27 Dec 2009
Location: Washington
Points: 43
|
 Post Options Post Options
 Thanks(0) Thanks(0)
 Quote Quote  Reply Reply
 Posted: 24 Jan 2010 at 2:12pm Posted: 24 Jan 2010 at 2:12pm |
|
I'm glad you all responded so that others can understand the possible implications prior to doing this type of surgery. It sounds like those who use their machine on a daily or even weekly basis should have plans in the works to put new tracks and sprockets on. For those like me who don't use their machines much, this procedure solves more problems than it creates.
|
 |
RichinWis 
Orange Level


Joined: 11 Sep 2009
Location: Deforest Wis
Points: 691
|
 Post Options Post Options
 Thanks(0) Thanks(0)
 Quote Quote  Reply Reply
 Posted: 24 Jan 2010 at 2:25pm Posted: 24 Jan 2010 at 2:25pm |
|
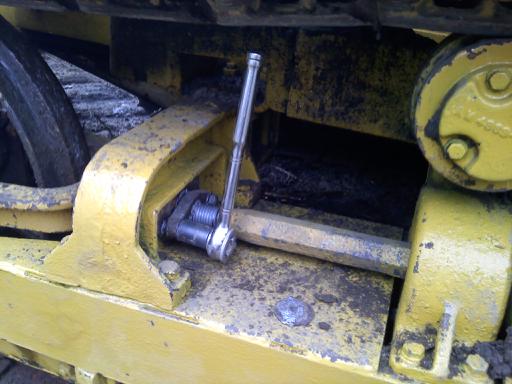
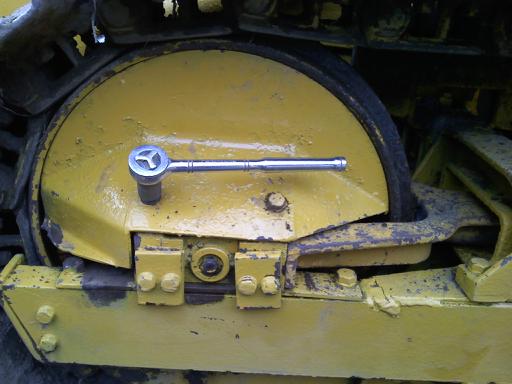
Guy's, it also states in the service manual that the H3 HD3 and HD4 have a hunting tooth sproket design so that every revolution that the track and sproket make puts it on different sproket teeth making the whole system wear alot longer. Allis had a track gauge which you could measure all kinds of diffent things such as track pitch sprocket toothnwear etc. Also tracks on the crawlers should not be adjusted tight, they should be adjusted so that with a straight edge layed across the top of the grousers should have 1.5 to 2.5 inches of sag on the mid point between the sprocket and the upper track roller. Allis manual ISM 19. not trying to cause any trouble, just trying to help you out. I will try some pictures for you.
|
 |
RichinWis 
Orange Level


Joined: 11 Sep 2009
Location: Deforest Wis
Points: 691
|
 Post Options Post Options
 Thanks(0) Thanks(0)
 Quote Quote  Reply Reply
 Posted: 24 Jan 2010 at 2:45pm Posted: 24 Jan 2010 at 2:45pm |
|
|
 |
RichinWis 
Orange Level


Joined: 11 Sep 2009
Location: Deforest Wis
Points: 691
|
 Post Options Post Options
 Thanks(0) Thanks(0)
 Quote Quote  Reply Reply
 Posted: 24 Jan 2010 at 2:46pm Posted: 24 Jan 2010 at 2:46pm |
|
My pictures are not the best but you will get the Idea. Rich
|
 |
wayneIA 
Orange Level

Joined: 17 Oct 2009
Location: Waverly, IA
Points: 268
|
 Post Options Post Options
 Thanks(0) Thanks(0)
 Quote Quote  Reply Reply
 Posted: 24 Jan 2010 at 3:07pm Posted: 24 Jan 2010 at 3:07pm |
I found this guide online to help determine wear the address is: http://www.crawlerheaven.com/wearlimits.htm
|
 |
mark/indiana 
Silver Level

Joined: 14 Sep 2009
Location: Central Indiana
Points: 129
|
 Post Options Post Options
 Thanks(0) Thanks(0)
 Quote Quote  Reply Reply
 Posted: 24 Jan 2010 at 5:43pm Posted: 24 Jan 2010 at 5:43pm |
|
thanks for the pictures as I will be going down that same road soon....when you rebuild your parts, lets us know....Mark
|
|
mark/indiana..."My favorite Allis Tractor or Crawler is the one I'm sitting on at the time!!..
|
 |
DiyDave 
Orange Level Access


Joined: 11 Sep 2009
Location: Gambrills, MD
Points: 54976
|
 Post Options Post Options
 Thanks(0) Thanks(0)
 Quote Quote  Reply Reply
 Posted: 24 Jan 2010 at 7:02pm Posted: 24 Jan 2010 at 7:02pm |
 RichinWis wrote: RichinWis wrote:
Guy's, it also states in the service manual that the H3 HD3 and HD4 have a hunting tooth sproket design so that every revolution that the track and sproket make puts it on different sproket teeth making the whole system wear alot longer. Allis had a track gauge which you could measure all kinds of diffent things such as track pitch sprocket toothnwear etc. Also tracks on the crawlers should not be adjusted tight, they should be adjusted so that with a straight edge layed across the top of the grousers should have 1.5 to 2.5 inches of sag on the mid point between the sprocket and the upper track roller. Allis manual ISM 19. not trying to cause any trouble, just trying to help you out. I will try some pictures for you. |
Rich, I think I read a portion of this manual, before, re the hunting
tooth sprocket. Just another area, in design, that Allis was ahead of
the competition. I don't judge what another does re their own machine, just wanted to explain the rationale behind the repair procedures.
|
 |
CTuckerNWIL 
Orange Level


Joined: 11 Sep 2009
Location: NW Illinois
Points: 22825
|
 Post Options Post Options
 Thanks(0) Thanks(0)
 Quote Quote  Reply Reply
 Posted: 25 Jan 2010 at 6:33am Posted: 25 Jan 2010 at 6:33am |
I'm no expert on this kind of equipment but I would agree with Rich that the tracks are too tight now.I thought the tracks on my OC46 were loose till I read the manual on how to tighten them. It mentions the amount of sag as measured across the top of the tracks.  The original picture looks closer to the proper adjustment. 
Edited by CTuckerNWIL - 25 Jan 2010 at 6:40am
|
|
|
 |
Rawleigh 
Orange Level


Joined: 14 Sep 2009
Location: White Stone, VA
Points: 421
|
 Post Options Post Options
 Thanks(0) Thanks(0)
 Quote Quote  Reply Reply
 Posted: 25 Jan 2010 at 9:27am Posted: 25 Jan 2010 at 9:27am |
|
Taking the link out does not affect the track pitch. The wear that has already occurred affected it. Taking the link out only cures the symptom of not being able to properly tighten the stretched chain. As said, the longer stretched chain length will cause the bushings to land up out of the pocket in the sprocket. It then slides down the tooth when it gets under tension and this is what causes the pocket in sprocket to wear elongated and is what makes the point of the tooth sharp, and ultimately to wear down to the point it will slip on the chain.
Nice work with the ball joint press though. I just bought one of those a couple of weeks ago to help rebush the front end on a Case tractor.
Edited by Rawleigh - 25 Jan 2010 at 9:29am
|
 |
CTuckerNWIL 
Orange Level


Joined: 11 Sep 2009
Location: NW Illinois
Points: 22825
|
 Post Options Post Options
 Thanks(0) Thanks(0)
 Quote Quote  Reply Reply
 Posted: 25 Jan 2010 at 5:45pm Posted: 25 Jan 2010 at 5:45pm |
|
But taking a link out so you can run the tracks too tight is not good for anything except maybe keeping a wandering wore out track from derailing.
|
|
|
 |
mark/indiana 
Silver Level

Joined: 14 Sep 2009
Location: Central Indiana
Points: 129
|
 Post Options Post Options
 Thanks(0) Thanks(0)
 Quote Quote  Reply Reply
 Posted: 26 Jan 2010 at 5:39pm Posted: 26 Jan 2010 at 5:39pm |
|
Thanks again for the discussion...and my first thought also was that the tracks were too tight...watch it as it moves forward to see were the tooth lands in the chain....also , be sure to drive ahead first before measuring the sag..Mark
|
|
mark/indiana..."My favorite Allis Tractor or Crawler is the one I'm sitting on at the time!!..
|
 |
Coke-in-MN 
Orange Level Access


Joined: 12 Sep 2009
Location: Afton MN
Points: 42191
|
 Post Options Post Options
 Thanks(0) Thanks(0)
 Quote Quote  Reply Reply
 Posted: 26 Jan 2010 at 8:24pm Posted: 26 Jan 2010 at 8:24pm |
No taking a link out does not change pitch length but if track is worn that much that a link needs to be removed then the track is way out on pitch length already. So to keep running it will lead to more wear on sprockets and if worn enough the tooth may not allow bushing to drop into sprocket. Now you put great strain on full undercarrage and rear bearings which are not made for that load, After having to have both rear cases machined as the case was worn so they would not hold the cup for the timken bearing for axel on the HD4 I had one can see what overloading does.
If the bushing isn't worn on both sides and has never been turned it is better to turn the pins and bushings than to distroy one link and run chain that is out of spec.
Edited by Coke-in-MN - 26 Jan 2010 at 8:26pm
|
|
Life lesson: If you’re being chased by a lion, you’re on a horse, to the left of you is a giraffe and on the right is a unicorn, what do you do? You stop drinking and get off the carousel.
|
 |
bsessoms 
Bronze Level

Joined: 11 Jun 2018
Location: dade city
Points: 2
|
 Post Options Post Options
 Thanks(0) Thanks(0)
 Quote Quote  Reply Reply
 Posted: 11 Jun 2018 at 4:40pm Posted: 11 Jun 2018 at 4:40pm |
I have a allis Ts-5 dozer, haven't had long and this one is my first track veh. Had lots of stuff over the years. Was surprised to see the tracks loose so quickly. Noticed the other day the left track jumped a cog. I thought great , this will be a big problem. But looked ok as far as wear. I looked into the heating and fighting to get the rusty threads loose and or rebuild jobs. I also considered the link removal. I am not quite convinced it changes the pitch causing excessive wear. So i went another way! I shimmed it. yes, i used the front Bucket with a chain and wrapped it around the Bucket on the end and thru the wheel and Track. Then i tilted the bucket slightly forward , putting tension on the track to relieve slack and added shims between the front Yoke and Hub assembly. It didn't have to much to remove the necessary slack. Hopefully i can finish the Hurricane cleanup here in Florida before more permanent repairs are needed. I Don't know how many hrs of work can normally be used before tracks have to be replaced? Would anyone know if rubber tracks are made to be used as a replacement upgrade? Thanks, Hope this will help someone else!
|
 |
DMiller 
Orange Level Access

Joined: 14 Sep 2009
Location: Hermann, Mo
Points: 35295
|
 Post Options Post Options
 Thanks(0) Thanks(0)
 Quote Quote  Reply Reply
 Posted: 11 Jun 2018 at 5:43pm Posted: 11 Jun 2018 at 5:43pm |
|
Pitch changes over time and you cannot see the wear on dry pin/bushing sets. The pins wear as do the bushings internally, external wear is normal and visible but internal wear can only be determined by measuring the rails. As little as .100 is too much, with rails that will start snaking trying to climb over the idlers, slipping across upper rollers or lowers when have the rails off ground. A worst case is breaking a pin and having to remove a section of rail to repair as not every link is a master.
|
 |
bsessoms 
Bronze Level

Joined: 11 Jun 2018
Location: dade city
Points: 2
|
 Post Options Post Options
 Thanks(0) Thanks(0)
 Quote Quote  Reply Reply
 Posted: 12 Jun 2018 at 12:20pm Posted: 12 Jun 2018 at 12:20pm |
Hello, Thanks so much for the info! Sounds almost like the pinns and bushings should be sealed using grease fittings or something similar to prevent wear? Maybe thats why some machines use rubber tracks!
|
 |
DMiller 
Orange Level Access

Joined: 14 Sep 2009
Location: Hermann, Mo
Points: 35295
|
 Post Options Post Options
 Thanks(0) Thanks(0)
 Quote Quote  Reply Reply
 Posted: 12 Jun 2018 at 12:33pm Posted: 12 Jun 2018 at 12:33pm |
|
Newer machines have was is called SALT rail, Sealed And Lubricated Track. Long lived but expensive and when worn out there is no recourse but throw away.
Do not know if are any New or rebuildable rails or if they would even fit AC but the old CASE 450, 455 and 475 used the same pitch rails.
Edited by DMiller - 12 Jun 2018 at 12:39pm
|
 |
Coke-in-MN 
Orange Level Access


Joined: 12 Sep 2009
Location: Afton MN
Points: 42191
|
 Post Options Post Options
 Thanks(0) Thanks(0)
 Quote Quote  Reply Reply
 Posted: 18 Jun 2018 at 12:46pm Posted: 18 Jun 2018 at 12:46pm |
|
they reccomend taking a measurment over the length of 4 links to come up with the actual wear of the track - measuring between the center to center of say 2 pins only gets a partial reading .
|
|
Life lesson: If you’re being chased by a lion, you’re on a horse, to the left of you is a giraffe and on the right is a unicorn, what do you do? You stop drinking and get off the carousel.
|
 |
wayne IA 
Silver Level

Joined: 22 Sep 2009
Points: 67
|
 Post Options Post Options
 Thanks(0) Thanks(0)
 Quote Quote  Reply Reply
 Posted: 19 Jun 2018 at 12:09am Posted: 19 Jun 2018 at 12:09am |
Here is a link to a posting on the forum for the dimensions of the track chains.
|
 |
B26240 
Orange Level

Joined: 21 Nov 2009
Location: mn
Points: 3866
|
 Post Options Post Options
 Thanks(0) Thanks(0)
 Quote Quote  Reply Reply
 Posted: 19 Jun 2018 at 7:01pm Posted: 19 Jun 2018 at 7:01pm |
|
When I was still running cats ( last one was a D4 ) about 12 years ago reccomended way for a contractor was to run em till they were wore out and then replace everything. Not cheep and I realize many undercarriage parts are hard to find for some AC's. Turning pins and bushings is old school but don't think thats possible with sealed and lubed rails.
|
 |
Ian Beale 
Orange Level

Joined: 03 Oct 2011
Location: New South Wales
Points: 1005
|
 Post Options Post Options
 Thanks(0) Thanks(0)
 Quote Quote  Reply Reply
 Posted: 19 Jun 2018 at 7:35pm Posted: 19 Jun 2018 at 7:35pm |
I've seem mention of a somewhat different strategy which was to replace everything at around 50% and sell off the "not bad by amateur standards" track gear.
Might have been around having an off season to do the replacement.
|
 |
jerbob 
Orange Level


Joined: 07 Aug 2017
Location: Michigan
Points: 961
|
 Post Options Post Options
 Thanks(0) Thanks(0)
 Quote Quote  Reply Reply
 Posted: 20 Jun 2018 at 3:05pm Posted: 20 Jun 2018 at 3:05pm |
|
this is all great information. I was fortunate that my 16DC was able to be tightened up and still have some rail left. Not much but some. Had to rebuild both hydraulic adjusters and replace seals but they are in good shape.
I am curious when I read all of this when it is mentioned about turning bushings and pins. how is that done?
sounds like a huge job.
|
|
HD16DC, Bobcat 863 Turbo, Oliver 1855, John Deere 855,
|
 |
Coke-in-MN 
Orange Level Access


Joined: 12 Sep 2009
Location: Afton MN
Points: 42191
|
 Post Options Post Options
 Thanks(0) Thanks(0)
 Quote Quote  Reply Reply
 Posted: 20 Jun 2018 at 4:46pm Posted: 20 Jun 2018 at 4:46pm |
HD5 track gauge 
|
|
Life lesson: If you’re being chased by a lion, you’re on a horse, to the left of you is a giraffe and on the right is a unicorn, what do you do? You stop drinking and get off the carousel.
|
 |


 Topic Options

 Post Options
 Thanks(0)





 RichinWis wrote:


