| Author |
 Topic Search Topic Search  Topic Options Topic Options
|
jerbob 
Orange Level


Joined: 07 Aug 2017
Location: Michigan
Points: 961
|
 Post Options Post Options
") Thanks(0) Thanks(0)
 Quote Quote  Reply Reply
 Topic: HD16DC track adjusters Topic: HD16DC track adjusters
Posted: 05 Sep 2017 at 8:47am |
Hello. Per my previous posts, I am going through item for item on the HD16 I picked. My first large piece of construction equipment. I have an Oliver 1855 tractor (98)HP, a Bobcat Skidsteer 855 (78)hp and a smaller JD 855 compact tractor (25)hp for mowing and small jobs. All have been brought up to spec and running great. 1. On the 16, the first thing I wanted to do was to get the track adjusted properly. Left side was not not bad and the hydraulic adjuster was not showing any piston exposed so I know I have plenty of adjustment available. However it was frozen up and I have been working slowing on it to get it freed up. I now have about an 1/8" showing telling me I am in fact moving something. I also heard what I assumed was the Idler breaking lose not he truck. 2. On the right side, an inch of ram is showing meaning they at some time adjusted that track but seal staring to push out grease and ram not moving so it too is froze. I also am showing a little bit of the rear adjuster where it rests agains the track release spring. Pics showing what I have been talking about. I am picking up a 10 ton porta power and going to try to push against the metal housing of the rear track release housing, looks pretty sturdy and see if I can push the idler arm yoke forward and free it up. Then, if successful, my thought and hope is that the current adjusters will have enough of a seal to hold the track adjustment in place. Feel free to comment on my thought process. The first two should be the right side with the ram exposed an inch and the second is the same side but where the adjuster pushes against the large spring and is showing about an 1/8'. The third pic is the left side track. Started to get it to move and letting it rest and the end that goes into the release housing with the large spring is flush and not showing any sign of movement. Thank you. 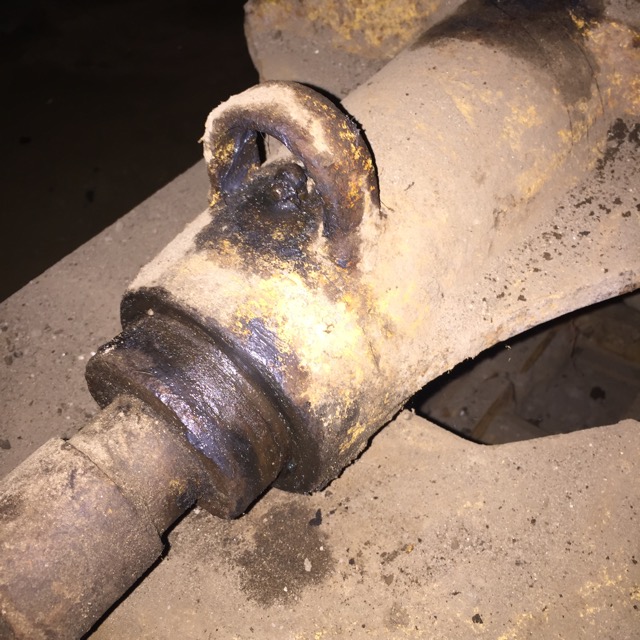 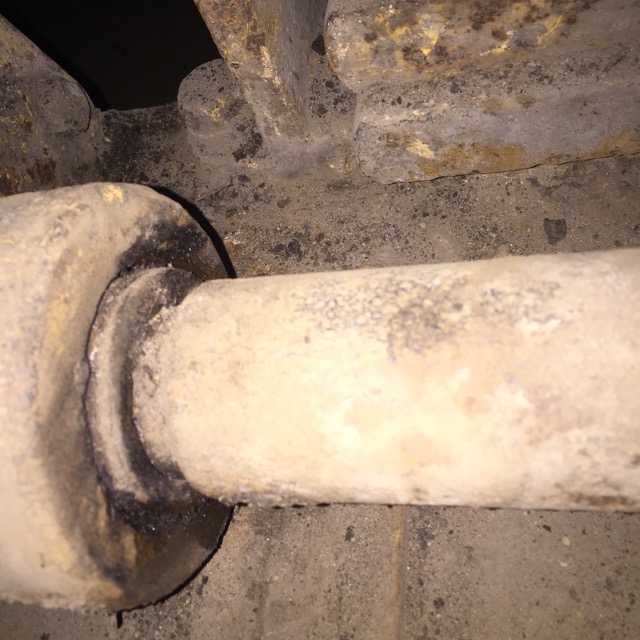 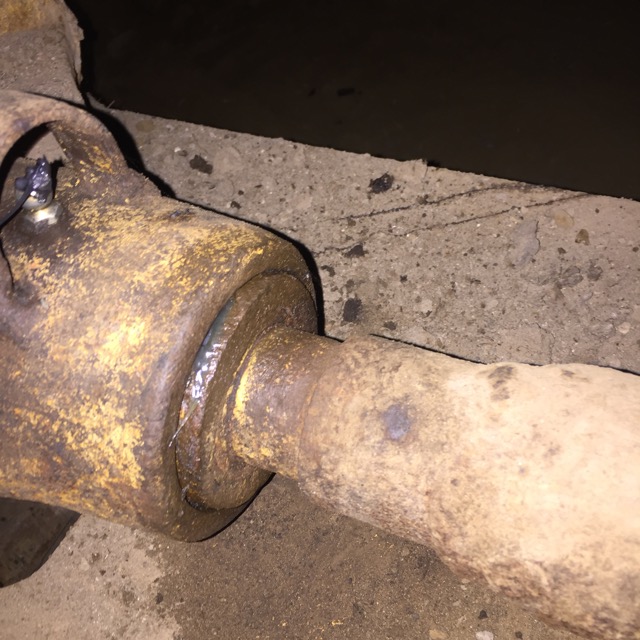
|
 |
|
Sponsored Links
|
|
|
DMiller
Orange Level Access
Joined: 14 Sep 2009
Location: Hermann, Mo
Points: 35650
|
Post Options
Thanks(0)
Quote Reply
Posted: 05 Sep 2017 at 10:08am |
|
There are two zerk fittings to these, the closest to the ram piston is the lube point to keep water/debris off the piston packing and keep the adjustment zone free from corrosion, the other will be at the idler end of the yoke, that actually pushes the piston out and has the release fitting to release the grease pressure when need to collapse the adjustment for track work.
|
|
jerbob
Orange Level
Joined: 07 Aug 2017
Location: Michigan
Points: 961
|
Post Options
Thanks(0)
Quote Reply
Posted: 05 Sep 2017 at 11:10am |
|
Yup got that DMiller. When I started no fittings would take grease so rather than heating them up and rolling with them, I replaced all 4 fittings. Got both sides to accept grease in the fittings that keep out debris and grease the seals. On the one side that has just started to start to move the left, that seal is holding pressure so far so i am putting small amounts of pressure on it each couple of day.
The other side, has grease coming out around the seal when pushing on the adjustment fitting so I stopped on that one. The other end looks like its not pushing against the release spring as you can see a small bit of that exposed.
A work in progress of sure DMIller. I have gone a little crazy on a multitude of posts the last couple of weeks and I will tone it down till I make some major progress.
Thanks for responding. This is a great site and have gotten a lot of information and advise thus far.
|
|
rickv57
Silver Level


Joined: 15 Jan 2016
Location: 64024
Points: 200
|
Post Options
Thanks(0)
Quote Reply
Posted: 05 Sep 2017 at 11:43am |
|
J e r b o b give me a call if you get a chance on your 16 816 615 3699
|
|
doctorcorey
Orange Level

Joined: 17 Jul 2011
Location: S. KC Missouri
Points: 589
|
Post Options
Thanks(0)
Quote Reply
Posted: 05 Sep 2017 at 1:04pm |
|
Here's another thought. My track adjusters moved ok when I first got my 7g in '11. Rarely if ever had to add grease after some initial 'bedding'. Now tracks are tight, real tight probably from mostly sitting for a few years with little activity. I'll remove the grease zerts and drive it a little to loosen everything up, then re-adjust. Probably need to drive it a bit during a rainstorm. Water is a great rust dissolver. My thought on unpickling an old tractor is maybe if the rams aren't fully retracted, try to let them retract {into a hopefully greasy area instead of jamming the seals into a rusty bore area}. And seeping out some grease here and there ain't necessarily a bad thing. AS Dennis said, you'll probably be adding grease here and there for a while till everything gets loosey-goosey.
|
|
Semper Fi USMC 1958 HD6G, 1959 MF 203 loader, 1960 Case 420B Backhoe, MF 65 Tractor/Loader Diesel
|
|
jerbob
Orange Level
Joined: 07 Aug 2017
Location: Michigan
Points: 961
|
Post Options
Thanks(0)
Quote Reply
Posted: 05 Sep 2017 at 2:48pm |
|
Good idea on driving her. I have 50 acres of good property to move her around in. clean dry and not marshy. Thought I would get her out and moving around to see if I can jar something loose as well. I have a Hot Water Steam power washer that is industrial. will blast everything I can find and add some soap as well. Thought it would help move stuff around if it was clean and soapy in the UC when I move her around. Plus I just like driving her.
Thank you.
|
|
DMiller
Orange Level Access
Joined: 14 Sep 2009
Location: Hermann, Mo
Points: 35650
|
Post Options
Thanks(0)
Quote Reply
Posted: 05 Sep 2017 at 6:00pm |
|
No need to remove zerks, takes a 3/4" socket once you dig the mud from around the shielded adjustment fitting, back that out a turn or two and the grease will ooze out, slotted in the threaded area. These are dry pin/bushing tracks, a little water won't hurt, too much and you intensify the issues.
Edited by DMiller - 05 Sep 2017 at 6:02pm
|
|
jerbob
Orange Level
Joined: 07 Aug 2017
Location: Michigan
Points: 961
|
Post Options
Thanks(0)
Quote Reply
Posted: 05 Sep 2017 at 6:22pm |
|
Got it. First one I took out was,,,, a little messy. This makes sense.
Thank you
|
|
doctorcorey
Orange Level
Joined: 17 Jul 2011
Location: S. KC Missouri
Points: 589
|
Post Options
Thanks(0)
Quote Reply
Posted: 05 Sep 2017 at 6:57pm |
 DMiller wrote: DMiller wrote:
No need to remove zerks, takes a 3/4" socket once you dig the mud from around the shielded adjustment fitting, back that out a turn or two and the grease will ooze out, slotted in the threaded area. These are dry pin/bushing tracks, a little water won't hurt, too much and you intensify the issues. |
OH, that's just too easy......and deprive myself of looking through every tool box I have trying to match the size and depth of that 50 year old zerk that originated on a Merlin engine during the Battle of Britain?. Actually, that's (yours) a good idea because the grease behind the zerk can also be concrete by now.
|
|
Semper Fi USMC 1958 HD6G, 1959 MF 203 loader, 1960 Case 420B Backhoe, MF 65 Tractor/Loader Diesel
|
|
jerbob
Orange Level
Joined: 07 Aug 2017
Location: Michigan
Points: 961
|
Post Options
Thanks(0)
Quote Reply
Posted: 05 Sep 2017 at 7:46pm |
|
Hahahaha, didn't want to admit I did some hunting and searching for the right size wrench
|
|


