| Author |
 Topic Search Topic Search  Topic Options Topic Options
|
case580 
Bronze Level

Joined: 09 Dec 2009
Location: Mt. Holly, NC
Points: 37
|
 Post Options Post Options
") Thanks(0) Thanks(0)
 Quote Quote  Reply Reply
 Topic: 50 B Front end wear Topic: 50 B Front end wear
Posted: 03 Nov 2010 at 8:50am |
|
|
 |
|
Sponsored Links
|
|
|
Charlie175
Orange Level

Joined: 11 Sep 2009
Location: Shenandoah, VA
Points: 6351
|
Post Options
Thanks(0)
Quote Reply
Posted: 03 Nov 2010 at 9:36am |
|
They should have a bushing in there that acts as the wear point. You will need to replace your bushing and bolt
|
|
Charlie
'48 B, '51 CA, '56 WD45 '61 D17, '63 D12, '65 D10 , '68 One-Ninety XTD
|
|
Dick L
Orange Level
Joined: 12 Sep 2009
Location: Edon Ohio
Points: 5082
|
Post Options
Thanks(0)
Quote Reply
Posted: 03 Nov 2010 at 11:41am |
|
If it were mine I would weld a piece of pipe in square on center and then fit a bushing inside the pipe. that would beef up the center of the axle.
Edited by Dick L - 03 Nov 2010 at 8:11pm
|
|
Ken in Texas
Orange Level
Joined: 11 Sep 2009
Location: Henderson, TX
Points: 5919
|
Post Options
Thanks(0)
Quote Reply
Posted: 04 Nov 2010 at 8:48am |
|
I'm with Dick L on this one. Some of the original AC designs can stand a bit of re-engineering.
|
|
GregLawlerMinn
Orange Level

Joined: 11 Sep 2009
Location: Lawler, Mn
Points: 1226
|
Post Options
Thanks(0)
Quote Reply
Posted: 04 Nov 2010 at 11:12am |
|
I usually bore out the hole thru the axle and rebush it with a snug fit bushing (in the axle and for the new bolt) then install a new bolt.
|
|
What this country needs is more unemployed politicians-and lawyers.
Currently have: 1 D14 and a D15S2.
With new owners: 2Bs,9CAs,1WD,2 D12s,5D14s,3D15S2s, 2D17SIVs,D17D,1D19D;1 Unstyled WC
|
|
case580
Bronze Level
Joined: 09 Dec 2009
Location: Mt. Holly, NC
Points: 37
|
Post Options
Thanks(0)
Quote Reply
Posted: 04 Nov 2010 at 11:23am |
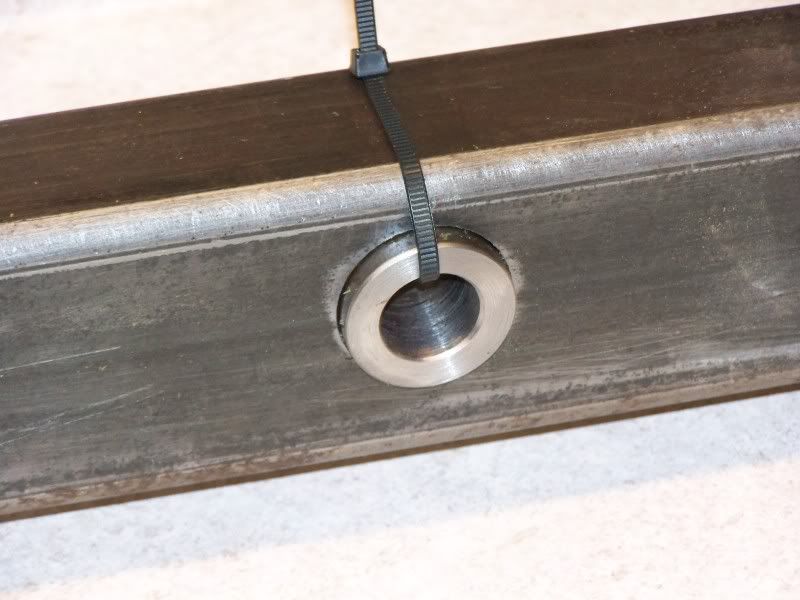
do you recall the size of the hole after you have bored it out? I measured the existing hole in my axle and its 1.25", judging from my pictures I have a little more room to expand the hole if I knew what size bushing to size the hole for. Pass along any dimensions if you have any available.
|
|
Dick L
Orange Level
Joined: 12 Sep 2009
Location: Edon Ohio
Points: 5082
|
Post Options
Thanks(0)
Quote Reply
Posted: 04 Nov 2010 at 12:48pm |
Unless you custom make the bushings you will have little choice in bushing OD. Start with a bushing that will match your bolt size and then fit whatever you decide to fill the hole back to the bushing OD (outside diameter) Your hole looks to me in the pictures to be larger than any standard bushing that would fit the bolt. That is why I would start with a bushing and then a thick wall pipe that the bushing would press into and then bore the axle for a press fit of the heavy wall pipe before welding in the pipe. It would make the axle stronger at the pivit point and keep from having uneven weld around the bushing. If the hole was not worn as much as it is I might just bore it for a bushing alone.
I broke the axle in the center of my 9523/5020 and built an all new one by welding on the old spindles. I bored the center and welded in a heavy wall pipe bored for a bushing.
I used thicker steel square tubing than what was on the tractor as well.
|
|
GBACBFan
Orange Level
Joined: 11 Sep 2009
Location: Green Bay WI
Points: 2662
|
Post Options
Thanks(0)
Quote Reply
Posted: 04 Nov 2010 at 6:25pm |
I made a straight axle for my hot rod B project, and Chad (WI)'s Dad Gus made a great bushing from steel for me that stuck out slightly on each side of the 2"x3" rectangular tubing, and was welded into place. It will outlast me.
|
|
"The trouble with quotes on the Internet is that you can never know if they
are genuine." - Mark Twain
|
|