| Author |
 Topic Search Topic Search  Topic Options Topic Options
|
wjohn 
Orange Level


Joined: 19 Jan 2010
Location: KS
Points: 1807
|
 Post Options Post Options
") Thanks(0) Thanks(0)
 Quote Quote  Reply Reply
 Topic: Gleaner CII/C2 Topic: Gleaner CII/C2
Posted: 31 Mar 2024 at 12:01am |
First, thanks to the forum for putting up with my random Gleaner questions over the last year or two. AC7060IL - special thanks to you and your knowledge of Gleaners in general.
I lucked into a CII that is only about 10 miles from my house. 16' header with no special equipment (just straight bats) and some rust/rock holes in the bottom/floor that I will have to tackle. It has been inside and was supposedly last used 5 years ago. Other than the fans being packed with rat nest, everything seems to move. I did get it to run for 15-20 seconds but only with the choke on, so I pulled the carb off and am cleaning it up. It was converted to a Carter electric fuel pump at some point but after repairing rat-chewed wires and getting good 12V to it, turns out that pump is toast.
The cooling system took about 1.5 gallons and later on I discovered a pinhole leak in the radiator just below the top hose connection. The gearbox for the steering shaft at the bottom of the cab seems to be empty. Otherwise the tires all took air and you can steer it with no engine power fairly well. Trans and finals were all full up to the check plugs. I changed engine and air cleaner oil. Still need to hit all of the grease zerks, reinstall the carb, and wait for the new fuel pump to show up.
Anything specific on these that I should for sure check before I try to road it 10 miles home? I have done nothing as far as the separating mechanism is concerned - I don't plan on touching that until I have time to clean it out and change some sprockets, chains, and belts. I'll leave it shut off for now.
|
|
1939 B, 1940 B, 1941 WC, 1951 WD, 1952 CA, 1956 WD-45
|
 |
|
Sponsored Links
|
|
|
DrAllis
Orange Level Access
Joined: 12 Sep 2009
Points: 19560
|
Post Options
Thanks(0)
Quote Reply
Posted: 31 Mar 2024 at 7:50am |
|
Condition of the main drive engine belt and the variable speed transmission input belt.
|
|
jiminnd
Orange Level
Joined: 16 Sep 2009
Location: Rutland ND
Points: 2209
|
Post Options
Thanks(0)
Quote Reply
Posted: 31 Mar 2024 at 9:34am |
|
My opinion, one of the best combines they made. Don't know what all you need but they are a good machine.
|
|
1945 C, 1949 WF and WD, 1981 185, 1982 8030, unknown D14(nonrunner)
|
|
wjohn
Orange Level
Joined: 19 Jan 2010
Location: KS
Points: 1807
|
Post Options
Thanks(0)
Quote Reply
Posted: 31 Mar 2024 at 2:07pm |
 DrAllis wrote: DrAllis wrote:
Condition of the main drive engine belt and the variable speed transmission input belt. |
Will do. I got a bunch of spare belts, but I think the only wider belts I got were all the same PN and those were for the pivot drive.
|
|
1939 B, 1940 B, 1941 WC, 1951 WD, 1952 CA, 1956 WD-45
|
|
wjohn
Orange Level
Joined: 19 Jan 2010
Location: KS
Points: 1807
|
Post Options
Thanks(0)
Quote Reply
Posted: 31 Mar 2024 at 2:13pm |
jiminnd wrote:
My opinion, one of the best combines they made. Don't know what all you need but they are a good machine. |
I only have ~20 acres in tillable right now, but there's another 60 or so that used to be tillable decades ago but is now pasture. I may convert some of that back to tillable at some point. A CII is bigger than I need but storage wise, they're basically the same height as an A, F, or K. I'm looking at wheat, soybeans, oats, and milo.
You had one? What all did you harvest with yours?
|
|
1939 B, 1940 B, 1941 WC, 1951 WD, 1952 CA, 1956 WD-45
|
|
AC7060IL
Orange Level
Joined: 19 Aug 2012
Location: central IL
Points: 3208
|
Post Options
Thanks(0)
Quote Reply
Posted: 31 Mar 2024 at 5:38pm |
Wjohn, Thank you for your kind words. Congratulations on your newly acquired gleaner C2. Awesome find! A 10 mile combine drive is very doable. Maybe inspect it’s fuel tank for gunk. If tank has ANY gunky residue, remove its fuel line & discard it. Attach a new fuel line to engine fuel pump & use a portable 5 gal plastic fuel tank instead. Just tarp strap 5 gal tank to a secure position. Maybe add two cups of ATF to 5 gal of 10% ethanol 87 octane gasoline. That combination will operate fine & help clean carb/intake/piston rings as you drive it the 10 miles. You can clean gunky fuel tank later, but probably eliminate any possible roading fuel issues. Shoups Ag Parts sells a 20’x48”roll of 3/32 thick poly sheeting for $132. It’s flexibility allows it to be riveted or bolted onto worn metal areas as a somewhat durable material for patching irregular shaped items like header floor, clean grain auger troughs, raddle floor, grain tank auger floor, etc. https://www.shoupparts.com/29020-White-Poly-RollWhen time allows, please update your progress & post some photos of your C2.
|
|
SteveMaskey(MO)
Orange Level

Joined: 11 Sep 2009
Location: Wellsville, MO
Points: 590
|
Post Options
Thanks(0)
Quote Reply
Posted: 31 Mar 2024 at 7:14pm |
 I still have one in the barn quit using
it when I bought the L3. They are a good combine and you have been given some
good advice. As the Dr says check the variable speed and engine belts. I had
the variable speed belt come apart on the road and it is not a good feeling
when you coast to the side of the road.
|
|
jiminnd
Orange Level
Joined: 16 Sep 2009
Location: Rutland ND
Points: 2209
|
Post Options
Thanks(0)
Quote Reply
Posted: 31 Mar 2024 at 9:17pm |
|
Got mine used, ran it for 7 years, wheat, oats, barley, millet, soybeans, and sunflower, was a good machine but was on the custom run before I got it so was really showing a lot of wear. Had to rebuild the rock door and a couple of auger screws. Also replaced the tin between the raddle chain, never touched the motor.
|
|
1945 C, 1949 WF and WD, 1981 185, 1982 8030, unknown D14(nonrunner)
|
|
SteveM C/IL
Orange Level Access
Joined: 12 Sep 2009
Location: Shelbyville IL
Points: 8018
|
Post Options
Thanks(0)
Quote Reply
Posted: 31 Mar 2024 at 11:04pm |
|
Might jack up rear wheels and spin them. If they're really noisy you may want to at least pack some grease in then to get home. Would not be good to ruin a wheel bearing and maybe hub on the way. Wheel brgs and pivot shafts seem to get neglected. Pack them before you ruin them....easier and cheaper.
|
|
Oldoug
Orange Level Access
Joined: 12 Sep 2009
Points: 1105
|
Post Options
Thanks(0)
Quote Reply
Posted: 01 Apr 2024 at 10:43am |
Might want to check your brake quick also...make sure they are clean and dry and the linkages are all free...I think I have a NOS engine belt if you are interested.
|
|
Matt Folkers
FOLKERS RESTORATION
Restoring vintage things to last so the future can enjoy our past.
|
|
DSeries4
Orange Level

Joined: 12 Sep 2009
Location: Ontario, Canada
Points: 7204
|
Post Options
Thanks(0)
Quote Reply
Posted: 01 Apr 2024 at 2:31pm |
Crud in the gas tank might be the big problem with the engine not being able to stay running - not the electric pump. Over the years, my dad had an A, K and F. All of them had issues with crud in the fuel tank.
|
|
'49 G, '54 WD45, '55 CA, '56 WD45D, '57 WD45, '58 D14, '59 D14, '60 D14, '61 D15D, '66 D15II, '66 D21II, '67 D17IV, '67 D17IVD, '67 190XTD, '73 620, '76 185, '77 175, '84 8030, '85 6080
|
|
only AC orange
Silver Level Access

Joined: 06 Dec 2014
Location: Eastern Indiana
Points: 394
|
Post Options
Thanks(0)
Quote Reply
Posted: 02 Apr 2024 at 12:05pm |
|
Check the main drive belt real close! If combine has sat awhile, belt will be dry rotted and when put under load going down road, will SLIP! I found out by experience driving a "C" home from auction years ago.
|
|
wjohn
Orange Level
Joined: 19 Jan 2010
Location: KS
Points: 1807
|
Post Options
Thanks(0)
Quote Reply
Posted: 02 Apr 2024 at 9:52pm |
All good thoughts. I will bring a jack to check the rear wheel bearings, and I definitely don't want a belt breaking when I'm halfway up a hill.
Regarding the gas tank - it appears to be rusty probably up under the top side of the tank. The sides and bottom look okay, at least from what I can see through the filler hole. That support/baffle is going to make it fun to clean out, and I assume there's another one on the other side of the outlet between it and the other end of the tank.
When I got the engine started I failed to mention I was gravity feeding the carb with a short hose from a garden tractor gas tank. The carb is all cleaned up and half back together now (waiting on some gasket sheeting to show up).
I also picked up a 6 gallon boat gas tank today, with the primer bulb fuel line and everything. I think that plus a good working new fuel pump should get me home. If it burns through more than 6 gallons of gas in the ~10 miles, I'll have another 5 gallon container with me as well.
|
|
1939 B, 1940 B, 1941 WC, 1951 WD, 1952 CA, 1956 WD-45
|
|
wjohn
Orange Level
Joined: 19 Jan 2010
Location: KS
Points: 1807
|
Post Options
Thanks(0)
Quote Reply
Posted: 02 Apr 2024 at 9:57pm |
AC7060IL wrote:
Shoups Ag Parts sells a 20’x48”roll of 3/32 thick poly sheeting for $132. It’s flexibility allows it to be riveted or bolted onto worn metal areas as a somewhat durable material for patching irregular shaped items like header floor, clean grain auger troughs, raddle floor, grain tank auger floor, etc. |
I actually think I lucked into a replacement floor that the guy must have purchased. Found it outside the shed and it sure seems to be the right dimensions. That will not be a quick fix so I may order some of that poly if I get into a time crunch.
I am seriously debating trying to plant some beans or milo for the first time but I have a few pieces of equipment to get fixed first.
|
|
1939 B, 1940 B, 1941 WC, 1951 WD, 1952 CA, 1956 WD-45
|
|
AC7060IL
Orange Level
Joined: 19 Aug 2012
Location: central IL
Points: 3208
|
Post Options
Thanks(0)
Quote Reply
Posted: 02 Apr 2024 at 11:56pm |
wjohn wrote:
All good thoughts. I will bring a jack to check the rear wheel bearings, and I definitely don't want a belt breaking when I'm halfway up a hill.
Regarding the gas tank - it appears to be rusty probably up under the top side of the tank. The sides and bottom look okay, at least from what I can see through the filler hole. That support/baffle is going to make it fun to clean out, and I assume there's another one on the other side of the outlet between it and the other end of the tank.
When I got the engine started I failed to mention I was gravity feeding the carb with a short hose from a garden tractor gas tank. The carb is all cleaned up and half back together now (waiting on some gasket sheeting to show up).
I also picked up a 6 gallon boat gas tank today, with the primer bulb fuel line and everything. I think that plus a good working new fuel pump should get me home. If it burns through more than 6 gallons of gas in the ~10 miles, I'll have another 5 gallon container with me as well. |
I don’t know the Buda gas engine fuel consumption rates. A 6* BTDC gleaner GM 250 will run approximately 8-9 minutes per quart of 10% ethanol 87 octane. That’s just engine at high idle, machine sitting still, & no separator loads. So a gallon would be 32-36 minutes run time. So if Buda 262 is comparable, at 10 mph travel speed, probably 2-3 gallon may suffice 10 mile road trip (1 hour)if stops/go are minimal?
Edited by AC7060IL - 03 Apr 2024 at 12:04am
|
|
IBWD MIke
Orange Level

Joined: 08 Apr 2012
Location: Newton Ia.
Points: 3464
|
Post Options
Thanks(0)
Quote Reply
Posted: 03 Apr 2024 at 9:18am |
|
wjohn, on the tank rust; I 'tumbled' the tank on my 756 when it was in process. Strapped it to the wheel/tire on the NF 45 and ran it in low gear 45 minutes or an hour, don't remember now. Anyway, wish I had run it three or four times that long! The big part of the tank got nice and clean but, (I think) the part on the other side of the baffle not so much. I have had trouble with the sediment bowl plugging when running it a lot in rough conditions with a mostly full tank. It's getting better with time.
|
|
wjohn
Orange Level
Joined: 19 Jan 2010
Location: KS
Points: 1807
|
Post Options
Thanks(0)
Quote Reply
Posted: 05 Apr 2024 at 10:18am |
I know the D-19 gassers were not as efficient HP per gal as their similar-sized competitors so it may be a tad worse than that Chevy engine, but you're right... should be in the ballpark. If 6 gallons doesn't do it I will still have a backup can and for sure have enough.
Mike, that's what I'm worried about here with the baffles. I think I will just have to clean and flush the tank as best as I can - maybe acid wash? Then just keep changing sediment bowls and filters.
I'm not sure I would feel right just keeping the boat tank on there for eternity and constantly filling it... although for my acreage, that might work - ha.
|
|
1939 B, 1940 B, 1941 WC, 1951 WD, 1952 CA, 1956 WD-45
|
|
wjohn
Orange Level
Joined: 19 Jan 2010
Location: KS
Points: 1807
|
Post Options
Thanks(0)
Quote Reply
Posted: 05 Apr 2024 at 10:39am |
I checked over the main drive belt from the engine and the traction/trans belts. There is no obvious damage or cracking so I will hope I can make it up the couple of hills I have to climb without any issues. The only play I could find at the rear wheels was a little bit in the spindles (not hub bearings), plus some play in the tie rod ends of the steering linkages. It's detectable but not scary so I am okay with it. May need to be fixed some years down the road.
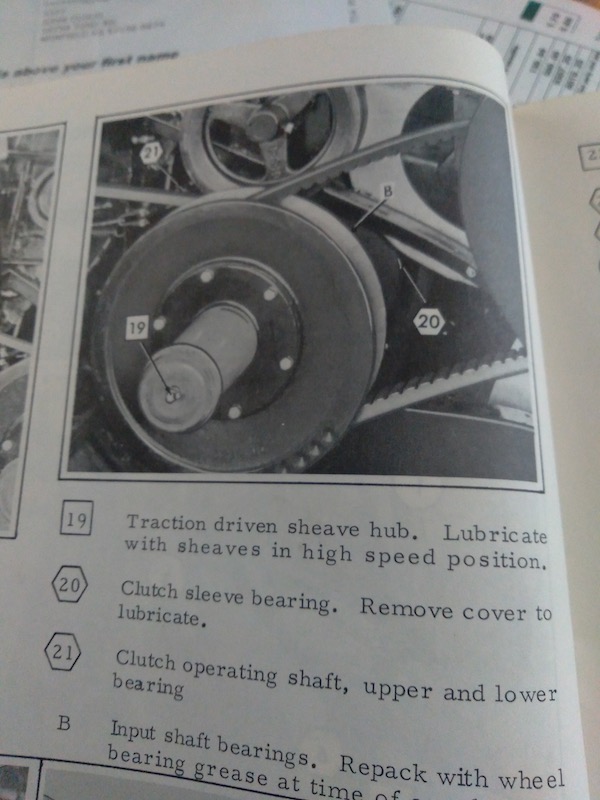
I hit as many of the grease zerks for the steering/brakes/engine/trans drive as I could yesterday. The pedal shaft zerks under the cab sure are a bear to access. Filling the steering gearbox also wasn't great but it's full for now. I was unable to find one zerk, though. I think the I got the #20 clutch sleeve bearing assuming that's the one that's on the cast housing going from the pulley on into the transmission, and I know I got #19 on the end of the sheave hub. I don't think I found the #21 clutch operating shaft fitting so I need to maybe crawl under there with a flashlight. That might be on the linkage from the clutch pedal, closer to the clutch?
|
|
1939 B, 1940 B, 1941 WC, 1951 WD, 1952 CA, 1956 WD-45
|
|