| Author |
|
EricPA 
Orange Level

Joined: 13 Sep 2009
Location: Watsontown,PA.
Points: 2578
|
 Post Options Post Options
 Thanks(0) Thanks(0)
 Quote Quote  Reply Reply
 Posted: 02 Dec 2014 at 8:05pm Posted: 02 Dec 2014 at 8:05pm |
|
very nice
|
|
Life is tough,but it's tougher when you're stupid. - John Wayne
|
 |
|
Sponsored Links
|
|
 |
structures 
Silver Level

Joined: 28 Feb 2011
Location: Beggs, OK
Points: 331
|
 Post Options Post Options
 Thanks(0) Thanks(0)
 Quote Quote  Reply Reply
 Posted: 07 Dec 2014 at 10:03am Posted: 07 Dec 2014 at 10:03am |
Guys appreciate the comments! Thank you.
Was able to get the patches in.
|
|
|
 |
Fourced 
Silver Level

Joined: 11 May 2013
Location: West Michigan
Points: 56
|
 Post Options Post Options
 Thanks(0) Thanks(0)
 Quote Quote  Reply Reply
 Posted: 07 Dec 2014 at 11:24am Posted: 07 Dec 2014 at 11:24am |
|
Double check the bottom tank on that radiator, I bought an aftermarket and the bottom tank was about 1" thicker front to back than the Stock one. The mounting holes won't line up because the tank hits.
Edited by Fourced - 07 Dec 2014 at 11:27am
|
 |
Clay 
Orange Level

Joined: 11 Sep 2009
Location: Udall, Kansas
Points: 8782
|
 Post Options Post Options
 Thanks(0) Thanks(0)
 Quote Quote  Reply Reply
 Posted: 07 Dec 2014 at 12:36pm Posted: 07 Dec 2014 at 12:36pm |
|
Looks very good. I would suggest grit blasting the rough areas and applying some good quality epoxy to smooth out any low spots.
After the epoxy has set, sand blast the entire wheel. Prime and paint.
|
 |
structures 
Silver Level


Joined: 28 Feb 2011
Location: Beggs, OK
Points: 331
|
 Post Options Post Options
 Thanks(0) Thanks(0)
 Quote Quote  Reply Reply
 Posted: 07 Dec 2014 at 11:08pm Posted: 07 Dec 2014 at 11:08pm |
 Fourced wrote: Fourced wrote:
Double check the bottom tank on that radiator, I bought an aftermarket and the bottom tank was about 1" thicker front to back than the Stock one. The mounting holes won't line up because the tank hits.
|
Yeah you're right. The tank is hitting the power steering casting. I might be able to work the tank in to clear the casting though.
|
|
|
 |
JGAnderson 
Bronze Level


Joined: 07 Dec 2014
Location: Indiana
Points: 4
|
 Post Options Post Options
 Thanks(0) Thanks(0)
 Quote Quote  Reply Reply
 Posted: 08 Dec 2014 at 3:53am Posted: 08 Dec 2014 at 3:53am |
Nice project... I woke up my dads series ii D15 just this fall. Had sat in a pole barn for the last 5 or 6 years at least. Going to use it to push snow this winter, then start tearing it down this next spring. I am taking plenty of notes on what you're doing! 
|
|
63 D-15 series ii
|
 |
DiyDave 
Orange Level Access


Joined: 11 Sep 2009
Location: Gambrills, MD
Points: 50527
|
 Post Options Post Options
 Thanks(0) Thanks(0)
 Quote Quote  Reply Reply
 Posted: 08 Dec 2014 at 4:58am Posted: 08 Dec 2014 at 4:58am |
|
Simple solution might be to grind some off the casting where it hits the tank. I re-used the tanks on my original, just had it re-cored, to avoid this problem. Still cost about $450...
|
 |
Fourced 
Silver Level

Joined: 11 May 2013
Location: West Michigan
Points: 56
|
 Post Options Post Options
 Thanks(0) Thanks(0)
 Quote Quote  Reply Reply
 Posted: 08 Dec 2014 at 11:31am Posted: 08 Dec 2014 at 11:31am |
|
I got mine from Reliable Aftermarket Parts INC on E-bay. I am now fighting with them because they will not refund $60 in shipping charges, the auction says it will fit, it won't. I don't think that is my fault.(rant over)
I returned it because the hood would not fit correctly with everything stretched out to fit the bottom tank.
Edited by Fourced - 08 Dec 2014 at 11:36am
|
 |
structures 
Silver Level


Joined: 28 Feb 2011
Location: Beggs, OK
Points: 331
|
 Post Options Post Options
 Thanks(0) Thanks(0)
 Quote Quote  Reply Reply
 Posted: 09 Dec 2014 at 9:55pm Posted: 09 Dec 2014 at 9:55pm |
Trying to do a little bit each night. weld, grind, grind, grind... weld, grind, grind, grind... 
I had pretty good penetration with the backside welds but I went ahead and welded the inner side of the rim patches. Trying to not use any filler.
|
|
|
 |
JayIN 
Orange Level


Joined: 18 Dec 2009
Location: SE/IN
Points: 1982
|
 Post Options Post Options
 Thanks(0) Thanks(0)
 Quote Quote  Reply Reply
 Posted: 10 Dec 2014 at 4:45am Posted: 10 Dec 2014 at 4:45am |
|
Nice! Its not that hard to fix the wheels. The hardest part is just getting started. You are saving my favorite tractor. Wish Ida kept mine!
|
|
sometimes I walk out to my shop and look around and think "Who's the idiot that owns this place?"
|
 |
structures 
Silver Level


Joined: 28 Feb 2011
Location: Beggs, OK
Points: 331
|
 Post Options Post Options
 Thanks(0) Thanks(0)
 Quote Quote  Reply Reply
 Posted: 01 Jan 2015 at 10:41pm Posted: 01 Jan 2015 at 10:41pm |
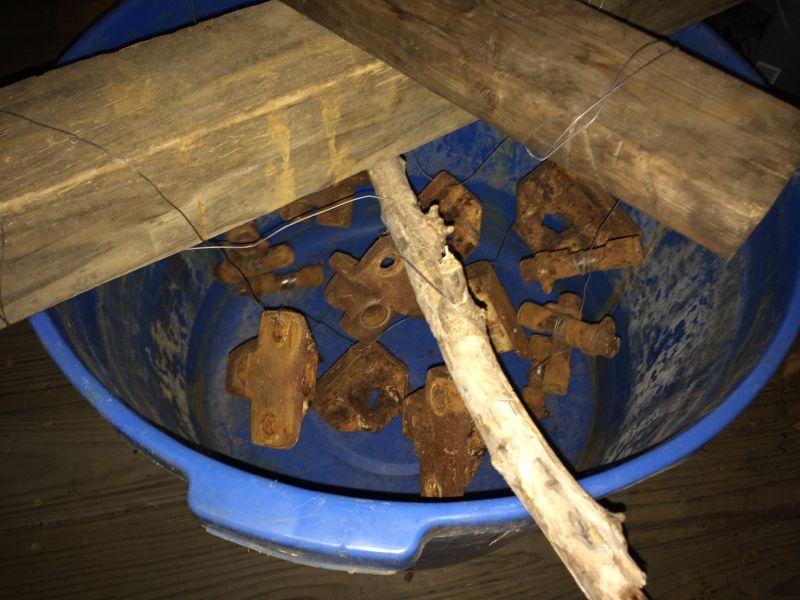
Had some time off for the holidays and s pent a little time sand blasting and I also dipped a rim in an electrolysis bath. It helps cut down on the sandblasting time. Hopefully I'll put some paint down soon. The first pic shows where I hammered a flat into the repaired rear rim for the schrader valve.
Edited by structures - 01 Jan 2015 at 10:41pm
|
|
|
 |
Sugarmaker 
Orange Level


Joined: 12 Jul 2013
Location: Albion PA
Points: 8167
|
 Post Options Post Options
 Thanks(0) Thanks(0)
 Quote Quote  Reply Reply
 Posted: 02 Jan 2015 at 8:05am Posted: 02 Jan 2015 at 8:05am |
|
Robert,
Found this thread again! Sorry I have been busy.
I think your coming up on a one year anniversary? Your doing a good job on your Dads tractor restoration! All your fabrication work looks good. (I like to fab things) I can say that these tractors are a lot of work. Use this forum to keep yourself motivated. Take lots of pictures and post them. Its a good break for you and helps show your progress!
We are here for support! The folks on the Allis Forum really did help me a lot as I worked on the WD projects this past year too.
Looks like your finding a lot of the same issues I had. The work on the rims looks very good. I also use a electrolysis tank/s. But did not have one big enough for the rear rims. So I had those blasted, then started the repairs. 6 rims to make 4:) Great that you have a sandblaster too!
On that radiator fit issue. I think I would look at modifying the casting too. But before that, is there anything else that is going to be a issue? Old man Casbohm says "you change one thing and five other things may need changed"!
One thing repaired/restored at a time and you will get there!
That rear rim with the POR black looks awesome. I will remember that!
Regards,
Chris
|
|
D17 1958 (NFE), WD45 1954 (NFE), WD 1952 (NFE), WD 1950 (WFE), Allis F-40 forklift, Allis CA, Allis D14, Ford Jubilee, Many IH Cub Cadets, 32 Ford Dump, 65 Comet.
|
 |
structures 
Silver Level


Joined: 28 Feb 2011
Location: Beggs, OK
Points: 331
|
 Post Options Post Options
 Thanks(0) Thanks(0)
 Quote Quote  Reply Reply
 Posted: 02 Jan 2015 at 6:05pm Posted: 02 Jan 2015 at 6:05pm |
|
Hey Chris. Yeah 1year into it... Hope 2015 yields more progress! I'm gonna set the radiator issue aside until I get the tractor rolling on 4 wheels. That's true about changing one thing and creating more issues. I got a '65 Chevy truck I'm restoring wish I hadn't done so much customizing!
|
|
|
 |
Sugarmaker 
Orange Level


Joined: 12 Jul 2013
Location: Albion PA
Points: 8167
|
 Post Options Post Options
 Thanks(0) Thanks(0)
 Quote Quote  Reply Reply
 Posted: 02 Jan 2015 at 6:09pm Posted: 02 Jan 2015 at 6:09pm |
|
Robert,
I have enough trouble trying to get near stock. I applaud you for doing custom work.
Post a picture of the truck too.
Regards,
Chris
|
|
D17 1958 (NFE), WD45 1954 (NFE), WD 1952 (NFE), WD 1950 (WFE), Allis F-40 forklift, Allis CA, Allis D14, Ford Jubilee, Many IH Cub Cadets, 32 Ford Dump, 65 Comet.
|
 |
structures 
Silver Level


Joined: 28 Feb 2011
Location: Beggs, OK
Points: 331
|
 Post Options Post Options
 Thanks(0) Thanks(0)
 Quote Quote  Reply Reply
 Posted: 02 Jan 2015 at 6:25pm Posted: 02 Jan 2015 at 6:25pm |
 Sugarmaker wrote: Sugarmaker wrote:
Robert,
I have enough trouble trying to get near stock. I applaud you for doing custom work.
Post a picture of the truck too.
Regards,
Chris
|
The truck is a long story. Lots of pics over here: Structures 65 Chevy
 JayIN wrote: JayIN wrote:
The hardest part is just getting started. |
Couldn't have said it better myself!
|
|
|
 |
macvette 
Orange Level


Joined: 13 Jun 2011
Location: nekoosa, wi
Points: 1656
|
 Post Options Post Options
 Thanks(0) Thanks(0)
 Quote Quote  Reply Reply
 Posted: 03 Jan 2015 at 11:16pm Posted: 03 Jan 2015 at 11:16pm |
Robert - What a great job of picture taking and posting on your restoration. I just came upon this thread today, so was treated to a whole year of progress at one time.
You do great work!
|
 |
structures 
Silver Level


Joined: 28 Feb 2011
Location: Beggs, OK
Points: 331
|
 Post Options Post Options
 Thanks(0) Thanks(0)
 Quote Quote  Reply Reply
 Posted: 04 Jan 2015 at 7:43pm Posted: 04 Jan 2015 at 7:43pm |
 macvette wrote: macvette wrote:
Robert - What a great job of picture taking and posting on your restoration. I just came upon this thread today, so was treated to a whole year of progress at one time.
You do great work! |
Was able to lay some paint down last night and today. Been so cold I've left the heater in the garage on all night, and I'll have to continue through tonight $$$
|
|
|
 |
Sugarmaker 
Orange Level


Joined: 12 Jul 2013
Location: Albion PA
Points: 8167
|
 Post Options Post Options
 Thanks(0) Thanks(0)
 Quote Quote  Reply Reply
 Posted: 09 Jan 2015 at 6:34pm Posted: 09 Jan 2015 at 6:34pm |
|
Robert,
The fresh paint looks great on the wheels and hubs!
Hey I read your entire thread on your Chevy Truck restoration! Awesome! Dad had one very similar to yours.
This tractor should be a piece of cake for you!
Regards,
Chris
|
|
D17 1958 (NFE), WD45 1954 (NFE), WD 1952 (NFE), WD 1950 (WFE), Allis F-40 forklift, Allis CA, Allis D14, Ford Jubilee, Many IH Cub Cadets, 32 Ford Dump, 65 Comet.
|
 |
structures 
Silver Level


Joined: 28 Feb 2011
Location: Beggs, OK
Points: 331
|
 Post Options Post Options
 Thanks(0) Thanks(0)
 Quote Quote  Reply Reply
 Posted: 11 Jan 2015 at 6:57pm Posted: 11 Jan 2015 at 6:57pm |
Thanks Chris.
Folks got a little more done this weekend. Instead of brushing the por15 I sprayed it. Looked okay. Put some paint on one front wheel. I have another wheel on order. Last I dipped my eccentrics into an e-bath for tonight.
|
|
|
 |
darrel in ND 
Orange Level


Joined: 22 Nov 2009
Location: Hebron, ND
Points: 8580
|
 Post Options Post Options
 Thanks(0) Thanks(0)
 Quote Quote  Reply Reply
 Posted: 11 Jan 2015 at 7:18pm Posted: 11 Jan 2015 at 7:18pm |
|
Good progress. Seems like once some new paint gets laid on, the pace picks up. Stuff starts to look new then, and generates some enthusiasm. Darrel
|
 |
structures 
Silver Level


Joined: 28 Feb 2011
Location: Beggs, OK
Points: 331
|
 Post Options Post Options
 Thanks(0) Thanks(0)
 Quote Quote  Reply Reply
 Posted: 14 Jan 2015 at 1:13pm Posted: 14 Jan 2015 at 1:13pm |
Blasted the eccentric fittings and pins. Some of the pins are pretty bad, but I think I'll go ahead and use them. If they break I'll replace them.

 darrel in ND wrote: darrel in ND wrote:
Good progress. Seems like once some new paint gets laid on, the pace picks up. Stuff starts to look new then, and generates some enthusiasm. Darrel |
Very true. Thanks!
Edited by structures - 14 Jan 2015 at 1:13pm
|
|
|
 |
DiyDave 
Orange Level Access


Joined: 11 Sep 2009
Location: Gambrills, MD
Points: 50527
|
 Post Options Post Options
 Thanks(0) Thanks(0)
 Quote Quote  Reply Reply
 Posted: 14 Jan 2015 at 5:50pm Posted: 14 Jan 2015 at 5:50pm |
|
Fill the pits with some epoxy, worst thing that could happen, is to have to remove them and replace them...
|
 |
Sugarmaker 
Orange Level


Joined: 12 Jul 2013
Location: Albion PA
Points: 8167
|
 Post Options Post Options
 Thanks(0) Thanks(0)
 Quote Quote  Reply Reply
 Posted: 14 Jan 2015 at 7:03pm Posted: 14 Jan 2015 at 7:03pm |
|
Robert,
I need to bring my e-tank inside. Its a solid block of ice. I could be using it. I ended up wire brushing my wheel brackets and pins.
What I did on those eccentric pins that are pitted is to grind the rough areas smooth so that when rotated they don't bind. We are working on some of the same stuff:) I just got my WD rims together.
Did you get new "C" snap rings?
Your cream looks very good. I just tossed a front rim in the truck yesterday that needs the tire removed, blasted and the valve stem hole repaired.
Looks like your ready for new rubber.
Keep the pictures coming.
Agreed that some fresh paint helps keep the interest level up, and can keep you going. Assuming the pocket book can keep up:)
Regards,
Chris
|
|
D17 1958 (NFE), WD45 1954 (NFE), WD 1952 (NFE), WD 1950 (WFE), Allis F-40 forklift, Allis CA, Allis D14, Ford Jubilee, Many IH Cub Cadets, 32 Ford Dump, 65 Comet.
|
 |
structures 
Silver Level


Joined: 28 Feb 2011
Location: Beggs, OK
Points: 331
|
 Post Options Post Options
 Thanks(0) Thanks(0)
 Quote Quote  Reply Reply
 Posted: 15 Jan 2015 at 8:12am Posted: 15 Jan 2015 at 8:12am |
 DiyDave wrote: DiyDave wrote:
Fill the pits with some epoxy, worst thing that could happen, is to have to remove them and replace them... |
Yeah kinda what I was thinking. Thanks.
 Sugarmaker wrote: Sugarmaker wrote:
Robert,
I need to bring my e-tank inside. Its a solid block of ice. I could be using it. I ended up wire brushing my wheel brackets and pins.
What I did on those eccentric pins that are pitted is to grind the rough areas smooth so that when rotated they don't bind. We are working on some of the same stuff:) I just got my WD rims together.
Did you get new "C" snap rings?
Your cream looks very good. I just tossed a front rim in the truck yesterday that needs the tire removed, blasted and the valve stem hole repaired.
Looks like your ready for new rubber.
Keep the pictures coming.
Agreed that some fresh paint helps keep the interest level up, and can keep you going. Assuming the pocket book can keep up:)
Regards,
Chris
|
I'm not having much luck with the e-tank at 30 deg F. The soda is not mixing well and I think the cold is slowing the process down. It definitely works, just not as well as I'm used to. I'm trying to keep up with your progress, you got 2 builds going on! I don't have new snap rings, but I seen your post about picking them up from the parts store.
|
|
|
 |
Sugarmaker 
Orange Level


Joined: 12 Jul 2013
Location: Albion PA
Points: 8167
|
 Post Options Post Options
 Thanks(0) Thanks(0)
 Quote Quote  Reply Reply
 Posted: 15 Jan 2015 at 8:24am Posted: 15 Jan 2015 at 8:24am |
|
Robert,
Check your connections, scrape the plates in the tank, and recharge the tank with some more washing soda. I have had good luck even in cold weather before.
I never had very good luck doing much more than 1 piece at a time, Not sure why, maybe just surface area.
Sandy Lake had new clips.
Regards,
Chris
|
|
D17 1958 (NFE), WD45 1954 (NFE), WD 1952 (NFE), WD 1950 (WFE), Allis F-40 forklift, Allis CA, Allis D14, Ford Jubilee, Many IH Cub Cadets, 32 Ford Dump, 65 Comet.
|
 |
j.w.freck 
Orange Level


Joined: 16 Sep 2009
Location: karnack texas
Points: 1153
|
 Post Options Post Options
 Thanks(0) Thanks(0)
 Quote Quote  Reply Reply
 Posted: 15 Jan 2015 at 7:48pm Posted: 15 Jan 2015 at 7:48pm |
|
dave has it all straight and level.tractor overall looks not too bad.on my 700 dollar wd-45 diesel,things looked like a good parts tractor.but as it turned out.it was a diamond in the rough,has won me several.first place pulling titles,and all systems worked.it set in the woods near dubac la.for 9 years.its amazing what a little tlc can yield you.....
|
 |
structures 
Silver Level


Joined: 28 Feb 2011
Location: Beggs, OK
Points: 331
|
 Post Options Post Options
 Thanks(0) Thanks(0)
 Quote Quote  Reply Reply
 Posted: 08 Mar 2015 at 1:25pm Posted: 08 Mar 2015 at 1:25pm |
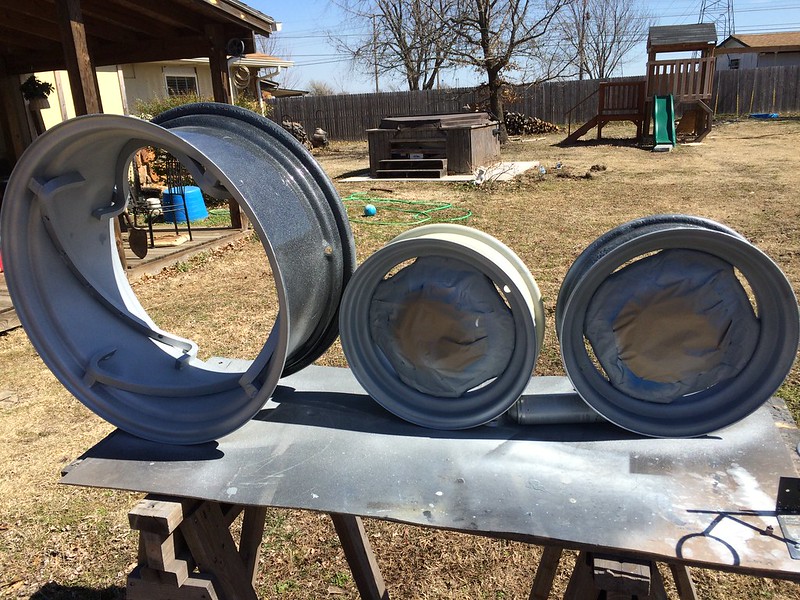
I painted some more on the wheels. Should be ready for rubber now. I did buy a new front wheel and I'm going to paint the center because the white it came with is darker than the white I have.
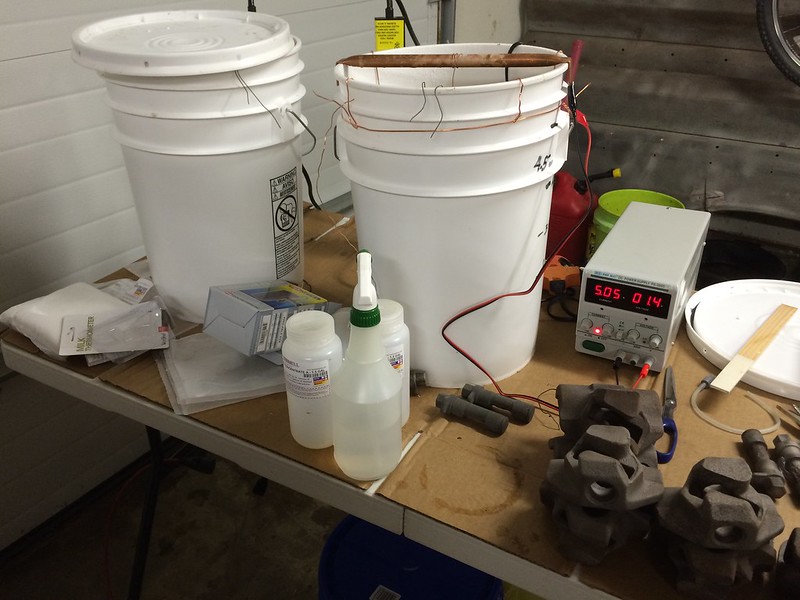
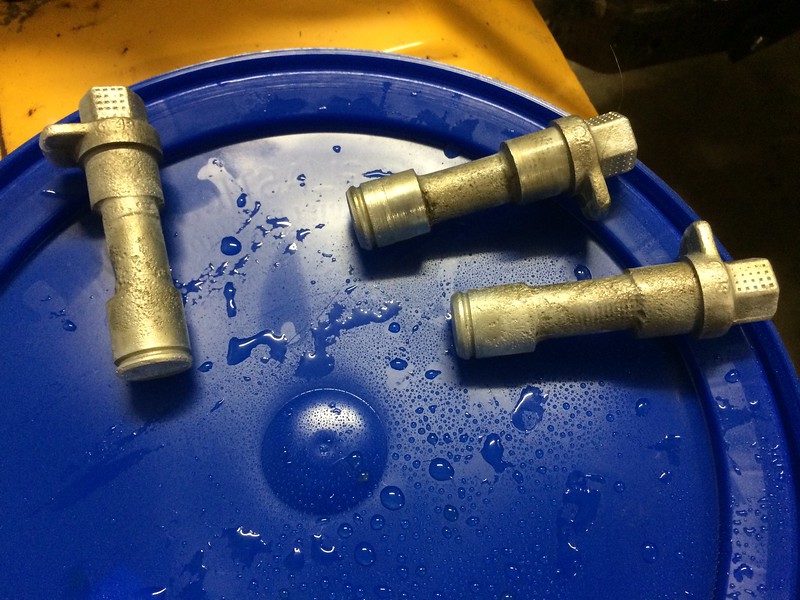
I also have been playing with plating. I'm putting a zinc plate on the eccentrics to help with the areas I wasn't going to paint. Turned out okay. Should provide some good protection, I think.
|
|
|
 |
JayIN 
Orange Level


Joined: 18 Dec 2009
Location: SE/IN
Points: 1982
|
 Post Options Post Options
 Thanks(0) Thanks(0)
 Quote Quote  Reply Reply
 Posted: 08 Mar 2015 at 2:24pm Posted: 08 Mar 2015 at 2:24pm |
|
Interesting. Keep up the good work on what is my favorite tractor!
|
|
sometimes I walk out to my shop and look around and think "Who's the idiot that owns this place?"
|
 |
rasman57 
Silver Level


Joined: 12 Sep 2009
Location: Illinois
Points: 367
|
 Post Options Post Options
 Thanks(0) Thanks(0)
 Quote Quote  Reply Reply
 Posted: 08 Mar 2015 at 7:48pm Posted: 08 Mar 2015 at 7:48pm |
|
Great work! Love watching your progress.
|
 |
Sugarmaker 
Orange Level


Joined: 12 Jul 2013
Location: Albion PA
Points: 8167
|
 Post Options Post Options
 Thanks(0) Thanks(0)
 Quote Quote  Reply Reply
 Posted: 08 Mar 2015 at 8:09pm Posted: 08 Mar 2015 at 8:09pm |
|
The rims looks real good! Nice work.
What is the plating process? Zinc?
Regards,
Chris
|
|
D17 1958 (NFE), WD45 1954 (NFE), WD 1952 (NFE), WD 1950 (WFE), Allis F-40 forklift, Allis CA, Allis D14, Ford Jubilee, Many IH Cub Cadets, 32 Ford Dump, 65 Comet.
|
 |


 Topic Options

 Post Options
 Thanks(0)


 Fourced wrote:


