| Author |
 Topic Search Topic Search  Topic Options Topic Options
|
Sugarmaker 
Orange Level


Joined: 12 Jul 2013
Location: Albion PA
Points: 8168
|
 Post Options Post Options
") Thanks(0) Thanks(0)
 Quote Quote  Reply Reply
 Posted: 12 Mar 2022 at 5:39pm Posted: 12 Mar 2022 at 5:39pm |
J, Awesome that Don is still helping folks! Engine is coming along nicely! Regards, Chris |
|
D17 1958 (NFE), WD45 1954 (NFE), WD 1952 (NFE), WD 1950 (WFE), Allis F-40 forklift, Allis CA, Allis D14, Ford Jubilee, Many IH Cub Cadets, 32 Ford Dump, 65 Comet.
|
 |
|
Sponsored Links
|
|
|
Jtaylor
Bronze Level

Joined: 11 Oct 2021
Location: Barrie, Ontario
Points: 194
|
Post Options
Thanks(0)
Quote Reply
Posted: 11 Mar 2022 at 6:59am |
 DrAllis wrote: DrAllis wrote:
Now, we need to find you a D-19 carburetor to wake it up !!! |
That would be a great idea! I had the intake manifold increased roughly 3/8" on the head side and we also opened the updraft side quite a bit as well. lets start the hunt for a D19 carb! super hard to find but well worth it.
|
|
DrAllis
Orange Level Access
Joined: 12 Sep 2009
Points: 19585
|
Post Options
Thanks(0)
Quote Reply
Posted: 11 Mar 2022 at 6:32am |
|
Now, we need to find you a D-19 carburetor to wake it up !!!
|
|
Jtaylor
Bronze Level
Joined: 11 Oct 2021
Location: Barrie, Ontario
Points: 194
|
Post Options
Thanks(0)
Quote Reply
Posted: 11 Mar 2022 at 6:25am |
Made some more progress on the engine last night,
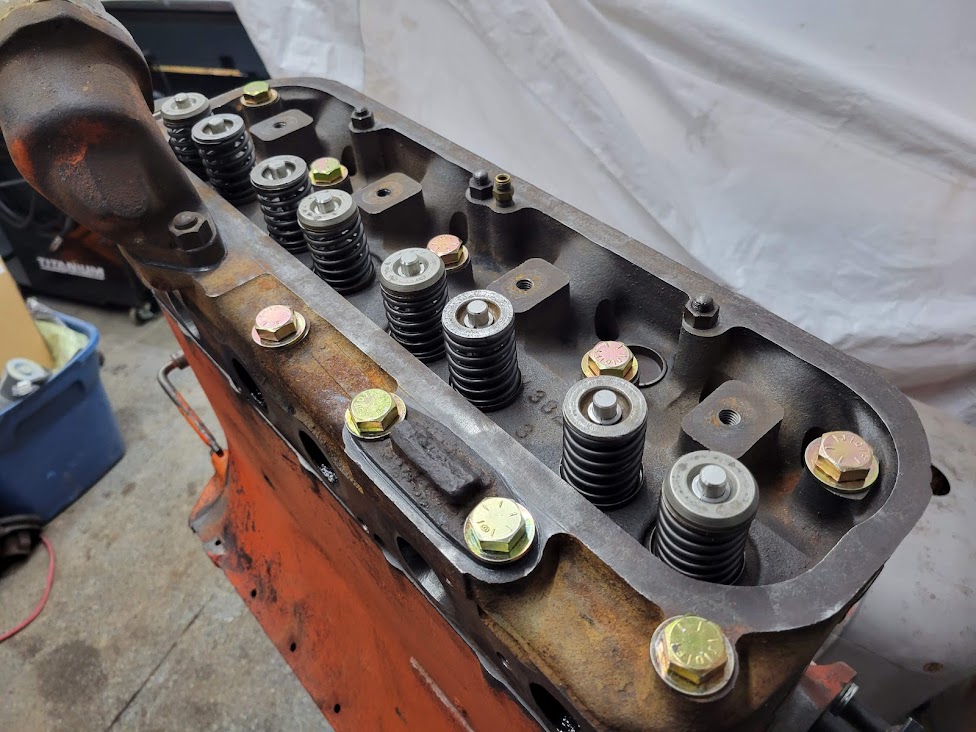
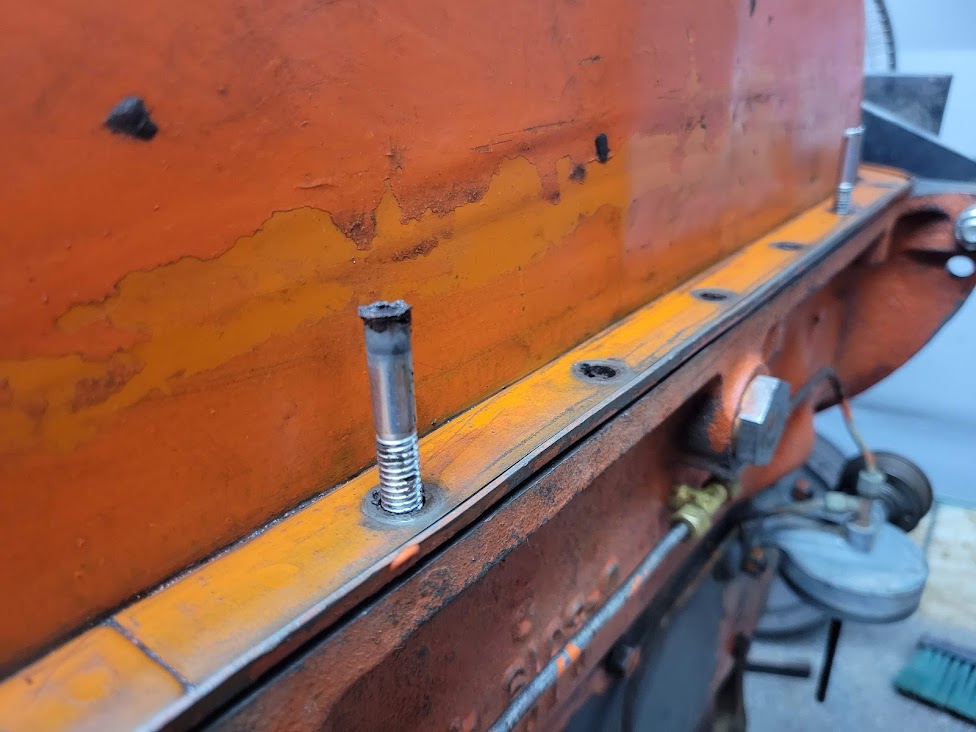
cylinder head installed with grade 8 hardware with nuts. torqued to 90ft lbs as per the service manual. I did RTV around the water jacket holes and pushrod holes just because. I have always had good luck doing it that way.
I was also able to clean up the original oil pan, remove a stripped drain plug and beat out a couple of dents. Once cleaned I placed on with locating pins to check fitment. no spring in the pan at all. it is in great shape! my cork pan gaskets are in some soup cans getting rounder for the installation tonight. made the locating pins out of some old hardware. after watching Don's video on the rear main seal, it was a no brainer that this would work well.
|
|
plummerscarin
Orange Level Access
Joined: 22 Jun 2015
Location: ia
Points: 3158
|
Post Options
Thanks(0)
Quote Reply
Posted: 09 Mar 2022 at 7:30am |
|
That looks nice. Will be interesting to see how it holds up. I have used grill paint on the 7060 muffler and cured it per directions but only held up for a year and a half. Granted it sits outside. I reapplied it last year and it seems to be holding well so far. Keep us posted on that
|
|
Jtaylor
Bronze Level
Joined: 11 Oct 2021
Location: Barrie, Ontario
Points: 194
|
Post Options
Thanks(0)
Quote Reply
Posted: 09 Mar 2022 at 7:24am |
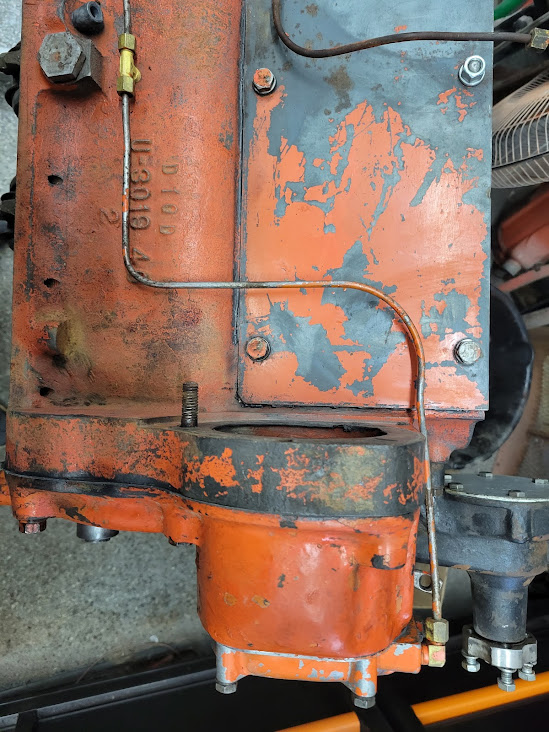
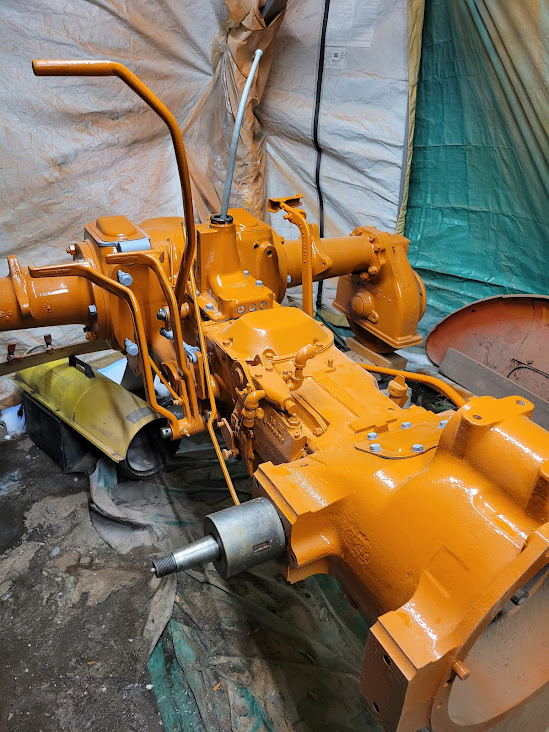
Last night i was able to clean up the governor housing from the 2 inches of mud that was caked onto it. getting it prepped for primer and paint soon.
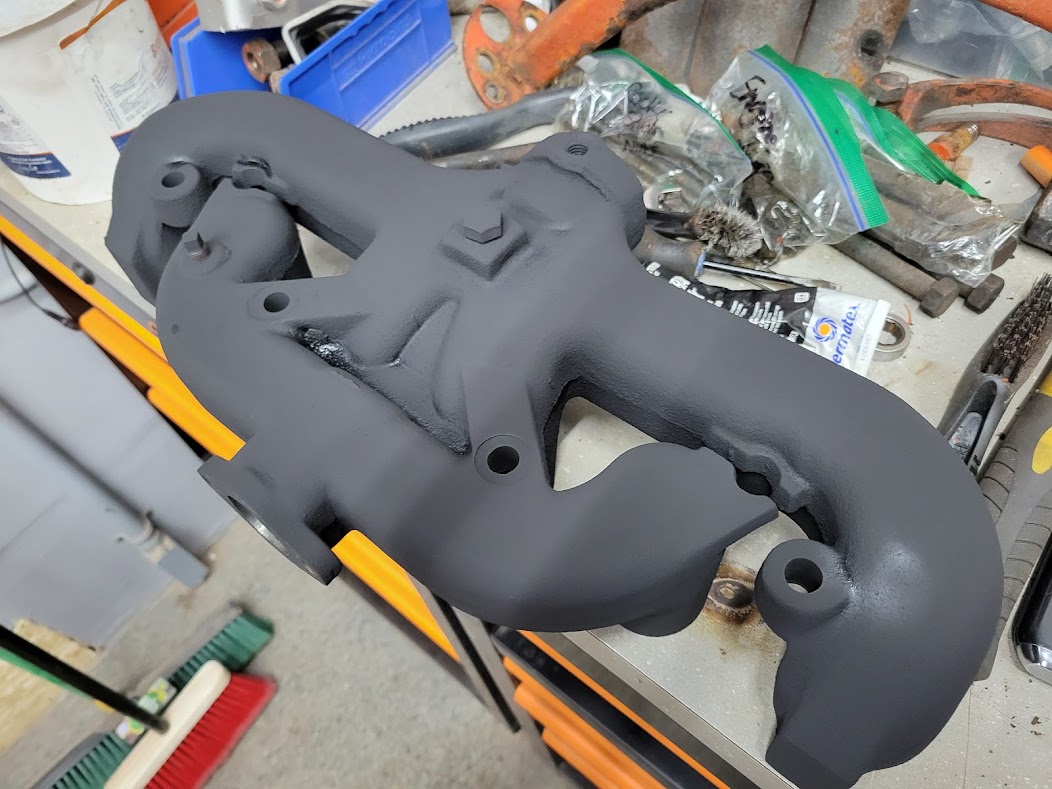
I also wanted to paint the exhaust manifold with a paint that would last. I was searching for powder coating or a ceramic coating but nothing tickled my fancy. I purchased a flame proof paint and after 2 coats, this is how it turned out. Very good!
|
|
Jtaylor
Bronze Level
Joined: 11 Oct 2021
Location: Barrie, Ontario
Points: 194
|
Post Options
Thanks(1)
Quote Reply
Posted: 08 Mar 2022 at 7:49am |
some more progress on the engine.
Was able to get the water pump installed and torqued down
I also was able to get the governor housing reinstalled with the oil line. This is the housing and oil line off the engine that was removed from the tractor after we bought it. It has a governor throw limiter set screw and the oil line. the original engine cover did not have the oil line and i was unsure where the tee fitting ran. Google did not tell me too much by photos so i went with my gut and reinstalled the other one.
I also got the oil pump resealed with a new gasket, all the gears looked great inside and very little wear. I reinstalled into the engine and torqued down the bolts as required. new mechanics wire is installed onto the mesh pickup guard. almost ready for oil pan installation.
|
|
Jtaylor
Bronze Level
Joined: 11 Oct 2021
Location: Barrie, Ontario
Points: 194
|
Post Options
Thanks(0)
Quote Reply
Posted: 07 Mar 2022 at 7:40am |
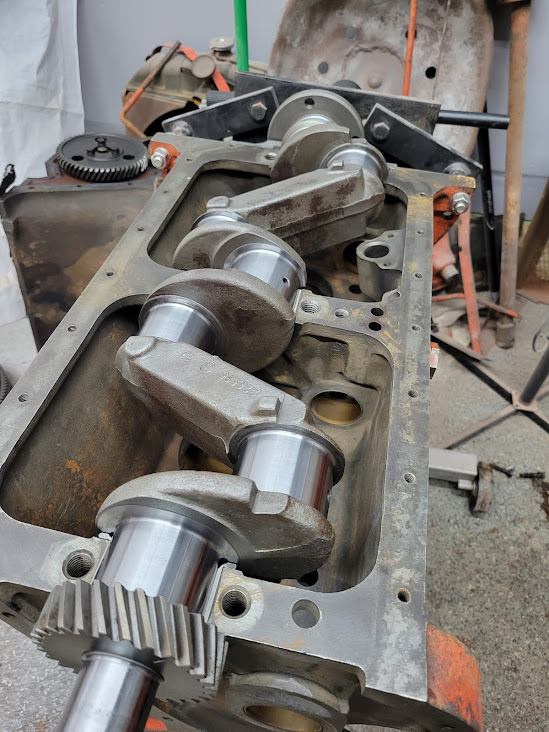
Made some great progress on the engine this weekend. After re-watching Don's rear main seal videos about 6 times to make sure, i got everything installed and working great.
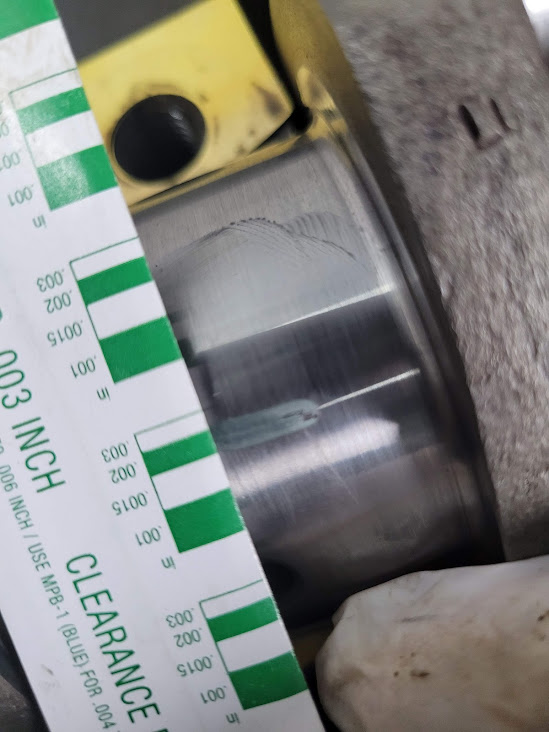
Got the crankshaft installed and torqued to spec.
about 0.0018" to 0.002" on the 2 front mains, and 0.0025" on the rear main cap.
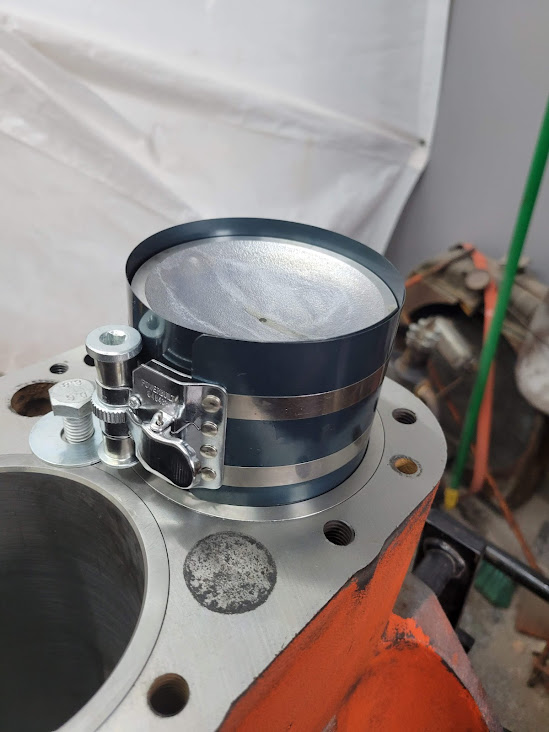
Got the sleeves installed as well. I went a bit higher on the liner height ( 0.005") just for a little extra crush.
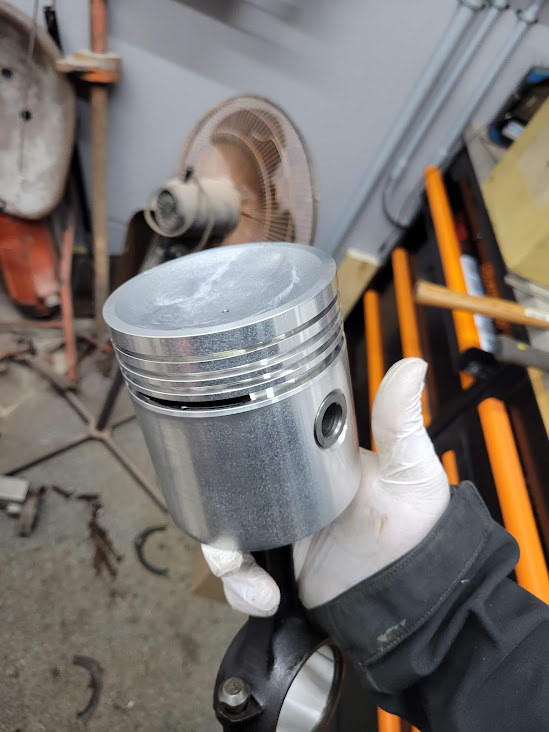
Also got the piston rings measured up for each cylinder and installed.
All pistons installed with non-bent connecting rods 
all connecting rod bearings spec'd at 0.002"
got the oil system back together - disregard the old filter, it is there for fun at this point. even was able to get the line tab installed again.
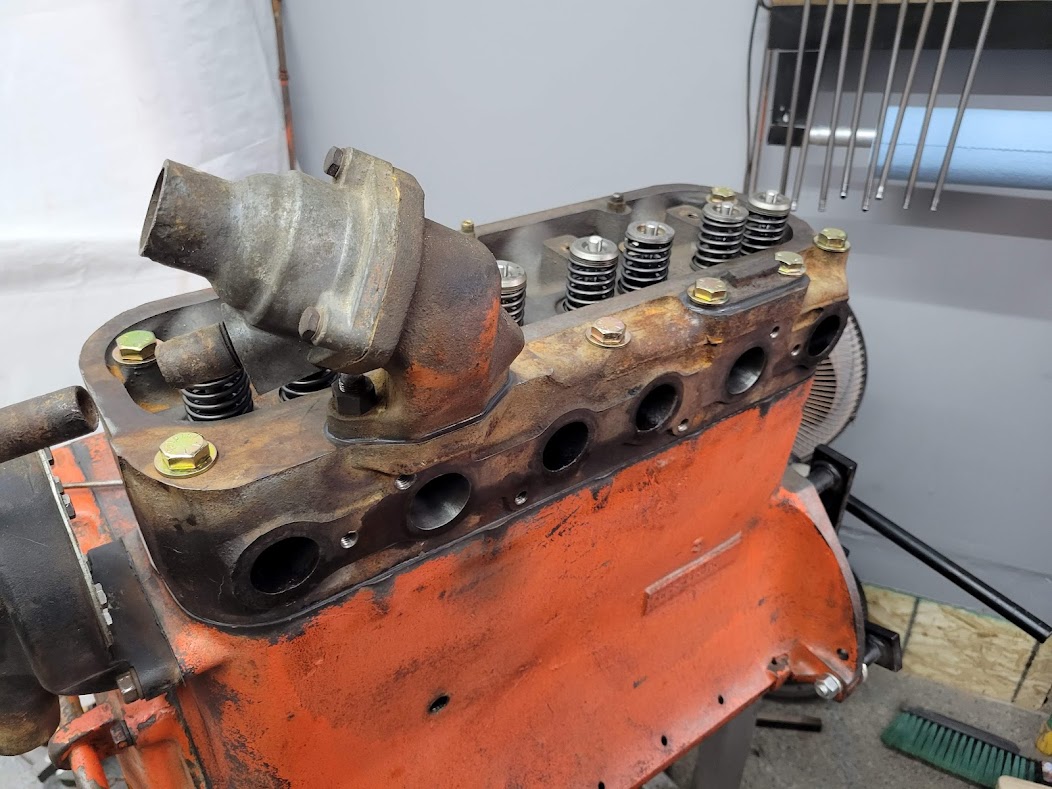
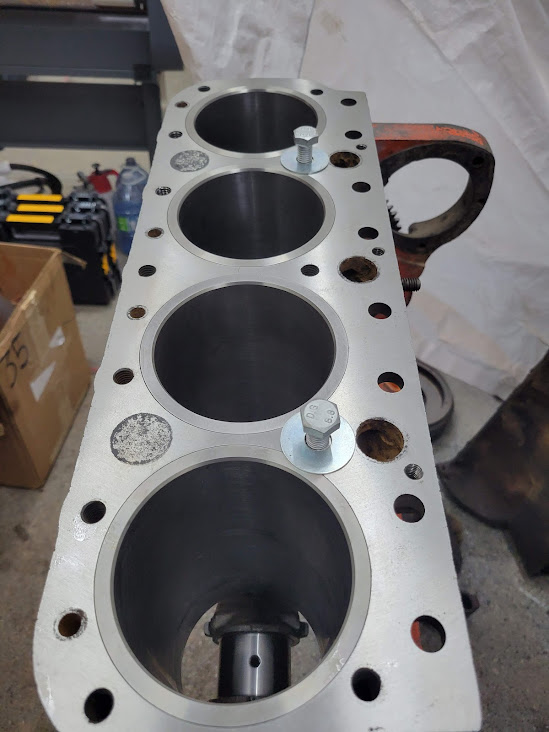
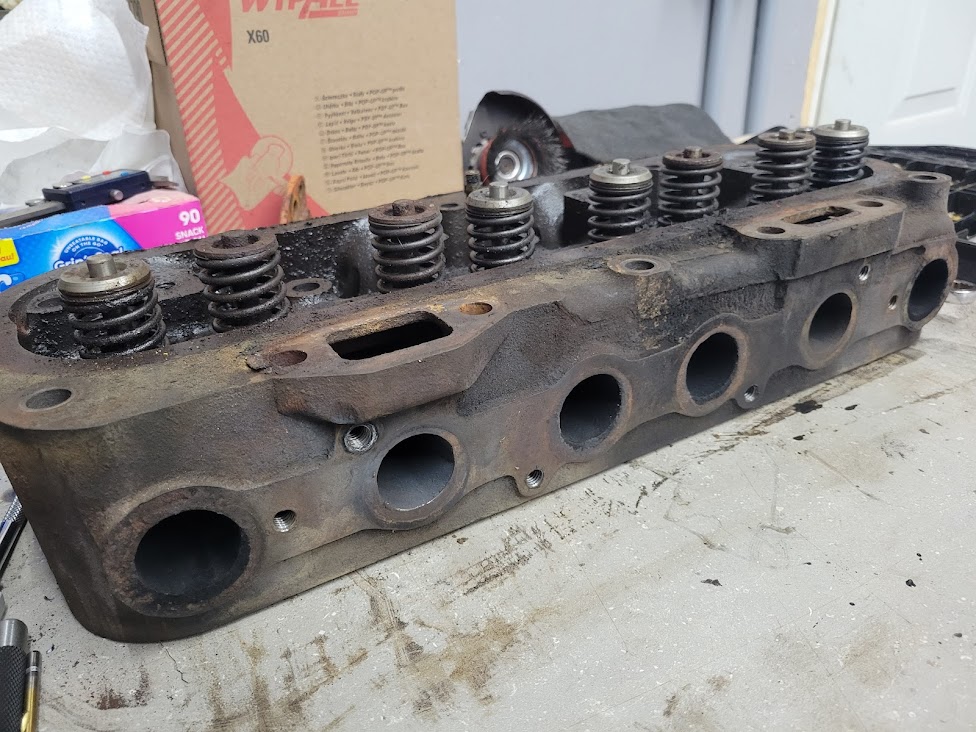
And the cylinder head, Back from the machine shop. New valves, seats ground to match, springs, keepers, guides, intake valve umbrella seals installed (just small ones to stop excessive oil) and head cleaned. looks better than new!
I will have the oil pump and pan on shortly, then prepped for paint and installed into the tractor. should be back in by next weekend for sure!
|
|
IBWD MIke
Orange Level

Joined: 08 Apr 2012
Location: Newton Ia.
Points: 3474
|
Post Options
Thanks(0)
Quote Reply
Posted: 03 Mar 2022 at 9:16am |
|
Looking good.
|
|
Jtaylor
Bronze Level
Joined: 11 Oct 2021
Location: Barrie, Ontario
Points: 194
|
Post Options
Thanks(0)
Quote Reply
Posted: 03 Mar 2022 at 8:37am |
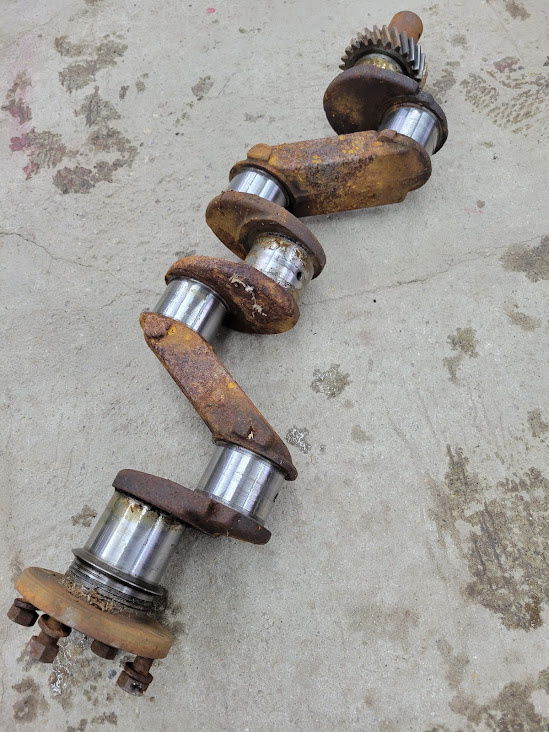
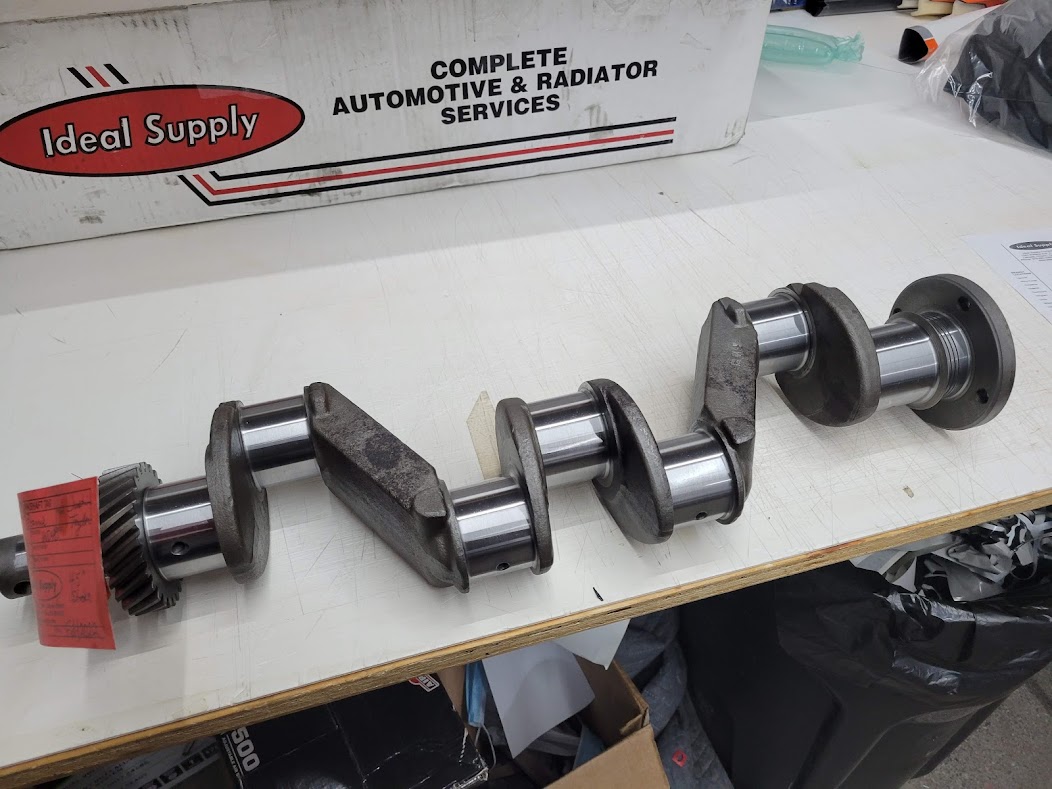
Made some progress on the engine last night. I got the crankshaft back looking like a million bucks. check out this before and after!
It was ground 0.010" under and is a 45 crank.
I was able to get it into the engine with new bearings. I will get the main caps on and check with plastigauge for the final amount of shims that will be required.
I started switching over connecting rods onto the new pistons, installing the new bearings.
ran into a bit of a snag with cylinder #1 connecting rod. Definitely something i did not see when pulling it apart
Off to the parts bin for another connecting rod..
|
|
FloydKS
Orange Level

Joined: 12 Sep 2009
Location: S E Kansas
Points: 7919
|
Post Options
Thanks(0)
Quote Reply
Posted: 01 Mar 2022 at 5:34am |
|
to change the phrase a little ... if it works, don't fix it :)
|
|
Holding a grudge is like taking poison and expecting the other person to die
|
|
55allis
Orange Level
Joined: 30 Jun 2020
Location: Southwest IA
Points: 549
|
Post Options
Thanks(0)
Quote Reply
Posted: 28 Feb 2022 at 8:53pm |
Yes that’s a dint but it doesn’t bother to much though... I think someone before me thought it was to close to the valve stem and bent it out. Figure it was going to mess it up worse trying to fix it so I left it.. 
|
|
FloydKS
Orange Level
Joined: 12 Sep 2009
Location: S E Kansas
Points: 7919
|
Post Options
Thanks(0)
Quote Reply
Posted: 28 Feb 2022 at 6:39pm |
|
I was noticing that 'flat spot' too...
|
|
Holding a grudge is like taking poison and expecting the other person to die
|
|
jvin248
Silver Level


Joined: 17 Jan 2022
Location: Detroit
Points: 268
|
Post Options
Thanks(0)
Quote Reply
Posted: 28 Feb 2022 at 5:54pm |
.
Front 'silvered' rims are much better looking to me too as they match the theme of the rear silvered rims. I can understand why they often get painted all orange though.
When I get to the painting stage on my 52WD I've planned to do silver rims too.
Is that a dent in the nearest front wheel rim? Or camera lens tricks?
.
|
|
55allis
Orange Level
Joined: 30 Jun 2020
Location: Southwest IA
Points: 549
|
Post Options
Thanks(0)
Quote Reply
Posted: 28 Feb 2022 at 1:06pm |
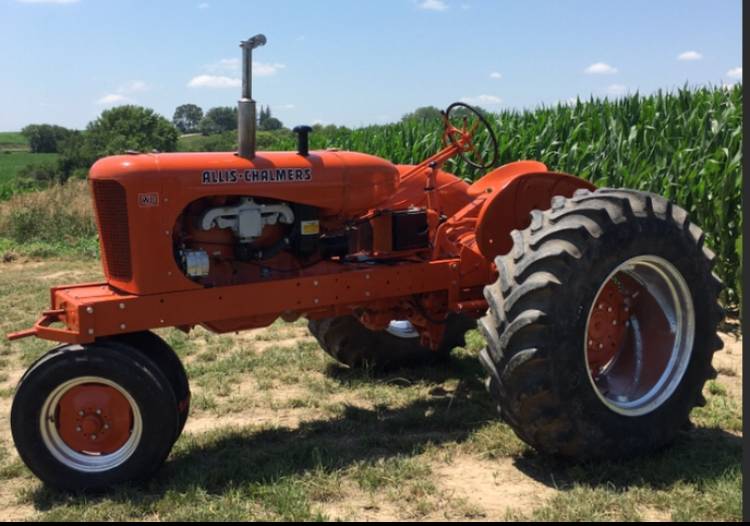
Looking like a tractor again, except it will be like new, if not better than new. Allis did have a power steering kit for the WD but would be like finding a needle in a haystack!!! Also when you paint your front wheels they look nicer when you put some silver on the rim, I know a lot of people put them to all orange...  Those are before I put the tires on so you see what I mean...
|
|
Jtaylor
Bronze Level
Joined: 11 Oct 2021
Location: Barrie, Ontario
Points: 194
|
Post Options
Thanks(0)
Quote Reply
Posted: 28 Feb 2022 at 6:24am |
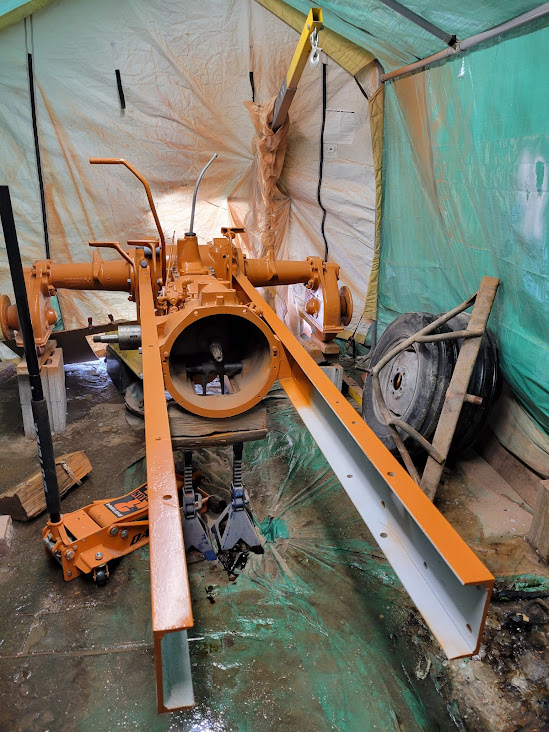
Made a touch of headway on the front end,
got the bolster back into spot.
I also heard back from the machine shop. 0.010" machined off both the main and rods. Should get that back in the next couple of days then we can start with reassembly. another $600 spent at DJS for replacement parts. they should also arrive wednesday or so.
Edited by Jtaylor - 28 Feb 2022 at 6:27am
|
|
Jtaylor
Bronze Level
Joined: 11 Oct 2021
Location: Barrie, Ontario
Points: 194
|
Post Options
Thanks(0)
Quote Reply
Posted: 25 Feb 2022 at 9:24am |
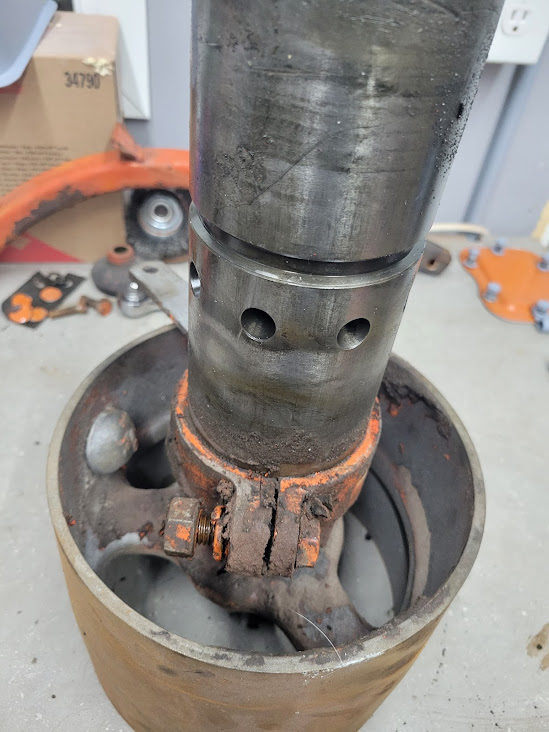
I have been cleaning up the front bolster for installation and making templates for the power steering conversion. I will also be working on the hand crank setup here in the next few days, it is currently bent and does look to have been tinkered with before. but i will start to repair this once it is in the frame of the tractor.
|
|
AC720Man
Orange Level

Joined: 10 Oct 2016
Location: Shenandoah, Va
Points: 4667
|
Post Options
Thanks(0)
Quote Reply
Posted: 25 Feb 2022 at 9:00am |
|
That looks like a sweet solution. Will be interested in how that turns out.
|
|
1968 B-208, 1976 720 (2 of them)Danco brush hog, single bottom plow,52" snow thrower, belly mower,rear tine tiller, rear blade, front blade, 57"sickle bar,1983 917 hydro, 1968 7hp sno-bee, 1968 190XTD
|
|
Jtaylor
Bronze Level
Joined: 11 Oct 2021
Location: Barrie, Ontario
Points: 194
|
Post Options
Thanks(0)
Quote Reply
Posted: 24 Feb 2022 at 6:43pm |
HudCo wrote:
how many rounds from stop to stop on that steering gear ? |
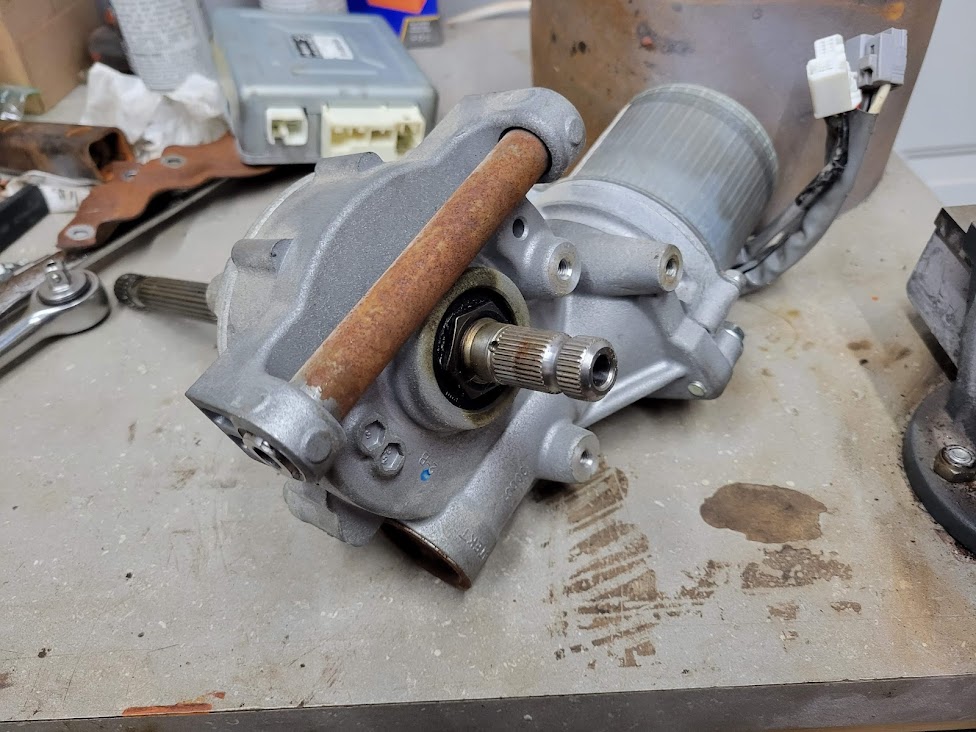
Unlimited! Because it's not a steering gear. This is basically a torque generator but electric.
|
|
HudCo
Orange Level

Joined: 29 Jan 2013
Location: Plymouth Utah
Points: 3301
|
Post Options
Thanks(0)
Quote Reply
Posted: 24 Feb 2022 at 6:32pm |
|
how many rounds from stop to stop on that steering gear ?
|
|
IBWD MIke
Orange Level
Joined: 08 Apr 2012
Location: Newton Ia.
Points: 3474
|
Post Options
Thanks(0)
Quote Reply
Posted: 24 Feb 2022 at 10:05am |
|
Very interesting! Have heard of guys doing this kind of power steering conversion, will be nice to see it documented.
|
|
Sugarmaker
Orange Level
Joined: 12 Jul 2013
Location: Albion PA
Points: 8168
|
Post Options
Thanks(0)
Quote Reply
Posted: 24 Feb 2022 at 8:57am |
Wow. Looking real good! interesting powersterring conversion too! Regards, Chris
|
|
D17 1958 (NFE), WD45 1954 (NFE), WD 1952 (NFE), WD 1950 (WFE), Allis F-40 forklift, Allis CA, Allis D14, Ford Jubilee, Many IH Cub Cadets, 32 Ford Dump, 65 Comet.
|
|
Jtaylor
Bronze Level
Joined: 11 Oct 2021
Location: Barrie, Ontario
Points: 194
|
Post Options
Thanks(0)
Quote Reply
Posted: 24 Feb 2022 at 8:48am |
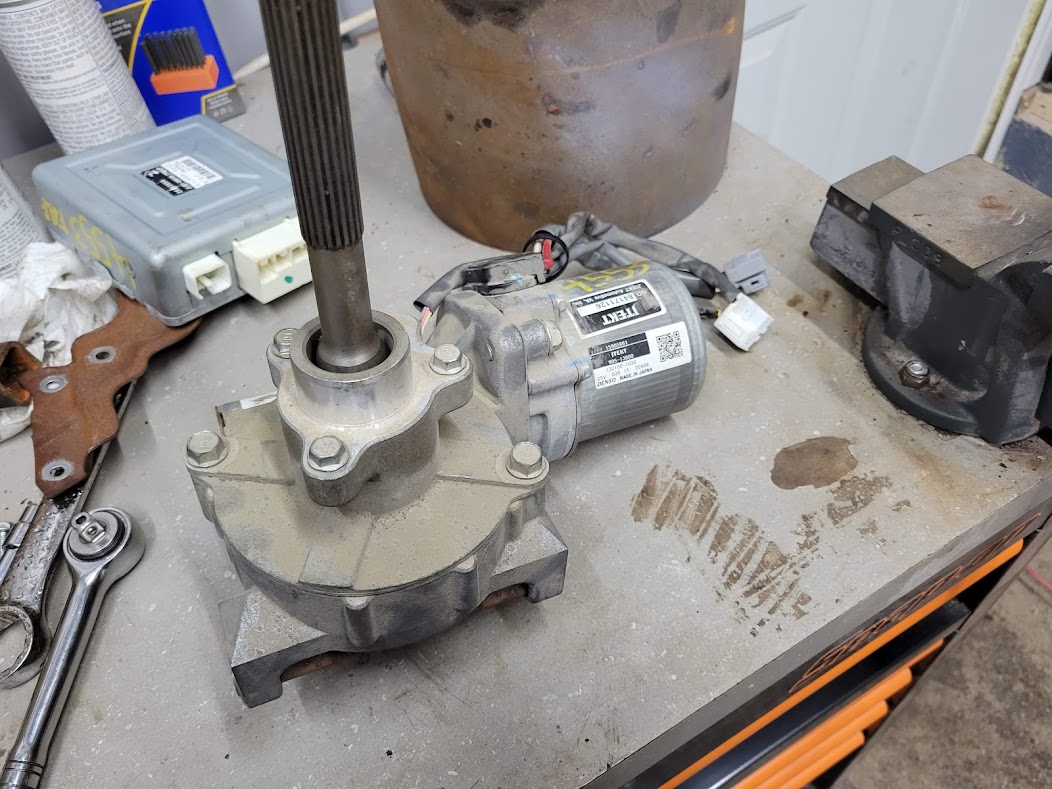
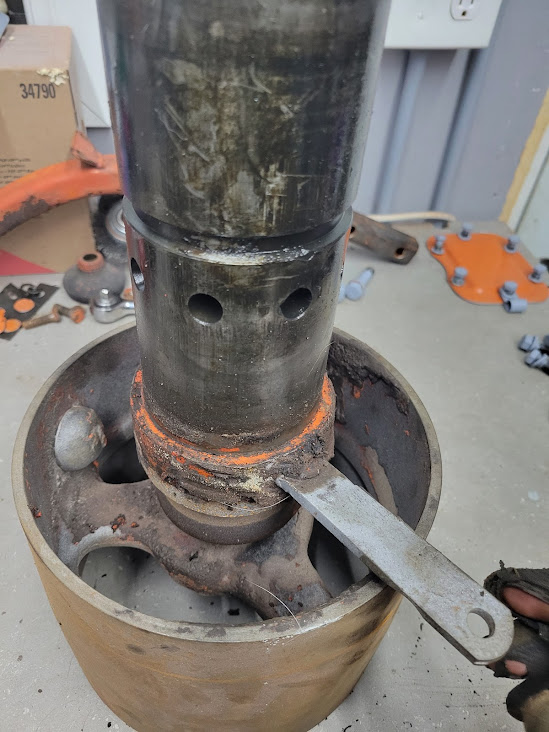
Another quick update. I have been pondering how to sucessfully complete a power steering conversion without purchasing the expensive char-lynn setup that some of these tractors came with.
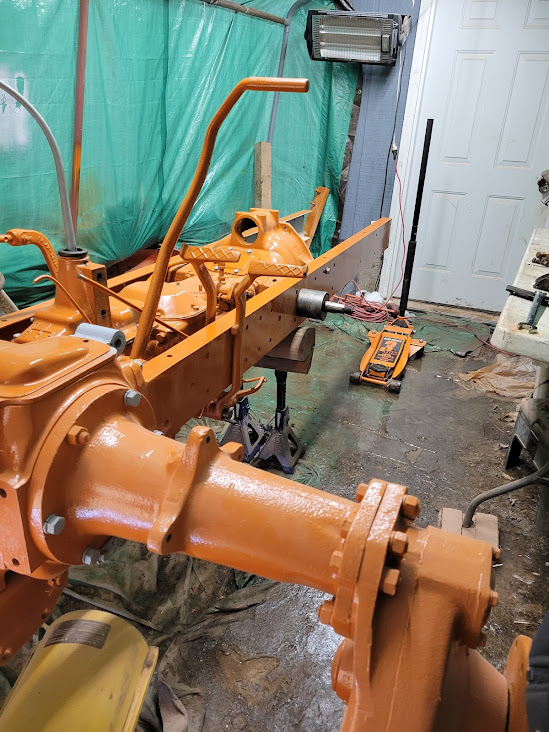
I did have a pre-requisite that i wanted it to look as factory "in place" as it could as well as be between the frame rails and not externally mounted. I was originally thinking of a ford power steering pump and gear but after extensive searching for something to work, I was stuck with a right hand drive unit to mount between the frame rails. since i am in canada, right hand drive parts are hard to find and i wanted to stay away from an uncommon source in case something breaks in the future.
Here was my solution.
This was an ELECTRIC power steering pump from a 2007 saturn Vue SUV. these use a one piece steering shaft that fits in line of the original steering gear. it uses torque sensors to provide steering assistance but without the worry of leaking fluid or hiding another reservoir for nobody to see. PLUS.... the unit is very small. It will fit in the spot between the engine and bolster with plenty of room to spare. the bonus part is if the fuse blows or there is a malfunction, the unit will default to an "off" position and the unit will return back to manual steering. these units use 10AWG wire to power them from the battery, they also draw about 60 amps at full lock. it seems like a lot but with the newer technology of 100+ amp alternators we should be just fine running it off these tractors.
keep your eyes peeled for installation once the bracket is made up and this setup is painted persian orange!
|
|
Jtaylor
Bronze Level
Joined: 11 Oct 2021
Location: Barrie, Ontario
Points: 194
|
Post Options
Thanks(1)
Quote Reply
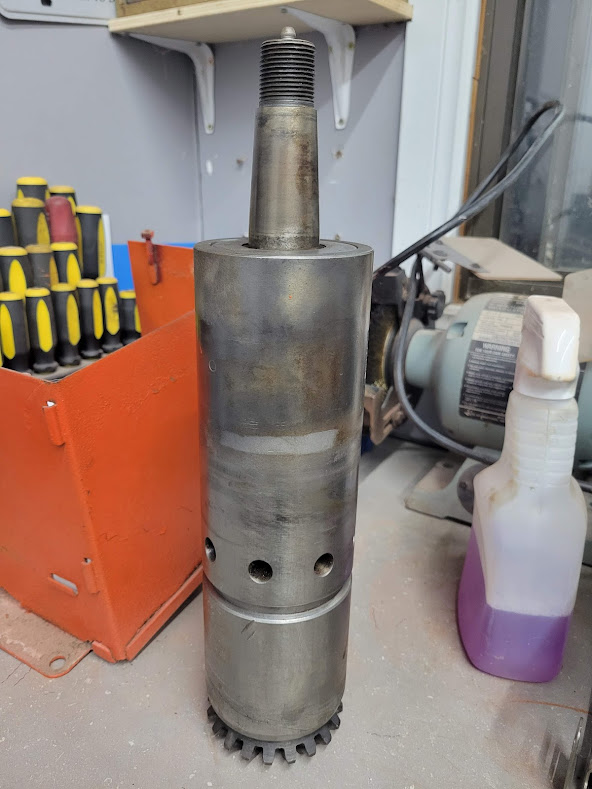
Posted: 22 Feb 2022 at 6:38am |
Good morning Everyone, Been away from the forum and the tractor for a couple of weeks. Busy with my own business and tending to the snowmobile trails around the area
Just finished the top color change on this to add the black bandana
As well as running this guy during nights
BUT!
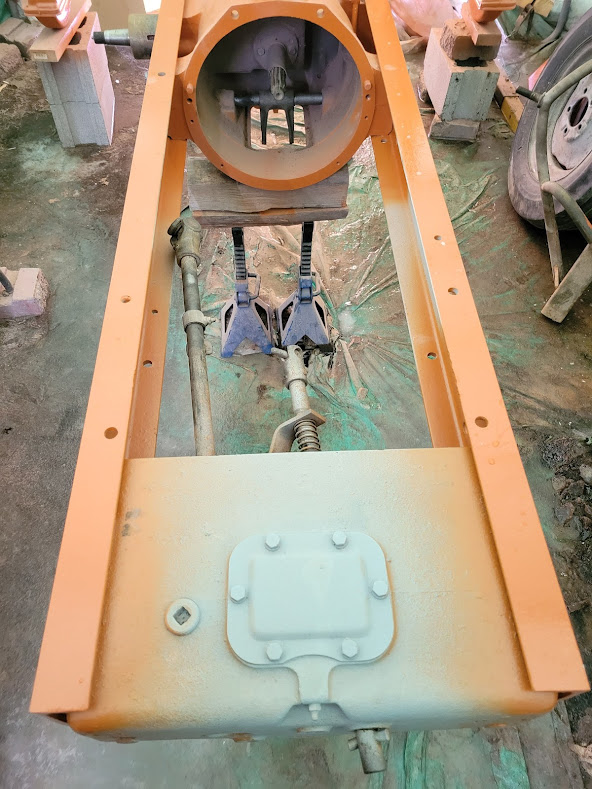
I was able to work on the tractor a bit over the long weekend. the main goal was frame rail prep. I wanted to have the tractor to the point the frame rails could be installed without the need for removal again. I finished the shifter assembly and sealed it to the tractor, as well as installed the belt drive with its cover sealed and tight. and all linkages i could think of was installed prior to the frame rails.
I installed the frame rails after that previous photo.
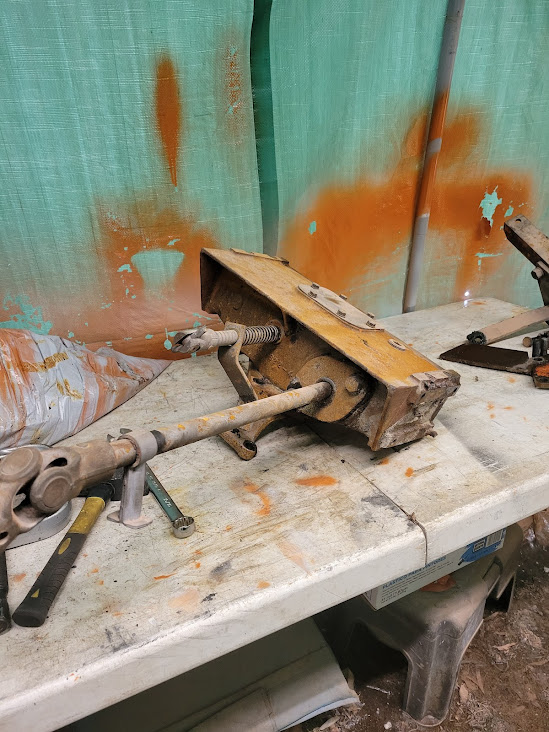
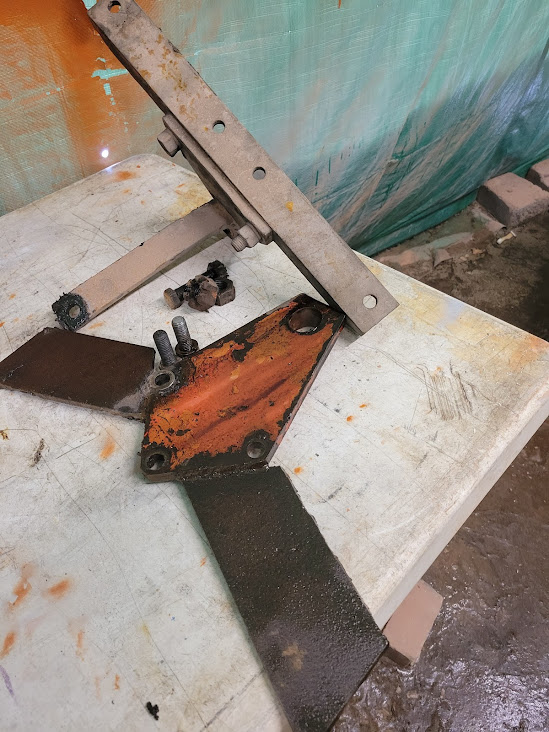
Then I started working on the front end, I pulled the bolster apart from the wide front for inspection and cleaning. lots of build up debris but not much in the form of wear.
I also got the front and rear pin plates removed, I will need to fill these in and machine them back to the correct size. the front is worn pretty good, Lots of time will be needed to reshape them back to original.
more updates to follow as the progress continues.
|
|
Jtaylor
Bronze Level
Joined: 11 Oct 2021
Location: Barrie, Ontario
Points: 194
|
Post Options
Thanks(0)
Quote Reply
Posted: 03 Feb 2022 at 6:40am |
Sugarmaker wrote:
Justin, I had not seen the pulley engagement system. Heard about them. Is that a aftermarket item? Your doing good during the winter months! Lots of moves to make for sure. Give good attention to your oil pump. That was a area I had to go back and re-do. I think you will like how the transmission shifts with your repairs. Like factree!:) Dash looks great! I always customize mine to move the key switch up on top. I like the Sierra brand marine switches. Seem very durable and water proof. Regards, Chris
|
It looks to be an allis part of some sort. stamping is indicative of Allis-type. it works well for sure! slowly getting things cleaned up and put back together. as much as possible anyways.. once i make some headway with the frame rails (next free day) they will be installed then i can paint the tractor again with all the new parts and pieces installed and prepare for its final assembly without sheetmetal.
|
|
Sugarmaker
Orange Level
Joined: 12 Jul 2013
Location: Albion PA
Points: 8168
|
Post Options
Thanks(0)
Quote Reply
Posted: 03 Feb 2022 at 6:30am |
Justin, I had not seen the pulley engagement system. Heard about them. Is that a aftermarket item? Your doing good during the winter months! Lots of moves to make for sure. Give good attention to your oil pump. That was a area I had to go back and re-do. I think you will like how the transmission shifts with your repairs. Like factree!:) Dash looks great! I always customize mine to move the key switch up on top. I like the Sierra brand marine switches. Seem very durable and water proof. Regards, Chris
|
|
D17 1958 (NFE), WD45 1954 (NFE), WD 1952 (NFE), WD 1950 (WFE), Allis F-40 forklift, Allis CA, Allis D14, Ford Jubilee, Many IH Cub Cadets, 32 Ford Dump, 65 Comet.
|
|
Jtaylor
Bronze Level
Joined: 11 Oct 2021
Location: Barrie, Ontario
Points: 194
|
Post Options
Thanks(0)
Quote Reply
Posted: 02 Feb 2022 at 8:03am |
A small update here. Got a bit tied up with work and other projects that have taken some time.
i cleaned and rebuilt the belt drive. pulled it apart and checked everything over. a nice couple of photos of the "live" belt setup. still do not know where it came from or what it was used for, but it is super simple and effective. check it out.
|
|
Sugarmaker
Orange Level
Joined: 12 Jul 2013
Location: Albion PA
Points: 8168
|
Post Options
Thanks(0)
Quote Reply
Posted: 26 Jan 2022 at 6:13pm |
The engine work is coming along nicely. Sound like about the same sleeve protrusion I had on the sleeves too. Thanks for the update! Keep hitting at it! Regards, Chris
|
|
D17 1958 (NFE), WD45 1954 (NFE), WD 1952 (NFE), WD 1950 (WFE), Allis F-40 forklift, Allis CA, Allis D14, Ford Jubilee, Many IH Cub Cadets, 32 Ford Dump, 65 Comet.
|
|
Jtaylor
Bronze Level
Joined: 11 Oct 2021
Location: Barrie, Ontario
Points: 194
|
Post Options
Thanks(0)
Quote Reply
Posted: 26 Jan 2022 at 7:14am |
some slow progress over the last week. Very cold here now (-25*C) and hard to work on things outside. Inside i have been busy getting the odds and ends ready to go. Main progress has been made on the engine. Counterbores were cut so the liners are now 0.005" above the deck. Perfect height. Crank is being sent in tomorrow for polishing and sizing. Cylinder head is also going over at the same time to be surfaced. I pulled out all manifold studs and rocker studs. Ready for machining.
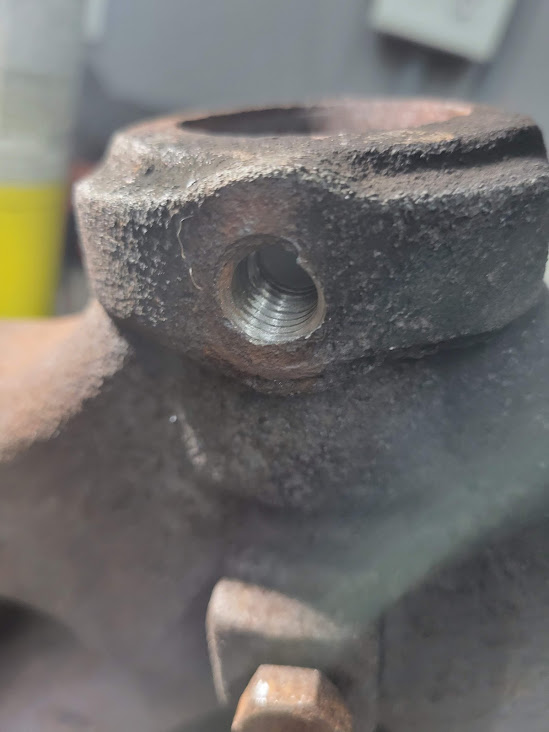
I also worked on getting the first bolt I broke when starting my disassembly. The exhaust pipe pinch bolt. I drilled and re-tapped the hole to 7/16 coarse thread just for simplicity.
|
|
Jtaylor
Bronze Level
Joined: 11 Oct 2021
Location: Barrie, Ontario
Points: 194
|
Post Options
Thanks(0)
Quote Reply
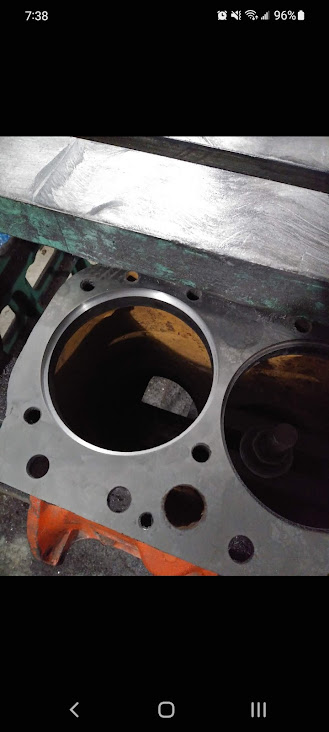
Posted: 19 Jan 2022 at 10:59am |
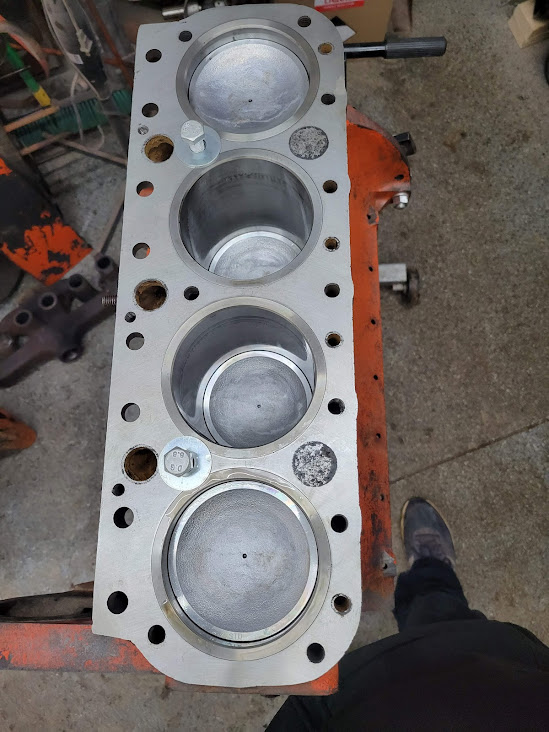
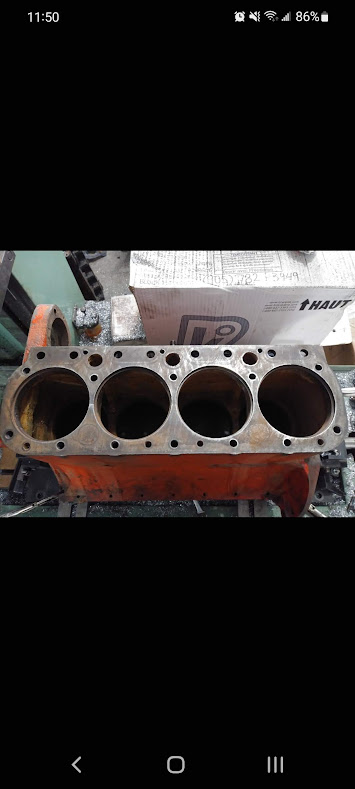
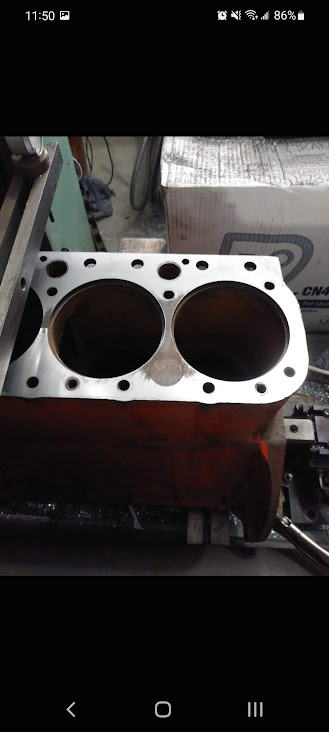
Got a message from the machine shop this morning. Block is decked and flat again. it has a couple of low spots in between a couple of cylinders. we still have to shave the liners (currently sticking out .008")
here is some photos from the machine shop.
0
|
|