| Author |
 Topic Search Topic Search  Topic Options Topic Options
|
ac hunter 
Orange Level


Joined: 05 Jan 2011
Location: OHIO
Points: 948
|
 Post Options Post Options
") Thanks(0) Thanks(0)
 Quote Quote  Reply Reply
 Posted: 02 May 2022 at 6:42pm Posted: 02 May 2022 at 6:42pm |
|
Very interesting to see your tractor grow as you add parts. Looks really good. Thanks for sharing all those pictures.
|
 |
|
Sponsored Links
|
|
|
Strokendiesel002
Silver Level


Joined: 04 Apr 2019
Location: 53158
Points: 252
|
Post Options
Thanks(0)
Quote Reply
Posted: 02 May 2022 at 2:11pm |
|
Very Nice Work!!!
I really am digging your power steering setup, may have to experiment with my D17. It's kinda tough when I've got a bucket full of stuff. Lots of worn parts to replace and repair before I add power though.
Thank you for sharing your journey, ideas and methods
Jimmy
|
|
Jtaylor
Bronze Level

Joined: 11 Oct 2021
Location: Barrie, Ontario
Points: 194
|
Post Options
Thanks(0)
Quote Reply
Posted: 02 May 2022 at 6:38am |
made some considerable progress over the weekend.
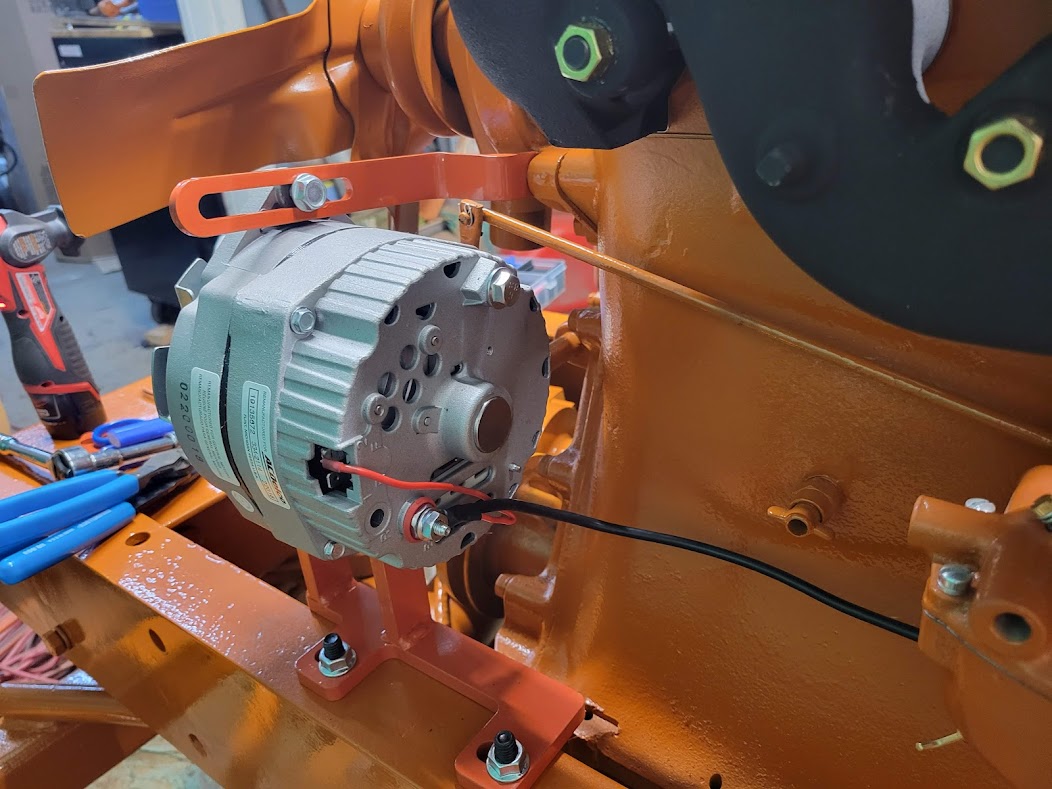
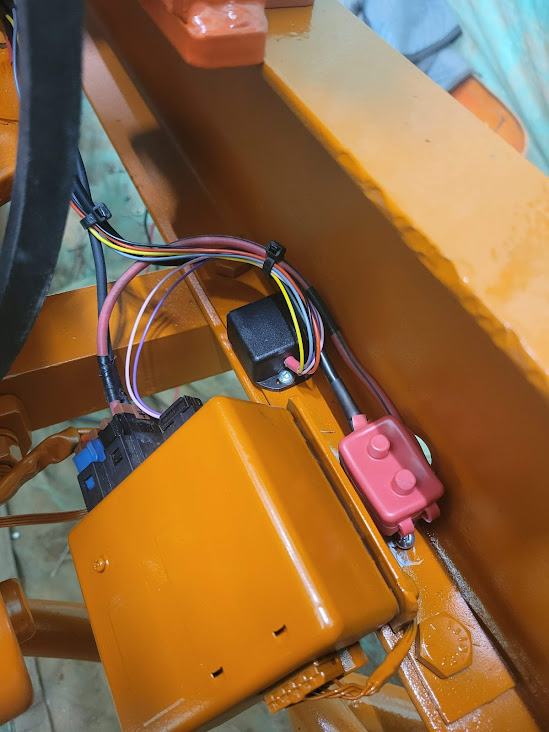
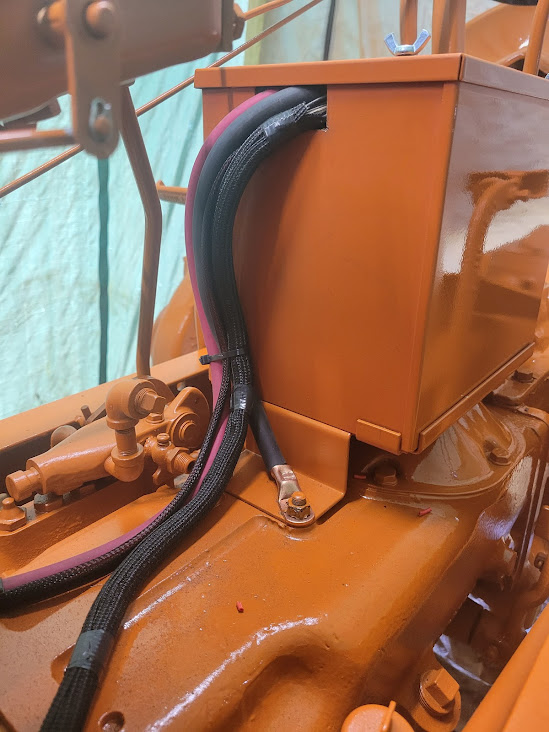
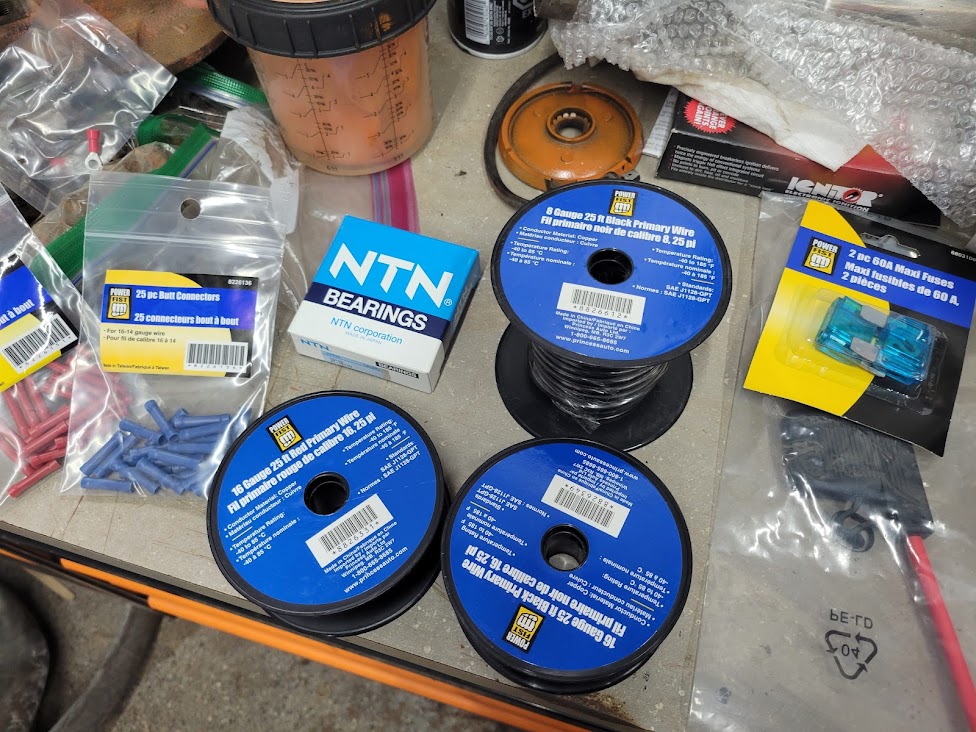
Got the wiring completed friday night into saturday - lots of wires to the front of the tractor. mainly for the alternator and the power steering.
Here was all the wire loomed up and tucked away. I think i genuinely used just over 65 ft of wire total..
I also got the console in placeand ammeter wiring correct. Looks good to me!
I then installed the front hubs with new bearings. packed and ready to go now.
And the front wheels were put back on to make it mobile. It was also a good test for the power steering unit. It works amazing.
I also fired up the tractor for the first time. After having to reposition the distributor (180* out) it fired right up. Ran very good as well. I also changed all fluids and refilled with Hytrans.
|
|
Jtaylor
Bronze Level
Joined: 11 Oct 2021
Location: Barrie, Ontario
Points: 194
|
Post Options
Thanks(0)
Quote Reply
Posted: 28 Apr 2022 at 7:03am |
Got a couple rolls of wire in to wire up the tractor. I have my wiring diagram ready and a new alternator on it's way. Should be ready to wire this one up tomorrow and prepare for it's first start!
I also was able to get some new wheel bearings for the front hubs. They should be finished at the beginning of next week.
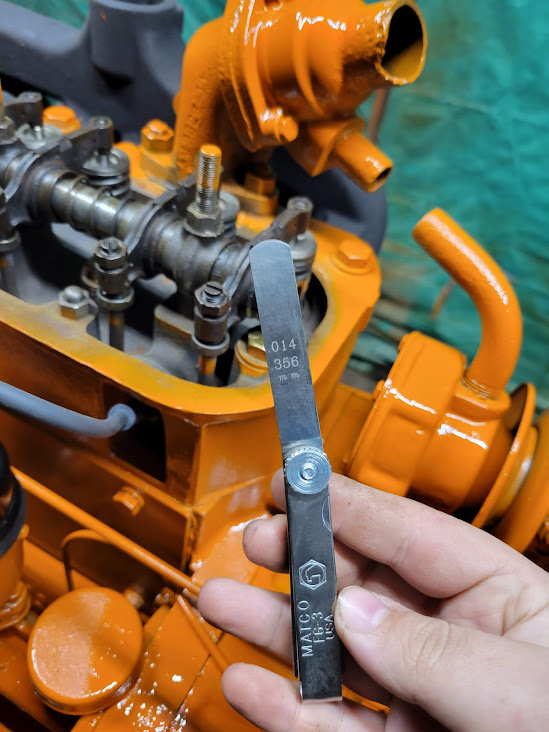
Valve adjustment also completed. set to 0.014" as per some of the guides on this forum. Of course i will need to double check for valve adjustment when hot, this is a good starting point on a cold engine.
|
|
Strokendiesel002
Silver Level
Joined: 04 Apr 2019
Location: 53158
Points: 252
|
Post Options
Thanks(0)
Quote Reply
Posted: 26 Apr 2022 at 8:43pm |
|
Awesome work!
Thanks for sharing with us
|
|
IBWD MIke
Orange Level

Joined: 08 Apr 2012
Location: Newton Ia.
Points: 3474
|
Post Options
Thanks(0)
Quote Reply
Posted: 25 Apr 2022 at 8:48am |
|
Looks great!
|
|
plummerscarin
Orange Level Access
Joined: 22 Jun 2015
Location: ia
Points: 3158
|
Post Options
Thanks(0)
Quote Reply
Posted: 25 Apr 2022 at 7:18am |
|
Great progress. Looking good
|
|
Jtaylor
Bronze Level
Joined: 11 Oct 2021
Location: Barrie, Ontario
Points: 194
|
Post Options
Thanks(0)
Quote Reply
Posted: 25 Apr 2022 at 6:06am |
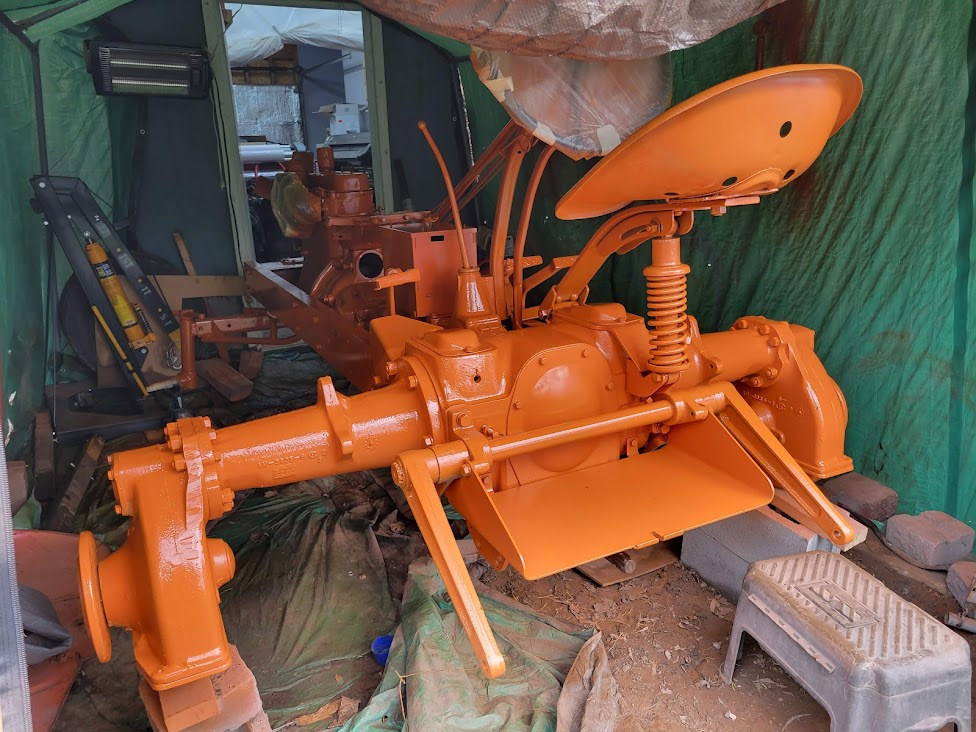
Yesterday was a very progressive day. The warm Temps allowed me to complete the majority of the items i wanted to. I prepped for paint by finishing some loose ends and getting cotter pins back into certain areas as well as some missing bolts.
here is the tractor prior to painting
After 2 coats of paint, this is what Allie looked like
After the 2 coats, I touched up a couple areas with a 3rd coat.
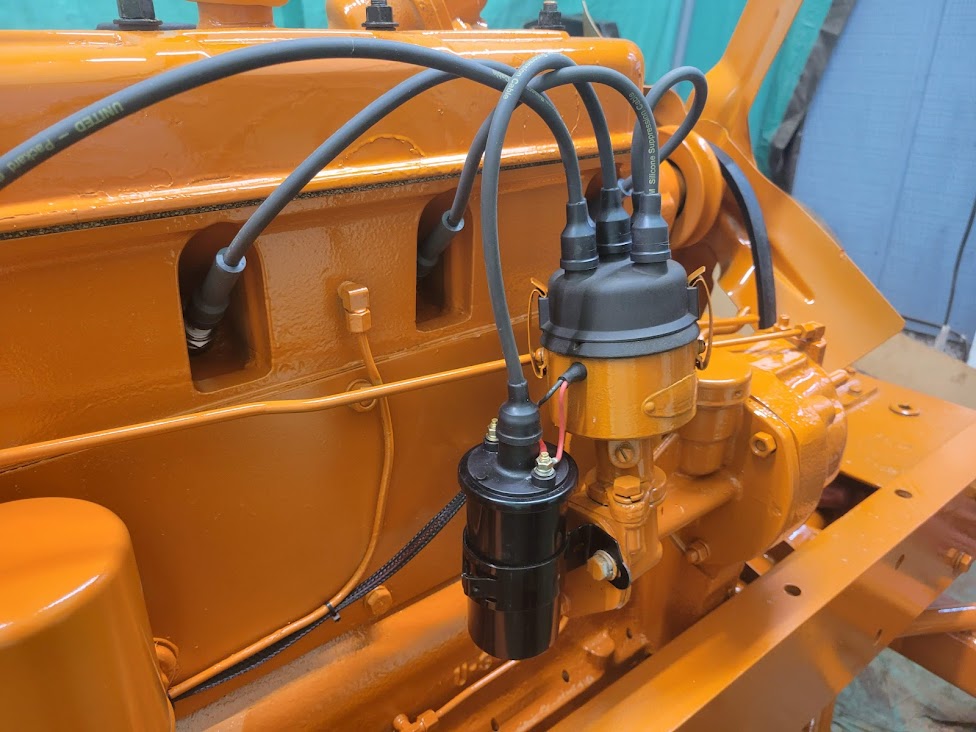
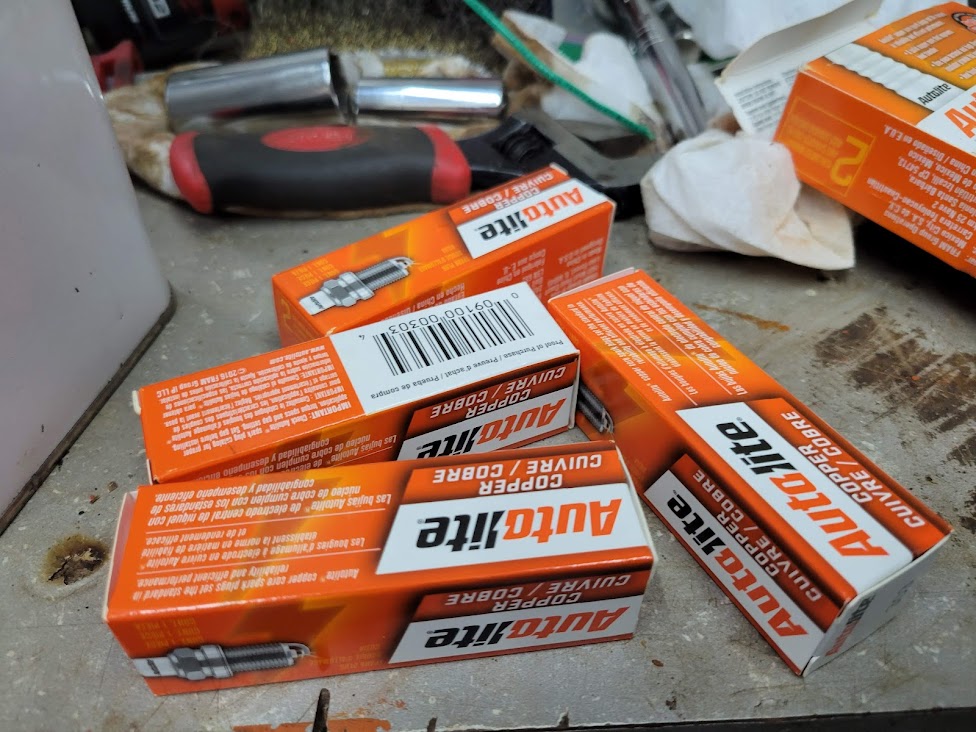
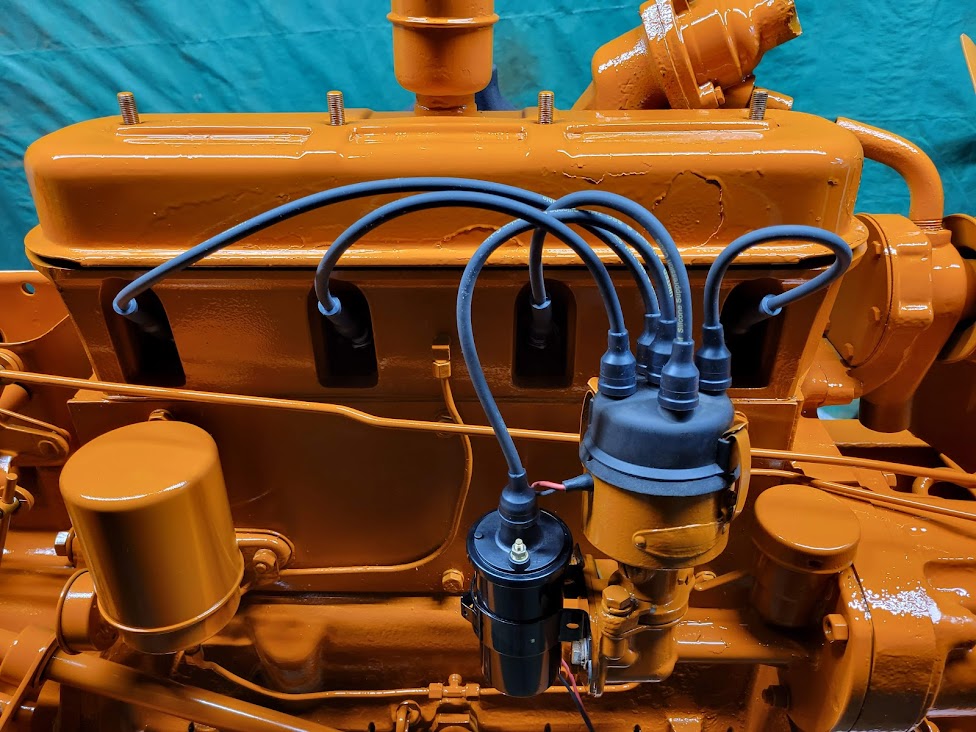
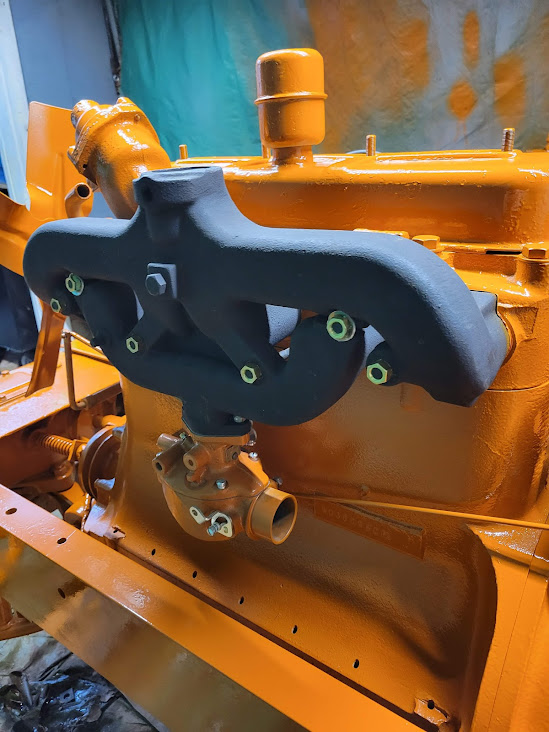
after the hardener started its magic, I was able to put some new spark plugs and ignition wires into place. along with a pertonix ignition kit and new coil
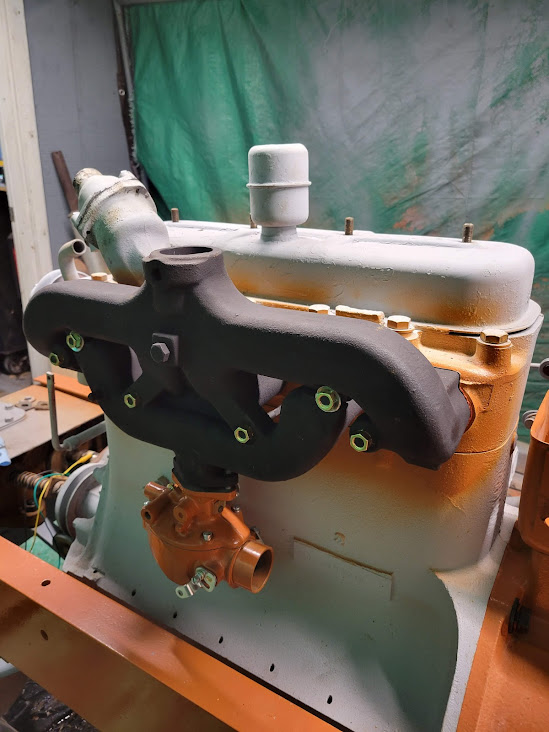
Exhaust manifold and carburetor looking good in place!
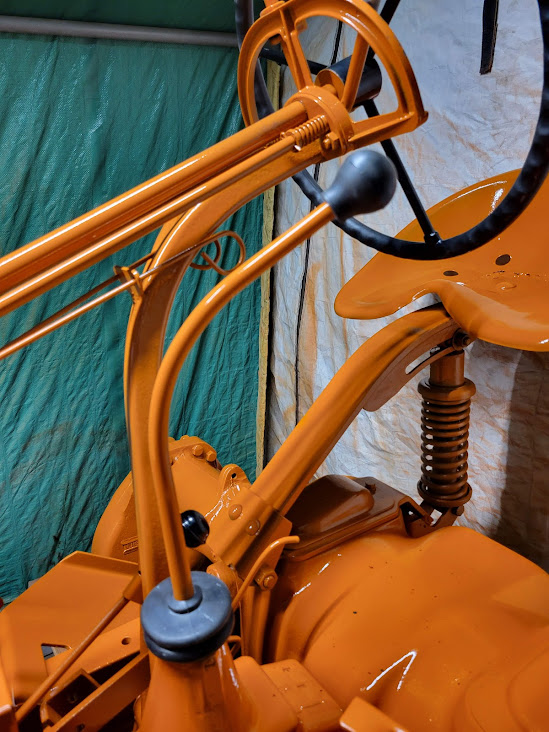
I also got the shifter boot and knob into place. I was really looking forward to installing that shifter boot. It was one of the first parts i purchased! its been a long wait but it finally found its home.
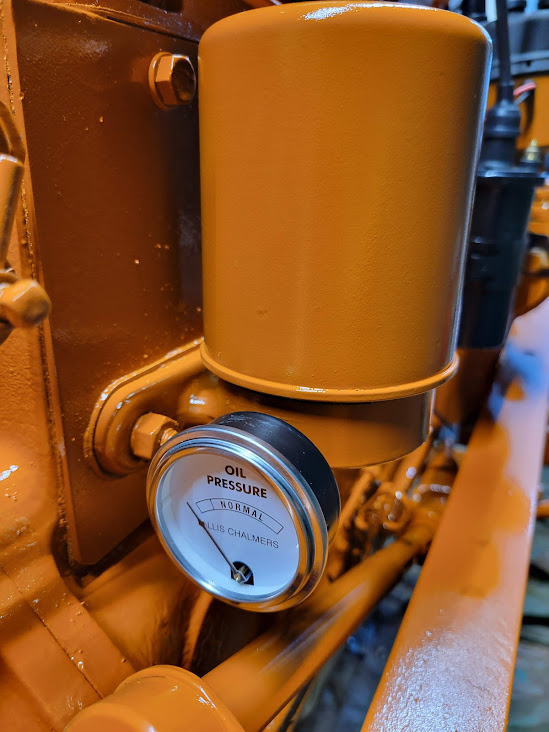
And the new oil pressure gauge.
Hoping to have the unit wired up over the next few days, Front hubs installed and the unit back onto its wheels by the end of the week. I will need to move the tractor outside to get the hood, grille and fuel tank prepped and painted.
|
|
Sugarmaker
Orange Level

Joined: 12 Jul 2013
Location: Albion PA
Points: 8168
|
Post Options
Thanks(0)
Quote Reply
Posted: 23 Apr 2022 at 10:08am |
Mr. Taylor, It is coming along very nicely! You have the large tension spring for the throttle linkage? Reworking the vertical steering shafts will help it steer like a new one. I did some similar things to our WD, and it steers very nice now! Your power steering system is very cool. Nice job engineering and fabricating the attachment hardware! My old brain cant hardly get around that but your make it look easy. Regards, Chris
|
|
D17 1958 (NFE), WD45 1954 (NFE), WD 1952 (NFE), WD 1950 (WFE), Allis F-40 forklift, Allis CA, Allis D14, Ford Jubilee, Many IH Cub Cadets, 32 Ford Dump, 65 Comet.
|
|
Jtaylor
Bronze Level
Joined: 11 Oct 2021
Location: Barrie, Ontario
Points: 194
|
Post Options
Thanks(0)
Quote Reply
Posted: 23 Apr 2022 at 6:52am |
 jvin248 wrote: jvin248 wrote:
.
You're making a lot of progress!
I swapped over my WD original-style manifold today for the newer WD45 manifold like you have. About to button up the carb and there was no space for the original carb bolts. So I had to stop and go get new studs so I won't have it fired back up until tomorrow.
.
|
Definitely a bit tight on that manifold! i had to cut mine to fit as well.
|
|
jvin248
Silver Level

Joined: 17 Jan 2022
Location: Detroit
Points: 268
|
Post Options
Thanks(0)
Quote Reply
Posted: 22 Apr 2022 at 7:37pm |
.
You're making a lot of progress!
I swapped over my WD original-style manifold today for the newer WD45 manifold like you have. About to button up the carb and there was no space for the original carb bolts. So I had to stop and go get new studs so I won't have it fired back up until tomorrow.
.
|
|
Jtaylor
Bronze Level
Joined: 11 Oct 2021
Location: Barrie, Ontario
Points: 194
|
Post Options
Thanks(0)
Quote Reply
Posted: 22 Apr 2022 at 6:44am |
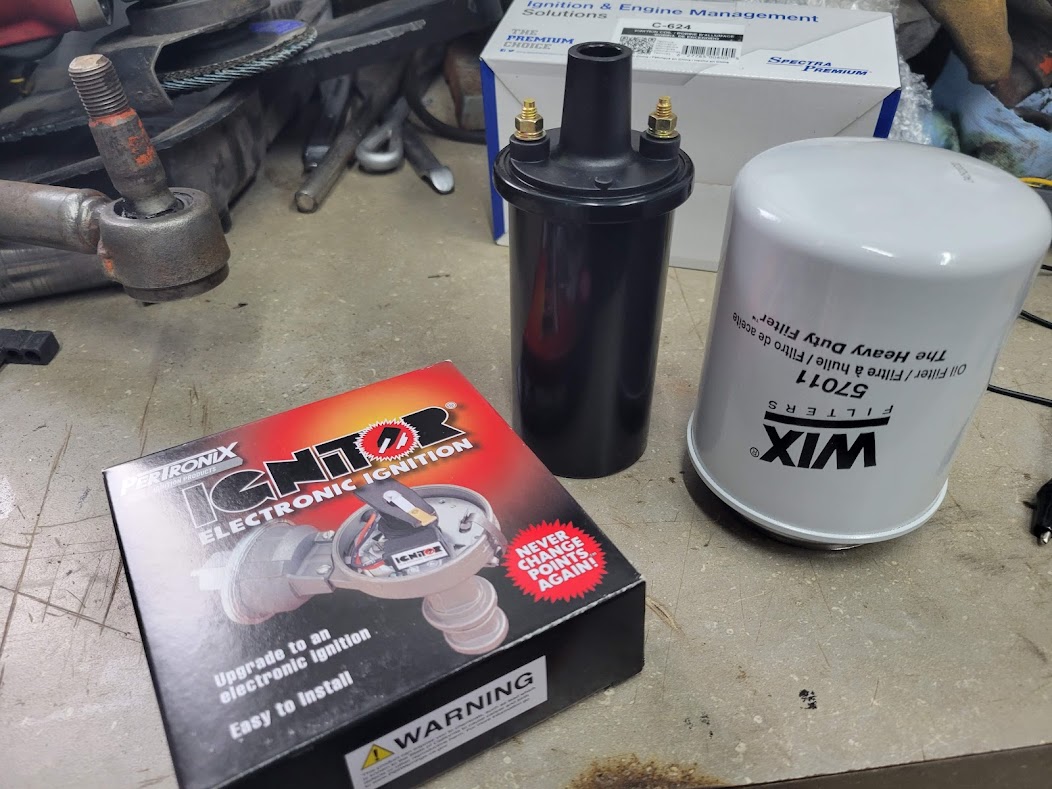
Some more parts have arrived! oil filter, ignition coil and Pertonix ignition 12V negative ground setup.
I also picked up some engine oil and filled the engine up, pertronix is installed but not wired, I have valves to adjust tonight and do some more spindle work or the left steering spindle. once that is complete we will be very close to paint for the remainder of the pieces of the chassis. Hoping for the whole running chassis to be painted orange by the beginning of next week!
|
|
IBWD MIke
Orange Level
Joined: 08 Apr 2012
Location: Newton Ia.
Points: 3474
|
Post Options
Thanks(0)
Quote Reply
Posted: 19 Apr 2022 at 8:37am |
|
Going to be one super-nice WD when you get done!
|
|
Jtaylor
Bronze Level
Joined: 11 Oct 2021
Location: Barrie, Ontario
Points: 194
|
Post Options
Thanks(0)
Quote Reply
Posted: 19 Apr 2022 at 7:52am |
I was able to make some more headway over the easter weekend here.
Exhaust manifold installed as well as carb loosely installed to check some other functions.
Seat also repaired and primered. I took the seat spring apart to clean and primer. I also installed new spring bushings
I also got the front end apart and new bushings installed, I had to repair the spindles to fit correctly without slop. These are the final photos
I also rebuilt the throttle linkage and installed onto the tractor.
|
|
Eric B
Orange Level

Joined: 09 Feb 2012
Location: British Columbi
Points: 889
|
Post Options
Thanks(0)
Quote Reply
Posted: 06 Apr 2022 at 2:59pm |
|
Very nice work!!
|
|
Currently- WD,WC,3WF's,2 D14's B. Previously- I 600,TL745,200,FL9,FR12,H3,816 LBH. Earth has no sorrow that Heaven cannot heal!
|
|
Jtaylor
Bronze Level
Joined: 11 Oct 2021
Location: Barrie, Ontario
Points: 194
|
Post Options
Thanks(0)
Quote Reply
Posted: 06 Apr 2022 at 7:27am |
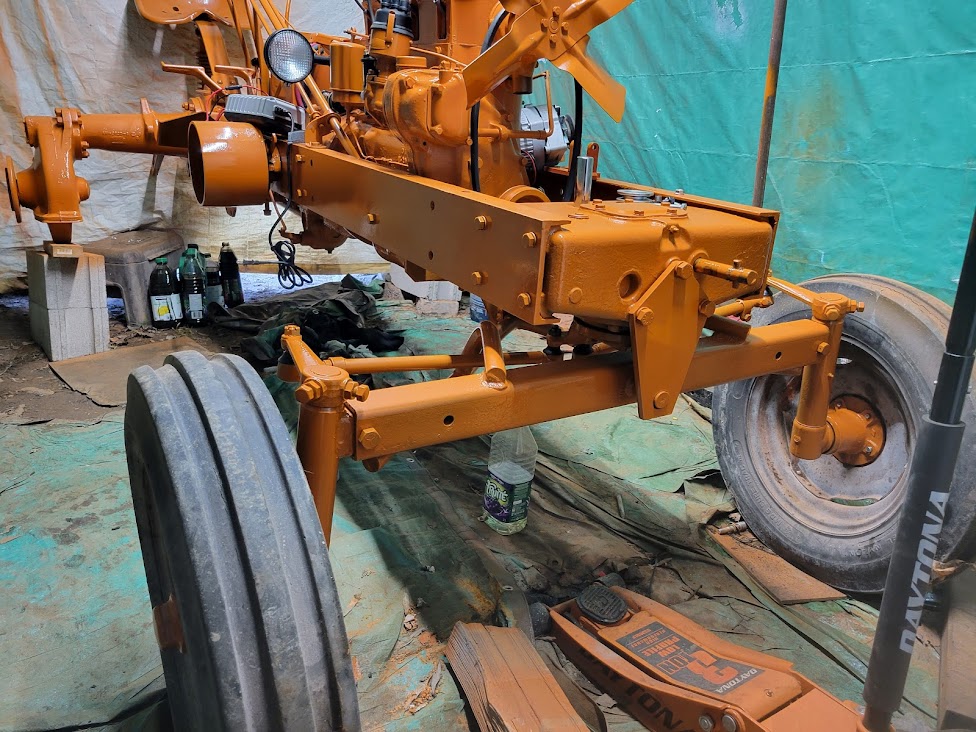
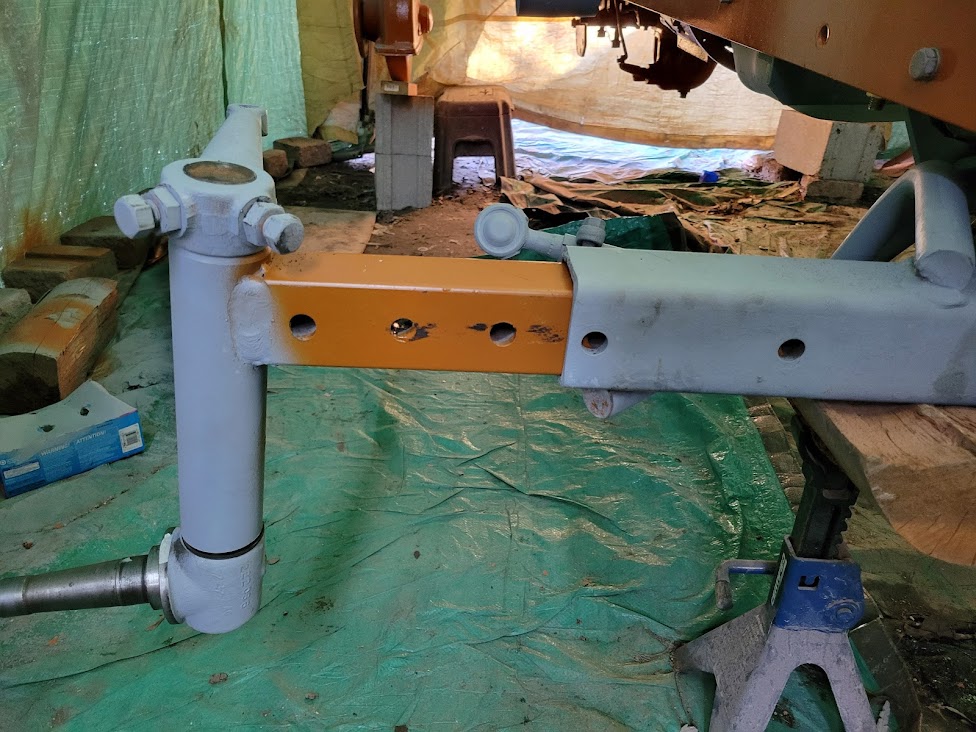
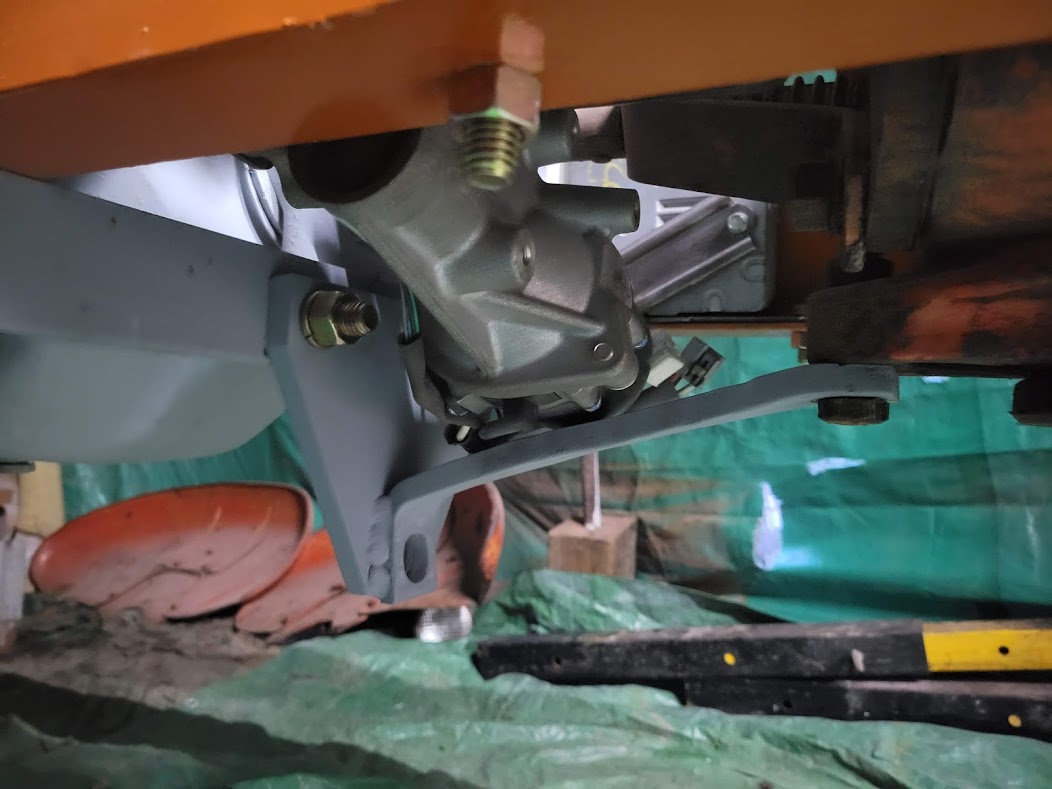
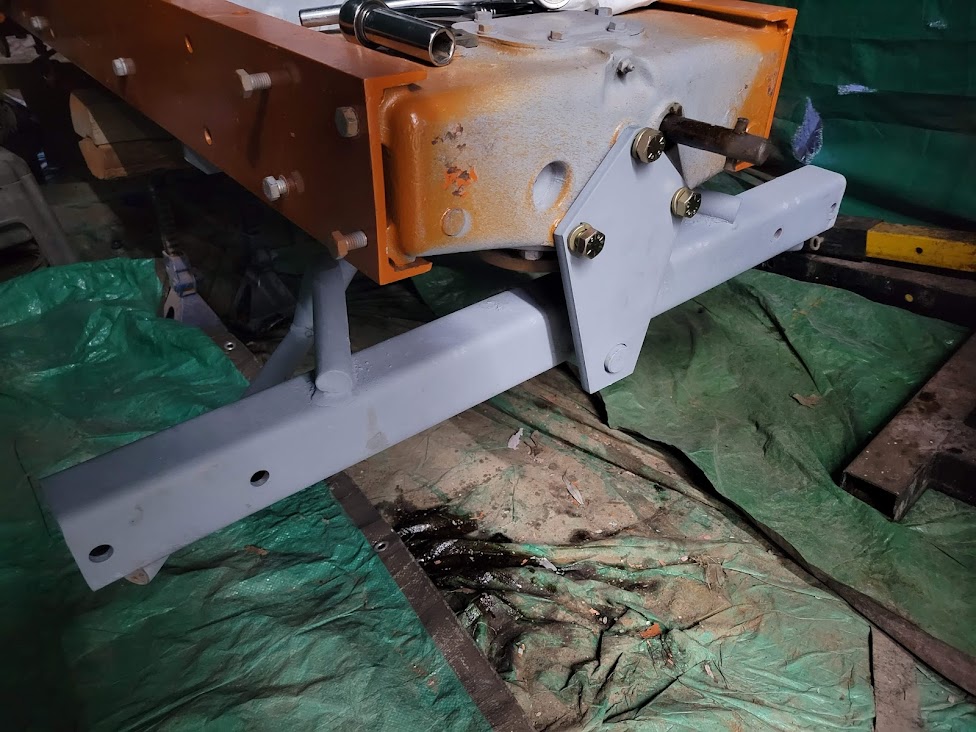
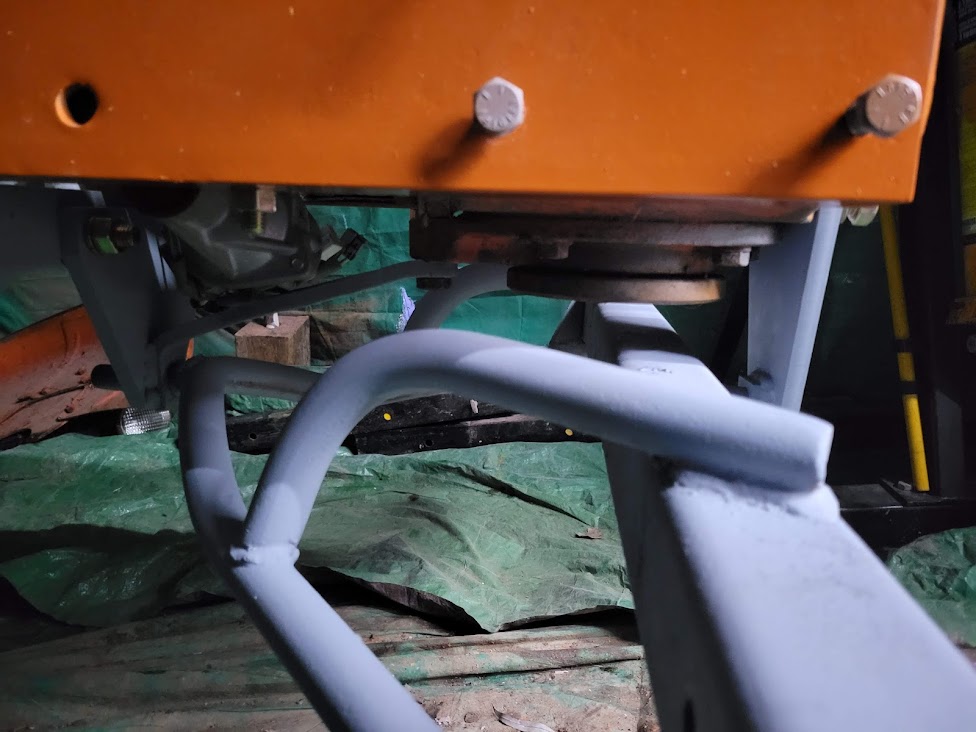
I was able to get the front axle back into the chassis last night with some new mounting hardware. the power steering fits nice above the rear axle mount.
|
|
Allis dave
Orange Level
Joined: 10 May 2012
Location: Northern IN
Points: 2856
|
Post Options
Thanks(0)
Quote Reply
Posted: 04 Apr 2022 at 9:32am |
You're bringing back a lot of memories. I did all this to my 45 back in 2009-2011. I rememebr fixing up the work front pivot parts. I had new pieces made and welded a new bolt on the the axle. The angle of the bolt wasn't quite right so I had to cut it off, put everything together and weld the bolt on in place.  Old stories now...
|
|
Jtaylor
Bronze Level
Joined: 11 Oct 2021
Location: Barrie, Ontario
Points: 194
|
Post Options
Thanks(0)
Quote Reply
Posted: 04 Apr 2022 at 6:42am |
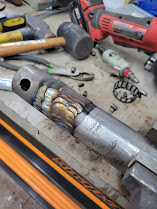
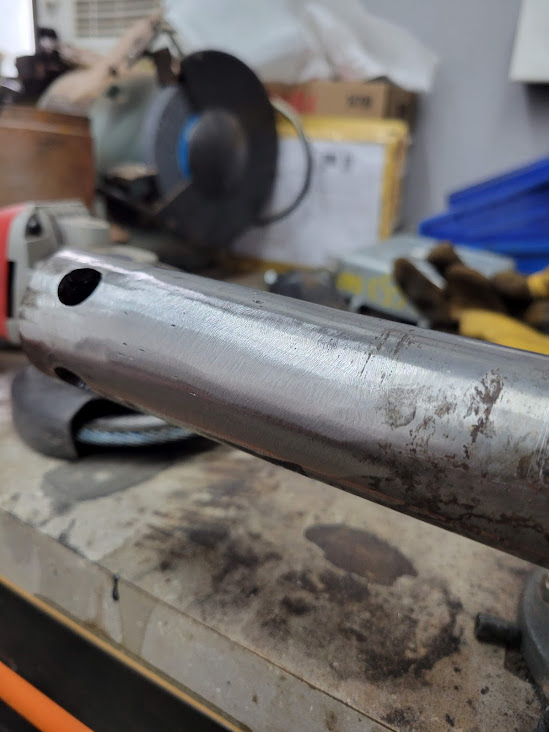
Some progress made on the front end this weekend. Got the CNC plasma parts prepped and fitted to the front axle beam. was able to build up the worn pieces of the axle pivots with weld and grind to a decent fit. Not the prettiest but takes the slop out of the axle.
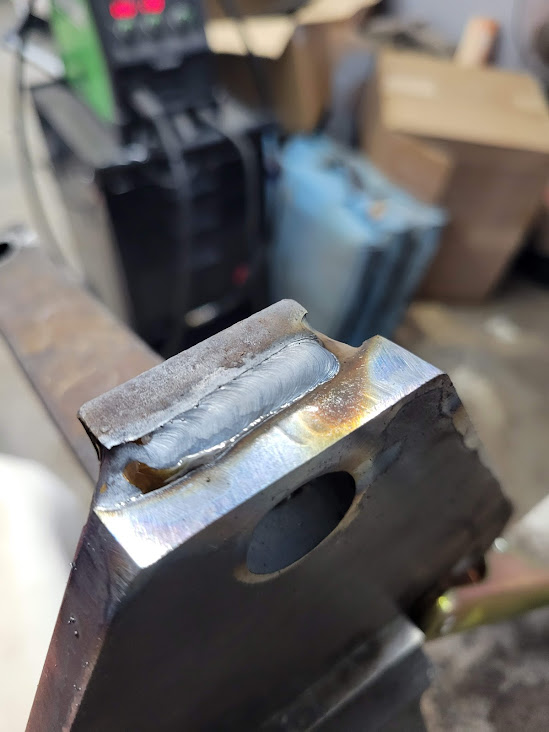
I also welded the original rear structural bar to the back mount. Look at that weld!
|
|
Jtaylor
Bronze Level
Joined: 11 Oct 2021
Location: Barrie, Ontario
Points: 194
|
Post Options
Thanks(0)
Quote Reply
Posted: 30 Mar 2022 at 11:19am |
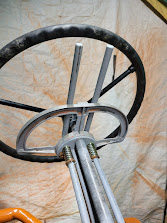
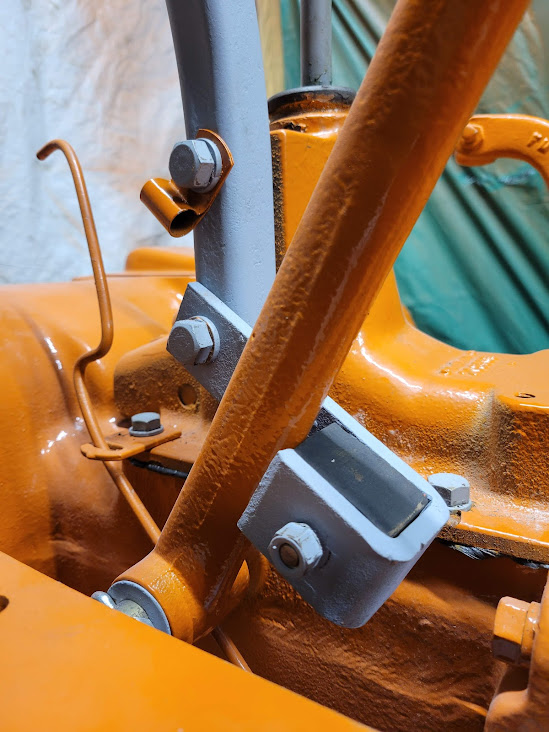
Made some progress on the steering side of things. New steering wheel, quadrant springs and repaired some throttle and steering shaft holes that were very worn.
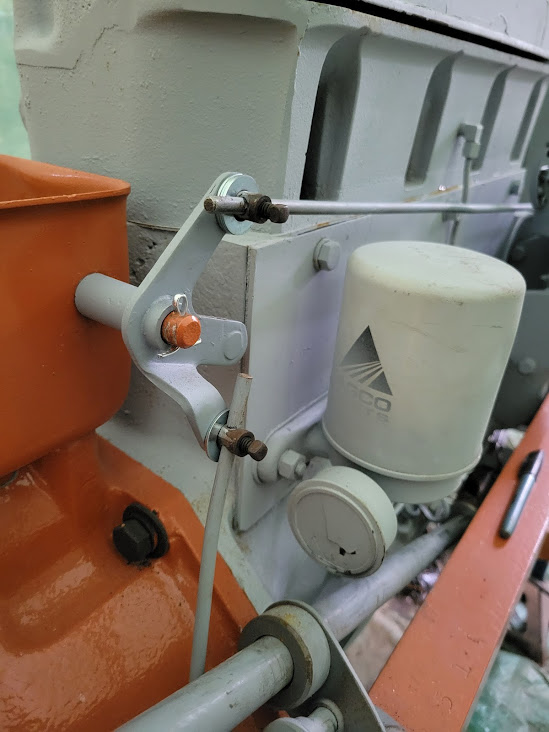
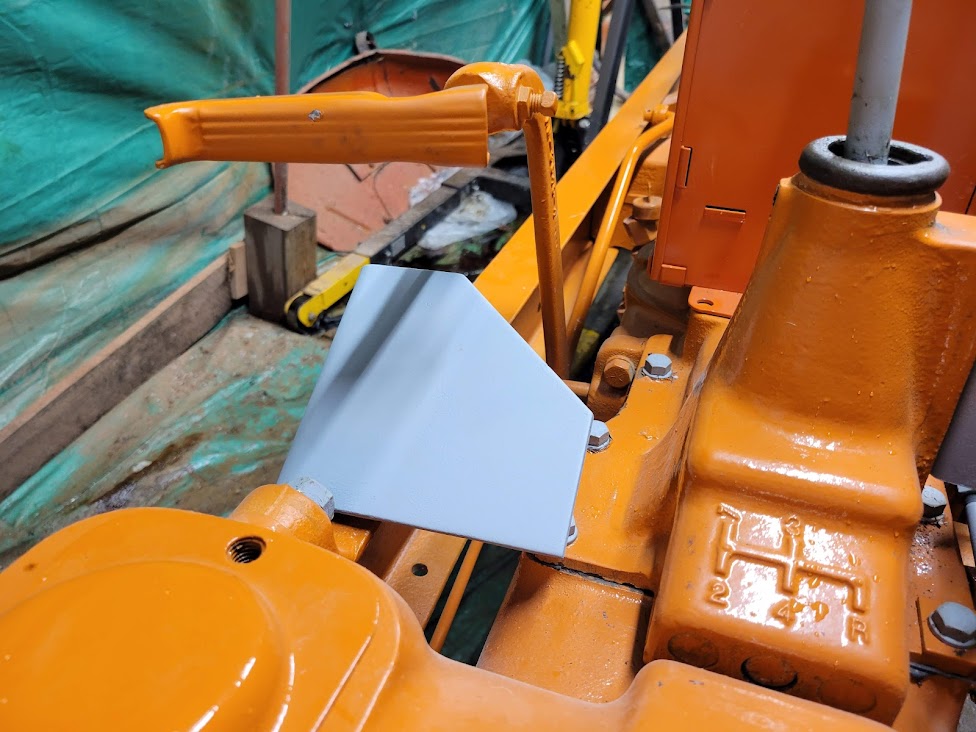
I also got the power steering mount started last night, something simple to hold the power steering in spot with a nice little bracket
|
|
Jtaylor
Bronze Level
Joined: 11 Oct 2021
Location: Barrie, Ontario
Points: 194
|
Post Options
Thanks(0)
Quote Reply
Posted: 24 Mar 2022 at 5:59am |
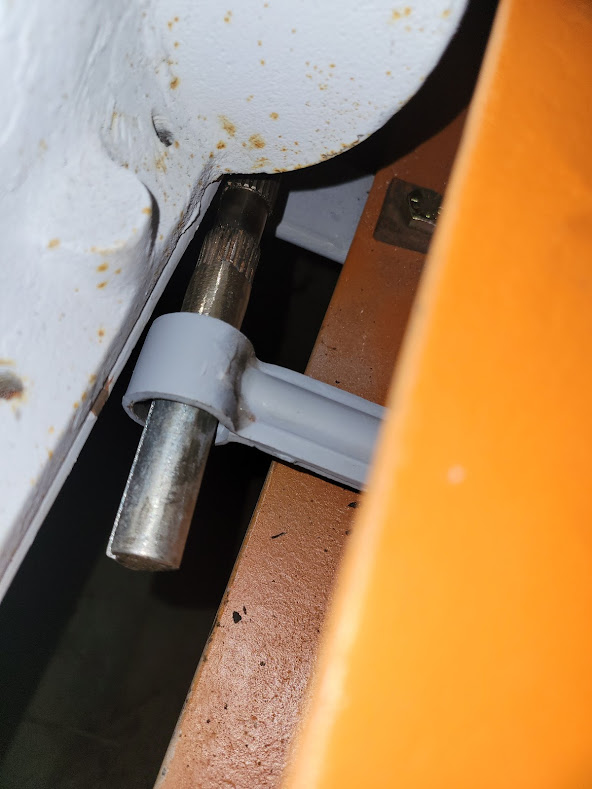
Made some progress last evening with the footrests. I was able to get them installed back into the original holes after a bit of sanding and priming.
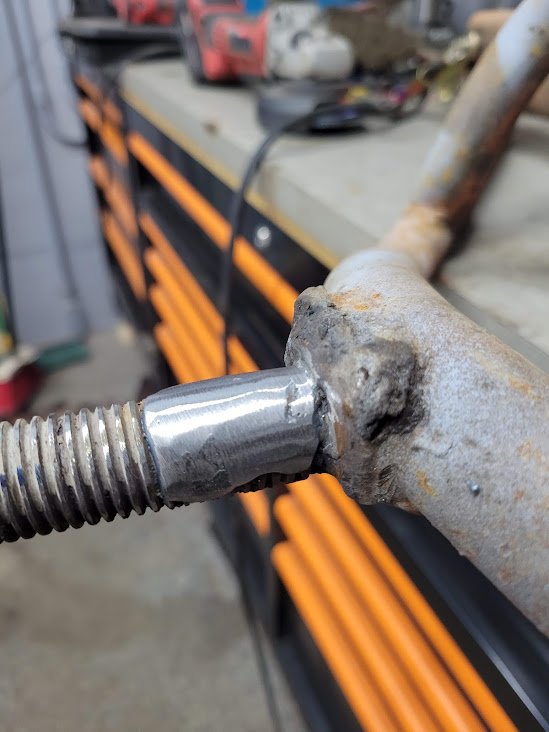
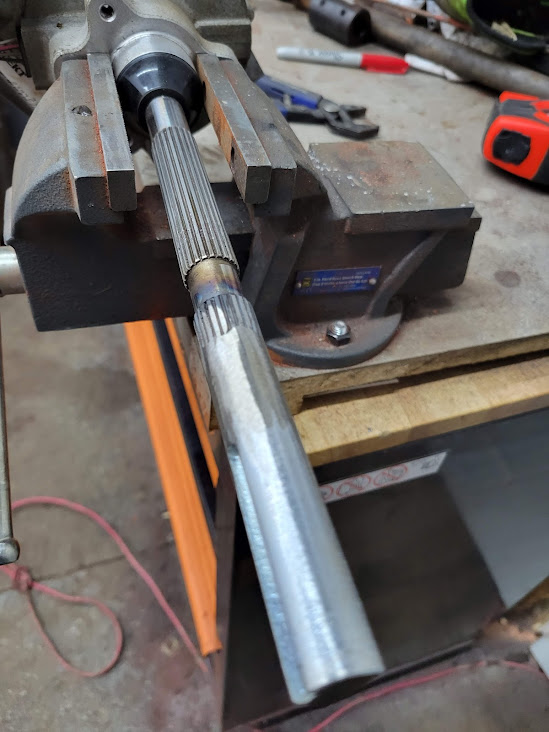
I also got the power steering shaft extended to the correct length.
|
|
Jtaylor
Bronze Level
Joined: 11 Oct 2021
Location: Barrie, Ontario
Points: 194
|
Post Options
Thanks(0)
Quote Reply
Posted: 21 Mar 2022 at 6:24am |
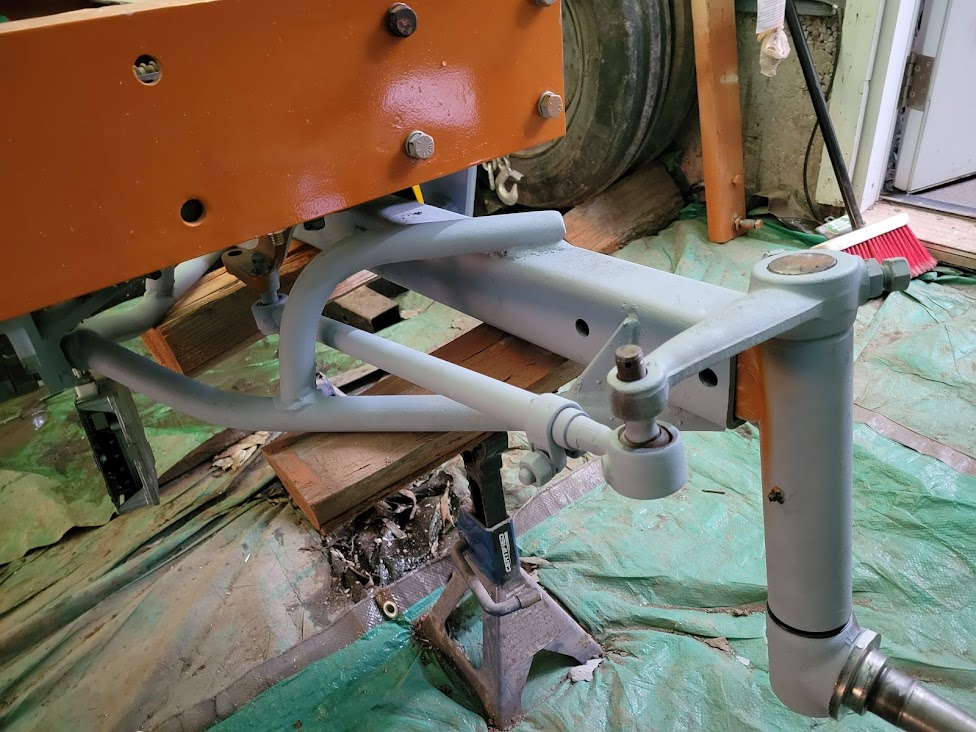
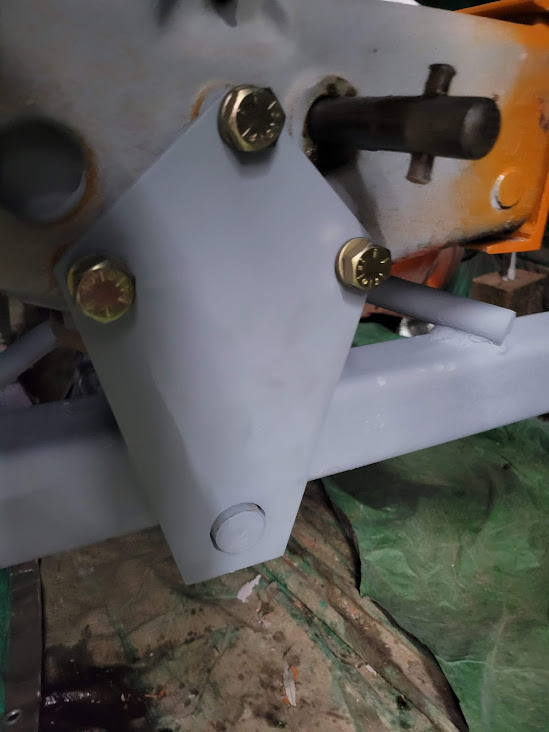
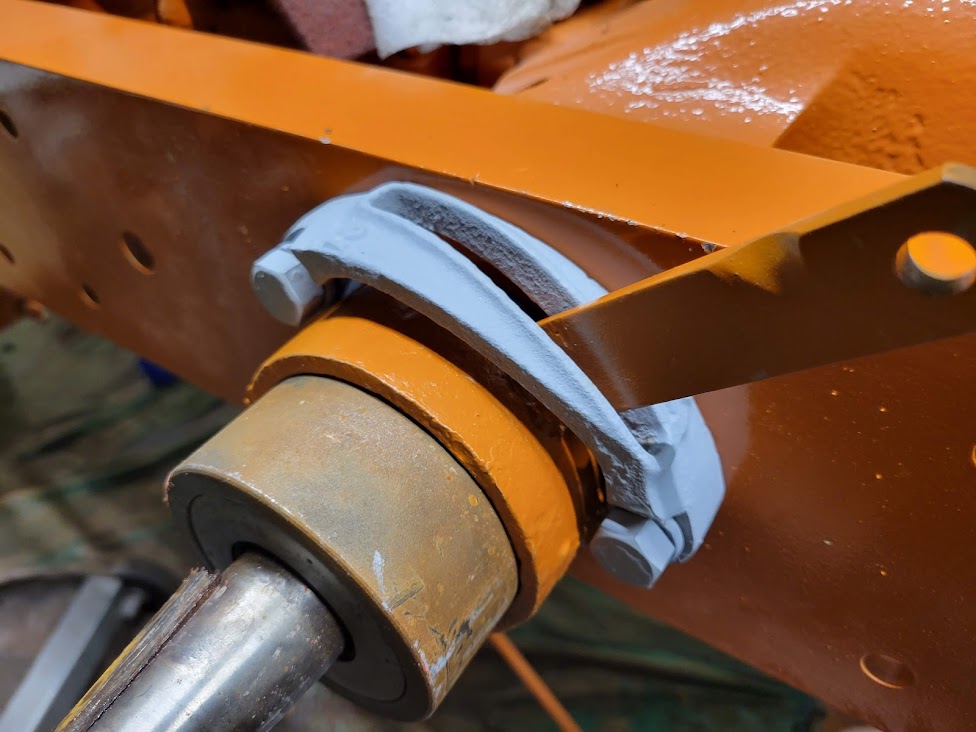
Here is the photos of the power steering conversion. A bit of tweaking to do yet, but making great progress. it fits well. even has room to spare on the left frame rail for the ECU.

|
|
Jtaylor
Bronze Level
Joined: 11 Oct 2021
Location: Barrie, Ontario
Points: 194
|
Post Options
Thanks(0)
Quote Reply
Posted: 21 Mar 2022 at 6:18am |
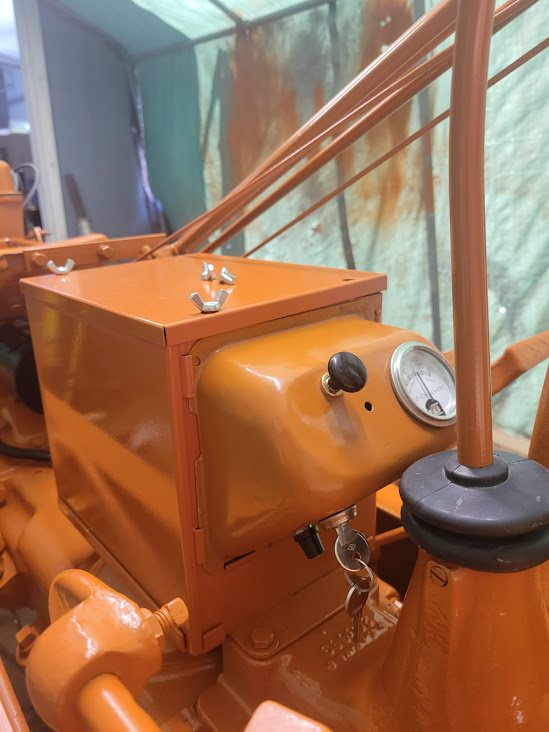
Some good progress this weekend.
painted and finished the gauge cluster with new switch, key and 60A gauge
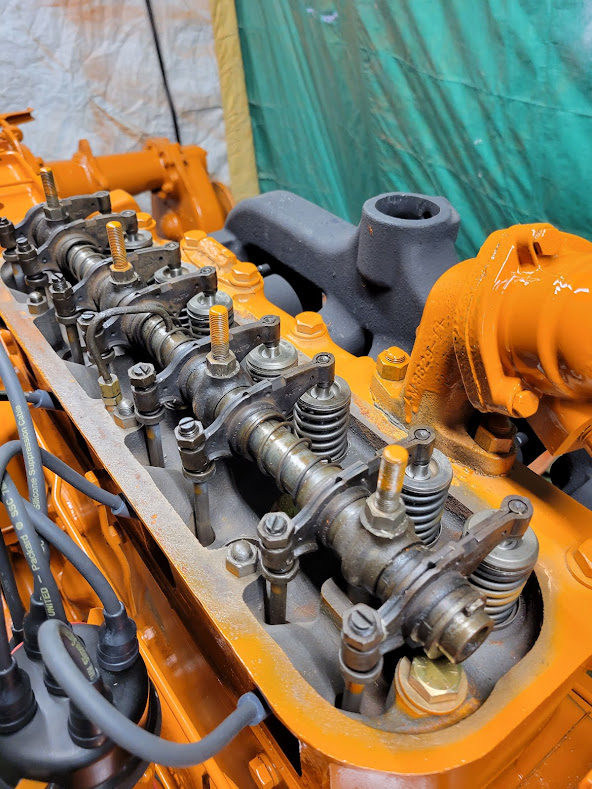
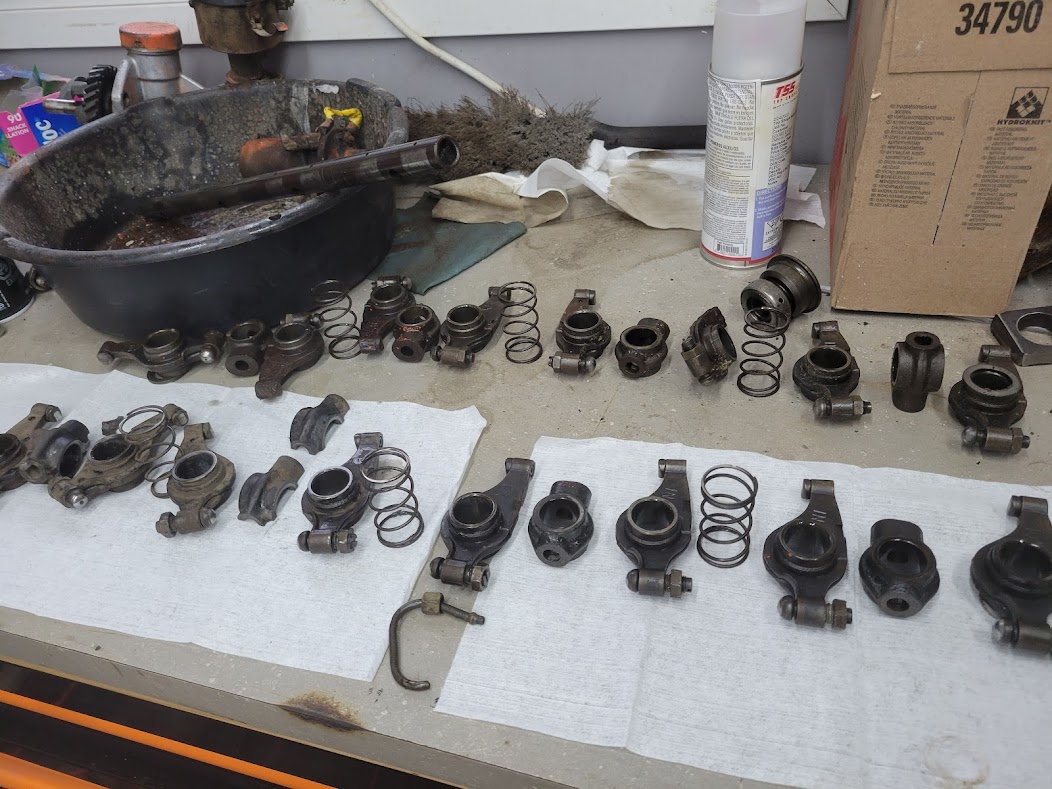
I also worked on the rocker shaft. Getting it back together. I actually found a couple broken stud stand off's. glad i caught that before going back together! I also had a bent rocker shaft. Not sure how that happened but glad i had a spare to make it work
I got the quadrant repaired, primed and installed onto the steering wheel support. new bushing was also installed.
Then, Onto the power steering conversion. working on uploading those photos. looks like i have hit the photo limit of our forum..
|
|
Sugarmaker
Orange Level
Joined: 12 Jul 2013
Location: Albion PA
Points: 8168
|
Post Options
Thanks(0)
Quote Reply
Posted: 17 Mar 2022 at 8:39am |
J, Making great progress! Always nice with new parts and assembly operations! Thanks for the update! Chris
|
|
D17 1958 (NFE), WD45 1954 (NFE), WD 1952 (NFE), WD 1950 (WFE), Allis F-40 forklift, Allis CA, Allis D14, Ford Jubilee, Many IH Cub Cadets, 32 Ford Dump, 65 Comet.
|
|
Jtaylor
Bronze Level
Joined: 11 Oct 2021
Location: Barrie, Ontario
Points: 194
|
Post Options
Thanks(0)
Quote Reply
Posted: 17 Mar 2022 at 6:20am |
Went on a bit of an adventure last night.
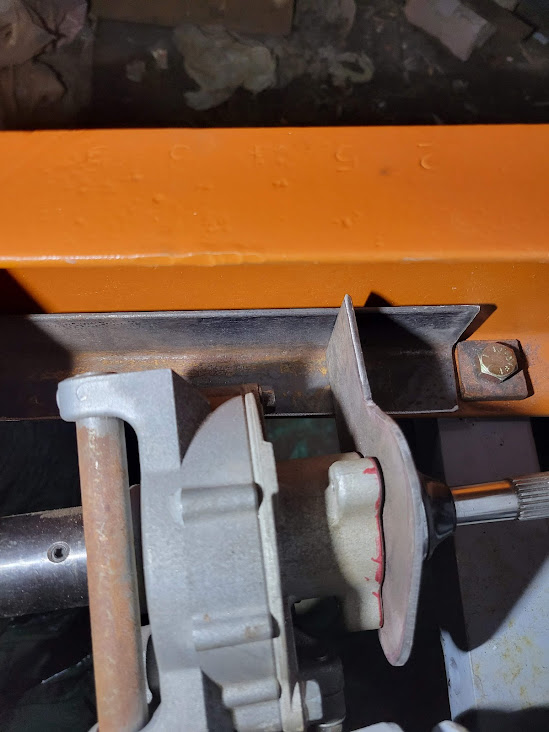
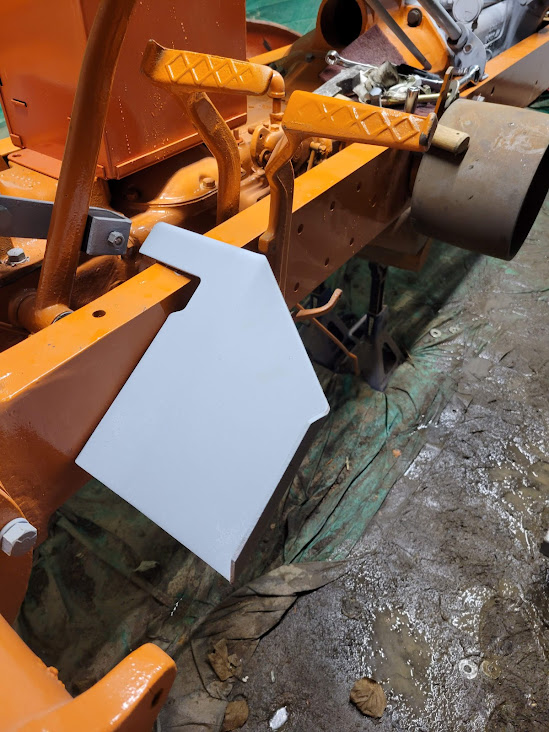
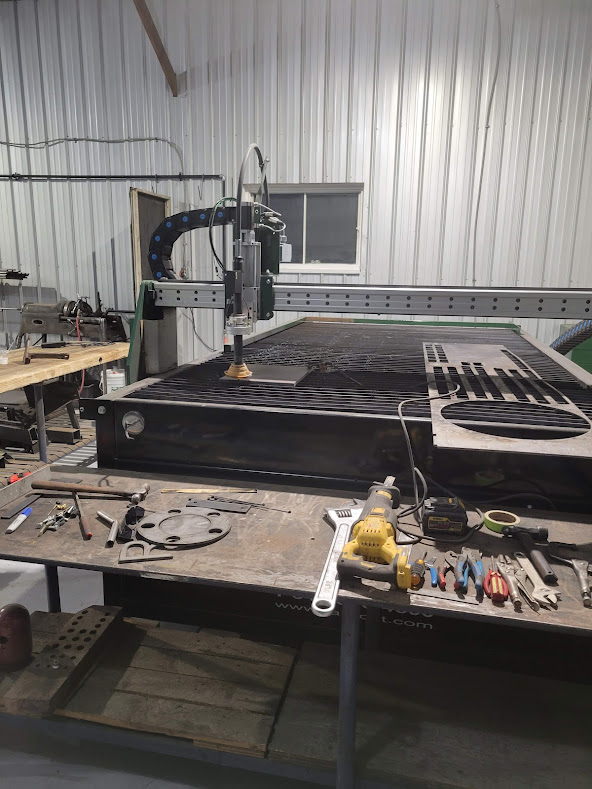
I wanted to get the bolster plates remade rather than welding and machining the oblong holes back to round. i found a local that has a brand new 5x10 foot CNC plasma cutter. So.. We played with some Allis parts!
Here it is compared to the original
|
|
Jtaylor
Bronze Level
Joined: 11 Oct 2021
Location: Barrie, Ontario
Points: 194
|
Post Options
Thanks(0)
Quote Reply
Posted: 15 Mar 2022 at 8:44am |
I also made progress last night on some other small odds and sods.
Got the tank and air cleaner bracket mounted
as well as the steering column with hand clutch stopper and pto bracket
|
|
Jtaylor
Bronze Level
Joined: 11 Oct 2021
Location: Barrie, Ontario
Points: 194
|
Post Options
Thanks(0)
Quote Reply
Posted: 15 Mar 2022 at 8:39am |
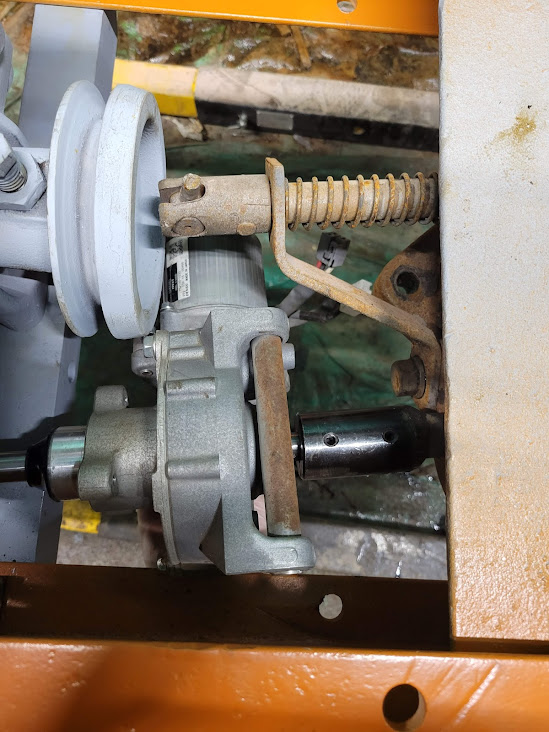
For everyone interested in the belt pulley engagement system. it is pretty slick! all cleaned up and reinstalled without the belt pulley. anyone recognize any stampings on here?
|
|
Sugarmaker
Orange Level
Joined: 12 Jul 2013
Location: Albion PA
Points: 8168
|
Post Options
Thanks(0)
Quote Reply
Posted: 14 Mar 2022 at 11:05am |
J, Your making great progress! With spring a month or so away you may have it ready and moving by then. Regards, Chris
|
|
D17 1958 (NFE), WD45 1954 (NFE), WD 1952 (NFE), WD 1950 (WFE), Allis F-40 forklift, Allis CA, Allis D14, Ford Jubilee, Many IH Cub Cadets, 32 Ford Dump, 65 Comet.
|
|
Jtaylor
Bronze Level
Joined: 11 Oct 2021
Location: Barrie, Ontario
Points: 194
|
Post Options
Thanks(0)
Quote Reply
Posted: 14 Mar 2022 at 9:30am |
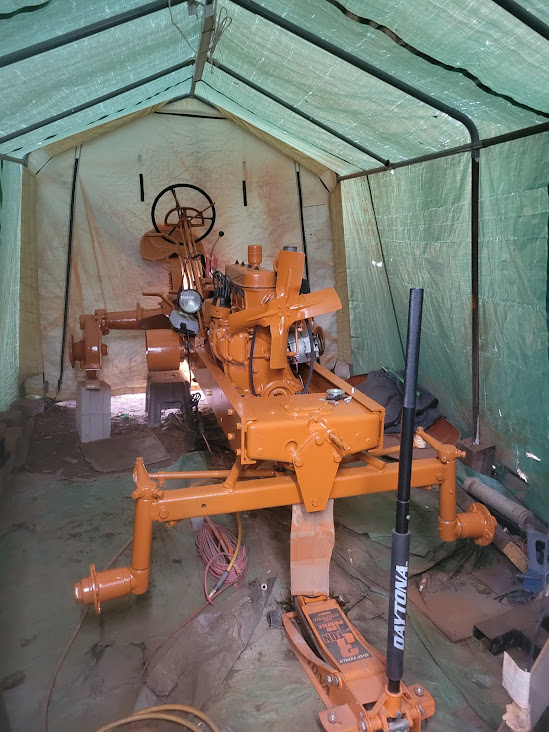
IBWD MIke wrote:
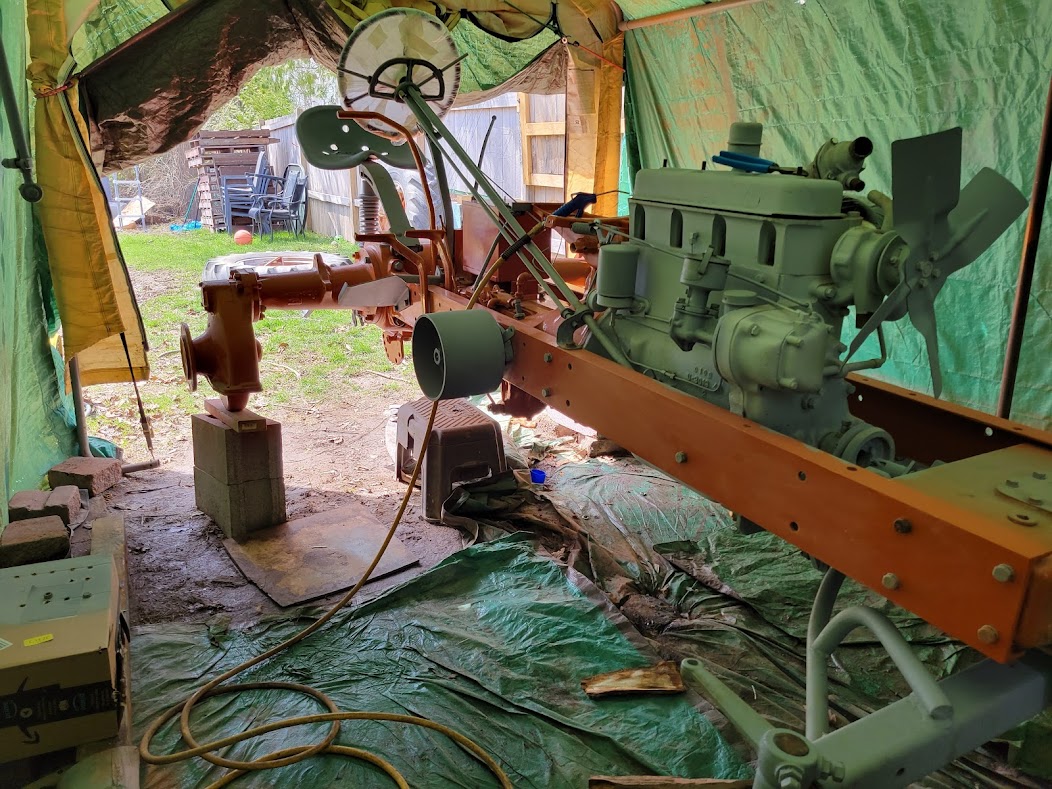
Very nice. The shelter is working great for you.
|
Better than expected! It has only blown away once too! it definitely a one time use type of shelter. The tarp is pretty beat up and not good for much anymore. although I am happy with the outcome.
|
|
IBWD MIke
Orange Level
Joined: 08 Apr 2012
Location: Newton Ia.
Points: 3474
|
Post Options
Thanks(0)
Quote Reply
Posted: 14 Mar 2022 at 8:17am |
|
Very nice. The shelter is working great for you.
|
|
Jtaylor
Bronze Level
Joined: 11 Oct 2021
Location: Barrie, Ontario
Points: 194
|
Post Options
Thanks(0)
Quote Reply
Posted: 14 Mar 2022 at 6:19am |
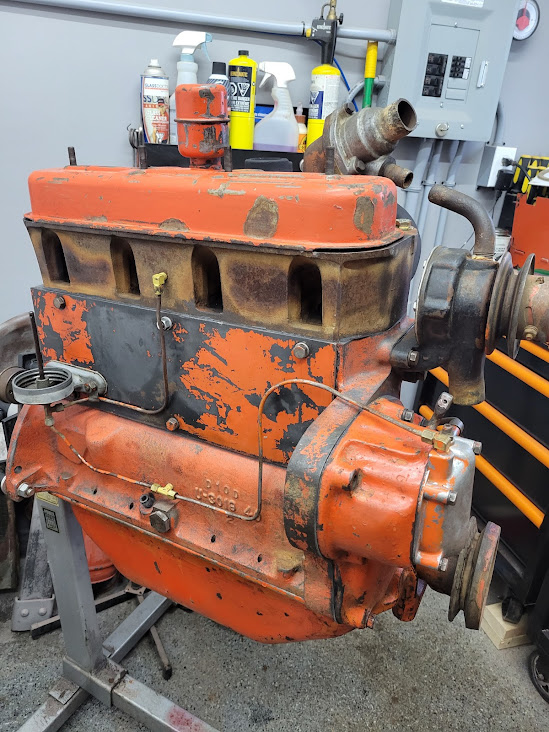
Made some considerable progress over the weekend. inching closer and closer every post.
I did a repair to the super worn throttle linkage hole on the governor spring side.
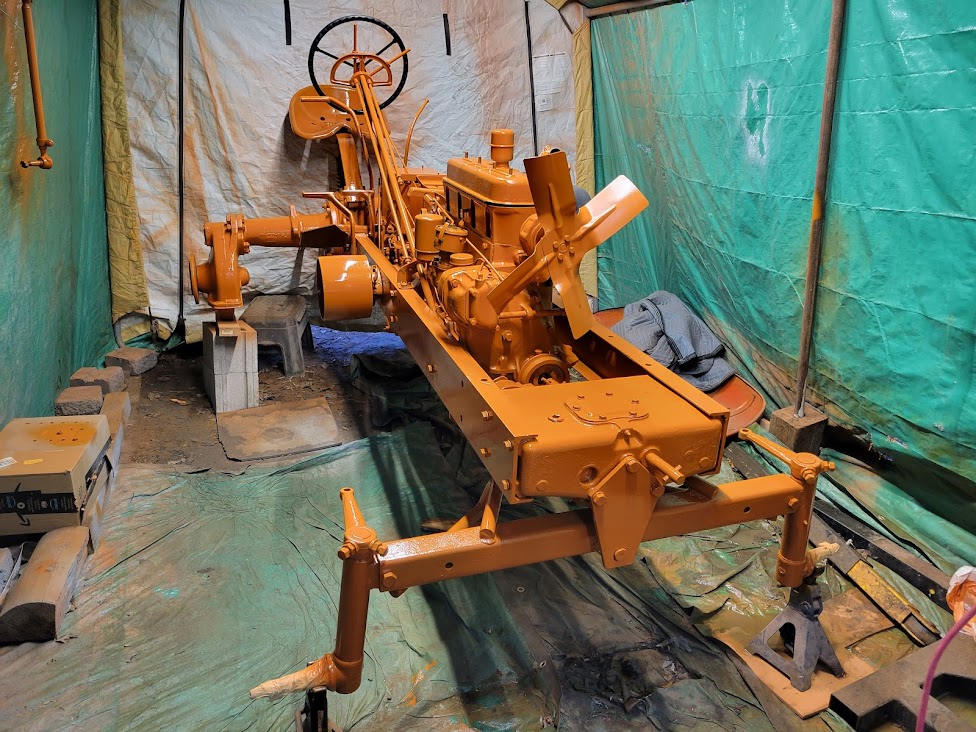
here is a photo of the engine finished up. in its ugly form.
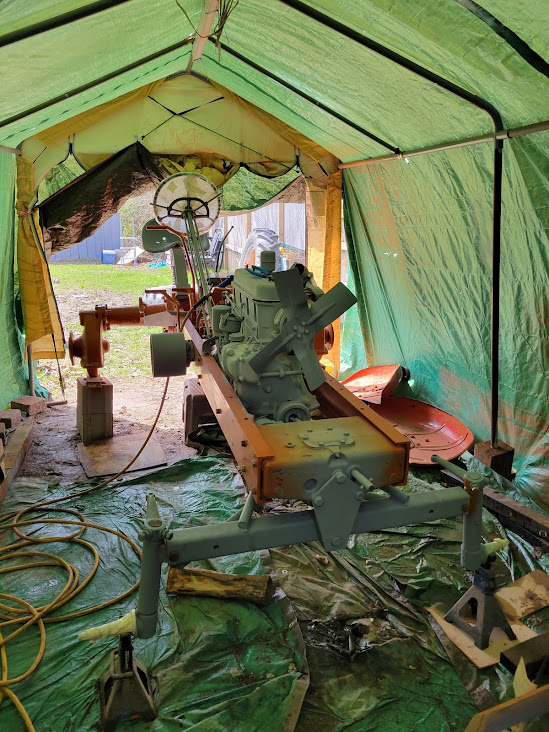
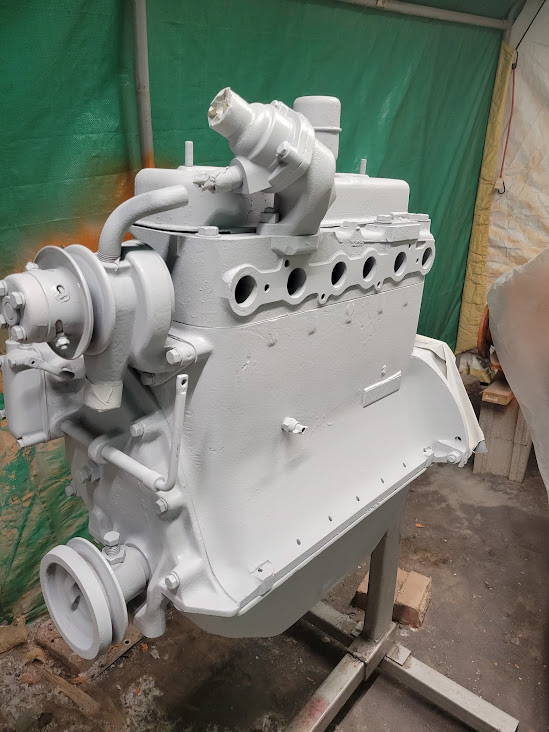
I was able to get it out and primered up in preparation for dropping into the chassis again.
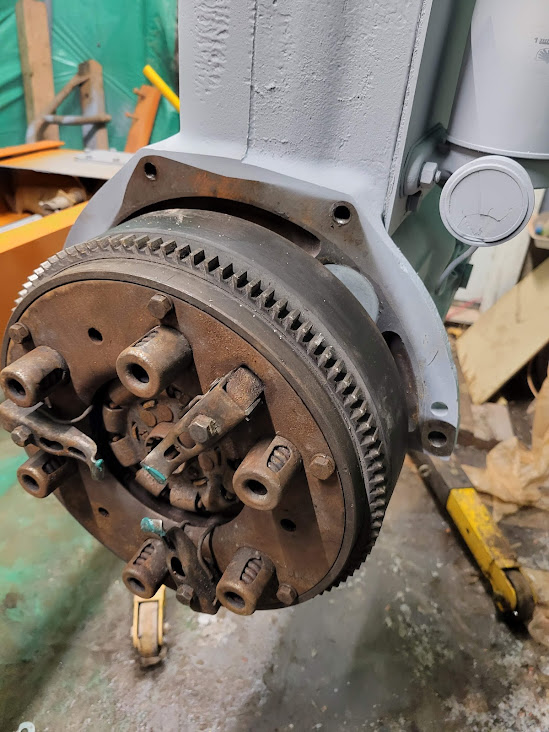
I installed the pilot bearing into the flywheel and marked both timing marks.
As well as installed all the correct clutch components. verified height of the pressure plate fingers and adjusted to 1 5/16" as per the service manual. one was perfect, the other 2 were just over 1/8" high.
Then, Made some headway with installing the whole assembly into the chassis. for the time being (until i get some 1/2" bolts to hold the front crossmember together) it will sit on the engine stand.
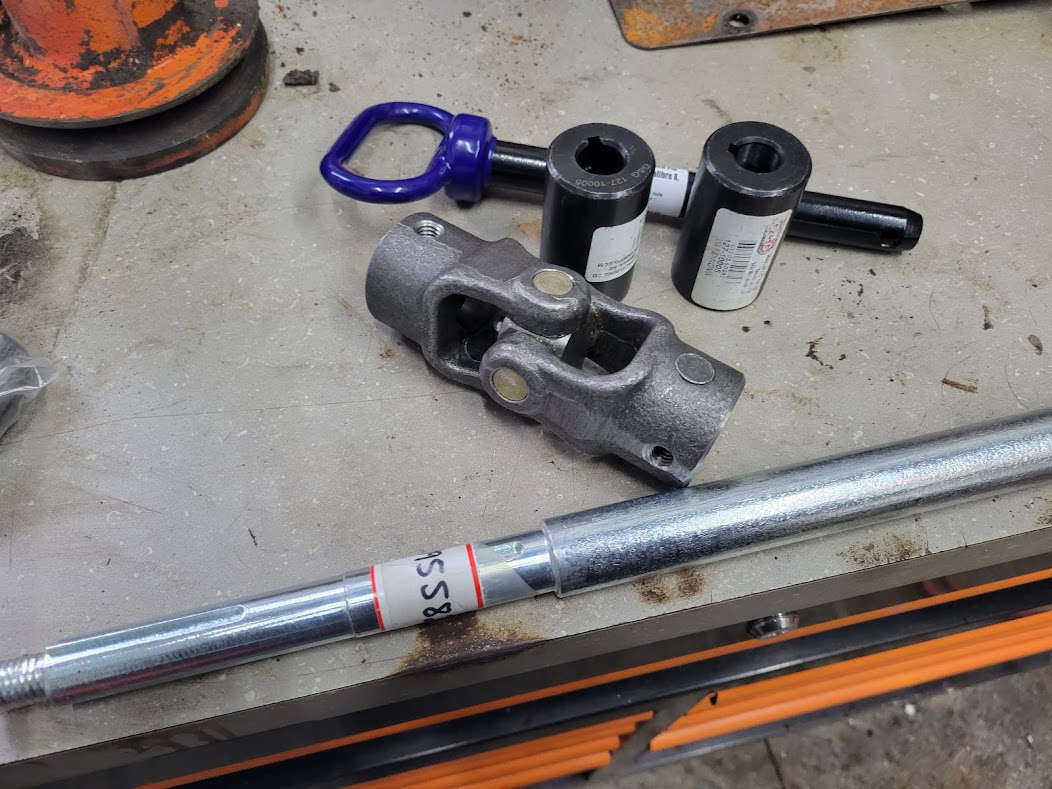
I also went to Princess Auto (Canadian harbor freight) for some steering components. I ended up with a few couplers, a 3/4" u-joint and a nice stepped down go-kart axle assembly. you will see in a couple weeks how I plan to make it all work with the electric unit. should be pretty good!
|
|