| Author |
 Topic Search Topic Search  Topic Options Topic Options
|
KMAG 
Orange Level Access

Joined: 26 May 2020
Location: Elizabethtown,
Points: 654
|
 Post Options Post Options
") Thanks(1) Thanks(1)
 Quote Quote  Reply Reply
 Posted: 28 Oct 2020 at 1:32pm Posted: 28 Oct 2020 at 1:32pm |
|
Another good idea (but I'm biased)! Tap and/or drill and tap your existing starter cone hole and install a hex pipe plug using red Loctite to help keep it in place (maybe stake it while you're at it). Drill and chamfer hole in center of plug centered through bellhousing opening.
Install original lock bolt setup. It should be as good or stronger than the original design.
|
 |
|
Sponsored Links
|
|
|
steve(ill)
Orange Level Access

Joined: 11 Sep 2009
Location: illinois
Points: 77988
|
Post Options
Thanks(1)
Quote Reply
Posted: 28 Oct 2020 at 1:30pm |
You can grind the taper hole in the starter nose a little to reform it... you can also grind the point / end of the bolt so it fits "better" into the starter nose hole... A good FIT will guarantee a good ground and will stop the starter from MOVING back and forth.
The starter may not set ALL THE WAY INTO THE TORQUE TUBE HOLE.. Seems to me that when i install the TAPER BOLT and it pilots INTO THE STARTER NOSE HOLE, that the starter motor may be 1/8 OUT from bottoming out in the torque tube.
Edited by steve(ill) - 28 Oct 2020 at 1:32pm
|
|
Like them all, but love the "B"s.
|
|
steve(ill)
Orange Level Access
Joined: 11 Sep 2009
Location: illinois
Points: 77988
|
Post Options
Thanks(1)
Quote Reply
Posted: 28 Oct 2020 at 1:26pm |
Since I am having a hard time finding that particular nose cone, I think my neighbor and I will attempt to weld the hole, then retap with a slightly smaller bolt, to bypass the threads in the torque tube.
If I understand you correctly, the threads in the torque tube should not be there?
NO.. I dont think you understand.. The bolt is POINTED on the end.. It screws INTO THE TORQUE TUBE and the point goes INTO THE STARTER NOSE.. It PUSHES the starter toward the motor and forms a GROUND for the elect to work.. The "HOLE" in the starter nose is suppose to be tapered and match the point on the BOLT... The THREADS in the TORQUE TUBE are what holds it all together.
|
|
Like them all, but love the "B"s.
|
|
KMAG
Orange Level Access
Joined: 26 May 2020
Location: Elizabethtown,
Points: 654
|
Post Options
Thanks(1)
Quote Reply
Posted: 28 Oct 2020 at 12:59pm |
|
Dick L is correct about welding cast iron. There are also different types of cast iron. Sometimes a quick MIG weld works for non-critical uses on cast iron.
A new cone will run $55 plus shippingor find a good used cone - best fix.
|
|
Dick L
Orange Level

Joined: 12 Sep 2009
Location: Edon Ohio
Points: 5082
|
Post Options
Thanks(1)
Quote Reply
Posted: 28 Oct 2020 at 12:20pm |
I think it is cast iron and welding will most likely cause it to crack if not heated and cooled at the proper rates. If the longer bolt holds from moving back which would expect as the front of the hole has not been compromised, I would hook up a ground wire from one of the starter bolts to a bolt under the battery box and not worry about it.
Edited by Dick L - 28 Oct 2020 at 12:28pm
|
|
jlbintn
Bronze Level

Joined: 28 Nov 2019
Location: Charleston, TN
Points: 138
|
Post Options
Thanks(0)
Quote Reply
Posted: 28 Oct 2020 at 10:15am |
Getting a little ahead of myself here, but thinking past this particular project if it does not end with success....
what would be involved to convert the tractor back to 6v, obviously the alternator has to go.
I don't want to go there, but it would beat resorting to hand cranking I suppose.
|
|
jlbintn
Bronze Level
Joined: 28 Nov 2019
Location: Charleston, TN
Points: 138
|
Post Options
Thanks(0)
Quote Reply
Posted: 28 Oct 2020 at 10:05am |
 Dick L wrote: Dick L wrote:
There is not supposed to have threads in that hole. Some one has messes up the starter lock (pocket).
I just check ebay to get a picture to post and see the brand new starter cones have a threaded hole. The only way that would work is if the torque tube was not threaded. All the starters I have here has a taper hole that the tapered end of the tapered stud locks the starter in place. With that large of a hole the tapered stud would never work properly. You might get it to work by using a longer bolt without a taper that would go all the way thru the cone casting. I would then add a ground wire from a starter bolt the the torque or to where the battery ground bolts to the tractor.
To use a new starter cones with the threaded hole and have success you would need to remove the threads from the torque tube or the starter could not pull up tight. |
Yes, I noticed that when my neighbor and I found a bolt to mate up with those threads in the cone. It stopped back and forth movement, but it did not lock the starter down tightly.
Since I am having a hard time finding that particular nose cone, I think my neighbor and I will attempt to weld the hole, then retap with a slightly smaller bolt, to bypass the threads in the torque tube.
If I understand you correctly, the threads in the torque tube should not be there?
I am going to rebuild the starter. It would be nice to find that particular nose cone. I wonder why everything I have found does not seem to match up to what I have, even though some that are for sale say those cones should work with the 1107043.
|
|
jlbintn
Bronze Level
Joined: 28 Nov 2019
Location: Charleston, TN
Points: 138
|
Post Options
Thanks(0)
Quote Reply
Posted: 28 Oct 2020 at 9:59am |
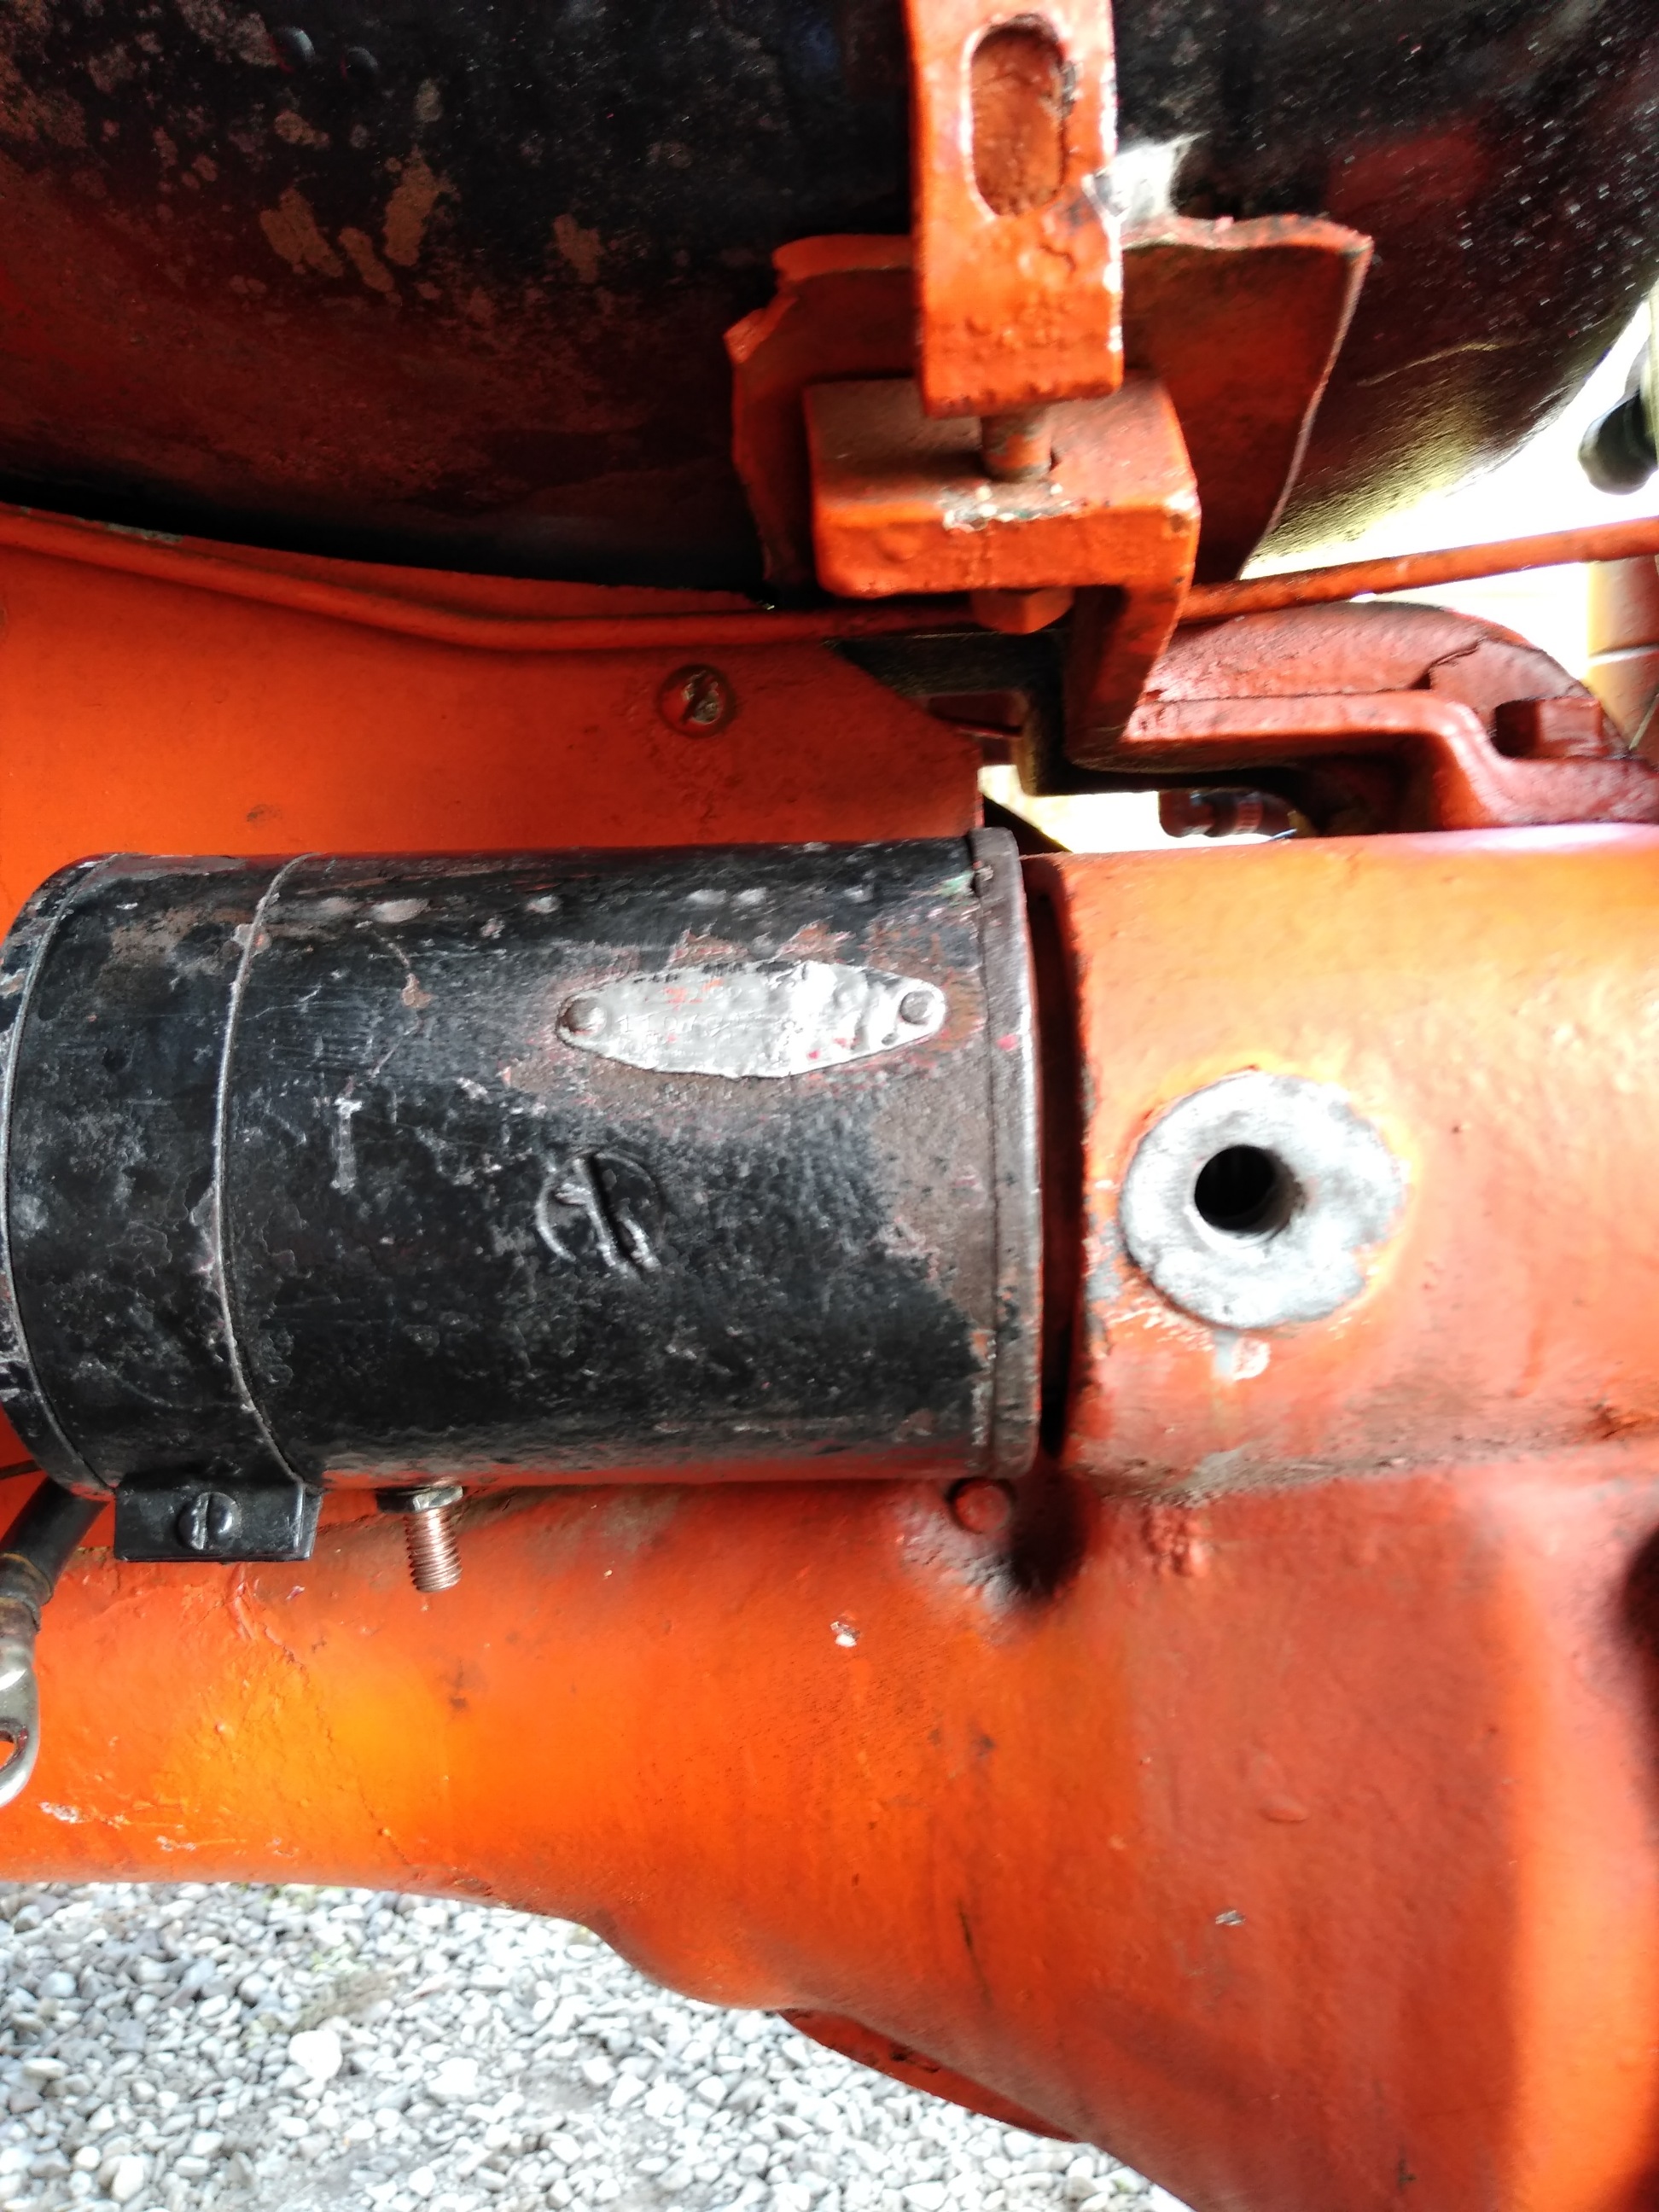
This is the starter, perfectly aligned with the tube opening.
I have noticed that, of all the starter nose cones I have found, none match the one I have.
|
|
Dick L
Orange Level
Joined: 12 Sep 2009
Location: Edon Ohio
Points: 5082
|
Post Options
Thanks(0)
Quote Reply
Posted: 28 Oct 2020 at 7:04am |
There is not supposed to have threads in that hole. Some one has messes up the starter lock (pocket).
I just check ebay to get a picture to post and see the brand new starter cones have a threaded hole. The only way that would work is if the torque tube was not threaded. All the starters I have here has a taper hole that the tapered end of the tapered stud locks the starter in place. With that large of a hole the tapered stud would never work properly. You might get it to work by using a longer bolt without a taper that would go all the way thru the cone casting. I would then add a ground wire from a starter bolt the the torque or to where the battery ground bolts to the tractor.
To use a new starter cones with the threaded hole and have success you would need to remove the threads from the torque tube or the starter could not pull up tight.
Edited by Dick L - 28 Oct 2020 at 7:29am
|
|
KMAG
Orange Level Access
Joined: 26 May 2020
Location: Elizabethtown,
Points: 654
|
Post Options
Thanks(1)
Quote Reply
Posted: 27 Oct 2020 at 1:15pm |
|
That retainer bolt hole seems too far back on the nose. It is normally centered between the starter cone's locating bands.
A photo with the starter mounted looking into the starter retainer bellhousing bolt hole would be helpful to see if there is an alignment problem.
Edited by KMAG - 27 Oct 2020 at 3:04pm
|
|
jlbintn
Bronze Level
Joined: 28 Nov 2019
Location: Charleston, TN
Points: 138
|
Post Options
Thanks(0)
Quote Reply
Posted: 27 Oct 2020 at 12:53pm |
I am using the proper starter bolt, as pictured above.
Should the starter, once tightened down, move? Because, no matter how tight I get the jam nut, after getting the bolt tight, it eventually starts working backwards and I eventually lose ground and I have to re-tighten.
|
|
HoughMade
Orange Level

Joined: 22 Sep 2017
Location: Valparaiso, IN
Points: 691
|
Post Options
Thanks(1)
Quote Reply
Posted: 27 Oct 2020 at 11:39am |
Are you using a regular bolt or the proper starter bolt like pictured below?
I don't think the hole is the problem other than the threads in the bellhousing, on the bolt and the hole should all be wire brushed bright for a good connection. Just line the hole up and tighten it down as far as it will go and then tighten the jam nut. I think a lot of B starters have holes wallowed out on one side like that.
|
|
1951 B
|
|
C in Concord
Bronze Level

Joined: 26 Sep 2019
Location: Concord, WI
Points: 109
|
Post Options
Thanks(1)
Quote Reply
Posted: 27 Oct 2020 at 10:52am |
That image clarifies things for me. I'm with Phil, you need to replace the nose section. Alex09(WI) or Stookless can probably hook you up. Both have served me well on my project. Ben
|
|
Leave things better than you found them.
1941 Model C (restored 2020)
|
|
Alberta Phil
Orange Level

Joined: 13 Sep 2009
Location: Alberta, Canada
Points: 3657
|
Post Options
Thanks(1)
Quote Reply
Posted: 27 Oct 2020 at 10:09am |
That hole looks like it has the remains of some threads in there. The original hole is drilled with a taper to match the lock bolt and was never threaded. Some one has attempted to modify that one. You should probably try to find a good used nose cone with the proper tapered hole or you will continue to have problems. Steve at B&B on this site can probably help you out with that and also a rebuild of the starter if it needs it.
|
|
jlbintn
Bronze Level
Joined: 28 Nov 2019
Location: Charleston, TN
Points: 138
|
Post Options
Thanks(0)
Quote Reply
Posted: 27 Oct 2020 at 6:56am |
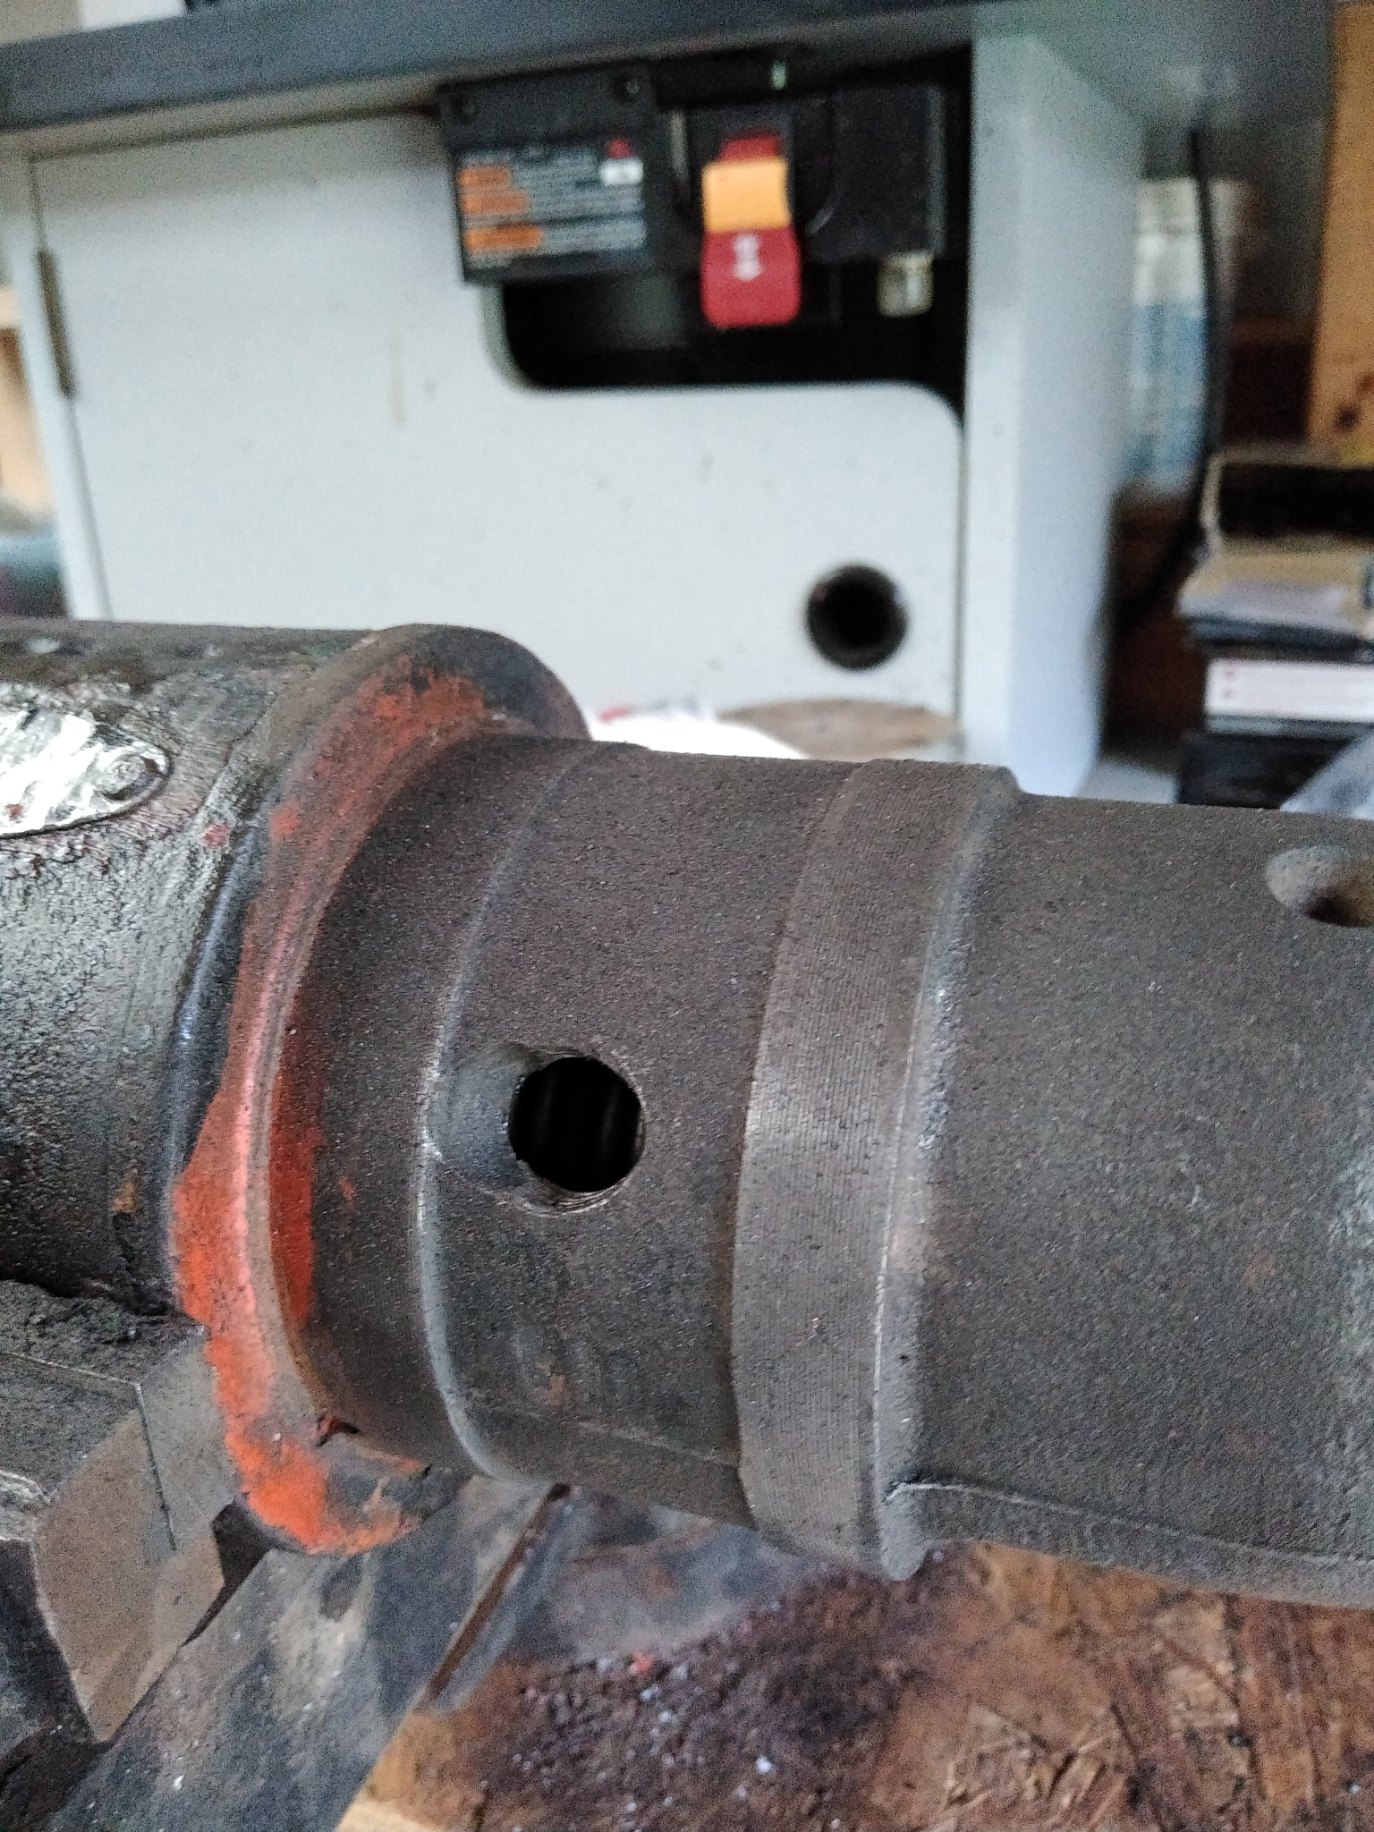
It might be hard to see from this picture, but that hole is not right. The armature and internals could probably use replacing after all this time, that I can do.... I'm worried about that hole though.... it really does look oblong, even with the taper.
From time to time (since I got the tractor last year), the starter would lose ground. I would have to loosen that bolt, and re-snug it to get juice to it. Even when I got it locked down tight, it would eventually slip back - towards the seat, then it was wash, rinse, repeat. My neighbor and I had the same idea - tap it - but there does not seem to be enough metal - towards the taper - to put a proper tap.... it's really worn out in there. Maybe that's normal.... I just don't know without seeing enough of these things. I guess I could go with a 6 volt starter, they seem to be available.... pricey for the newbies though.
Edited by jlbintn - 27 Oct 2020 at 7:07am
|
|
Dick L
Orange Level
Joined: 12 Sep 2009
Location: Edon Ohio
Points: 5082
|
Post Options
Thanks(1)
Quote Reply
Posted: 27 Oct 2020 at 6:18am |
|
The stud that locks the starter in place is 1/2". Rather than try welding you can drill and tap it to 5/8". The end of the stud needs to be shaped to match the indent in the starter. That stud not only locks the starter in place it is the way it is grounded. Those that think the ground comes from the outside of the starter in the torque tube should try making their battery cable clamps a slip fit on the battery.
|
|
mdm1
Orange Level

Joined: 12 Sep 2009
Location: Onalaska, WI
Points: 2599
|
Post Options
Thanks(1)
Quote Reply
Posted: 26 Oct 2020 at 5:32pm |
A lot me more knowledgable people than me will reply but the starter doesn't care if it is 6 or 12v. 12v would be neg ground and that is not an issue either. That's why you see no 12v starters. They can be rebuilt to 12v but I think most of us just use the 6v starter on a 12v conversion and just be careful not to do alot of grinding with it. Hope that helps alittle bit till the experts crime in. Good luck.
|
|
Everything is impossible until someone does it! WD45-trip loader 1947 c w/woods belly mower, 1939 B, #3 sickle mower 1944 B, 2 1948 G's. Misc other equipment that my wife calls JUNK!
|
|
jlbintn
Bronze Level
Joined: 28 Nov 2019
Location: Charleston, TN
Points: 138
|
Post Options
Thanks(0)
Quote Reply
Posted: 26 Oct 2020 at 5:10pm |
I am just honestly at a loss of words that this happened right after I got the head re-installed. Just totally effing unbelievable.
It's a 12 volt system, and best I can make out from the stamp is it is a Delco 1107043.
The bolt hole that mounts the starter to the frame is no longer round. I have replaced the drive on the armature, but still little luck. The starter is not holding ground, or the flywheel is not engaged. Even tightening down that toggle bolt causes the starter to shift backwards toward the seat.
I was looking for a replacement shroud, but can't seem to find one for that particular starter. I see plenty of starters for 6 volt systems, but not much for 12 volt systems.
I think I can rebuild the starter, but that housing hole is going to have to be welded full, ground and re-tapped I believe.
Any suggestions on how to proceed. I will try to post some pictures later. Thanks again for any help offered.
John
Edited by jlbintn - 08 Nov 2020 at 3:18am
|
|