| Author |
 Topic Search Topic Search  Topic Options Topic Options
|
jlbintn 
Bronze Level

Joined: 28 Nov 2019
Location: Charleston, TN
Points: 138
|
 Post Options Post Options
") Thanks(0) Thanks(0)
 Quote Quote  Reply Reply
 Topic: My B Starter (and now magneto) project Topic: My B Starter (and now magneto) project
Posted: 23 Nov 2020 at 11:08am |
 DaveKamp wrote: DaveKamp wrote:
Good morning, Jim!
Yes, they take some work and money to get brought back to life, but as you noted, they're not nearly as costly as something new, hence, very worth it, provided you don't need all the extended features (useful, and useless) of modernity.
|
Howdy Dave, thanks for the response. Informative response in the other B thread, too. I love modernity, but only to a point.
my name is John, but Jim is a good name, too   |
 |
|
Sponsored Links
|
|
|
DaveKamp
Orange Level Access

Joined: 12 Apr 2010
Location: LeClaire, Ia
Points: 5637
|
Post Options
Thanks(1)
Quote Reply
Posted: 23 Nov 2020 at 5:14am |
Good morning, Jim!
Yes, they take some work and money to get brought back to life, but as you noted, they're not nearly as costly as something new, hence, very worth it, provided you don't need all the extended features (useful, and useless) of modernity.
|
|
Ten Amendments, Ten Commandments, and one Golden Rule solve most every problem. Citrus hand-cleaner with Pumice does the rest.
|
|
jlbintn
Bronze Level
Joined: 28 Nov 2019
Location: Charleston, TN
Points: 138
|
Post Options
Thanks(0)
Quote Reply
Posted: 20 Nov 2020 at 9:01am |
Coming up on a year since I got this tractor. To date, I have about two grand into it. Five hundred of that came to me with the tractor/trailer trade. Even if, eventually, push comes to shove and I decide (or am compelled) to rebuild the engine, there is no way I could have got a newer modern tractor for the cost invested in this old B, especially considering that it will do everything I need it to do.
Edited by jlbintn - 20 Nov 2020 at 9:13am
|
|
jlbintn
Bronze Level
Joined: 28 Nov 2019
Location: Charleston, TN
Points: 138
|
Post Options
Thanks(0)
Quote Reply
Posted: 20 Nov 2020 at 8:55am |
The tractor is back up and running. My neighbor told me something about a vehicle he purchased, but was having issues with. A Jeep, too and Jeeps can be more problematic (financially) than a tractor I suspect.
All it needed was money.
The starter is fine, however, I do not like that starter switch. Even without over-cranking it, those contacts get pitted fast, and then the circuit is not completed and all I get is the solenoid click. For now, I took the switch off and just hold the cable to the flat head of the lug and it turns every time.
I looked at the contact points in the switch.... they did not look bad.... definitely not abused, pitting as I stated above, but minor. I fluxed the contacts really good and brazed some solder on both and it worked.... but only for a bit. I think I am beginning to understand why the previous owner (whichever one it was), re-engineered the original starter to have a longer lug with threads outside the starter body, bypassing that push button switch.
I may take it to a good alternator shop, and see if they can do that for me. For now, with the addition of the reman magneto, it fires up with 2-3 bump cranks, the way it's supposed to.
I have a compression test kit on the way, I want to check that to get a baseline and know what I may be dealing with in the block, but the tractor runs nice and sounds good.
What an adventure this has turned out to be....
edit to add:
Oil pressure hold steady at 20 when cold, between 15-18 at operating temperature.
Edited by jlbintn - 20 Nov 2020 at 9:11am
|
|
Stookless
Bronze Level
Joined: 11 Jan 2019
Location: 46759
Points: 98
|
Post Options
Thanks(1)
Quote Reply
Posted: 09 Nov 2020 at 7:49pm |
|
I have starter nose cones for b starters if anyone needs them. They might even be nos.
|
|
jlbintn
Bronze Level
Joined: 28 Nov 2019
Location: Charleston, TN
Points: 138
|
Post Options
Thanks(0)
Quote Reply
Posted: 08 Nov 2020 at 3:12am |
mdm1 wrote:
Your starter was converted to a push button start. Nothing wrong with that. You will have to hold the button in to engage the starter. Maybe I missed it but did you bench test the starter? |
Wanted to edit this, and apologize to mdm1. I read too much into your post (overthinking ), hope you didn't think I was contradicting your correct analysis of the push button. That was not my intent.
Actually, whoever did the conversion on the starter that came with the tractor, most likely eliminated the starter rod, thereby allowing turning the key to crank the starter without doing anything else. I tried bench testing the old starter, but could not figure out how to do it without the solenoid off the tractor. All I got was sparks, but nothing else, and that was after putting in new brushes, new stators and a new armature. I can't figure out what I did wrong. I had continuity from the post to the starter casing. I don't think that is normal, so if my thoughts on that are correct, something got shorted somewhere, but I couldn't figure out what.
My neighbor and I completely tore down the magneto today, and replacement parts have been ordered. Looking forward to getting it back together. I wish I could roll down to a store and get all of this, the same day I need it. Kinda sucks waiting on online ordering. 
I have no idea why the rims are the way they are. That farmerized drawbar has been off the tractor since July. I had hoped to be on a plow project by now (and rebuild of the hyd pump if necessary), but this other stuff had to be addressed.
Edited by jlbintn - 20 Nov 2020 at 9:51am
|
|
mdm1
Orange Level

Joined: 12 Sep 2009
Location: Onalaska, WI
Points: 2592
|
Post Options
Thanks(1)
Quote Reply
Posted: 07 Nov 2020 at 2:08pm |
|
Your starter was converted to a push button start. Nothing wrong with that. You will have to hold the button in to engage the starter. Maybe I missed it but did you bench test the starter?
|
|
Everything is impossible until someone does it! WD45-trip loader 1947 c w/woods belly mower, 1939 B, #3 sickle mower 1944 B, 2 1948 G's. Misc other equipment that my wife calls JUNK!
|
|
jlbintn
Bronze Level
Joined: 28 Nov 2019
Location: Charleston, TN
Points: 138
|
Post Options
Thanks(0)
Quote Reply
Posted: 07 Nov 2020 at 10:55am |
steve(ill) wrote:
YEP... with that starter, rear wheel rims, seat, backrest and drawbar..... there has been a lot of "modification" going on before you ............ NICE LOOKING TRACTOR !
What is the deal with the rims and bolts to the hub.... hard to see details in that photo.
Make sure the trans is in NEUTRAL when you push that starter button !!! Double check and check again !
|
yes, even though I know it is, I always check that shifter stick. The tractor looks nicer now, than it did then, with a clean head, cleaned up thermostat housing and cleaned up magneto case.
I should just go all in, but right now I want to get it back to starting reliably. I think I have some magneto work to do, it does not want to start after installing the new starter. My neighbor and I checked spark on each cylinder.... barely registering any at all. I put new points and a condensor in, but still no spark. It is timed correctly, using this guide:
|
|
steve(ill)
Orange Level Access

Joined: 11 Sep 2009
Location: illinois
Points: 77747
|
Post Options
Thanks(0)
Quote Reply
Posted: 06 Nov 2020 at 6:07pm |
YEP... with that starter, rear wheel rims, seat, backrest and drawbar..... there has been a lot of "modification" going on before you ............ NICE LOOKING TRACTOR !
What is the deal with the rims and bolts to the hub.... hard to see details in that photo.
Make sure the trans is in NEUTRAL when you push that starter button !!! Double check and check again !
Edited by steve(ill) - 06 Nov 2020 at 6:09pm
|
|
Like them all, but love the "B"s.
|
|
jlbintn
Bronze Level
Joined: 28 Nov 2019
Location: Charleston, TN
Points: 138
|
Post Options
Thanks(0)
Quote Reply
Posted: 06 Nov 2020 at 10:09am |
This is a picture I posted in my inaugural thread last year. It should show clearly the starter as it came with the tractor. 
|
|
jlbintn
Bronze Level
Joined: 28 Nov 2019
Location: Charleston, TN
Points: 138
|
Post Options
Thanks(0)
Quote Reply
Posted: 06 Nov 2020 at 10:01am |
Thanks Steve, the battery is new, thereby clean.
I sand-blasted the old starter.... there was so much paint on the old one that I didn't notice that it had been "remanufactured" by a past owner. The post that is supposed to be engaged from the Starter Rod wasn't there, that I knew with comparison to newer pictures of re-man starters. I had been wondering why I didn't have that post cover, but it was of secondary concern, considering the other issues I have been dealing with.... and the tractor started reliably soooo.... on the backburner until it could no longer be left there.
My tractor did not come with a Starter Rod, but I didn't even know that til this problem came up. By that I mean that I did not know it was a necessary part of the tractor because the starter was not reliant upon it. Somebody removed it, sometime in the past.
Looking at the old starter, the post was a single brass/copper bolt, but threaded to the outside, not inside the starter as it was designed to be. Had I not sand-blasted it, I never would have seen the two threaded holes for the post mount cover with the spring button that is activated by the starter rod.
So I had a 6 volt starter that somebody home remedied sometime long in the past, during a rebuild. Everything became clear upon closer inspection last night.
So that is where I am. I have to hold that button in to get the starter to turn, but a starter rod is definitely a must.
Edited by jlbintn - 06 Nov 2020 at 11:20am
|
|
steve(ill)
Orange Level Access
Joined: 11 Sep 2009
Location: illinois
Points: 77747
|
Post Options
Thanks(1)
Quote Reply
Posted: 05 Nov 2020 at 5:42pm |
|
clean cable ends and battery clamps... and CLEAN the battery lugs themselves is a main cause of NO CRANK.... not just wipe off clean.. you have to sand paper or wire brush.
|
|
Like them all, but love the "B"s.
|
|
jlbintn
Bronze Level
Joined: 28 Nov 2019
Location: Charleston, TN
Points: 138
|
Post Options
Thanks(0)
Quote Reply
Posted: 05 Nov 2020 at 4:58pm |
ok, nevermind got the starter to turn. Not sure why it wouldn't at the time of the last post. I didn't do anything else. Maybe cables
|
|
jlbintn
Bronze Level
Joined: 28 Nov 2019
Location: Charleston, TN
Points: 138
|
Post Options
Thanks(0)
Quote Reply
Posted: 05 Nov 2020 at 4:12pm |
steve(ill) wrote:
quite often the cause is bad terminal ends on the starter cables and the battery terminals themselves... corrosion / tarnish on the terminals ...........and yes, there should be continuity from the STUD thru the windings ... brushes will have some resistance thru them.
since you have a STUD , you are using a SOLENOID... it is possible the contact inside is burnt... have you tried jumping it ... going straight from the battery terminal to the starter stud ? ..... and you cant BENCH test it that way.
|
No, haven't tried to jump it. Not sure how to safely connect it. I tried and the battery jumper cables started getting warm, so I took them off. I've never done that before, so working a bit in the dark.
I bought a new starter, it's a 6v starter that is supposed to be a direct replacement for the starter I have on the tractor, the 1107043. I'm getting 12.3 volts from the battery positive to the top solenoid stud. Getting the same on the bottom stud. I get 12.35 volts to the stud on the new starter.
Just solenoid clicking. The same thing it did with the rebuild attempt. I'm trying to figure out what I'm missing here. I believe my old starter is a 6v starter as well.
This has to be something simple. Would the ignition be an issue? I wouldn't think so, if voltage is moving through the connectors and the solenoid and getting to the starter.
Anyway, that's where I'm at.
|
|
steve(ill)
Orange Level Access
Joined: 11 Sep 2009
Location: illinois
Points: 77747
|
Post Options
Thanks(1)
Quote Reply
Posted: 01 Nov 2020 at 12:29pm |
quite often the cause is bad terminal ends on the starter cables and the battery terminals themselves... corrosion / tarnish on the terminals ...........and yes, there should be continuity from the STUD thru the windings ... brushes will have some resistance thru them.
since you have a STUD , you are using a SOLENOID... it is possible the contact inside is burnt... have you tried jumping it ... going straight from the battery terminal to the starter stud ? ..... and you cant BENCH test it that way.
Edited by steve(ill) - 01 Nov 2020 at 12:37pm
|
|
Like them all, but love the "B"s.
|
|
jlbintn
Bronze Level
Joined: 28 Nov 2019
Location: Charleston, TN
Points: 138
|
Post Options
Thanks(0)
Quote Reply
Posted: 01 Nov 2020 at 11:52am |
Spent a good part of yesterday rebuilding the starter. New armature, new brushes, new gear....
and nothing. My neighbor is coming over later today to put another set of eyes on the work, but honestly.... how hard can it be.
It won't even turn. Just a click on the solenoid, but not even a response from the starter, as though it's shorted.
Should there be continuity on the starter cylinder? I get continuity from the 12 volt stud to the rest of the body when I hook up the brush plate (the back plate) to the cylinder, e.g., the stators. All I did was replace the brushes, the armature, the stators and the springs. That's all that came with the kit.
Edited by jlbintn - 01 Nov 2020 at 11:53am
|
|
steve(ill)
Orange Level Access
Joined: 11 Sep 2009
Location: illinois
Points: 77747
|
Post Options
Thanks(1)
Quote Reply
Posted: 29 Oct 2020 at 4:03pm |
If you listen to the EXPERTS they will tell you to preheat the cast iron to 1000 degrees and weld it up with a stainless or inconel ( nickle rod).....
You dont really need the iron that HOT.. It can be "warm".. I use about 300 degrees. The idea to to BURN OFF any oil that is impregnated in the casting... Nice to use stainless rod, but i have had a lot of success with 7018 steel rod. You only weld short passes, maybe an inch long.. Chip the flux and peen the metal to relive stresses as you weld... GO SLOW... When done, cover with a heat blanket or maybe sand and let it COOL SLOW.
|
|
Like them all, but love the "B"s.
|
|
Brian G. NY
Orange Level

Joined: 12 Sep 2009
Location: 12194
Points: 2198
|
Post Options
Thanks(1)
Quote Reply
Posted: 29 Oct 2020 at 2:23pm |
KMAG wrote:
Another good idea (but I'm biased)! Tap and/or drill and tap your existing starter cone hole and install a hex pipe plug using red Loctite to help keep it in place (maybe stake it while you're at it). Drill and chamfer hole in center of plug centered through bellhousing opening.
Install original lock bolt setup. It should be as good or stronger than the original design.
|
I think this is a good idea if you're not comfortable with the welding option. If you use an internal hex plug or a pipe reducer, you will have the beginnings of your hole already.
On the other hand, there must be a guy (or two) on here that has a good B nose cone lying around that they could part with?
|
|
jlbintn
Bronze Level
Joined: 28 Nov 2019
Location: Charleston, TN
Points: 138
|
Post Options
Thanks(0)
Quote Reply
Posted: 29 Oct 2020 at 10:55am |
Thanks again to all of you. Lots of good information, ideas and suggestions. Got the innards for the starter today, going to completely rebuild it, thinking about how I want to go forward with the cone.
Welding the hole and re-tapping is still at the top of the list.
Heating that nose up before welding.... minimum temperature should be what since it's cast iron?
I've read 300 F, I've read 500 F minimum. Then letting it cool slowly, immersed in sand.
Thanks again. I'll keep y'all posted on the progress.
p.s.
I like the idea of a bracket, btw. Might be an option.
|
|
Brian G. NY
Orange Level
Joined: 12 Sep 2009
Location: 12194
Points: 2198
|
Post Options
Thanks(1)
Quote Reply
Posted: 29 Oct 2020 at 10:22am |
[QUOTE I would guess that China had a better idea!  [/QUOTE]
Different, but I'm not sure better.
There are a few nose cones on ebay right now and the vendors say they fit Bs, Cs, CA,s, WCs, WDs and WD-45s. I don't know how that is possible since the location of the tapered hole has to be different between the smaller and larger engines. If you look at the threaded holes in the blocks, you will see that, in the case of the larger engines, the hole is exactly perpendicular with the crankshaft. It is not on the smaller engines. Assuming the housing is the same diameter, it would probably be fairly easy to machine a new tapered hole in a WD-WD-45 housing so it would fit either engine. The original tapered hole is located dead center between the two machined surfaces. Although the hole in jibintn's housing is really messed up, it appears to me that there is enough of the original hole left to allow the tapered bolt to be inserted far enough to still hold the starter in its correct position. Here is a picture of a nose cone which I think came from a WC. You can see that the tapered hole is located differently than the one on the B.
t 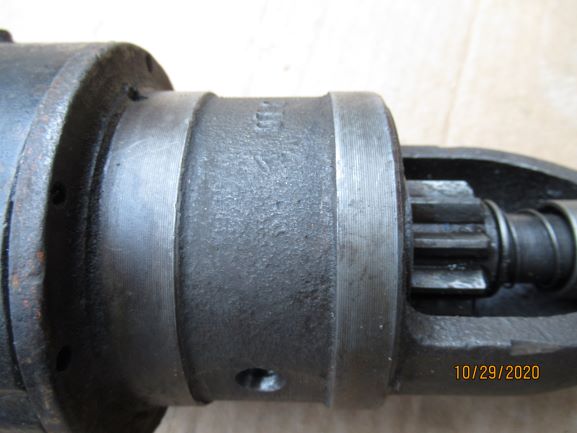
|
|
Steve in NJ
Orange Level Access
Joined: 12 Sep 2009
Location: Andover, NJ
Points: 11550
|
Post Options
Thanks(1)
Quote Reply
Posted: 29 Oct 2020 at 9:22am |
The old pinch bolt system was a pretty crappy design to hold these Starter motors in place. Being most of the weight is to the rear of the unit, it didn't take much for the Starter to become loose and lose its ground. The rings on the nose cone are also for grounding purposes on some applications. I've repaired some of the nose cone mounting holes with either JB Weld or if the hole was really bad (like yours is) had my welder fill the damaged part of the hole, and I would taper it for the pinch bolt to fit much more snug in the cone. Another thing to inspect is to make sure the threads in the hole in the torque tube are not stretched to where the bolt is loose and when the jam nut is tightened cocks the Starter motor, or does not hold the unit tight as it should. This will cause mis-alignment problems possibly cracking the nose cone or pre-maturely wearing out the ring gear teeth on the flywheel.
The nose cone problem you are having is not new. There were a lot of these old Starter motors that had different indexed nose cones that were used for different applications. I myself had some problems finding the correct cones for certain motors over the years and I rebuild the damn things. A lot of my old suppliers are gone and it makes it tougher to find the CORRECT parts for certain units. Some I would have to index myself to make the cone work for the application. I've come across a lot of goofy stuff over the past 50 years I've been rebuilding Starters, especially these older Delco units, and even more so with other older brands such as Autolites, & Prestolites.
On some of the high torque pulling Starter motors I've built over the years, I would make the suggestion to the customer to build a support bracket to support the rear of the Starter to keep it from moving when my high torques engage to a high compression pulling engine. This keeps the motor straight and snug to where it won't move and all torque gets transferred to the engines flywheel when engaged. If you run into the problem of repairing the nose cone, you might want to consider that idea to help support the rearward weight of the unit and keep it aligned correctly. A rear support helps emensly with the poor pinch bolt design. Of coarse, like anything else, designing a rearward support bracket depends on the application involved... HTH Steve@B&B
|
|
39'RC, 43'WC, 48'B, 49'G, 50'WF, 65 Big 10, 67'B-110, 75'716H, 2-620's, & a Motorhead wife
|
|
Dick L
Orange Level
Joined: 12 Sep 2009
Location: Edon Ohio
Points: 5082
|
Post Options
Thanks(1)
Quote Reply
Posted: 29 Oct 2020 at 5:32am |
steve(ill) wrote:
Thanks Dick... learn something every day.. Never heard of that... but i never needed a new one either !!!
In that case i would warm up the nose with a propane torch, then weld the hole up and remachine for the taper. |
I would guess that China had a better idea!
|
|
steve(ill)
Orange Level Access
Joined: 11 Sep 2009
Location: illinois
Points: 77747
|
Post Options
Thanks(1)
Quote Reply
Posted: 28 Oct 2020 at 8:21pm |
Thanks Dick... learn something every day.. Never heard of that... but i never needed a new one either !!!
In that case i would warm up the nose with a propane torch, then weld the hole up and remachine for the taper.
Edited by steve(ill) - 28 Oct 2020 at 8:22pm
|
|
Like them all, but love the "B"s.
|
|
Dick L
Orange Level
Joined: 12 Sep 2009
Location: Edon Ohio
Points: 5082
|
Post Options
Thanks(1)
Quote Reply
Posted: 28 Oct 2020 at 6:52pm |
steve(ill) wrote:
I ment when you put the bolt into the torque tube and tighten, it PUSHES the starter toward the CENTER of the tractor and it gets TIGHT.. The starter is slightly smaller than the hole it sets in.... After tightening, the starter should be 1/8 of an inch rearward from bottoming out in the torque tube hole..
Im not sure you really have a problem.. CLean every thing up and set the starter in the hole, 1/8 inch from bottoming out... Install the taper plug and tighten it into the torque tube... it will pilot into the starter and BIND it into the hole.. What part of that does not work ?? ...... I have seen some distorted holes in the nose and threads in the nose and that normally is not a problem.... Yours appears the hole was moved FORWARD and had threads in it... If you screw the taper bolt into that area, the starter has to move FORWARD to get loose... you may have a little over 1/8 clearance between the starter and the bellhousing at the entrance hole... as long as the fly wheel engages, that is fine.
|
The hole is larger than the taper. If you go ebay Steve and type in Allis Chalmers B starter cone you will see the new cones have the larger hole with threads. To make those to work properly you would need to remove the threads in the torque tube to draw the cone tight in the torque tube. Those would need to be drawn up tight rather than forced down tight as the old starter were.
|
|
steve(ill)
Orange Level Access
Joined: 11 Sep 2009
Location: illinois
Points: 77747
|
Post Options
Thanks(1)
Quote Reply
Posted: 28 Oct 2020 at 3:40pm |
I ment when you put the bolt into the torque tube and tighten, it PUSHES the starter toward the CENTER of the tractor and it gets TIGHT.. The starter is slightly smaller than the hole it sets in.... After tightening, the starter should be 1/8 of an inch rearward from bottoming out in the torque tube hole..
Im not sure you really have a problem.. CLean every thing up and set the starter in the hole, 1/8 inch from bottoming out... Install the taper plug and tighten it into the torque tube... it will pilot into the starter and BIND it into the hole.. What part of that does not work ?? ...... I have seen some distorted holes in the nose and threads in the nose and that normally is not a problem.... Yours appears the hole was moved FORWARD and had threads in it... If you screw the taper bolt into that area, the starter has to move FORWARD to get loose... you may have a little over 1/8 clearance between the starter and the bellhousing at the entrance hole... as long as the fly wheel engages, that is fine.
Edited by steve(ill) - 28 Oct 2020 at 3:46pm
|
|
Like them all, but love the "B"s.
|
|
jlbintn
Bronze Level
Joined: 28 Nov 2019
Location: Charleston, TN
Points: 138
|
Post Options
Thanks(0)
Quote Reply
Posted: 28 Oct 2020 at 3:02pm |
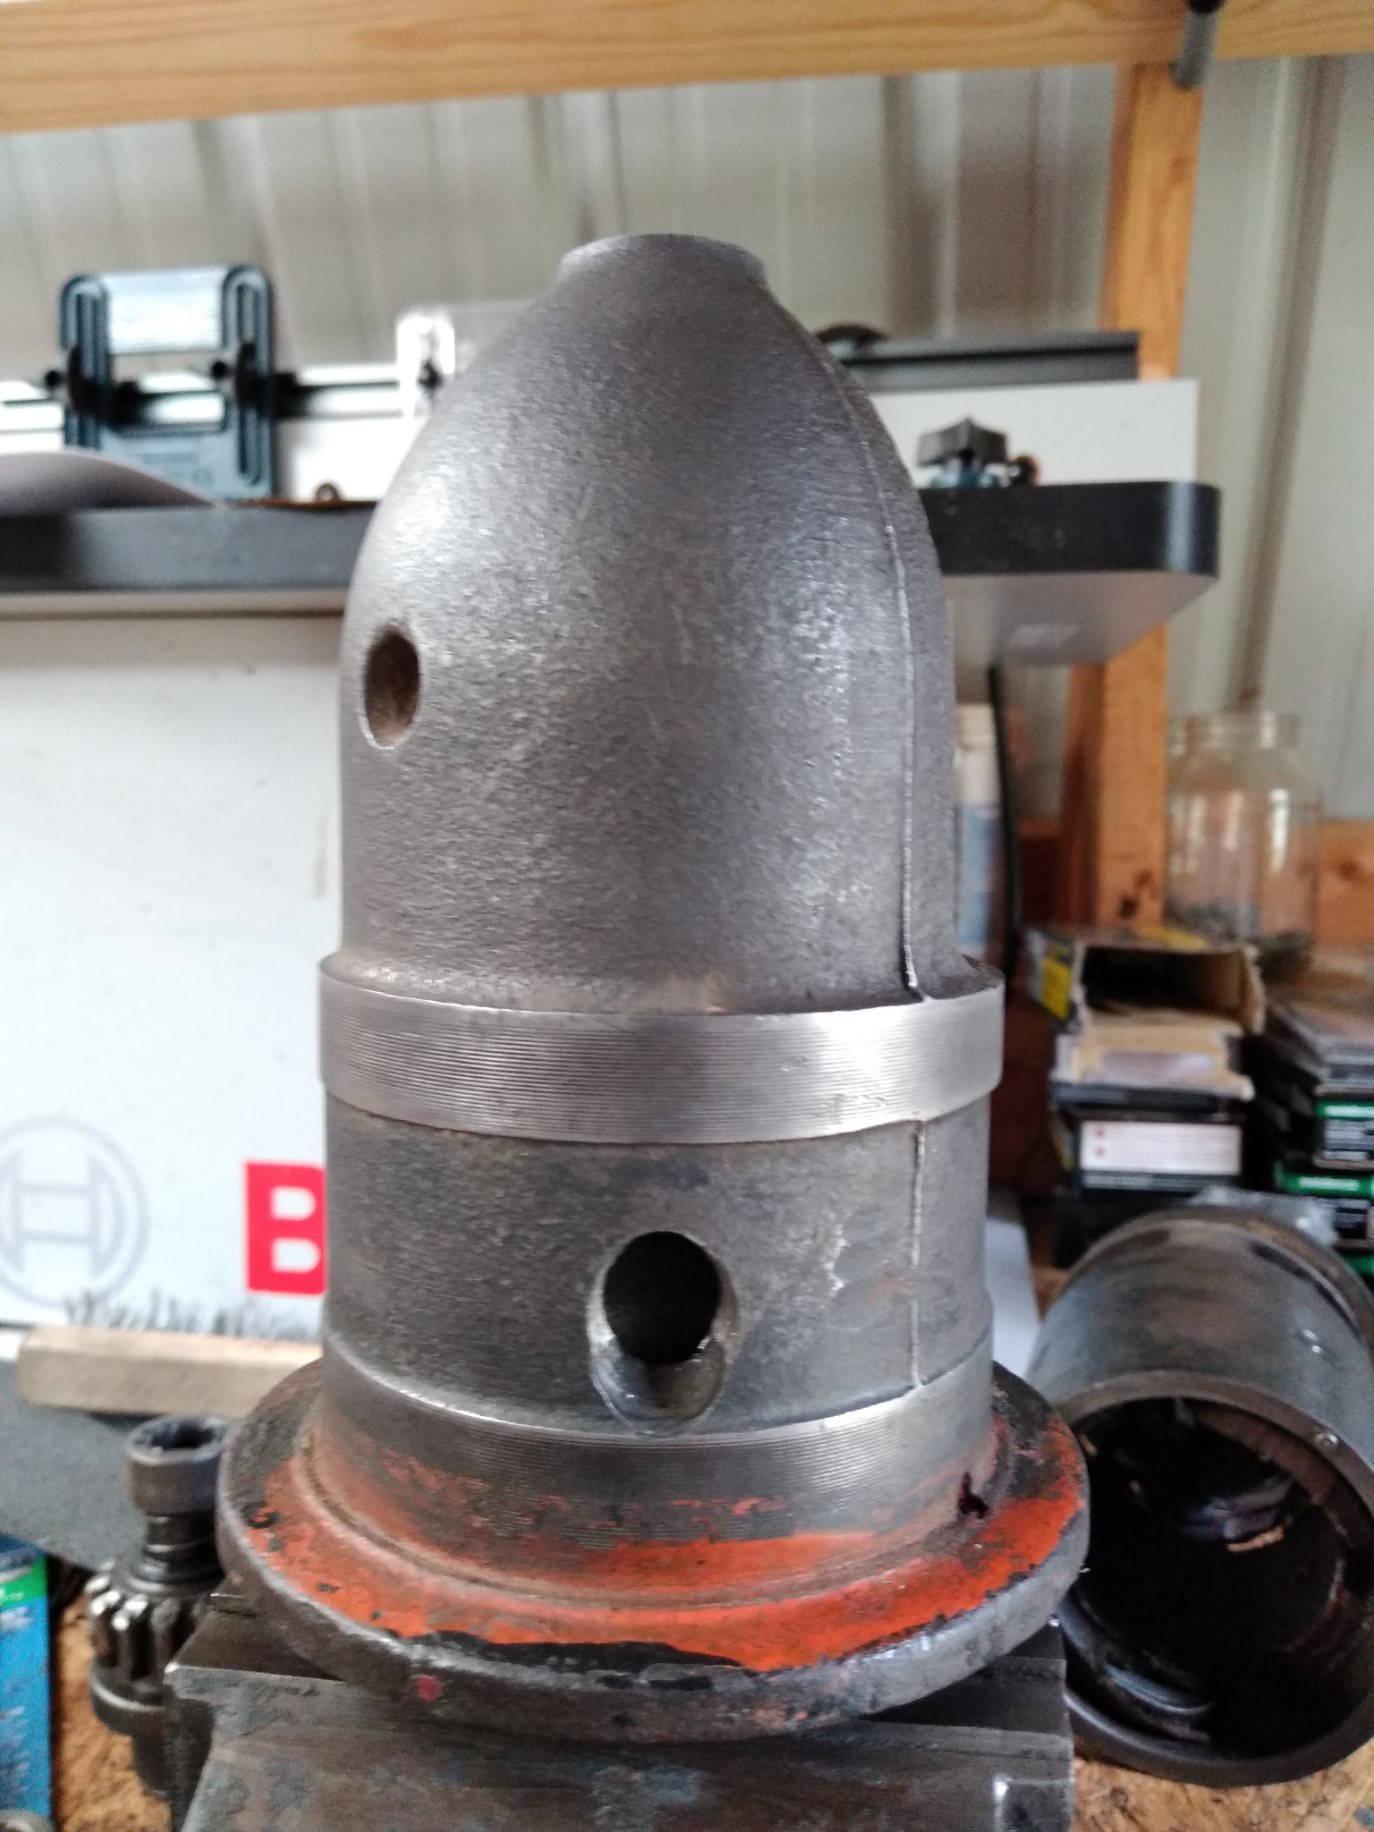
|
|
|
jlbintn
Bronze Level
Joined: 28 Nov 2019
Location: Charleston, TN
Points: 138
|
Post Options
Thanks(0)
Quote Reply
Posted: 28 Oct 2020 at 2:06pm |
steve(ill) wrote:
Since I am having a hard time finding that particular nose cone, I think my neighbor and I will attempt to weld the hole, then retap with a slightly smaller bolt, to bypass the threads in the torque tube.
If I understand you correctly, the threads in the torque tube should not be there?
NO.. I dont think you understand.. The bolt is POINTED on the end.. It screws INTO THE TORQUE TUBE and the point goes INTO THE STARTER NOSE.. It PUSHES the starter toward the motor and forms a GROUND for the elect to work.. The "HOLE" in the starter nose is suppose to be tapered and match the point on the BOLT... The THREADS in the TORQUE TUBE are what holds it all together. |
Thanks for clarifying that, I thought the same, but wanted to make sure I was understanding what the poster had said. 
That hole in my nose is so deformed, that when I tighten that bolt it actually pushes the starter back away from the motor.... guessing around an 1/8"....
edit to add
when I install the starter into the tube- before threading the bolt, the holes line up perfectly and the tip of the cone is flush against the tube.
Edited by jlbintn - 28 Oct 2020 at 2:09pm
|
|
jlbintn
Bronze Level
Joined: 28 Nov 2019
Location: Charleston, TN
Points: 138
|
Post Options
Thanks(0)
Quote Reply
Posted: 28 Oct 2020 at 2:01pm |
KMAG wrote:
Dick L is correct about welding cast iron. There are also different types of cast iron. Sometimes a quick MIG weld works for non-critical uses on cast iron.
A new cone will run $55 plus shippingor find a good used cone - best fix.
|
The problem I have run into so far, are the mating holes on the nose not matching the starter cylinder. On my cylinder, there are the two bolt holes, and a tab that have to line up with the nose. Maybe I just haven't looked in the right places yet, but I have looked at a few.... prices ranging from $50-75.
The search continues....
|
|
jlbintn
Bronze Level
Joined: 28 Nov 2019
Location: Charleston, TN
Points: 138
|
Post Options
Thanks(0)
Quote Reply
Posted: 28 Oct 2020 at 1:57pm |
That looks a bit similar to where mine ends up, after engaging it, over time. To everybody else that offered it, thanks for the advice/heads up with the welding option.
Edited by jlbintn - 28 Oct 2020 at 1:58pm
|
|
HoughMade
Orange Level

Joined: 22 Sep 2017
Location: Valparaiso, IN
Points: 691
|
Post Options
Thanks(1)
Quote Reply
Posted: 28 Oct 2020 at 1:44pm |
steve(ill) wrote:
You can grind the taper hole in the starter nose a little to reform it... you can also grind the point / end of the bolt so it fits "better" into the starter nose hole... A good FIT will guarantee a good ground and will stop the starter from MOVING back and forth.
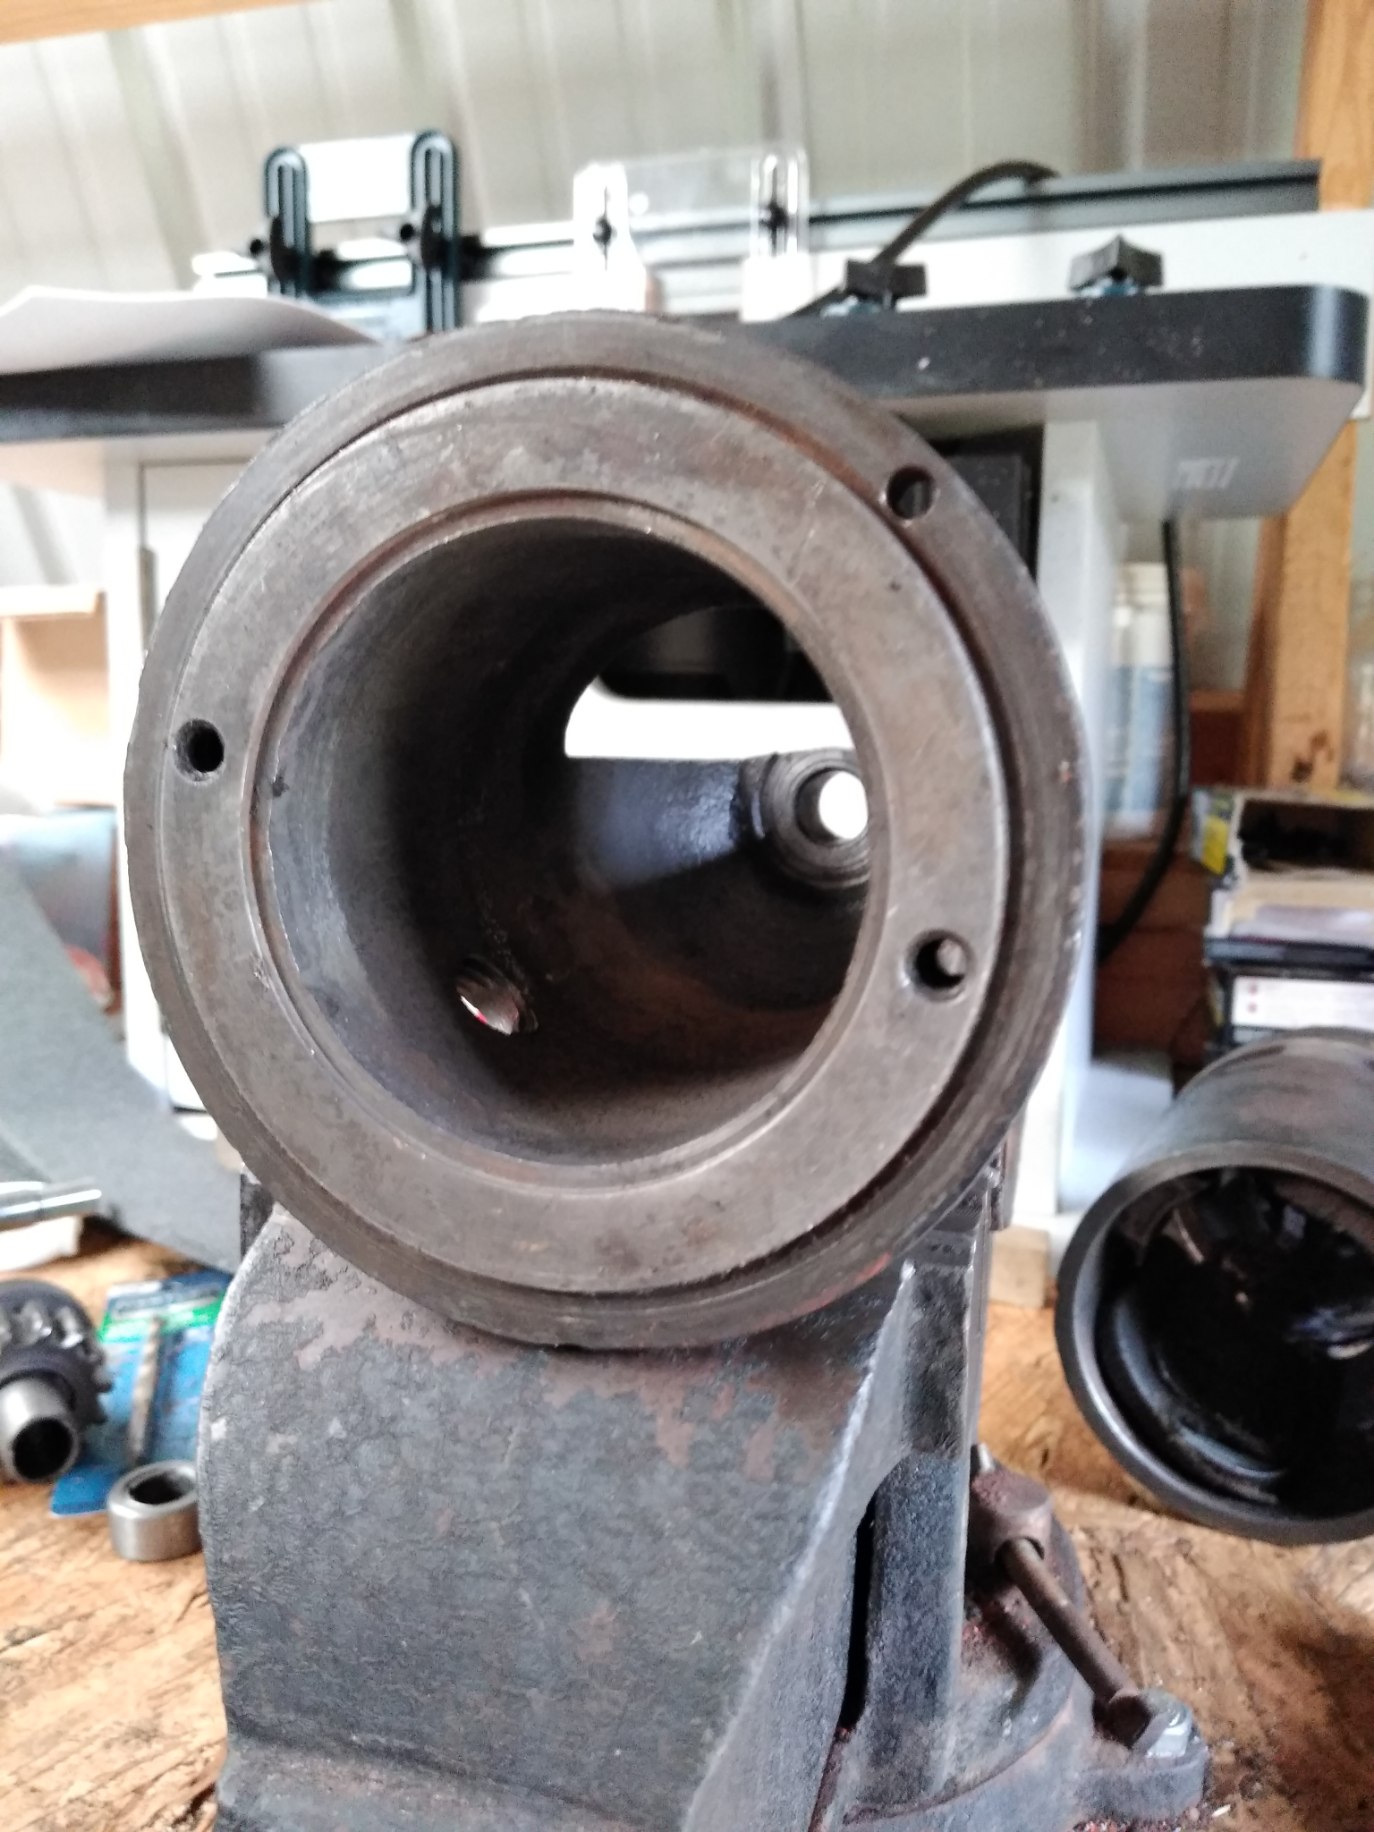
The starter may not set ALL THE WAY INTO THE TORQUE TUBE HOLE.. Seems to me that when i install the TAPER BOLT and it pilots INTO THE STARTER NOSE HOLE, that the starter motor may be 1/8 OUT from bottoming out in the torque tube. |
All good points. Look at the space on mine in the pic below. It works perfectly and doesn't get loose. (I also wire brushed the inside of the starter hole on the torque tube and the outside of the starter nose where it rests against the hole for added contact).
I took this picture some time ago for another purpose, but you can see how far the body of the starter is from the hole.
Edited by HoughMade - 28 Oct 2020 at 1:45pm
|
|
1951 B
|
|