| Author |
 Topic Search Topic Search  Topic Options Topic Options
|
DennyS 
Bronze Level

Joined: 08 Feb 2012
Location: Savona,NY
Points: 26
|
 Post Options Post Options
") Thanks(0) Thanks(0)
 Quote Quote  Reply Reply
 Topic: D-17 Hitch help Topic: D-17 Hitch help
Posted: 08 Feb 2012 at 9:47pm |
I recently purchased a 1961 D17. I believe this would be series II. Runs great back tires new, new paint, Had a B before and then a 59 Massey, which threw a rod snowplowing my driveway. Sold the Massey and bought this D17. Problem is this. I was told it was a three point, but upon further checking, I"m not sure what is hanging off the back of this tractor. I think I kinda might have jumped too quickly on the new tires and power steering without figuring out how to attach my backblade to plow snow. Anyhow I'll attach a picture of what I got and quite possibly someone can fill me in. The swivel balls for the blade pins are not there. Anyhow I'll try the picture idea. 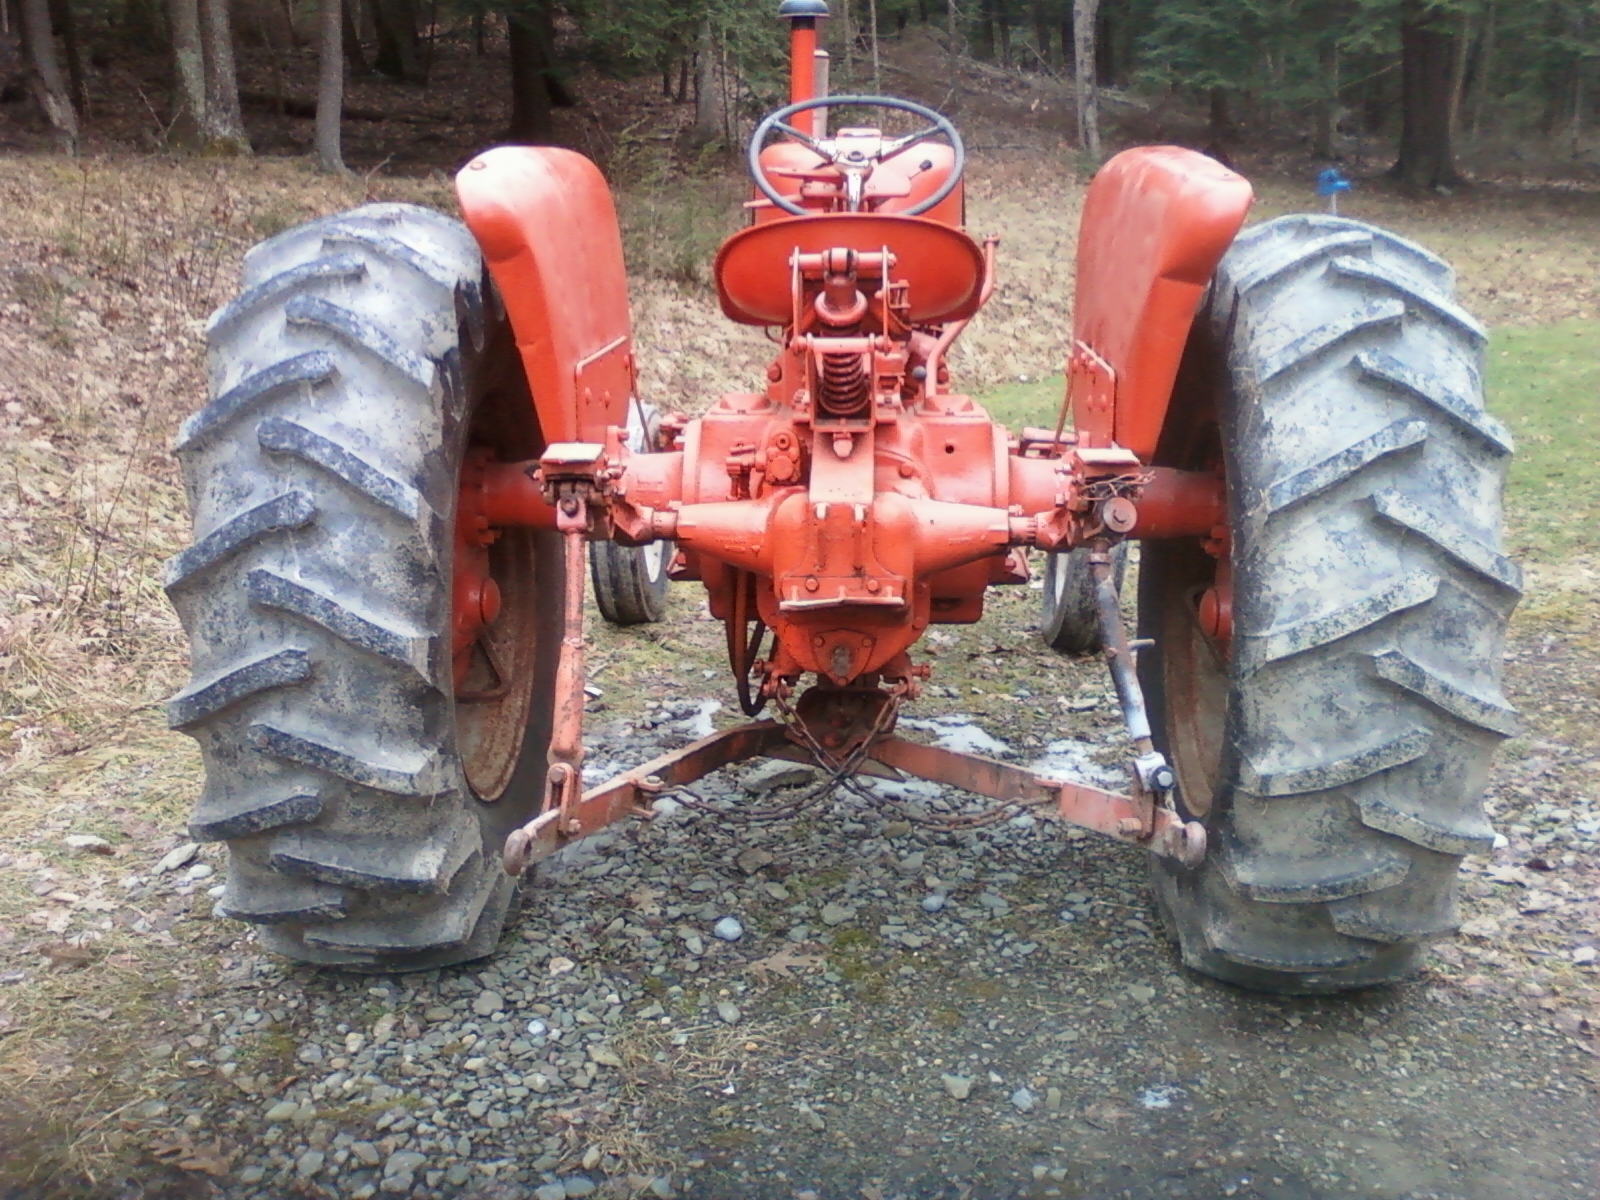
|
 |
|
Sponsored Links
|
|
|
jmikeyoung
Bronze Level
Joined: 10 May 2011
Points: 42
|
Post Options
Thanks(0)
Quote Reply
Posted: 08 Feb 2012 at 9:58pm |
|
its snap coupler to 3 point conversion hook the side of your blade into your lower armslike normal and get your 3rd member and hook up to the bracket on the back of the lift assembly behide your seat and hook to the top of the 3 point on your blade. and you have it. exact same as we have on grandpa's d17
|
|
Chalmersbob
Orange Level

Joined: 11 Sep 2009
Location: Pennsylvania
Points: 2122
|
Post Options
Thanks(0)
Quote Reply
Posted: 08 Feb 2012 at 10:00pm |
What you have is a snap couple with a 3 point adapter, which will work fine.
The holes might be larger then you need, but you can get reducers for them. I have one like that on my CA and WD with class 2 mounting holes in the arms and I use 1 to 2 reducers to make it work. The mount for the top link is there, all you will need is the pin. Bob
Edited by Chalmersbob - 08 Feb 2012 at 10:00pm
|
|
dustinmo
Orange Level Access

Joined: 12 Sep 2009
Location: Auxvasse, MO
Points: 2187
|
Post Options
Thanks(0)
Quote Reply
Posted: 08 Feb 2012 at 10:19pm |
|
the balls are missing, you will need to cut the ends off and go buy a set of replacement ends at a farm and home or somewhere and weld the new ends to the lower arms, but you do have the 3pt adapter on the ol 17. nor you could buy new lower arms and cut them off and bolt the stubs to your lower arms with a little drilling, either way not a big deal
|
|
DennyS
Bronze Level
Joined: 08 Feb 2012
Location: Savona,NY
Points: 26
|
Post Options
Thanks(0)
Quote Reply
Posted: 08 Feb 2012 at 10:20pm |
I know I need a few small pieces to get the snaps working correctly, I also need the two leveling arms. One is welded and the other is bent. I am pretty fussy guy so I'll need gauges also. Oil pressure is the only gauge that works. Needs a Creme colored steering wheel and also the tach is missing.Starts and runs perfectly with no smoke or rattles,clutch and brakes are good. Power director works as it should too. PTO runs quiet.Lights are all gone. Power steering smooth and quiet. I know it's POS ground, but I;m not sure if it's 6Vor12V.3rd gear has some noise,but does not popout.
|
|
Pat the Plumber CIL
Orange Level

Joined: 11 Sep 2009
Location: Springfield,Il
Points: 4974
|
Post Options
Thanks(0)
Quote Reply
Posted: 09 Feb 2012 at 10:50pm |
|
I have a 60 D-17 with a 3pt conversion that I bought on here.Basically same as yours but thicker arms and cat 2 swivels.Works better pulling than pushing.Looks like someone mounted 3rd top link with larger bolts than came stock.Mine were original 3/8 inch stud bolts that only held PTO gaurd in place.Broke them off when I turned blade around and was pushing snow.Luckily the studs came out and replaced with longer grade8 bolts and nuts.Looks like someone drilled and tapped where the top link connects.If you want to use that for heavy duty use I would suggest a "saginaw" style conversion.Harder to convert back to Snap coupler if you want to use SC equipt. but much better stronger set up.A couple of guys on here sell them.
Edited by Pat the Plumber CIL - 09 Feb 2012 at 10:51pm
|
|
You only need to know 3 things to be a plumber;Crap rolls down hill,Hot is on the left and Don't bite your fingernails
1964 D-17 SIV 3 Pt.WF,1964 D-15 Ser II 3pt.WF ,1960 D-17 SI NF,1956 WD 45 WF.
|
|
David(Stockbridge)MI
Orange Level

Joined: 15 Sep 2009
Location: Stockbridge MI
Points: 536
|
Post Options
Thanks(0)
Quote Reply
Posted: 10 Feb 2012 at 6:30am |
Denny, can help with all your part needs and can answer any questions you may have that don't get answered here. David 734-320-3470 www.djstractorparts.com
|
|
All "NEW" Web Site http://www.djstractorparts.com
2035,A,U,UC,WF unstyled,WF styled,WC High Crop (cane),RC,B,IB,C,CA,WD,WD45,G,D10,D12,D14,D15,D15 II,D17,D19,WC styled,WC unstyled H3 crawler
|
|
Mike_426
Silver Level


Joined: 07 Dec 2011
Location: Ypsilanti Mi
Points: 138
|
Post Options
Thanks(0)
Quote Reply
Posted: 10 Feb 2012 at 7:23am |
|
I've been to Davids place a dozen times, bout countless parts and pieces even traded a thing ortwo. He knows his stuff and has good prices, just my 2 cents.. Mike
|
|
G, 200, 8050 mfd, D17, 195 chainsaw, c-wide front
|
|
Orange Blood
Orange Level
Joined: 29 Nov 2010
Location: ColoradoSprings
Points: 4053
|
Post Options
Thanks(0)
Quote Reply
Posted: 10 Feb 2012 at 7:51am |
To your point about the swivel balls missing from the three point, I see what you are saying, unfortunately they were probably cut out, they are pressed into place on all three points I have ever seen, unless you have a rare style were there are slots, that they can be inserted and turned, you may be out of luck with that adapter. Rest assured you have the right tractor, but you may have to find another adapter to make the three point work right. Doesn't mean you can't use what you have, but it will wear funny, push crooked, and be a basic pain in the butt.
Welcome to the forum, you are in the right place.
|
|
Still in use:
HD7 WC C CA WD 2-WD45 WD45LP WD45D D14 3-D17 D17LP 2-D19D D19LP 190XTD 190XTLP 720 D21 220 7020 7030 7040 7045 3-7060
Projects: 3-U UC 2-G 2-B 2-C CA 7-WC RC WDLP WF D14 D21 210 7045 N7
|
|
Brian G. NY
Orange Level

Joined: 12 Sep 2009
Location: 12194
Points: 2270
|
Post Options
Thanks(0)
Quote Reply
Posted: 10 Feb 2012 at 9:38am |
 Unfortunately, you're missing a few pieces that originally came with that A-C adaptor.
The stabilizer chains go in the holes ahead of the "clevis" type brackets to which they are now attached. Those "clevis" type brackets are used to connect either the Top link crossbar when utilizing the "traction booster" feature or the stabilizer when using the 3-PH without that feature.
Since you're tractor is equipped with the top-link bracket, I assume that hitch should have originally come with the stabilizer.
The original adjustable lift link has a neat little gearbox with a crank; see picture.
I am postimg a picture showing the pieces that originally came with the adaptor and how they worked.
Edited by Brian G. NY - 10 Feb 2012 at 9:48am
|
|
JimD
Orange Level
Joined: 11 Sep 2009
Location: Mounds, OK
Points: 2116
|
Post Options
Thanks(0)
Quote Reply
Posted: 10 Feb 2012 at 10:12am |
Denny, We sell hitches very similar to what you have and can answer any questions on it. Gauges are all available. If the swivel balls are missing on the end, then as suggested, you can cut them off and weld on new ones. JimD
|
Owner of OKtractor.com PM for an instant response on parts. Open M-F 9-6 Central. We have new and used parts. 877-378-6543
|
|
DennyS
Bronze Level
Joined: 08 Feb 2012
Location: Savona,NY
Points: 26
|
Post Options
Thanks(0)
Quote Reply
Posted: 10 Feb 2012 at 9:18pm |
|
Cut off ends and welded new pieces on them. Straightened the adjustable link and fixed the snap with a new rivet and springs. All I'm planning to do with my hitch is plow snow with a back blade. I don't plow backwards anyhow. Driveway is too steep and sliding backwards down it I've already tried a few times with my Massey with chains and I decided against anymore of that. I have no cross piece between the hitch arms, just chains. I guess if it snows anymore I'll give it a shot and see whats happens. Just looking at the hitch arrangement, I agree it doesn't look like pushing is a strong suit. I am goling to need stuff, but I have to do things a little at a time.
|
|
DennyS
Bronze Level
Joined: 08 Feb 2012
Location: Savona,NY
Points: 26
|
Post Options
Thanks(0)
Quote Reply
Posted: 10 Feb 2012 at 10:16pm |
|
I guess I should have looked at the back of this tractor a little closer before I jumped. The stabilizer bar that I'm missing mentioned in an earlier post. Can someone send me a picture and are they still available anywhere ? I don't plan on doing any heavy farm work with this, just a little driveway grading and snow plowing. I see by the other drawings that the chains are attached at the wrong point on the arms. The tractors saving grace is new tires and engine is very strong, Director works as it should and although 3 gear is somewhat noisy it doen't pop out in high or low.Someday I'd love to put a loader on it,even a trip bucket would work for me.Had a Freeman Trip loader om my 50 and althought it greatly added to the steering effort, it would move alot of snow.And once you got the hang of it you could move dirt and grade with it. And I checked,it is 12V Pos grounnd. no problem for me.I'm gonna need a tach and I'm sure drivecable.Haven't checked distributor yet. Gas guage doesn''t work. Are they just a mechanical float arm off the back of the guage or electrical ? Temp guage doesn't work,Amp guage wiggles but stays at 12 oclock.Hoorah Oil pressure guage does work. And who sells PappY steps for a D. It's big step for an old fat guy. Oh and yes a creme steering wheel and a new seat bushing kit.Oh and a seat cover for my cold hard metal pan. I guess I have to learn a whole new tractor. Almost forgot two little lever handles for up down lever and traction booster lever. Oh and lights, The list goes on and on......
|
|
Orange Blood
Orange Level
Joined: 29 Nov 2010
Location: ColoradoSprings
Points: 4053
|
Post Options
Thanks(0)
Quote Reply
Posted: 11 Feb 2012 at 9:01am |
Go to OKTRACTOR.COM, Jim will get you the parts you need. The gas gauge is a mechanical setup, but the needle is not directly connected to the float shaft, there is a magnetic setup in there, so no fuel seals to worry about. If you are lucky the cork fell of or deteriorated on the end of the swing arm. If not, rust could have killed the gauge. With well under a half a tank of fuel pull the gauge and see what you have. They are available new, not the same face, but new for around $99. Amp gauge may be ok, what you probably need to do is flash the genny, search on here for the procedure. If it has been sitting long with a dead battery, it will need this done. I don't remember who sells the custom steps, but one of the guys on here does, and they are wonderful.
|
|
Still in use:
HD7 WC C CA WD 2-WD45 WD45LP WD45D D14 3-D17 D17LP 2-D19D D19LP 190XTD 190XTLP 720 D21 220 7020 7030 7040 7045 3-7060
Projects: 3-U UC 2-G 2-B 2-C CA 7-WC RC WDLP WF D14 D21 210 7045 N7
|
|
Gary
Orange Level Access
Joined: 13 Sep 2009
Location: Peterborough,On
Points: 5909
|
Post Options
Thanks(0)
Quote Reply
Posted: 11 Feb 2012 at 9:40am |
Dennis I see you are a Newbie to the Allis Forum. Welcome aboard. I would suggest you need this original Allis Manual: and if you are 'mechanically inclined' enough to get in to major repairs: the I & T Shop Service Manual Gary
|
|
SteveM C/IL
Orange Level Access
Joined: 12 Sep 2009
Location: Shelbyville IL
Points: 8729
|
Post Options
Thanks(0)
Quote Reply
Posted: 11 Feb 2012 at 10:40am |
|
Don't waste $ on I&T manuals. Get the real thing
|
|
DennyS
Bronze Level
Joined: 08 Feb 2012
Location: Savona,NY
Points: 26
|
Post Options
Thanks(0)
Quote Reply
Posted: 18 Feb 2012 at 6:20pm |
Progress, Welded new ends on the three point arms. All new bolts and springs on the snaps. Hooked up the back blade, Liftworks good
but chatters a little,oil Full,Holds like it should. Did learn that it needs to warm up a few minutes before I attempt to pull my driveway. If not it dies as soon as I hit the steep part. Warmed up it's fine. Changed out the trans oil, crap looked like runny driveway sealer. Of course now that it's full I got an axle seal leaking. I had a feeling that it wasn't charging even though I don't trust old gauges. Tester on Battery, No charge. Of course when it was barnyard painted every wire actually everything has a thick coat of orange on it. Tractor sat for a year and a half and battery was almost flat. So what's the easiest test to see what's not working? What exactly is "Genny Flashing" I guess I'll take one thing at a time. Need a seat bushing kit, Steering wheel,Gauges, Etc Etc. But it starts and runs great and doesn't jump out of anything.
|
|
DaveKamp
Orange Level Access
Joined: 12 Apr 2010
Location: LeClaire, Ia
Points: 6108
|
Post Options
Thanks(0)
Quote Reply
Posted: 19 Feb 2012 at 1:06pm |
|
Hi Denny-
Stock for yours would be a 12-volt system, positive ground, but don't be surprised if someone swapped it to negative. No problem there.
Take off the right side cover panel (under gas tank) and pull the two screws holding the voltage regulator cover in place. Put a voltmeter on the battery, write down voltage, start the engine at low idle, check voltage. Bring it up to full governed speed, and watch the voltmeter... and get an idea of where the voltage changes occur.
If the voltage doesn't change, tap on the side of the regulator a little with a screwdriver handle, and watch... if it starts indicating a charging voltage, let it work for a bit. If it doesn't respond, tap on each of the armature bars and see if it responds. If it does, it just needs to have the contacts cleaned a smidgen, and put out to work a bit.
If not, you can flash it by jumping across two terminals on the left side. OTH I don't remember which two, but I'm sure someone here will jump in with the right terminal ID soon.
Oh... and lightly tap on the back-end of the generator... a little vibration frequently releases a stuck brush!
|
|
Travis(NE)
Silver Level
Joined: 24 Sep 2009
Location: Seward NE
Points: 300
|
Post Options
Thanks(0)
Quote Reply
Posted: 19 Feb 2012 at 3:27pm |
|
If I remember right you "feed the fields" to polarize the generator and regulator to let them know which way to charge. That means you touch battery voltage to the field side of the generator or regulator. The field side of the generator is stamped with an F while the armature side has an A. One way to check the generator is to take the belt loose and then feed the field which should make the generator "motor" or try to turn. Sometimes the pulley needs some help to get it going, but if it fights you or try's to turn that is a good sign it should work. Another way to test the generator is to ground out or "full field" it while it is running which will make it charge at full capacity. Do not do this for to long cause it can burn the generator up.
All that said I would replace the generator with a Delco 10si alternator and make it a 12volt negative ground system. You will thank yourself in the long run.
|
|
DaveKamp
Orange Level Access
Joined: 12 Apr 2010
Location: LeClaire, Ia
Points: 6108
|
Post Options
Thanks(0)
Quote Reply
Posted: 19 Feb 2012 at 4:46pm |
|
I don't recall which type is used on which machines ('cause I've worked on too many), but SOME fields are grounded at the 'far end' (opposite the terminal) and some are 'sourced'. On a grounded far-end, the regulator flows battery current TO the terminal. On a 'sourced' far end, the regulator simply manages current to ground.
The Delco-Remy generator and regulator systems cover both circuits (iirc they call them 'a-circuit' and 'b-circuit'), as well has include a full description of how each work, how to test, and adjust for proper operation.
The 10SI, or other alternators DO work nicely, and converting the tractor to positive-ground isn't a difficult task (makes it harder to mess up when a battery-charger or jumper cables are involved), but the one-wire installation will frequently result in a non-charging situation if the engine isn't throttled up... the one-wire uses residual magnetism to initiate excitation, and it takes a good spin-up in order to start charging. Setting them up for external excitation solves that issue nicely.
The generator system does work fine, just keep in mind that it wasn't intended to run a competition stereo system or electric snowblade, nor was it intended to be left for want of routine preventive maintenance like giving it a drop of oil every few months, checking the brushes, and an occasional cleaning and adjustment of the regulator contacts.
|
|


