| Author |
 Topic Search Topic Search  Topic Options Topic Options
|
calico190xt68 
Orange Level


Joined: 12 Jan 2017
Location: Frankton, IN
Points: 903
|
 Post Options Post Options
") Thanks(0) Thanks(0)
 Quote Quote  Reply Reply
 Topic: 7010 Clutch Cable Adjustment Topic: 7010 Clutch Cable Adjustment
Posted: 28 Apr 2025 at 6:56am |
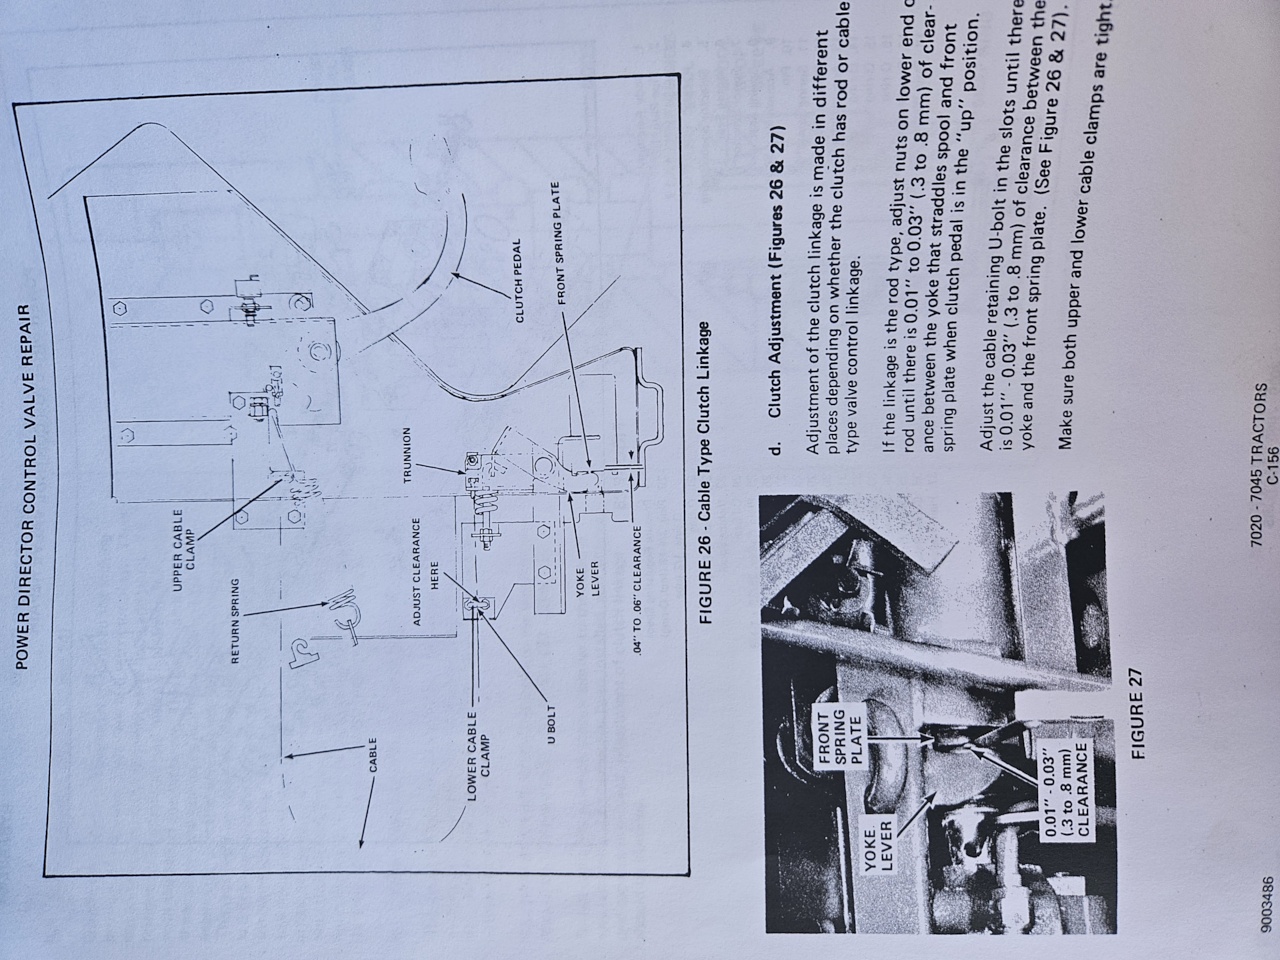
I have been having some trouble shifting 1 through 4 gears. I have a 16 speed not a 20 speed Power Director. I had the bolt break that holds the upper cable eyebolt to the clutch pedal. I had to push the pedal all the way to the floor and then it would shift without grinding gears. After doing this repeatedly though, I think this is what broke the bolt holding the clutch cable to the pedal. I took off the side panels and have access to replace the bolt. I put a test bolt into place before replacing everything and decided to screw in the upper eyebolt thinking that might improve shifting. Did a test shift and it won't go into gear now without grinding. I screwed it out but I don't have many threads left to make it long enough to make it shift without grinding. My guess is that the eyebolt screw was bent, before it broke and was allowing the shifting to happen. Now that I have a straight bolt, it doesn't have the necessary play but only a guess.
I read the manual and it only has one sentence about adjusting the cable in an obscure place. It shows doing that on the lower cable clamp and mentions a clearance of .01 inches - .03 inches. That's not very much clearance. I am going to play around with the lower cable clamp and see if I can get anything to change. Doesn't mention adjusting either the upper or the lower eyebolt lengths which surprised me. However, the adjustment I made on the upper eyebolt didn't change anything. Nothing has changed on this over the years other than this bolt breaking as far as I know. Is it possible that the cable is bad? How common is that? I can remove both ends of the cable and see if it moves back and forth freely to see if the cable is sticking as another test.
Anyone have experience adjusting the clutch pedal? Any help is appreciated.
Here is the page I found. Is there a reference somewhere else?
|
|
80 7010, 80 7020, 68 190XTD, 67 190XTD, 500 Loader, AC 2000 Plow, Member Indiana A-C Partners, Member TAC
|
 |
|
Sponsored Links
|
|
|
DrAllis
Orange Level Access
Joined: 12 Sep 2009
Points: 22770
|
Post Options
Thanks(0)
Quote Reply
Posted: 28 Apr 2025 at 7:09am |
|
Ignore the books numbers. Make it ZERO clearance. Bolt must be grade 8 with a lock nut !! Spray WD40 all over that area so things move freely !! But, first of all, REPLACE the two bushings on the fork pivot. The inside one is broken. Then WD40 all over and down inside your shift lever T-handle.
|
|
AC7060IL
Orange Level
Joined: 19 Aug 2012
Location: central IL
Points: 3662
|
Post Options
Thanks(0)
Quote Reply
Posted: 28 Apr 2025 at 8:35am |
Replace your 7010’s “original stretched” clutch cable with a new one from Bunker Hill Cable. Here’s their weblink. https://bunkerhillcables.com/clutch-pedal-cable-replaces-allis-chalmers-70269446/These 45+ year old AC clutch cables will stretch resulting in poor shifting / gear grinding. Little by little it becomes more pronounced, then an engine shutoff is only way to not grind gears for shift. If continued, then someday the cable completely snaps apart.
|
|
DrAllis
Orange Level Access
Joined: 12 Sep 2009
Points: 22770
|
Post Options
Thanks(0)
Quote Reply
Posted: 28 Apr 2025 at 9:08am |
|
If you still have an original cable, you won't believe how much easier the pedal will push with a new cable.
|
|
calico190xt68
Orange Level
Joined: 12 Jan 2017
Location: Frankton, IN
Points: 903
|
Post Options
Thanks(0)
Quote Reply
Posted: 28 Apr 2025 at 9:16am |
 DrAllis wrote: DrAllis wrote:
Ignore the books numbers. Make it ZERO clearance. Bolt must be grade 8 with a lock nut !! Spray WD40 all over that area so things move freely !! But, first of all, REPLACE the two bushings on the fork pivot. The inside one is broken. Then WD40 all over and down inside your shift lever T-handle. |
I did use a grade 8 with a lock nut to get the tractor out of the field. I have to shift it while it is off to get it into gear. I looked and I see zero clearance right now.
So, it must be the bushings in the fork pivot?
Turns out I do have a fairly new cable. It has an agco part number tag on it which means it is new. My son said it got replaced over a year ago while at an agco dealer who was fixing the steering. I am guessing that replacement wasn't done correctly or there is another issue.
Where exactly are the shift fork bushings? I looked up "fork" in Agco parts book and I don't see any bushings around the shift forks in the diagram.
|
|
80 7010, 80 7020, 68 190XTD, 67 190XTD, 500 Loader, AC 2000 Plow, Member Indiana A-C Partners, Member TAC
|
|
DrAllis
Orange Level Access
Joined: 12 Sep 2009
Points: 22770
|
Post Options
Thanks(0)
Quote Reply
Posted: 28 Apr 2025 at 11:10am |
|
Page 272 in AGCO parts book for a 7010........two- 70269529 bushings. Always replace with new ones whenever a cable is replaced and sometimes more often than that.
|
|
calico190xt68
Orange Level
Joined: 12 Jan 2017
Location: Frankton, IN
Points: 903
|
Post Options
Thanks(0)
Quote Reply
Posted: 28 Apr 2025 at 1:05pm |
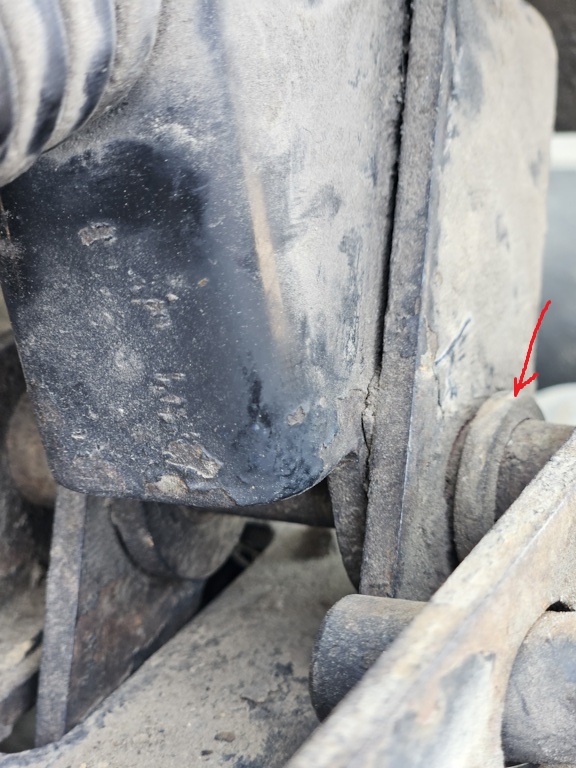
Thanks for the part number and I do see those bushings. Those bushings look like they are there. See pictures below but I will take it apart and check them out.
I did loosen the cable clamps and also unscrew the tie rod end out on the lower cable end, then moved the cable clamp back, but it didn't matter.
So far, adjusting cable and clamp has NOT worked. I can try to go shorter on the cable. To me, it would need to be longer to allow the clutch to engage sooner though. That's why I thought it would be good to extend the lower tie rod end.
The issue is that prior to the break in the bolt, I had to push the clutch pedal all the way to the floor to get it to shift without grinding. Now I can't even do that.
That fork with the bushings via a spring causes a small rod to pull out of the hydraulic manifold. It is almost like that small rod isn't coming out far enough? Not sure how to make that happen. There are spings that can be tightened or lossen to do that?
If I take it loose to inspect the bushings, could I pull out on the rod and see how far it comes as a test?
Here is what I see:
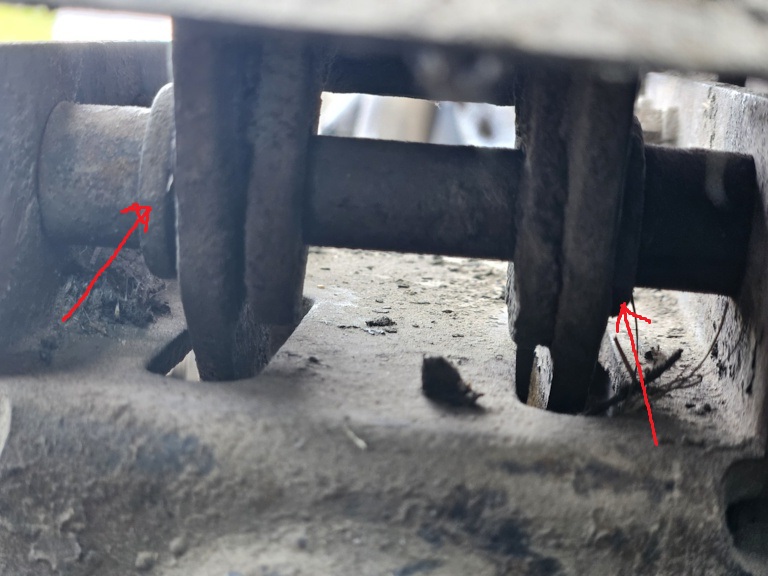
Another view showing the bushings. I suppose they could be worn down on the inside. I will remove.
|
|
80 7010, 80 7020, 68 190XTD, 67 190XTD, 500 Loader, AC 2000 Plow, Member Indiana A-C Partners, Member TAC
|
|
DrAllis
Orange Level Access
Joined: 12 Sep 2009
Points: 22770
|
Post Options
Thanks(0)
Quote Reply
Posted: 28 Apr 2025 at 1:11pm |
|
Zero clearance where you are measuring it will give you the BEST transmission brake. You must go to the bottom with the pedal to fully apply the trans brake. Make the cable shorter not longer.
|
|
calico190xt68
Orange Level
Joined: 12 Jan 2017
Location: Frankton, IN
Points: 903
|
Post Options
Thanks(0)
Quote Reply
Posted: 28 Apr 2025 at 3:13pm |
I took it all loose and decided to test the cable. This cable does not pull all the way through from end to end to the threads. I think it should. When I bought the bunker hill cables for the range shift it seemed they went from end to end. This cable stops about an inch from the threads on one end. The other end goes about to the threads. I think it should go to the threads on each end? I will shorten the cable and see what happens.
I may go to Agco and get another one and see if it does the same thing. I can return it to them if it doesn't work. Not sure what else to adjust or fix. at this stage.
I will shorten everything and see if it matters.
|
|
80 7010, 80 7020, 68 190XTD, 67 190XTD, 500 Loader, AC 2000 Plow, Member Indiana A-C Partners, Member TAC
|
|
DrAllis
Orange Level Access
Joined: 12 Sep 2009
Points: 22770
|
Post Options
Thanks(0)
Quote Reply
Posted: 28 Apr 2025 at 3:52pm |
|
Screw the ball sockets on as far as they will go. Leave the lower cable casing U-clamp a little loose. Pull the cable casing FORWARD towards the radiator as far as you can pull it. Tighten the U-clamp. There should be ZERO gap at the end of the fork tips. If you are close, but not quite there, whack off the cable ends a little to get the ball socket to go on farther. Oil everything.
Edited by DrAllis - 28 Apr 2025 at 3:54pm
|
|
calico190xt68
Orange Level
Joined: 12 Jan 2017
Location: Frankton, IN
Points: 903
|
Post Options
Thanks(0)
Quote Reply
Posted: 28 Apr 2025 at 8:49pm |
|
Pulling that cable forward is a challenge as a one man show but i will prevail. I found out my agco dealer has this cable in stock so I may stop by and compare. I still think this cable isn't right.
|
|
80 7010, 80 7020, 68 190XTD, 67 190XTD, 500 Loader, AC 2000 Plow, Member Indiana A-C Partners, Member TAC
|
|
calico190xt68
Orange Level
Joined: 12 Jan 2017
Location: Frankton, IN
Points: 903
|
Post Options
Thanks(0)
Quote Reply
Posted: 29 Apr 2025 at 11:26am |
It is fixed. It was the cable. I went to my local Agco dealer and asked them to lookup the fix they did for me last year and it turns out they did not replace the clutch cable. It must have been before I owned it. It does have an agco sticker on it so it isn't original. It also so happened the dealer had a cable in stock. It looks a lot like a Bunker Hill cable as it has the purple casing on it and a Bunker Hill part number. I could have saved some money ordering from Bunker Hill but I needed it today. When I tested it in the store, it went easily from threads to threads. Mine wouldn't budge to the end as mentioned before.
The bolt breaking was actually a good thing because it caused me to dig into the bad shifting and fix this cable. I replaced with Grade 8 Bolt and locking nut but with the clutch working so much easier now, I doubt I would break a lower grade bolt. I did screw the eyebolts all the way in and pull back on the cable to seat it in the u bolt as Dr Allis suggested. There is no gap.
I have to do a test drive on the transmission brake to make sure it works as expected as soon as it stops raining. I was able to shift all gears without grinding while the engine was running. The clutch is so much easier to push in now too. Super happy to get this fixed!
Thanks for all who jumped in. While I have the side panels off am going to replace the temp/gas gauge too.
Edited by calico190xt68 - 29 Apr 2025 at 11:29am
|
|
80 7010, 80 7020, 68 190XTD, 67 190XTD, 500 Loader, AC 2000 Plow, Member Indiana A-C Partners, Member TAC
|
|