| Author |
 Topic Search Topic Search  Topic Options Topic Options
|
Reindeer 
Orange Level

Joined: 14 Sep 2009
Location: Calgary, AB
Points: 650
|
 Post Options Post Options
") Thanks(0) Thanks(0)
 Quote Quote  Reply Reply
 Topic: D15 project Topic: D15 project
Posted: 13 Dec 2017 at 4:10pm |
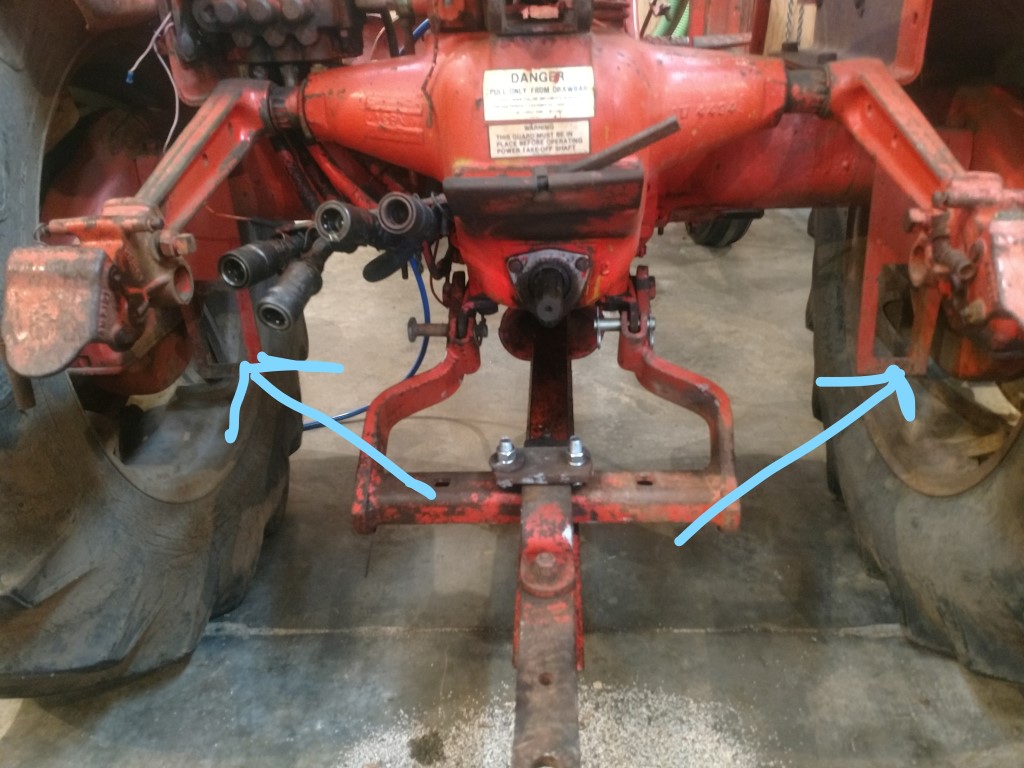
So I have my recently acquired D15 S2 in the shop, and have been messing around getting familiar with it. New plugs, points, condesor, etc, took the carb apart twice, just for practice, and to get it to run right of course. Drained the fuel tank in between and got the last bit of loose stuff out of it. All that seems to be OK. I notice that there appear to be loader mounts hanging off the back axles. I am planning to put a 3 pt conversion on the tractor, and normally there is no anti sway with the dogleg drawbar bail. The idea crossed my mind that with some adapting one might be able to get a chain and turnbuckle onto the these loader mounts, at about the same axis as the front of the lift arms. Then attach the other end to the lift arms take up side shift in the 3 point. I don't like the bush hog swinging from side to side freely. Pretty hard on the 3 pt, and everything else. Any thoughts, comments, suggestions? Anyone done anything like this?
Edited by Reindeer - 13 Dec 2017 at 5:47pm
|
|
|
 |
|
Sponsored Links
|
|
|
copyrite1972
Orange Level

Joined: 26 Feb 2016
Location: idaho
Points: 331
|
Post Options
Thanks(0)
Quote Reply
Posted: 13 Dec 2017 at 5:41pm |
I think you have a good idea! LOOK AT ALL THOSE REMOTES!!!!  Wish mine was set up like that!  |
|
D15 Series II
|
|
Reindeer
Orange Level
Joined: 14 Sep 2009
Location: Calgary, AB
Points: 650
|
Post Options
Thanks(0)
Quote Reply
Posted: 13 Dec 2017 at 5:44pm |
|
The remote hydraulic connections are a project as well. Have to come up with a way to support them better, as they have just about pulled the PTO shield into a pretzel.
Anyone have a good idea on how to support them, without interfering with everything else going on at the back of the tractor? Pictures please if you have made a working support.
Edited by Reindeer - 13 Dec 2017 at 5:46pm
|
|
|
|
wfmurray
Orange Level
Joined: 13 Sep 2009
Location: Bostic NC
Points: 1225
|
Post Options
Thanks(0)
Quote Reply
Posted: 13 Dec 2017 at 6:40pm |
Pivot points will all need to be inline to keep length from changing when raising and lowering.Looks like it could be a stable set up.
|
|
TimNearFortWorth
Orange Level

Joined: 12 Dec 2009
Points: 2014
|
Post Options
Thanks(0)
Quote Reply
Posted: 13 Dec 2017 at 6:50pm |
Do yourself a favor and pull the loader brackets off and save them vs. retrofitting an anti- sway device. Your best bet is an OEM 3-pt. adaptor that was an option for the tractor. Even without the center sliding support, sway is far less than you might imagine with only the top light duty sway control that mounts on the bail supports where the drawbar usually mounts (small chains for each side). The uprights on the adaptor that latch into each claw are made to allow side to side "swing" to an extent. I have run a heavy Bush Hog 6' unit for years on a D15II, just check the bushing spacers at the swivel points as they will oblong out over time. There has been posts showing the OEM adaptors and they are out there if you look around. I swapped back over to my 3-pt. adaptor just this afternoon as I had been pulling a trailer with a ball in the drawbar the last two weeks clearing limbs. Rarely do I use the drawbar and I have an aluminum bread cart to drop/store my 3-pt. adaptor when I use the SC blade or drawbar. Bread cart works nice as just the right height, adaptor off or on in 2-3 minutes for an old man. BTW, if that unit has the OEM multi-spool hydraulic valves, it is pretty rare. Additional single spool units are not that common either but the multi-spool is far less common from what I have seen over the years.
|
|
Reindeer
Orange Level
Joined: 14 Sep 2009
Location: Calgary, AB
Points: 650
|
Post Options
Thanks(0)
Quote Reply
Posted: 14 Dec 2017 at 5:52pm |
I would be very happy to find an OEM AC adapter, as Tim suggests. Unfortunately, this area is fairly thin for AC equipment, and it commands quite a premium. Snap coupler 3 btm plow advertised for 600$ Canadian, about 500 US. Did not last long. And the supply is pretty limited. Most tractors here were used with drawbars, and trail type implements.
I took a pic of the hydraulic controls and connections. Looks a lot like the valves on my 170. Except for the single acting coupler next the seat. No idea how common this many valves were, but given there was a loader on this tractor at some point, probably was bought with it. I ordered a owners manual for the tractor but have not received it yet. Would be interesting to see what every thing does. The lever next the seat is for the snap coupler, and the next two levers are for the remote quick couplers, but next the fender is a peculiar looking "valve". Perhaps a diverter for the remote single acting cylinder?
Edited by Reindeer - 14 Dec 2017 at 6:01pm
|
|
|
|
DiyDave
Orange Level Access

Joined: 11 Sep 2009
Location: Gambrills, MD
Points: 54118
|
Post Options
Thanks(0)
Quote Reply
Posted: 14 Dec 2017 at 6:25pm |
From what I see I'd take a piece of 1x1 angle, and mount the remotes to the PTO guards bolts. Of course, the thicker the angle, the better, and you'll have to notch a leg off, to mount the PTO guard.
Also, don't use that upper 3 point bracket, welded to the seat bracket, unless you want a toplink enema... Most of the good 3PH kits come with a 1/2" thick toplink bracket, that bolts under the seat bracket, in the same holes...
|
|
Reindeer
Orange Level
Joined: 14 Sep 2009
Location: Calgary, AB
Points: 650
|
Post Options
Thanks(0)
Quote Reply
Posted: 14 Dec 2017 at 11:08pm |
|
I had a look at the seat bracket with the 3 pt center link and came to the same conclusion. Cut it off. Already bought one of the heavy adapters that bolt under the seat, just waiting for it to get here. I'm thinking that the new center link bracket that will be put on might be the better attachment for the hydraulic quick connectors.
The PTO guard has taken a beating already from the quick connects. Will get it straightened out. May use the bolts as the attachment for the quick connect angle iron support as opposed to the bracket itself if I don't come off the center link bracket.
Dug through the service manual and found a good explanation for the hydraulic controls. Still will have to hook up a cylinder and experiment to clarify exactly how the transport valve works. That is the one closest to the seat. Somehow limited to 1000 PSI and allows the cylinder to work at the low pressure but defaults to the Snap Coupler as soon as the pressure is above 1000 PSI?
Edited by Reindeer - 14 Dec 2017 at 11:13pm
|
|
|
|
jaybmiller
Orange Level Access
Joined: 12 Sep 2009
Location: Greensville,Ont
Points: 24693
|
Post Options
Thanks(0)
Quote Reply
Posted: 15 Dec 2017 at 6:41am |
|
I have the same loader mounts, took them off and the rest of the loader( looking for 'good farm) or higher scrap $$. I have 3 3pt adapters, one is a bodged unit. I bolted them onto my 3pt implements. Have a real( OK..CNC clone) top link bracket sitting here can take dimns/pix if wanted. too bad you're 2 provinces away, shipping is a killer,sigh.
I made a snap coupler 'carryall' ( frame that can hold forklift forks) with a 2" receiver so I never use drawbars anymore... SC stuff is easier to mount !!
Jay
|
|
3 D-14s,A-C forklift, B-112
Kubota BX23S lil' TOOT( The Other Orange Tractor)
Never burn your bridges, unless you can walk on water
|
|
Reindeer
Orange Level
Joined: 14 Sep 2009
Location: Calgary, AB
Points: 650
|
Post Options
Thanks(0)
Quote Reply
Posted: 15 Dec 2017 at 1:26pm |
|
Thanks Jay. I have one of the top link brackets on the way from Tony Carbaugh, just need to get it here, and I will be taking the seat off and putting it on. The seat bushings are shot as well, so those are part of the project. Should keep me busy most of the winter if I don't slack off to much. This getting up with nothing to do, and going to bed with it half done (retirement) is pretty seductive...:)
|
|
|
|
Jim Hancock
Orange Level

Joined: 11 Sep 2009
Location: EL Reno, Ok.
Points: 1112
|
Post Options
Thanks(0)
Quote Reply
Posted: 15 Dec 2017 at 2:16pm |
Who upgraded their D15 to a Series 3? He has good pics of the way he mounted his remotes and the whole rear of the tractor.
|
|
How blessed we are by HIS GRACE!
|
|
Reindeer
Orange Level
Joined: 14 Sep 2009
Location: Calgary, AB
Points: 650
|
Post Options
Thanks(0)
Quote Reply
Posted: 15 Dec 2017 at 3:04pm |
|
Everything came with the tractor when I bought it. Its my winters project, so just sizing up what I have and coming to terms with what I want to do with it. No shortage of improvements to be made, but still a fairly straight tractor, runs good, no gear jumping, power director snaps in and out just fine. It sat outside on a pasture property and was used to pound fence posts and make a bit of hay, so most repairs were of the quick and superficial nature. Lots of grease, oil, and general TLC required. The brake cross shaft is not quite seized but as close as you can get. Takes about all my horse power to get the left brake pedal to move.
Have a large number of parts on the way, so hoping to have them before Christmas. Then I can get into attack mode.
|
|
|
|