| Author |
 Topic Search Topic Search  Topic Options Topic Options
|
HVFDFIREFIGHTER 
Orange Level


Joined: 11 Jun 2013
Location: Heuvelton, NY
Points: 563
|
 Post Options Post Options
") Thanks(0) Thanks(0)
 Quote Quote  Reply Reply
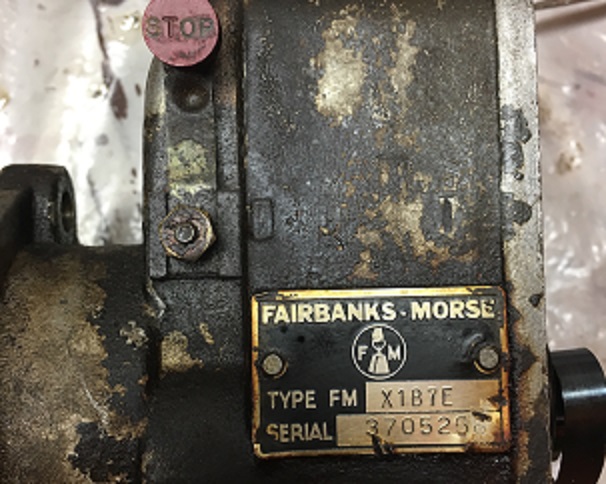
 Topic: Fairbanks Morse magneto FMX1B7E Topic: Fairbanks Morse magneto FMX1B7E
Posted: 27 Jun 2017 at 12:56pm |
|
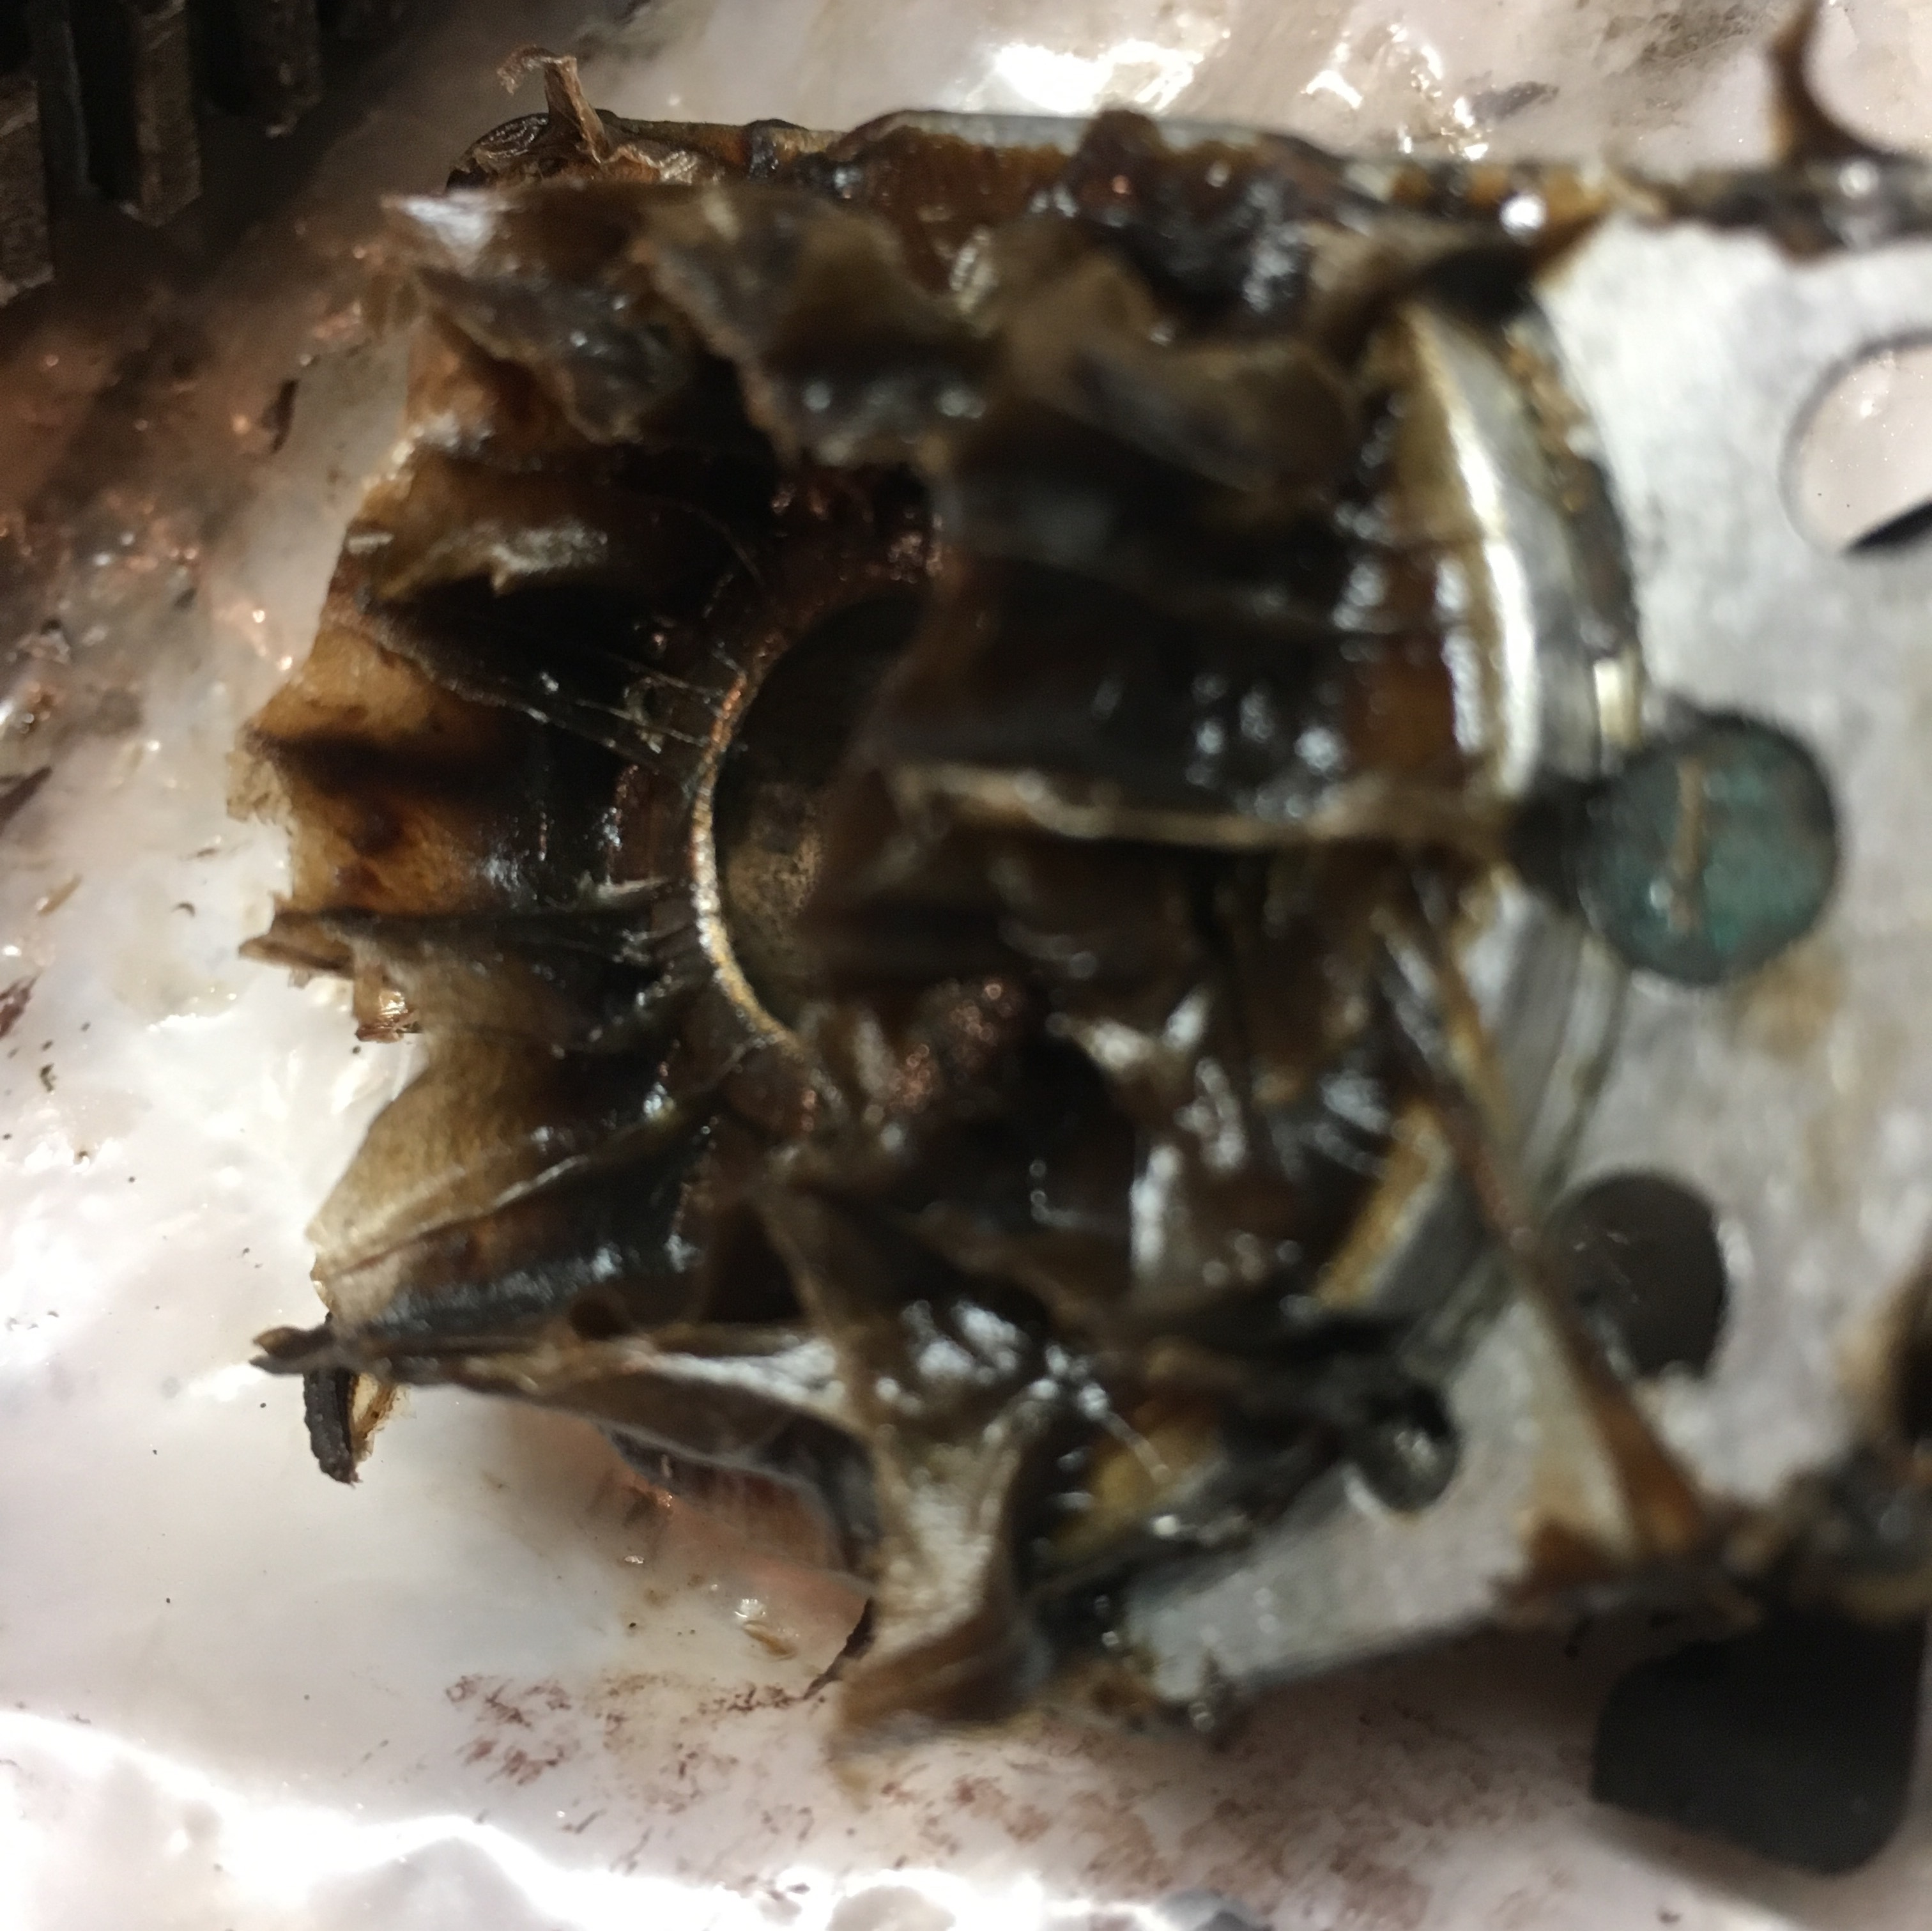
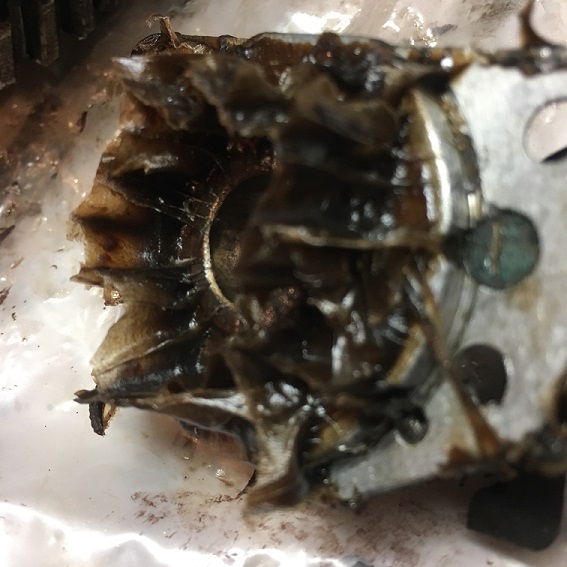
I have a Wisconsin AEN engine that appeared to be stuck. Did a little more work on the engine this morning. Took the mag off. Now the engine turns freely but I can't turn the mag. Took the mag apart and it is full of a tar like substance. It is all over everything. I am soaking it in gas to try to get it dissolved. Not sure why it is in there in the first place. Does anyone know where I can get a Fairbanks Morse FMX1B7E rebuilt? I am sure I will not remember how to put it back together. I hate to buy replacement. Only paid $25 for the engine and it was running about 5 years ago. I can see how over time the gooey substance has worked its way down to the bottom of the mag and literally "gummed up the works".
Any help would be appereciated.
|
 |
|
Sponsored Links
|
|
|
HVFDFIREFIGHTER
Orange Level
Joined: 11 Jun 2013
Location: Heuvelton, NY
Points: 563
|
Post Options
Thanks(0)
Quote Reply
Posted: 27 Jun 2017 at 12:58pm |
|
I have pictures in my phone but the website says they are to big. I will post them later today.
|
|
HVFDFIREFIGHTER
Orange Level
Joined: 11 Jun 2013
Location: Heuvelton, NY
Points: 563
|
Post Options
Thanks(0)
Quote Reply
Posted: 27 Jun 2017 at 1:07pm |
Edited by HVFDFIREFIGHTER - 27 Jun 2017 at 7:17pm
|
|
Leon n/c AR.
Bronze Level


Joined: 19 Mar 2013
Location: Heber Springs A
Points: 176
|
Post Options
Thanks(0)
Quote Reply
Posted: 27 Jun 2017 at 1:07pm |
|
I would guess that mag has the old style coil with tar in the windings. Check with Steve at B&B see if he can get parts to rebuild that model.
|
|
HVFDFIREFIGHTER
Orange Level
Joined: 11 Jun 2013
Location: Heuvelton, NY
Points: 563
|
Post Options
Thanks(0)
Quote Reply
Posted: 27 Jun 2017 at 1:12pm |
|
|
|
HVFDFIREFIGHTER
Orange Level
Joined: 11 Jun 2013
Location: Heuvelton, NY
Points: 563
|
Post Options
Thanks(0)
Quote Reply
Posted: 27 Jun 2017 at 1:14pm |
|
deleted photo
Edited by HVFDFIREFIGHTER - 27 Jun 2017 at 7:29pm
|
|
VTdirtguy
Bronze Level

Joined: 04 May 2017
Location: Vermont
Points: 18
|
Post Options
Thanks(1)
Quote Reply
Posted: 27 Jun 2017 at 2:05pm |
Here, I think I fixed them for you! 
|
|
Grampa's old C got a whole new lease on life.
|
|
HVFDFIREFIGHTER
Orange Level
Joined: 11 Jun 2013
Location: Heuvelton, NY
Points: 563
|
Post Options
Thanks(0)
Quote Reply
Posted: 27 Jun 2017 at 6:19pm |
|
OK. I got it all cleaned up. Does anyone know how the wires go on? Does this picture look right? Black wire to bottom black wire from condenser to bottom, red wire from coil to screw beside condenser. What should the gap be set at? What is the two pieces of felt for?
|
|
HVFDFIREFIGHTER
Orange Level
Joined: 11 Jun 2013
Location: Heuvelton, NY
Points: 563
|
Post Options
Thanks(0)
Quote Reply
Posted: 27 Jun 2017 at 6:20pm |
|
deleted photo
Edited by HVFDFIREFIGHTER - 27 Jun 2017 at 7:27pm
|
|
HVFDFIREFIGHTER
Orange Level
Joined: 11 Jun 2013
Location: Heuvelton, NY
Points: 563
|
Post Options
Thanks(0)
Quote Reply
Posted: 27 Jun 2017 at 6:23pm |
|
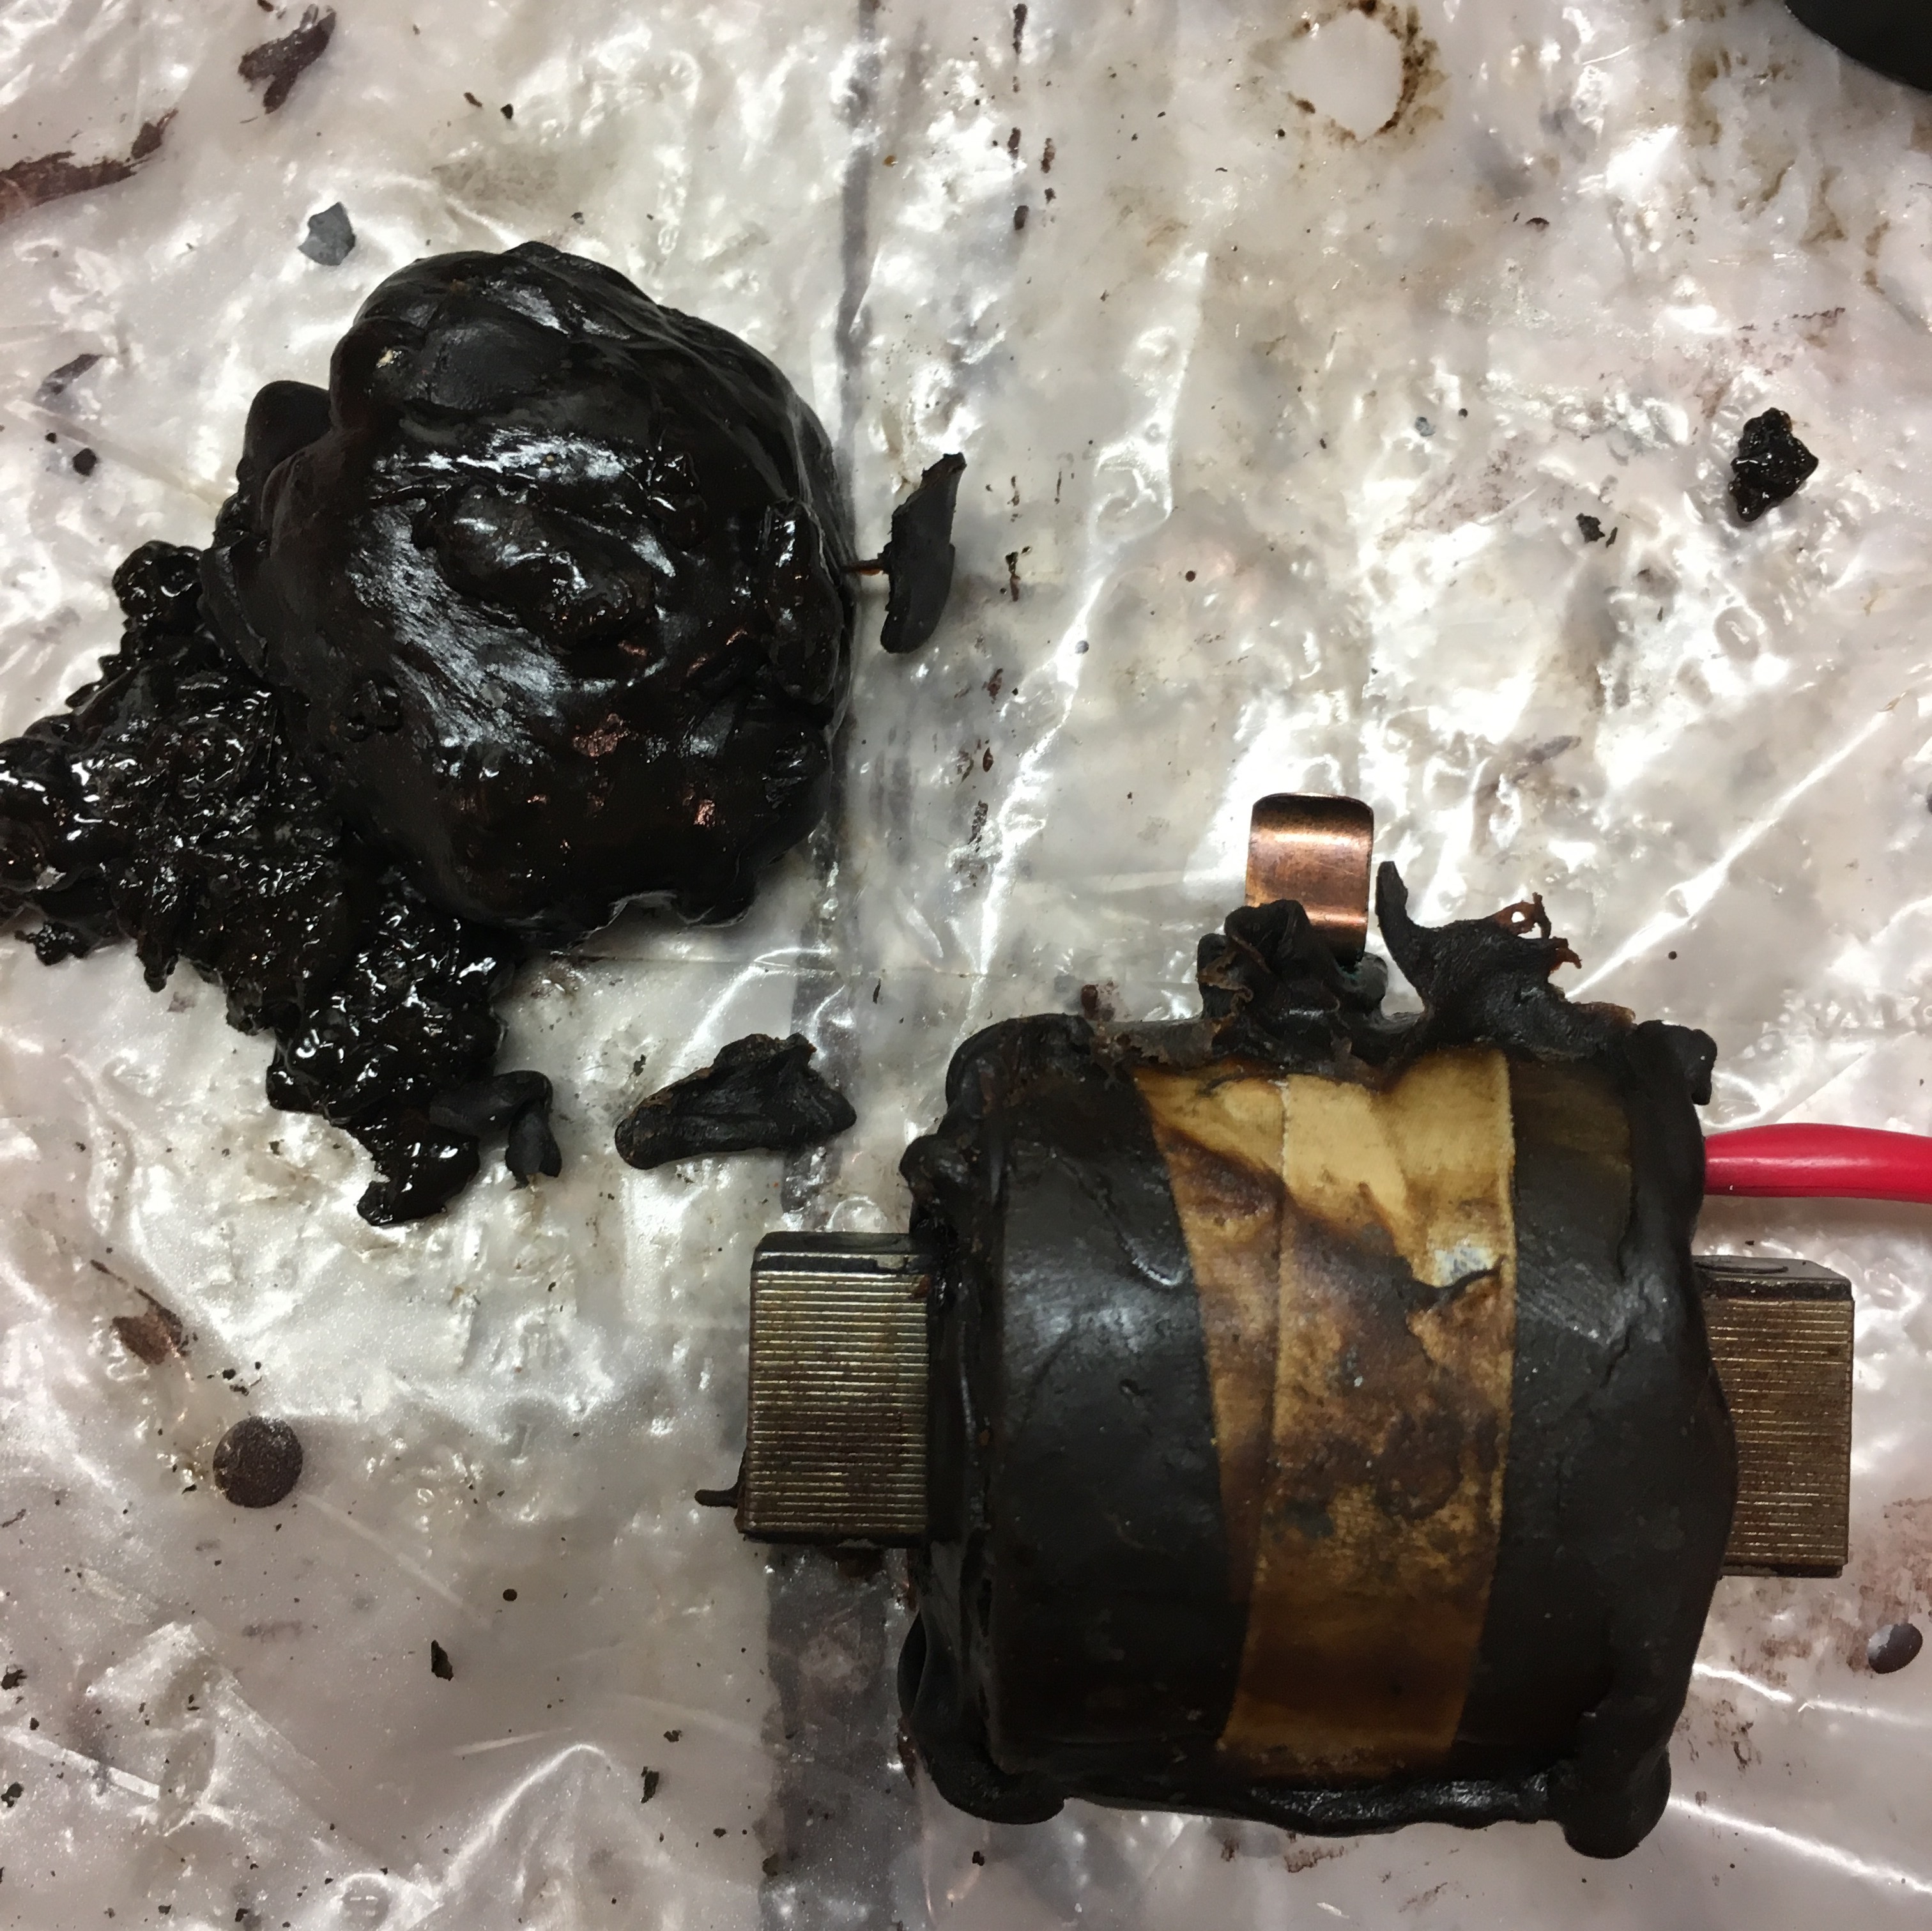
I removed all the tar. Wrapped the coil in tape. I really don't see how on earth this will work. I had it completely apart. I just don't have faith in my skills.
|
|
Matt (Jordan,MN)
Orange Level
Joined: 12 Sep 2009
Location: Jordan, MN
Points: 3812
|
Post Options
Thanks(1)
Quote Reply
Posted: 27 Jun 2017 at 6:29pm |
|
All 3 wires go under the screw for the points. The felt on the right is a oil wick. the one on the points acts as a shield so the point contact doesn't get full of oil. I have never seen a coil leak that bad before. I sure the coil will need to be replaced. I can rebuild it. Matt
|
|
Owner of Matt Scott LLC
Specializing in NOS and used Allis Chalmers tractor & implement parts & liturature and Magneto Repair
http://www.mattscottllc.com/
|
|
Bill Long
Orange Level
Joined: 12 Sep 2009
Location: Bel Air, MD
Points: 4556
|
Post Options
Thanks(0)
Quote Reply
Posted: 27 Jun 2017 at 8:42pm |
Steve NJ is our resident expert and a sponsor of this site. You may want to contact him for a rebuild or any other information. Good Luck! Bill Long PS There may be other sponsors closer to you - Sandy Lake for one
|
|
Hubert (Ga)engine7
Orange Level

Joined: 12 Sep 2009
Location: Jackson Cnty,GA
Points: 6554
|
Post Options
Thanks(0)
Quote Reply
Posted: 27 Jun 2017 at 9:07pm |
|
I highly recommend Steve in NJ (B&B Custom Circuits). It will be like new when you get it back.
|
|
Just an old country boy saved by the grace of God.
|
|
Gerald J.
Orange Level
Joined: 12 Sep 2009
Location: Hamilton Co, IA
Points: 5636
|
Post Options
Thanks(0)
Quote Reply
Posted: 27 Jun 2017 at 9:34pm |
|
Page 11 of my AEN manual says point gap is 0.015" On that same page it suggests a magneto test. Take the plug wire off the plug and hold the bare connector 1/8" from the engine head bare metal. Turn the crankshaft by hand until the impulse mechanism trips. Should be a good spark at the plug wire. If not it suggests setting the point gap and if that doesn't work change the condenser. I'd think cleaning the points with a point file might also be useful, of course the point gap will have to be readjusted after filing.
This AEN manual includes a 4 page Fairbanks-Morse magneto manual with more details. Filing the points is mentioned there. Among the details are that the cover has a gasket that is held in place with varnish and that when reassembling after working on it and it is proven to work that a new gasket and fresh varnish should be installed.
Gerald J.
|
|
Gerald J.
Orange Level
Joined: 12 Sep 2009
Location: Hamilton Co, IA
Points: 5636
|
Post Options
Thanks(0)
Quote Reply
Posted: 28 Jun 2017 at 9:52pm |
I have scanned that manual section and posted it at: http://www.geraldj.networkiowa.com/Trees/FM-Xmagneto.pdfIt came out huge but is sharp. Gerald J.
|
|
drobCA
Orange Level

Joined: 20 Jun 2017
Location: Perris, CA
Points: 292
|
Post Options
Thanks(0)
Quote Reply
Posted: 29 Jun 2017 at 9:49am |
|
thanks again for yet another great reference piece from the Gerald J. Library.
|
|
HVFDFIREFIGHTER
Orange Level
Joined: 11 Jun 2013
Location: Heuvelton, NY
Points: 563
|
Post Options
Thanks(0)
Quote Reply
Posted: 14 Jul 2017 at 5:42pm |
Thanks to Bill at Sandy Lake Implements. I got a new coil and got it running. Here is the video. https://m.youtube.com/watch?v=1Uw2rOqlGNU&feature=youtu.be
Edited by HVFDFIREFIGHTER - 14 Jul 2017 at 5:44pm
|
|