| Author |
 Topic Search Topic Search  Topic Options Topic Options
|
littlemarv 
Orange Level

Joined: 10 Jun 2013
Location: Wisconsin
Points: 1834
|
 Post Options Post Options
") Thanks(0) Thanks(0)
 Quote Quote  Reply Reply
 Topic: WD hydraulics Topic: WD hydraulics
Posted: 18 Apr 2016 at 8:14pm |
|
Looking at a WD with a hydraulic problem.
I asked about this awhile ago, but got sidetracked for, oh, a few YEARS.
Halfway up the quadrant, you can feel a detent. I am working under the assumption that this is HOLD. As you raise the lever, it should raise the arms in proportion to lever position, right? By that I mean just above the middle detent would raise slow, all the way up would raise fast.
Lowering should work just the opposite.
On the traction booster decal on the battery box, I set it up for the HOLD position.
What I want it to do, is raise, hold, and lower.
O.K., enough rambling. The problem is with the lowering part. Raising works fine, and holding does too. When you move it to lower, there is no "easy does it". When you go below the detent, she goes to full drop and the implement crashes to earth.
Whats the culprit and is it serviceable with the pump in place or do I have to remove the pump?
Thanks in advance.
|
|
The mechanic always wins.
B91131, WC23065, WD89101, CA29479, B1, Early B10, HB212, 416H
|
 |
|
Sponsored Links
|
|
|
Sugarmaker
Orange Level

Joined: 12 Jul 2013
Location: Albion PA
Points: 8627
|
Post Options
Thanks(0)
Quote Reply
Posted: 18 Apr 2016 at 8:25pm |
|
Mine drops like a rock also. That's the WD with the brush hog. Doesn't hold for a darn either. I just haven't gotten around to doing much with it. Will be watching and learning.
Regards,
Chris
|
|
D17 1958 (NFE), WD45 1954 (NFE), WD 1952 (NFE), WD 1950 (WFE), Allis F-40 forklift, Allis CA, Allis D14, Ford Jubilee, Many IH Cub Cadets, 32 Ford Dump, 65 Comet.
|
|
jkoby
Silver Level

Joined: 26 Aug 2014
Location: New Castle, IN
Points: 179
|
Post Options
Thanks(0)
Quote Reply
Posted: 18 Apr 2016 at 9:17pm |
|
I have about 275lbs of weight on my rear blade. After a couple trips across the lot while pulling snow, I can get fairly good with mine to where you don't even hear it touch the concrete.
So, I don't think it is just a wd thing since mine can go slow enough to be a gentle drop. It is really a finesse thing though.
Hold on the other hand doesn't seem to work for me either.
|
|
Allis dave
Orange Level
Joined: 10 May 2012
Location: Northern IN
Points: 3086
|
Post Options
Thanks(0)
Quote Reply
Posted: 19 Apr 2016 at 7:00am |
Was discussed once on here before. Hold position does drop fast. If you set it for traction boost it will act more like a 3-point. You'll get controlled lift and drop. The hold is a little iffy, but hold's a little iffy in hold position sometimes too 
|
|
CTuckerNWIL
Orange Level

Joined: 11 Sep 2009
Location: NW Illinois
Points: 22825
|
Post Options
Thanks(0)
Quote Reply
Posted: 19 Apr 2016 at 7:19am |
I think you should feel fortunate that the hold position works  A lot of em don't after 60 years. On my 45, if I pull it just a bit down from the hold position, I can somewhat control the speed of the drop. It is touchy though.
|
|
|
|
Butch(OH)
Orange Level
Joined: 11 Sep 2009
Location: Lucerne Ohio
Points: 3842
|
Post Options
Thanks(0)
Quote Reply
Posted: 19 Apr 2016 at 7:34am |
As they said that's the way it works, good news is it is fixable for not a whole lot of cash. There are adjustable valves that easily plumb into the cylinder line. First thing you need to do is figure out which of your rockshaft cylinders are plumbed to the hold valve. Depending on how it is plumbed you could have one or both. Usually both are plumbed to hold if you do not have a remote line but if remote was added then it is (again usually) plumbed to the hold port and a rock shaft cylinder is them moved to a non-holding port. Somebody needs to conform this but I think that the front ports are holding ports and the rears are not?? Anyway once that is done you call or order one of these valves from Surplus Center and plumb it in down at the cylinder inlet. They only restrict one way so lifting isn't affected and lowering is adjustable depending on load. http://www.surpluscenter.com/Hydraulics/Hydraulic-Valves/Flow-Control-Valves/1-4-NPT-5-GPM-PRINCE-WFC-400-IN-LINE-FLOW-CONTROL-9-7960-4.axd
|
|
littlemarv
Orange Level
Joined: 10 Jun 2013
Location: Wisconsin
Points: 1834
|
Post Options
Thanks(0)
Quote Reply
Posted: 19 Apr 2016 at 11:20pm |
|
Thanks a lot for the help. I may not get to it until this summer, but those valves may be the way to go....
|
|
The mechanic always wins.
B91131, WC23065, WD89101, CA29479, B1, Early B10, HB212, 416H
|
|
littlemarv
Orange Level
Joined: 10 Jun 2013
Location: Wisconsin
Points: 1834
|
Post Options
Thanks(0)
Quote Reply
Posted: 06 Jun 2016 at 3:25pm |
O.K., got back to the WD. Here is a picture of the pump. I don't have the cylinders hooked up right now, but one was hooked to the elbow pointing down, and the other one was hooked to the REAR port on the opposite side. (You can see the two square headed pipe plugs toward the top of the picture) My first thought is the lines should be straight across from one another? I ordered a couple of those valves, but maybe its as simple as straightening out some hoses and setting up the pump for traction control? Can somebody with a WD nearby look and see where the cylinders are plumbed into the pump? Thanks in advance. 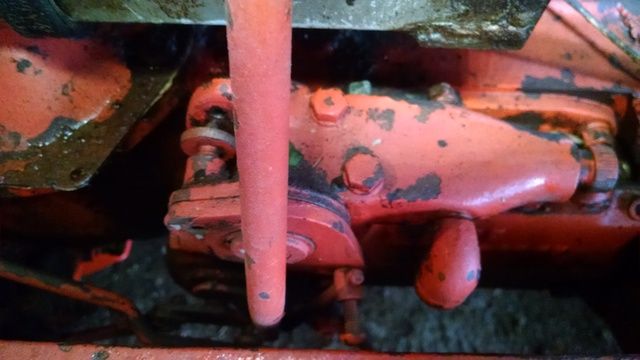
|
|
The mechanic always wins.
B91131, WC23065, WD89101, CA29479, B1, Early B10, HB212, 416H
|
|
CTuckerNWIL
Orange Level
Joined: 11 Sep 2009
Location: NW Illinois
Points: 22825
|
Post Options
Thanks(0)
Quote Reply
Posted: 06 Jun 2016 at 5:05pm |
|
The cylinders were plumbed that way because when you put the cultivator on, the one raise the front first, then the other raises the back. The front drops first and then the back so you can control the cultivator when you get to the end rows without leaving tracks from the back wheels, or plow out corn in the end rows with the back gang.
If you add that restrictor valve, and don't plan on cultivating, hook both line together on one rear port.
Edited by CTuckerNWIL - 06 Jun 2016 at 5:07pm
|
|
|
|
littlemarv
Orange Level
Joined: 10 Jun 2013
Location: Wisconsin
Points: 1834
|
Post Options
Thanks(0)
Quote Reply
Posted: 06 Jun 2016 at 8:30pm |
|
Nope, no cultivating going on here. I mostly use it for snap coupler plow, back blade, and sickle mower, so I'm looking for nice easy lowering.
|
|
The mechanic always wins.
B91131, WC23065, WD89101, CA29479, B1, Early B10, HB212, 416H
|
|
littlemarv
Orange Level
Joined: 10 Jun 2013
Location: Wisconsin
Points: 1834
|
Post Options
Thanks(0)
Quote Reply
Posted: 06 Jun 2016 at 8:45pm |
Here's a picture I took of a WD over at Hutch. The steel line is for the remote ram, and the two cylinder hoses are hooked up the way mine was. 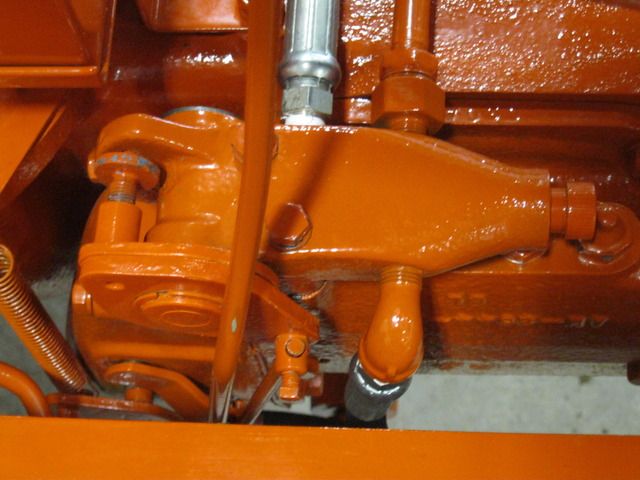
|
|
The mechanic always wins.
B91131, WC23065, WD89101, CA29479, B1, Early B10, HB212, 416H
|
|
allischalmerguy
Orange Level

Joined: 11 Sep 2009
Location: Deep River, IA
Points: 2894
|
Post Options
Thanks(0)
Quote Reply
Posted: 06 Jun 2016 at 9:50pm |
|
My 1950 WD gives me fits at times...the hold does not work...it is either going up a little or down a little...any know how to fix this?
|
|
It is great being a disciple of Jesus! 1950 WD, 1957 D17...retired in Iowa,
|
|
dann
Bronze Level

Joined: 10 Feb 2015
Location: WI 53520
Points: 37
|
Post Options
Thanks(0)
Quote Reply
Posted: 07 Jun 2016 at 1:31pm |
|
If both lines for the cylinders are plumbed to the front port of hyd. valve with a tee you will have better hold and control lift/lowering. I have had issues with holding lift arms up on two different WD'S and solved issue by plumbing cylinders to front hyd port.
|
|
allischalmerguy
Orange Level
Joined: 11 Sep 2009
Location: Deep River, IA
Points: 2894
|
Post Options
Thanks(0)
Quote Reply
Posted: 07 Jun 2016 at 1:55pm |
 dann wrote: dann wrote:
If both lines for the cylinders are plumbed to the front port of hyd. valve with a tee you will have better hold and control lift/lowering. I have had issues with holding lift arms up on two different WD'S and solved issue by plumbing cylinders to front hyd port. |
Thanks Dan, I will have to try this! Mike
|
|
It is great being a disciple of Jesus! 1950 WD, 1957 D17...retired in Iowa,
|
|
TBone
Silver Level

Joined: 11 May 2014
Location: SWWI
Points: 82
|
Post Options
Thanks(0)
Quote Reply
Posted: 07 Jun 2016 at 7:46pm |
|
littlemarv is correct. Right cylinder to the front right. Left cylinder to the left rear. If you don't have a remote valve, nothing is hooked up to the left front.
90% of the time, the whole works is thrown off because it is not set correctly. Don't assume it is because they wear over time and nothing works after a while. Get your book out and follow the directions. Make sure your detent hole is cleaned out and very visible. That is the key!
|
|
allischalmerguy
Orange Level
Joined: 11 Sep 2009
Location: Deep River, IA
Points: 2894
|
Post Options
Thanks(0)
Quote Reply
Posted: 16 Jun 2016 at 8:13am |
dann wrote:
If both lines for the cylinders are plumbed to the front port of hyd. valve with a tee you will have better hold and control lift/lowering. I have had issues with holding lift arms up on two different WD'S and solved issue by plumbing cylinders to front hyd port. |
Dan, in the photo in the post above I see two front ports, does it matter which one? Thanks Mike
|
|
It is great being a disciple of Jesus! 1950 WD, 1957 D17...retired in Iowa,
|
|
dann
Bronze Level
Joined: 10 Feb 2015
Location: WI 53520
Points: 37
|
Post Options
Thanks(0)
Quote Reply
Posted: 16 Jun 2016 at 12:46pm |
|
connect to eather front port with a tee or connect one hose to each front port if nothing else is connected to a front port, will work the same. good luck
|
|
littlemarv
Orange Level
Joined: 10 Jun 2013
Location: Wisconsin
Points: 1834
|
Post Options
Thanks(0)
Quote Reply
Posted: 16 Jun 2016 at 12:54pm |
|
If that's the case, then when you have a remote ram, one lift arm and the ram on the implement are hooked together and the other lift arm (plumbed into the rear port) is controlled differently?
Up above, someone says hook them together on a rear port. Now someone says hook them together to one front port.
I just put them back the way they were, but didn't get the valves in yet cause I forgot I needed two pipe fittings, so it will have to wait until I get back up to the farm.
Edited by littlemarv - 16 Jun 2016 at 12:59pm
|
|
The mechanic always wins.
B91131, WC23065, WD89101, CA29479, B1, Early B10, HB212, 416H
|
|
CTuckerNWIL
Orange Level
Joined: 11 Sep 2009
Location: NW Illinois
Points: 22825
|
Post Options
Thanks(0)
Quote Reply
Posted: 16 Jun 2016 at 3:15pm |
littlemarv wrote:
If that's the case, then when you have a remote ram, one lift arm and the ram on the implement are hooked together and the other lift arm (plumbed into the rear port) is controlled differently?
|
The pump pressure is the same on all 3 ports. No matter how you hook the 2 lift arm cylinders up, the arms will go up before a remote ram will pick up any kind of a load. Oil goes to the easiest place first. My remote connection is original. I plugged the left rear port and connected a diverter valve to the right port. My loader cylinders run off one side of the diverter and the lift arm cylinders runs off the other. When the diverter is centered, the remote line can be used while keeping the lift arms up and the loader up.
Edited by CTuckerNWIL - 16 Jun 2016 at 3:16pm
|
|
|
|
CTuckerNWIL
Orange Level
Joined: 11 Sep 2009
Location: NW Illinois
Points: 22825
|
Post Options
Thanks(0)
Quote Reply
Posted: 16 Jun 2016 at 3:27pm |
littlemarv wrote:
Looking at a WD with a hydraulic problem.
I asked about this awhile ago, but got sidetracked for, oh, a few YEARS.
Halfway up the quadrant, you can feel a detent. I am working under the assumption that this is HOLD. 1As you raise the lever, it should raise the arms in proportion to lever position, right? 2By that I mean just above the middle detent would raise slow, all the way up would raise fast.
Lowering should work just the opposite.
On the traction booster decal on the battery box, I set it up for the HOLD position.
What I want it to do, is raise, hold, and lower.
O.K., enough rambling. The problem is with the lowering part. Raising works fine, and holding does too. When you move it to lower, there is no "easy does it". When you go below the detent, she goes to full drop and the implement crashes to earth.
Whats the culprit and is it serviceable with the pump in place or do I have to remove the pump?
Thanks in advance.
|
1. NO, put the lever all the way up and it raises. Pull the lever down to the detent position and it should hold. There is no raising proportionally by the position of the lever, except in TB mode( see number 3 below). 2. By limiting how far open the valve is, you may slow the rate at which it raises, but not control where it raises to. 3.When set up for traction booster, with the lever just off the bottom a ways, the pump will raise the arms a very little bit relative to the position of the lever and the pull on the SC bell.
|
|
|
|
littlemarv
Orange Level
Joined: 10 Jun 2013
Location: Wisconsin
Points: 1834
|
Post Options
Thanks(0)
Quote Reply
Posted: 16 Jun 2016 at 4:13pm |
|
Ok, that makes sense. Very good explanation. I think I will leave the hoses hooked up the way they are, put the valves in, and add a remote line. Thanks much!
Is the loader slow? I thought old WDs didn't have much for volume. Is it a trip bucket or are there four cylinders?
|
|
The mechanic always wins.
B91131, WC23065, WD89101, CA29479, B1, Early B10, HB212, 416H
|
|
CTuckerNWIL
Orange Level
Joined: 11 Sep 2009
Location: NW Illinois
Points: 22825
|
Post Options
Thanks(0)
Quote Reply
Posted: 16 Jun 2016 at 6:51pm |
|
My loader is not "slow". It is a Freeman with the original cylinders that came with it. They are made for high pressure low volume systems, at least they work OK with the Allis hydraulics. It is a trip bucket but I haven't had a bucket on it in years. Just used the homemade blade for pushing out big snow and the blade "cleans up" after.
|
|
|
|
dann
Bronze Level
Joined: 10 Feb 2015
Location: WI 53520
Points: 37
|
Post Options
Thanks(0)
Quote Reply
Posted: 16 Jun 2016 at 8:06pm |
|
please referance Allis-Chalmers operating instructions book page #34, hydrolic system, rams, when left ram is used in connection with hold position the ram hose MUST BE ATTACHED TO ONE OF THE FORWARD HOLES CLOSEST TO SCREW "C". This is how the system was designed to work.
|
|
littlemarv
Orange Level
Joined: 10 Jun 2013
Location: Wisconsin
Points: 1834
|
Post Options
Thanks(0)
Quote Reply
Posted: 16 Jun 2016 at 8:28pm |
|
Yes, I read that as well. The hold works fine. Its the lowering speed that I'm trying to get under control. Thanks again, I will post the results once I get the valves installed.
|
|
The mechanic always wins.
B91131, WC23065, WD89101, CA29479, B1, Early B10, HB212, 416H
|
|
Don(MO)
Orange Level
Joined: 12 Sep 2009
Location: Bates City MO.
Points: 6862
|
Post Options
Thanks(0)
Quote Reply
Posted: 17 Jun 2016 at 8:40am |
OK I will post this one more time. Like it's been said above set all the linkages first and if you are not Ok with how the lift is working then set it like in the left side of the book. 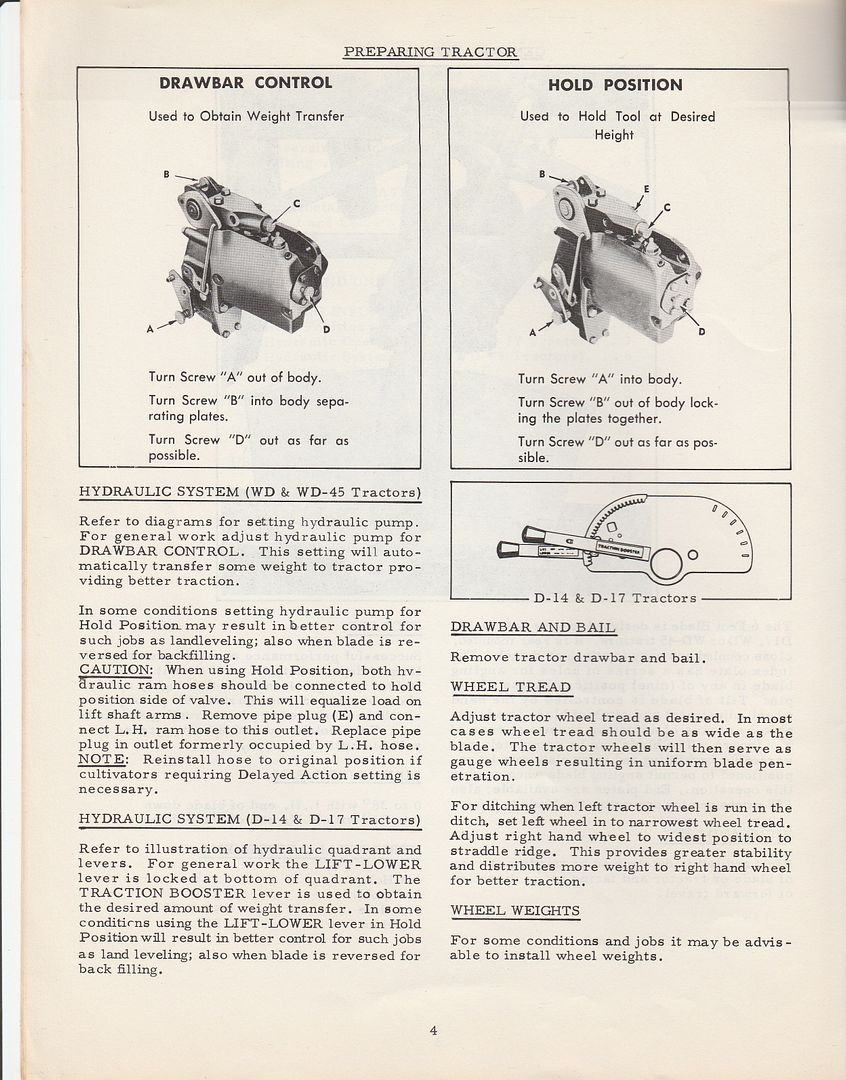
|
|
3 WD45's with power steering,G,D15 fork lift,D19, W-Speed Patrol, "A" Gleaner with a 330 corn head,"66" combine,roto-baler, and lots of Snap Coupler implements to make them work for their keep.
|
|
Don(MO)
Orange Level
Joined: 12 Sep 2009
Location: Bates City MO.
Points: 6862
|
Post Options
Thanks(0)
Quote Reply
Posted: 17 Jun 2016 at 2:46pm |
This is part you need to read. 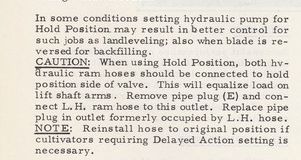
|
|
3 WD45's with power steering,G,D15 fork lift,D19, W-Speed Patrol, "A" Gleaner with a 330 corn head,"66" combine,roto-baler, and lots of Snap Coupler implements to make them work for their keep.
|
|
SteveM C/IL
Orange Level Access
Joined: 12 Sep 2009
Location: Shelbyville IL
Points: 8734
|
Post Options
Thanks(0)
Quote Reply
Posted: 18 Jun 2016 at 7:53am |
|
I put a tee on the right front port connecting both cylinders. The RG630 cultivator was too much hanging on one lift cyl in hold position.Would put a twist on rockshaft.My wD seems worse on the "breakover" when lowering than my 45.WD has loader,if wanting to slowly lower a loaded bucket,it takes two hands on the lever & quadrant but can be done.The adjustments for the linkages makes a difference.Mine seem to work best when not exactly what the instructions prescribe.
|
|


