| Author |
 Topic Search Topic Search  Topic Options Topic Options
|
mherndon 
Bronze Level

Joined: 30 Apr 2012
Location: Tennessee
Points: 87
|
 Post Options Post Options
") Thanks(0) Thanks(0)
 Quote Quote  Reply Reply
 Topic: Flywheel and timing on D-14 Topic: Flywheel and timing on D-14
Posted: 20 May 2012 at 3:44pm |
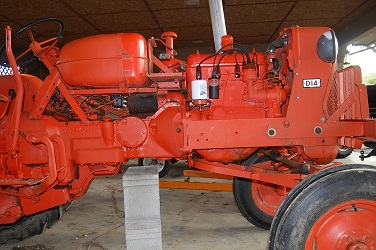
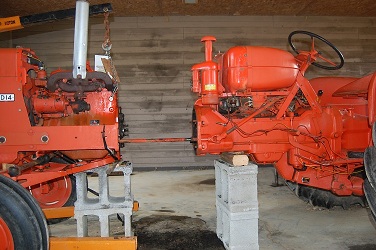
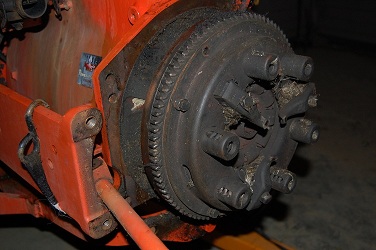
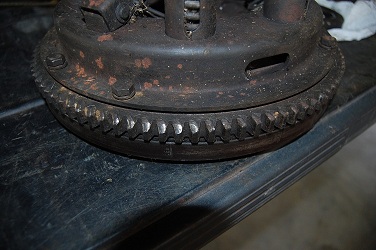
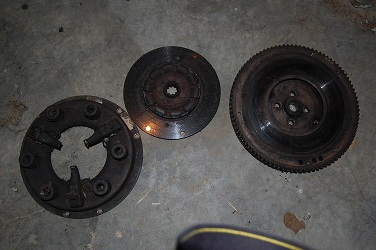
A few weeks ago I borrowed a timing light to check my D14 during a tuneup. I was unable to see the mark on the flywheel with the light. I split the tractor yesterday to take the clutch out and did see the marks on the flywheel. I turned the flywheel to the approximate location for the timing hole. My rotary button was on the number four post. I did not see a key way for the flywheel. I only had 4 bolts holding the flywheel and I think I could mount it where ever I wanted. Could someone have been in the tractor before and not lined the marks with the distributor? I will make sure when I put it back together to get the number one piston on TDC and then put on the flywheel to get the marks in the right position. I would have thought the flywheel could only be put on in one position. I will try to upload some pics of the split 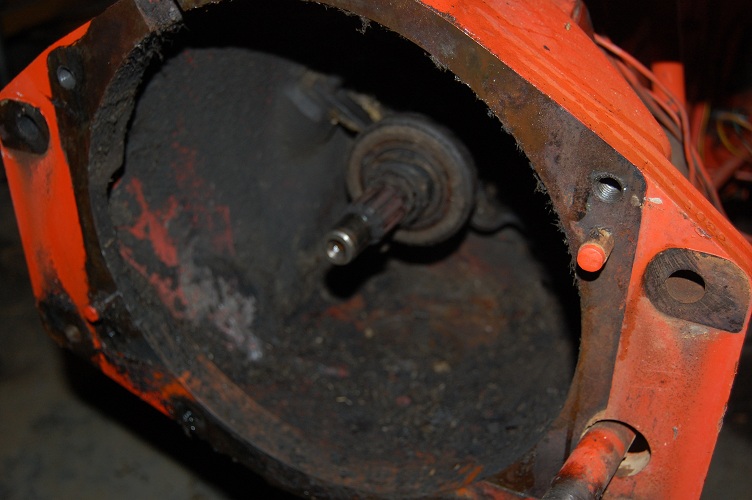 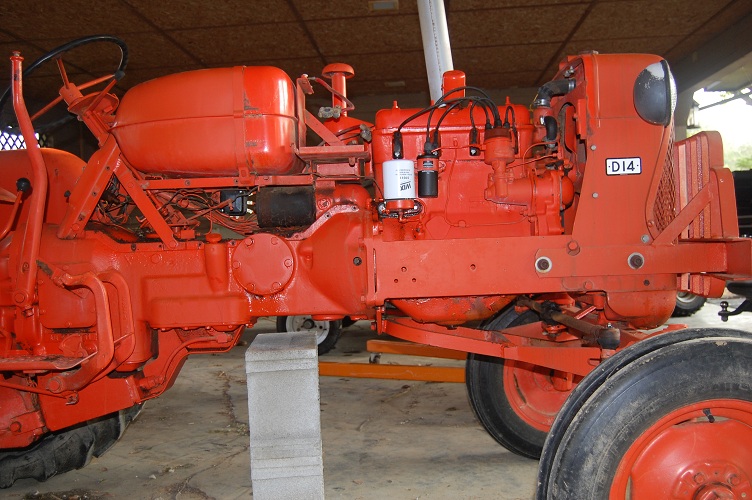
|
|
D-15, Old dealer in Smithville, TN
|
 |
|
Sponsored Links
|
|
|
mherndon
Bronze Level
Joined: 30 Apr 2012
Location: Tennessee
Points: 87
|
Post Options
Thanks(0)
Quote Reply
Posted: 20 May 2012 at 4:05pm |
|
|
|
D-15, Old dealer in Smithville, TN
|
|
Orange Blood
Orange Level

Joined: 29 Nov 2010
Location: ColoradoSprings
Points: 4053
|
Post Options
Thanks(0)
Quote Reply
Posted: 20 May 2012 at 5:11pm |
|
NO, you can't put the flywheel on wrong, if you look really closely the bolt hole are not exactly the same distance apart. If you put the flywheel up there and just happen to hit the correct position congratulations. As to why your timing isn't correct, I don't know if I read what you were trying to say correctly, but your timing light trigger needs to be on the Number 1 cylinder wire, the front one.
|
|
Still in use:
HD7 WC C CA WD 2-WD45 WD45LP WD45D D14 3-D17 D17LP 2-D19D D19LP 190XTD 190XTLP 720 D21 220 7020 7030 7040 7045 3-7060
Projects: 3-U UC 2-G 2-B 2-C CA 7-WC RC WDLP WF D14 D21 210 7045 N7
|
|
Soilguy
Bronze Level
Joined: 10 Jul 2011
Location: Weslaco, TX
Points: 32
|
Post Options
Thanks(0)
Quote Reply
Posted: 20 May 2012 at 7:04pm |
|
If there is disagreement between the timing mark and showing a firing position on #1, someone may have stabbed the distributor a tooth or two off, maybe? Larry
|
|
jaybmiller
Orange Level Access
Joined: 12 Sep 2009
Location: Greensville,Ont
Points: 25256
|
Post Options
Thanks(0)
Quote Reply
Posted: 20 May 2012 at 8:25pm |
Yup, flywheel only goes on one RIGHT way and gets mighty heavy after try #3,#4,#5...
It's one of those 'I should have marked it BEFORE I took it apart things'...next time..
Also I'd rather you not use concrete blocks ,unless solids, or at least put them 'regular' way down not the way in the picture. Maybe I'm getting fussy about safety the older I get but blocks do not have a lot of strength the way you've got them.I used 10by10 timbers and 1by8 'shims'.Odds are you won't get hurt or be pinned under the tractor when the block fails by ,but will break a leg or gash something or run into a rather solid steel workbench(don't ask...)when you 'jack rabbit' away from the 'accident'.
Always better safe than sorry!!
Looks like you had a nice 'mouse house' in the bell housing . Also check the ring gear and be sure all the teeth are good.It's a lot easier to do it all NOW instead of later...(yup, me did that too !!)
Jay
|
|
3 D-14s,A-C forklift, B-112
Kubota BX23S lil' TOOT( The Other Orange Tractor)
Never burn your bridges, unless you can walk on water
|
|
Hubert (Ga)engine7
Orange Level

Joined: 12 Sep 2009
Location: Jackson Cnty,GA
Points: 6610
|
Post Options
Thanks(0)
Quote Reply
Posted: 20 May 2012 at 8:42pm |
|
Second what Jay says about the concrete blocks. The way you have them stacked is inviting a catastrophic failure. They only have compression strength when stacked in the "normal" direction. But I had rather not use them at all. Heavy wood blocks are much safer. Not being nitpicking, just don't want an accident happening when it can be prevented.
|
|
Just an old country boy saved by the grace of God.
|
|
mherndon
Bronze Level
Joined: 30 Apr 2012
Location: Tennessee
Points: 87
|
Post Options
Thanks(0)
Quote Reply
Posted: 20 May 2012 at 9:17pm |
|
Thanks for the advice. I will try to borrow some wood blocks from a local truck shop.
|
|
D-15, Old dealer in Smithville, TN
|
|