| Author |
 Topic Search Topic Search  Topic Options Topic Options
|
Johnwilson_osf 
Orange Level

Joined: 29 Jul 2012
Location: Mount Bethel PA
Points: 944
|
 Post Options Post Options
") Thanks(0) Thanks(0)
 Quote Quote  Reply Reply
 Topic: F2 Grain Head Question Topic: F2 Grain Head Question
Posted: 08 Jul 2016 at 8:57pm |
Greetings all, I was servicing the grain head to my F2, in preparation for rye and oats. I was looking underneath the grain cart, and I saw a tie-rod looking item hanging from one end. I have posted the picture from AGCO partsbook, it is item number 8. The parts book does not show how it should be attached. Is it just a bolt through the bearing ends? 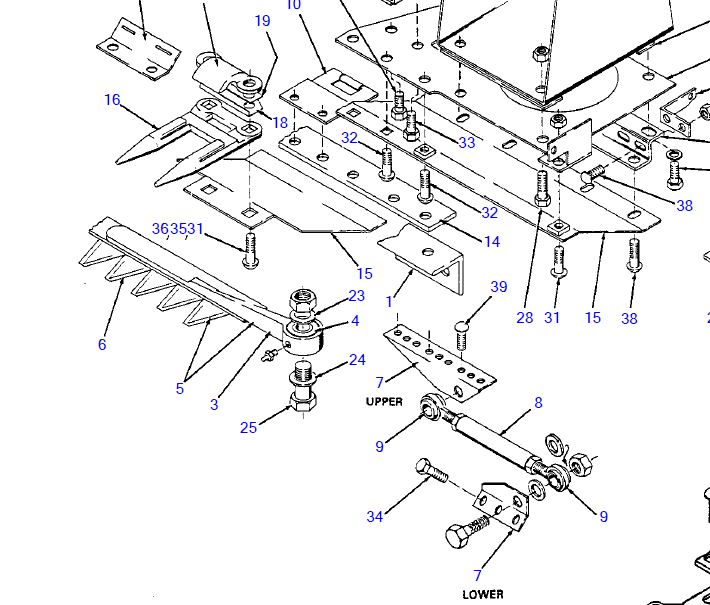 Thank you for your assistance. John
Edited by Johnwilson_osf - 08 Jul 2016 at 9:02pm
|
|
Allis Express: Eastern PA on Rt 80
8050, 8010, 6080, 190, D14, DA 6035, AA 6690, 5650, Gleaner F2
|
 |
|
Sponsored Links
|
|
|
shameless (ne)
Orange Level

Joined: 08 Jul 2016
Location: nebraska
Points: 7463
|
Post Options
Thanks(0)
Quote Reply
Posted: 08 Jul 2016 at 9:11pm |
|
that is used for "timing" the cutterbar. that's if bolt #25 goes thru one end of it, otherwise it's prolly just a stabilizer bar.
|
|
tbran
Orange Level
Joined: 14 Sep 2009
Location: Paris Tn
Points: 3545
|
Post Options
Thanks(0)
Quote Reply
Posted: 08 Jul 2016 at 9:29pm |
|
7 upper bolts to the header frame and 7 lower bolts to the cutter bar. Very important it is attached
. IF not when the combine is turned the cutterbar will twist the rear hangers and eventually fail them. The are probably bent already. A tip - when the C sections and guards wear out - switch them out to AC Gleaner std stuff. Also bend the skid shoes down so the rear is 1-2" away from the twinbars right above them and install a skid shoe from a NI 5400 disc mower to the wobble box skid to raise it 1" or so. Cut a slot for the tip and bolt the rear. This will keep the head from digging. There is no way to "time" this cutterbar other than move the wobble box...
|
|
When told "it's not the money,it's the principle", remember, it's always the money..
|
|
Johnwilson_osf
Orange Level
Joined: 29 Jul 2012
Location: Mount Bethel PA
Points: 944
|
Post Options
Thanks(0)
Quote Reply
Posted: 09 Jul 2016 at 9:26am |
|
tbran,
One nice thing is that I only cut small grains, so I am never running the cutter on the ground. In the future I would gladly look for a fixed head instead of the flex/float that I have.
I see the hole that the tie rod bolts to, it just needs a standard bolt through it then?
John
|
|
Allis Express: Eastern PA on Rt 80
8050, 8010, 6080, 190, D14, DA 6035, AA 6690, 5650, Gleaner F2
|
|
tbran
Orange Level
Joined: 14 Sep 2009
Location: Paris Tn
Points: 3545
|
Post Options
Thanks(0)
Quote Reply
Posted: 10 Jul 2016 at 9:10pm |
that would mean going back to a pitman drive.... lock the cutterbar up rigid via V clamps and change the hart carter over to the AC or Crary or SCH guards and sections. PAy close attention to the auger, check for rust inside center. We always weld a 1" angle iron across the center side to side to strengthen the center. Weld 4 in 90 degrees apart around the auger. There are no more augers available. Also keep a check on the wobble box. Rock the pulley fore and aft - there is NO allowable play or slack period. IF there is find the issue and fix it.
|
|
When told "it's not the money,it's the principle", remember, it's always the money..
|
|


