| Author |
 Topic Search Topic Search  Topic Options Topic Options
|
snakefoot 
Bronze Level


Joined: 11 Mar 2019
Location: missouri
Points: 23
|
 Post Options Post Options
") Thanks(0) Thanks(0)
 Quote Quote  Reply Reply
 Topic: D17 SERIES IV BRAKES Topic: D17 SERIES IV BRAKES
Posted: 11 Apr 2019 at 7:41pm |
|
d17 series iv does anybody know of a video showing how to change brake pads on a series iv thanks. also every time I reply to thank someone for information on yahoo it always says mailer- daemon @yahoo.com failure notice. there for I would like to thank people for the information in advance. tks Snakefoot
|
 |
|
Sponsored Links
|
|
|
Brian Jasper co. Ia
Orange Level

Joined: 11 Sep 2009
Location: Prairie City Ia
Points: 10508
|
Post Options
Thanks(0)
Quote Reply
Posted: 11 Apr 2019 at 8:21pm |
If you don't already have, pick up a copy of the shop manual. The best one is a copy of the actual manual the dealership mechanics used. An I&T manual is far better than nothing. I have an early D17 shop manual that I got from Jens Sales. It's a scan of an original A-C manual. Not the clearest pics, but it has everything I need to know.
|
|
"Any man who thinks he can be happy and prosperous by letting the government take care of him better take a closer look at the American Indian." Henry Ford
|
|
DrAllis
Orange Level Access
Joined: 12 Sep 2009
Points: 22858
|
Post Options
Thanks(0)
Quote Reply
Posted: 11 Apr 2019 at 8:28pm |
|
Series 3 and 4 model D17's require pulling the rear axle and final drive to reline or do any service to. Unless you KNOW there is something wrong, why are you wanting to reline?? If the pedals are a long ways down, adjust them by tightening the brake pull rods. Hopefully they will turn and not twist off. Also, the brake rods must be in the LOWER holes on the arms.
|
|
DSeries4
Orange Level

Joined: 12 Sep 2009
Location: Ontario, Canada
Points: 7643
|
Post Options
Thanks(0)
Quote Reply
Posted: 11 Apr 2019 at 8:36pm |
Have done a couple now. Currently doing them on my 185 which are identical.
Only do one side at a time. Remove the wheel, fender and seat, unhook the hydraulic lift cylinder and get it out of the way, remove the final drive with a cherry picker (I use an engine hoist), cut the brake bands on the top pin and get them out of there. Getting that top pin out can be tricky - some are pretty easy, some are not. When everything is out, I use a vacuum to suck up all the dust and debris in the cavity - a good opportunity to make sure the brake rod adjustment is not rusted or seized. I also change the bearing carrier O ring and seal while I am in there. When putting everything back together, you will have to measure the tolerances between the brake drum and the anchor and shim it accordingly. The Allis service manual gives the acceptable range. It is the most important part of the installation. As far as new parts needed: shoes, drum facing, drum springs, shoe springs, top pin, bearing carrier O ring and oil seal. You might also need new balls for the drum - clean and inspect the old ones, they must be smooth and round. No rough or flat spots. It can be a bit overwhelming the first time you do it, just take your time and make sure you have the tractor well supported - no cinder blocks!
|
|
'49 G, '54 WD45, '55 CA, '56 WD45D, '57 WD45, '58 D14, '59 D14, '60 D14, '63 D15D, '66 D15II, '66 D21II, '67 D17IV, '67 D17IVD, '67 190XTD, '73 620, '76 185, '77 175, '84 8030, '85 6080
|
|
HD6GTOM
Orange Level

Joined: 30 Nov 2009
Location: MADISON CO IA
Points: 6627
|
Post Options
Thanks(0)
Quote Reply
Posted: 11 Apr 2019 at 9:19pm |
|
Snake. I did mine a couple of years ago. When removing the right axle, leave all the hydraulics bolted to the fender. Take it all off as a unit. The inner block inside the rear housing, has a weap hole in it. That must be down. It keeps rear end grease from getting on the brakes, if the seal leaks.
Edited by HD6GTOM - 11 Apr 2019 at 9:20pm
|
|
DrAllis
Orange Level Access
Joined: 12 Sep 2009
Points: 22858
|
Post Options
Thanks(0)
Quote Reply
Posted: 12 Apr 2019 at 7:20am |
|
Hydraulic console doesn't need to be removed. Disconnect some of the lower linkages and prop it up an inch or two with a stick from the platform. No need to touch any of the hydraulic lines except maybe the one on the lift cylinders.
|
|
snakefoot
Bronze Level
Joined: 11 Mar 2019
Location: missouri
Points: 23
|
Post Options
Thanks(0)
Quote Reply
Posted: 12 Apr 2019 at 11:15am |
|
I'm doing the LEFT brake (the right brake is fine) because when you push the pedal and watch, the rivets on the brake shoe pop up so I know the brake lining is to thin. also don't want to screw up the drum.
|
|
snakefoot
Bronze Level
Joined: 11 Mar 2019
Location: missouri
Points: 23
|
Post Options
Thanks(0)
Quote Reply
Posted: 12 Apr 2019 at 11:45am |
|
I have a new service manual and operators manual. they show the old style brakes on earlier 17's, the ones where you do don't have to pull any axle. it seems to me like it's a great big secret on how to do anything to and Allis. if I knew how to I would film it and put it up but have no idea how to. the one I'm working on is a serial 88963. I know tractor data says they only made something like 86000 something but this is 88963
|
|
Alvin M
Orange Level
Joined: 24 Jun 2018
Location: PA
Points: 822
|
Post Options
Thanks(0)
Quote Reply
Posted: 12 Apr 2019 at 12:04pm |
|
D17 series iv 1964 s # 75001 to 1967 S# 89213
|
|
Jim.ME
Orange Level
Joined: 19 Nov 2016
Location: Maine
Points: 979
|
Post Options
Thanks(0)
Quote Reply
Posted: 12 Apr 2019 at 12:19pm |
Here is a scan of the two pages on the brake from a 170 manual. I believe it may help you. 170_brake.pdf
|
|
snakefoot
Bronze Level
Joined: 11 Mar 2019
Location: missouri
Points: 23
|
Post Options
Thanks(0)
Quote Reply
Posted: 12 Apr 2019 at 12:21pm |
|
that's the one I have txs
|
|
snakefoot
Bronze Level
Joined: 11 Mar 2019
Location: missouri
Points: 23
|
Post Options
Thanks(0)
Quote Reply
Posted: 12 Apr 2019 at 12:35pm |
|
well jim.me you are absolutely correct it helps 100% plus now I know how to deal the with brake. not sure yet about pulling axle. never did it before.
txs Jim.me
|
|
DrAllis
Orange Level Access
Joined: 12 Sep 2009
Points: 22858
|
Post Options
Thanks(0)
Quote Reply
Posted: 12 Apr 2019 at 1:13pm |
|
Do yourself a favor and slide the drum over to one side and then measure the gap with a stack of feeler gauge blades. This will establish where you are now. Then when the drum assembly is removed you can measure how thick it is from one side to the other.
|
|
HoughMade
Orange Level

Joined: 22 Sep 2017
Location: Valparaiso, IN
Points: 714
|
Post Options
Thanks(0)
Quote Reply
Posted: 12 Apr 2019 at 1:25pm |
|
|
|
1951 B
|
|
Jim.ME
Orange Level
Joined: 19 Nov 2016
Location: Maine
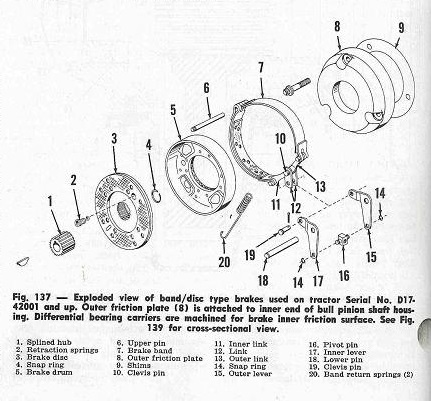
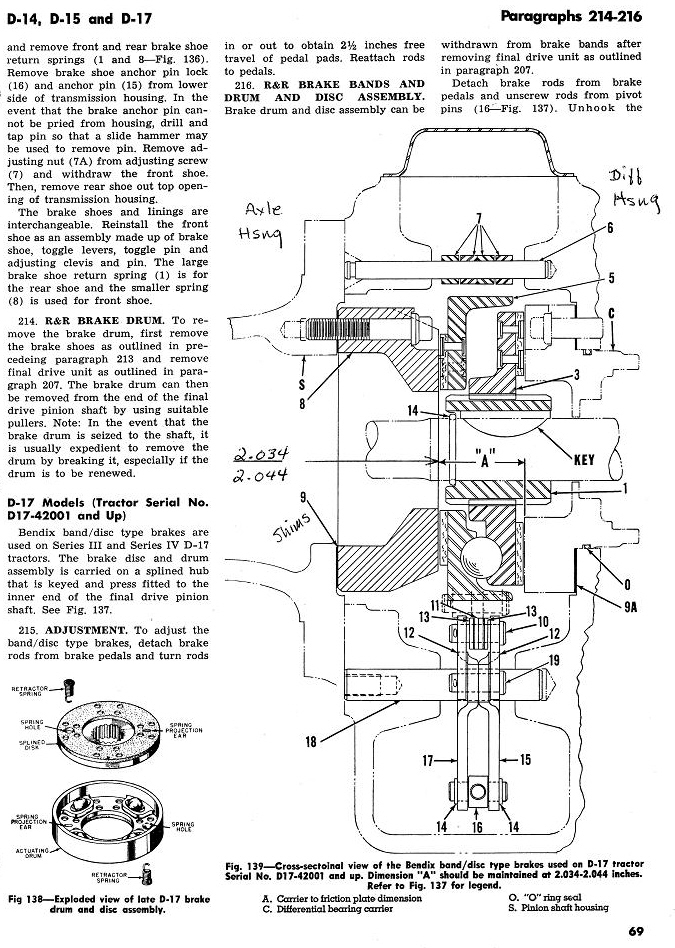
Points: 979
|
Post Options
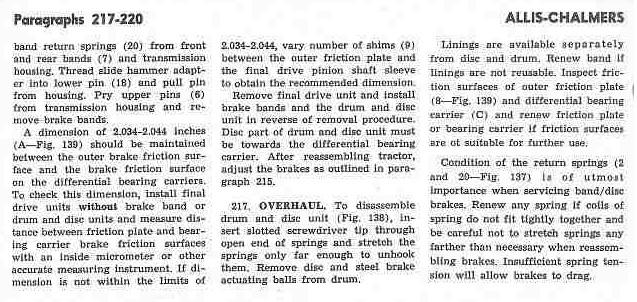
Thanks(0)
Quote Reply
Posted: 12 Apr 2019 at 1:43pm |
I don't know but, take a look at this one, it might be closer to yours. 185 brake removal
|
|
snakefoot
Bronze Level
Joined: 11 Mar 2019
Location: missouri
Points: 23
|
Post Options
Thanks(0)
Quote Reply
Posted: 12 Apr 2019 at 1:43pm |
|
sounds like a good idea I probably would not have thought of it txs.
|
|
DrAllis
Orange Level Access
Joined: 12 Sep 2009
Points: 22858
|
Post Options
Thanks(0)
Quote Reply
Posted: 12 Apr 2019 at 2:19pm |
|
Like I said, the hydraulic console doesn't have to be stripped down like that or removed. A lot of unnecessary work.
|
|
snakefoot
Bronze Level
Joined: 11 Mar 2019
Location: missouri
Points: 23
|
Post Options
Thanks(0)
Quote Reply
Posted: 12 Apr 2019 at 3:04pm |
|
JIM,ME!!!! that's exactly what I needed to see. going to attack the beast soon as it warms up around here. thank you JIM.ME and everyone else txs.
|
|
Alvin M
Orange Level
Joined: 24 Jun 2018
Location: PA
Points: 822
|
Post Options
Thanks(0)
Quote Reply
Posted: 12 Apr 2019 at 3:22pm |
|
I never take the bottom pin out just the two pins on the bands
|
|
snakefoot
Bronze Level
Joined: 11 Mar 2019
Location: missouri
Points: 23
|
Post Options
Thanks(0)
Quote Reply
Posted: 12 Apr 2019 at 8:20pm |
|
I'll be looking txs
|
|
DSeries4
Orange Level
Joined: 12 Sep 2009
Location: Ontario, Canada
Points: 7643
|
Post Options
Thanks(0)
Quote Reply
Posted: 12 Apr 2019 at 8:31pm |
That is not a series IV. Series 3 and 4 had different brake setups than the earlier models like seen in this video.
|
|
'49 G, '54 WD45, '55 CA, '56 WD45D, '57 WD45, '58 D14, '59 D14, '60 D14, '63 D15D, '66 D15II, '66 D21II, '67 D17IV, '67 D17IVD, '67 190XTD, '73 620, '76 185, '77 175, '84 8030, '85 6080
|
|
DSeries4
Orange Level
Joined: 12 Sep 2009
Location: Ontario, Canada
Points: 7643
|
Post Options
Thanks(0)
Quote Reply
Posted: 12 Apr 2019 at 8:35pm |
 snakefoot wrote: snakefoot wrote:
I'm doing the LEFT brake (the right brake is fine) because when you push the pedal and watch, the rivets on the brake shoe pop up so I know the brake lining is to thin. also don't want to screw up the drum. |
If the one brake needs replacing, chances are the other one is not far behind (even though you say it is fine). I would do the other side while I am at it.
|
|
'49 G, '54 WD45, '55 CA, '56 WD45D, '57 WD45, '58 D14, '59 D14, '60 D14, '63 D15D, '66 D15II, '66 D21II, '67 D17IV, '67 D17IVD, '67 190XTD, '73 620, '76 185, '77 175, '84 8030, '85 6080
|
|
DrAllis
Orange Level Access
Joined: 12 Sep 2009
Points: 22858
|
Post Options
Thanks(0)
Quote Reply
Posted: 12 Apr 2019 at 9:51pm |
|
Not always true. There are many times the left brake is shot before it should be because it has been left locked on when the tractor gets driven away. A visual inspection from up on top can many times tell the condition of the disc lining for sure and in the case of this tractor, loose rivets on the bands are a bad sign.
|
|
snakefoot
Bronze Level
Joined: 11 Mar 2019
Location: missouri
Points: 23
|
Post Options
Thanks(0)
Quote Reply
Posted: 13 Apr 2019 at 6:05am |
|
yes that's true the one in the video I believe is a series 2 or3 where you need not have to pull axle to change the brake shoes. txs
|
|
snakefoot
Bronze Level
Joined: 11 Mar 2019
Location: missouri
Points: 23
|
Post Options
Thanks(0)
Quote Reply
Posted: 13 Apr 2019 at 6:08am |
|
the left brake rivets raise when you push the pedal. the left brake is the brake everyone pushes when they need to stop tractor, unless the brake pedals are locked together. txs to all snakefoot
|
|
Gatz in NE
Orange Level
Joined: 11 Sep 2009
Location: Lincoln, NE
Points: 1064
|
Post Options
Thanks(0)
Quote Reply
Posted: 13 Apr 2019 at 6:31pm |
Replace item 2, Retraction Spring while you're in there.
The critical dimension, and procedure ... (we're looking at the LEFT side here)
I made a lifting bracket that bolts to the final drive and makes the whole assembly balanced when taking it out and putting it back in. The axle has to be lined up for it to slide together. If you want the dimensions and/or pic of the bracket , let me know gatz
Edited by Gatz in NE - 13 Apr 2019 at 6:32pm
|
|
snakefoot
Bronze Level
Joined: 11 Mar 2019
Location: missouri
Points: 23
|
Post Options
Thanks(0)
Quote Reply
Posted: 13 Apr 2019 at 7:22pm |
|
yes sounds good Gatz send dems and pics if you would. one can never have enough knowledge I do believe Gatz
|
|
Gatz in NE
Orange Level
Joined: 11 Sep 2009
Location: Lincoln, NE
Points: 1064
|
Post Options
Thanks(0)
Quote Reply
Posted: 13 Apr 2019 at 10:16pm |
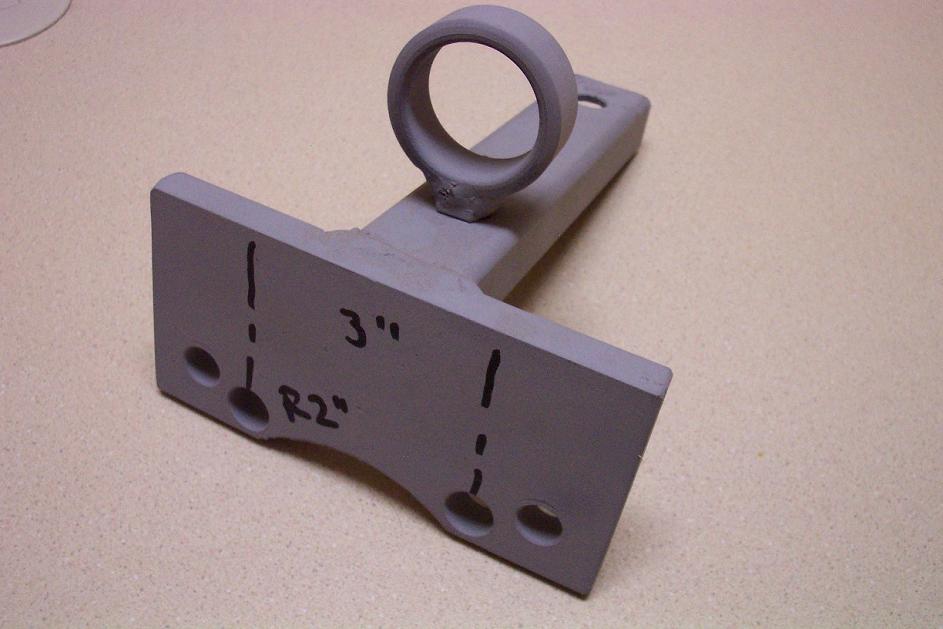
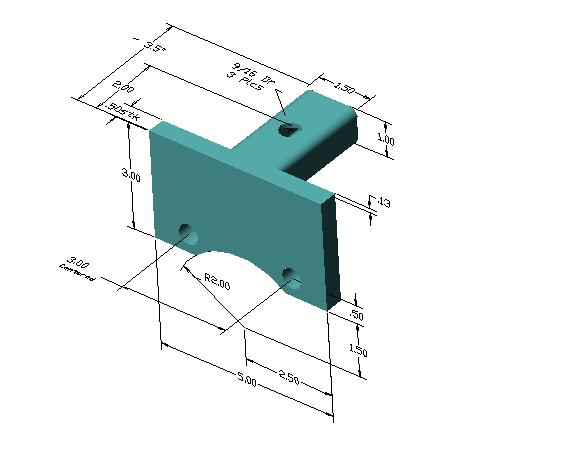
Lift Bracket;
Drawing;
The plate can be flame-cut. It can easily be 3/8 thick.
The 1" x 1 1/2" was rectangular tubing; not solid.
|
|
Gatz in NE
Orange Level
Joined: 11 Sep 2009
Location: Lincoln, NE
Points: 1064
|
Post Options
Thanks(0)
Quote Reply
Posted: 13 Apr 2019 at 10:30pm |
BTW, be careful not to over-stretch the Retractor Springs when installing them. A spring hook tool works well to get them lil buggers in place. Don't grease or oil the ramps or balls.....that would only collect dust and dirt, which might cause them to lock up. Ya don't need that ! Just make sure they're clean & leave them dry.
|
|