| Author |
 Topic Search Topic Search  Topic Options Topic Options
|
Gunn 
Bronze Level

Joined: 22 Mar 2010
Location: Maryland
Points: 62
|
 Post Options Post Options
 Thanks(0) Thanks(0)
 Quote Quote  Reply Reply
 Topic: D15 ignition and timing help needed Topic: D15 ignition and timing help needed
Posted: 30 Apr 2012 at 7:59pm |
I'm wanting to replace my ignition components and have purchased points, condenser, rotor, cap and new spark plug wires. I have a few questions...
1) When setting the points gap (0.022"), the service manual says to rotate the engine until peak of cam lobe is contacting the breaker arm and points are at their widest position. What's the best way to rotate the engine to accurately get to this position?
2) Are there specs for using a dwell meter to fine tune the gap? I couldn't find any in my service manuals.
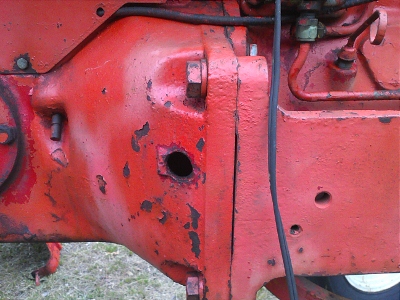
3) When setting the timing, the manual references a "hole in the torque tube". Is the photo below this hole??! It says to adjust @ 1750RPM until I see a "F-25" centered in the hole.
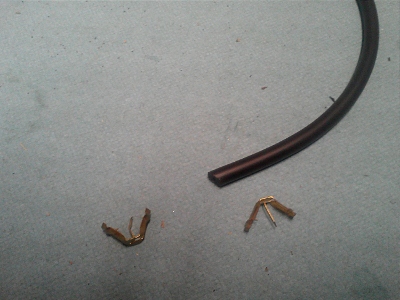
4) And one more thing...while I have built custom spark plug wires before the distributor end has already been factory crimped. With this kit (given to me by previous owner) I have has these little brass colored devices, as shown in second photo. I assume I'm supposed to pierce the plug wire along the conductor and sink it in? When I try to do so, the thing bends (left one in pic) because it's so thin.
Thanks,
Tom
|
|
1961 D-15 Hi-Clearance
|
 |
|
Sponsored Links
|
|
 |
Orange Blood 
Orange Level


Joined: 29 Nov 2010
Location: ColoradoSprings
Points: 4053
|
 Post Options Post Options
 Thanks(0) Thanks(0)
 Quote Quote  Reply Reply
 Posted: 30 Apr 2012 at 8:12pm Posted: 30 Apr 2012 at 8:12pm |
When setting the points gap, I get it close then loosen the distributor hold down, and rotate the distributor to fine tune the gap. Since you have to set the timing anyway.
Don't know about a dwell setting.
Yes you are correct on the hole location.
I hate those plug wires you are trying to use, but what you are doing is the right idea. They have to push in the center of the wire to contact the wire well, then the distributor cap holds them up against the wire. I think you will find that those won't attach to your plugs, those are the dist. end, not the plug end, so you are probably better off buying a better set anyway.
|
|
Still in use:
HD7 WC C CA WD 2-WD45 WD45LP WD45D D14 3-D17 D17LP 2-D19D D19LP 190XTD 190XTLP 720 D21 220 7020 7030 7040 7045 3-7060
Projects: 3-U UC 2-G 2-B 2-C CA 7-WC RC WDLP WF D14 D21 210 7045 N7
|
 |
Orange Blood 
Orange Level


Joined: 29 Nov 2010
Location: ColoradoSprings
Points: 4053
|
 Post Options Post Options
 Thanks(0) Thanks(0)
 Quote Quote  Reply Reply
 Posted: 30 Apr 2012 at 8:16pm Posted: 30 Apr 2012 at 8:16pm |
|
BTW, it looks like you need to address the clutch pivot soon, before you loose the pin all together. At the back of the bell housing, do you see the ~3/16" pin with a groove machined into it sticking out of the housing about an 1" or so. That should be pushed in flush, and a keeper pin, on the inside of the housing. I am not sure you can fix that without a split, since the inspection holes on these things are so small. Anyway, I would get that fixed soon, if it fall out, your clutch won't work right, and it could catch on the pressure plate springs and tear something up.
|
|
Still in use:
HD7 WC C CA WD 2-WD45 WD45LP WD45D D14 3-D17 D17LP 2-D19D D19LP 190XTD 190XTLP 720 D21 220 7020 7030 7040 7045 3-7060
Projects: 3-U UC 2-G 2-B 2-C CA 7-WC RC WDLP WF D14 D21 210 7045 N7
|
 |
Gary in da UP 
Orange Level


Joined: 13 Sep 2009
Location: EUP of Mi.
Points: 1885
|
 Post Options Post Options
 Thanks(0) Thanks(0)
 Quote Quote  Reply Reply
 Posted: 30 Apr 2012 at 8:32pm Posted: 30 Apr 2012 at 8:32pm |
|
Before crimping those terminals in that kit, strip off 3/8" of insulation and bend the bared wire back over the insulation, you'll get better contact.
|
 |
DrAllis 
Orange Level Access

Joined: 12 Sep 2009
Points: 22307
|
 Post Options Post Options
 Thanks(0) Thanks(0)
 Quote Quote  Reply Reply
 Posted: 30 Apr 2012 at 8:55pm Posted: 30 Apr 2012 at 8:55pm |
|
Adjust the ignition timing at full throttle, not 1750 rpm.
|
 |
Tracy Martin TN 
Orange Level Access


Joined: 11 Sep 2009
Location: Gallatin,TN
Points: 10870
|
 Post Options Post Options
 Thanks(0) Thanks(0)
 Quote Quote  Reply Reply
 Posted: 30 Apr 2012 at 9:14pm Posted: 30 Apr 2012 at 9:14pm |
|
The pivot pin can be fixed safely without a split. Will not be correct, but will work till clutch time. Need a rod same diameter longer in length. From the top is the way to pin it. Needs to be long enough to taper- chamfer the entrance end and a cotter pin hole below chamfer , other end needs cotter pin hole also. Start the pin from side you have in picture. Chamfer first with pin hole behind chamfer. Your pin will have to be much longer than it is now. When pin is thru the torque tube, you will have a cotter pin on top of torque tube, and one for the side showing. It will keep the pin from working out. The same as the clip was meant to do. Clip shoud have been towards top to be correct.Throw them wires away and get a set from Steve at B&B Circuits, you will be happier. HTH Tracy Martin
Edited by Tracy Martin TN - 30 Apr 2012 at 9:16pm
|
|
No greater gift than healthy grandkids!
|
 |
Gunn 
Bronze Level

Joined: 22 Mar 2010
Location: Maryland
Points: 62
|
 Post Options Post Options
 Thanks(0) Thanks(0)
 Quote Quote  Reply Reply
 Posted: 01 May 2012 at 8:10pm Posted: 01 May 2012 at 8:10pm |
Wow, good eye on the clutch pivot pin. Funny thing, when I took that photo, I noticed that pin. Had never gave it a glance before, and wondered what the heck it was. And just as quickly, I forgot about it. Tracy, thanks for the info on the easier fix, I'll get to that as soon as I can.
I did read in two of my service manuals to use 1750RPM using a reliable tach, as the advance will be more at higher RPM's.
Was going to use the plug wires that I had, but I'm not happy with how they go together. The plug end is more typical, but the distributor end is junk.
Thanks again,
|
|
1961 D-15 Hi-Clearance
|
 |
Gunn 
Bronze Level

Joined: 22 Mar 2010
Location: Maryland
Points: 62
|
 Post Options Post Options
 Thanks(0) Thanks(0)
 Quote Quote  Reply Reply
 Posted: 02 May 2012 at 7:19am Posted: 02 May 2012 at 7:19am |
Anyone have a good way to turn over the engine to get it into position to adjust points? Or for that matter, to find TDC accurately? Bump it with the starter, or is there a better location to get a wrench on it somewhere?
|
|
1961 D-15 Hi-Clearance
|
 |
captaindana 
Orange Level

Joined: 14 Sep 2009
Location: Fort Plain, NY
Points: 2593
|
 Post Options Post Options
 Thanks(0) Thanks(0)
 Quote Quote  Reply Reply
 Posted: 02 May 2012 at 7:52am Posted: 02 May 2012 at 7:52am |
|
Gunn I use the fanbelt and fan to move being careful not to bend fanblade. If plugs are out this works easier.
|
 |
Steve in NJ 
Orange Level Access


Joined: 12 Sep 2009
Location: Andover, NJ
Points: 12043
|
 Post Options Post Options
 Thanks(0) Thanks(0)
 Quote Quote  Reply Reply
 Posted: 02 May 2012 at 8:44am Posted: 02 May 2012 at 8:44am |
I can't believe that those "universal" spark plug wire sets with those junk terminal ends are still sold out there. Those are the worst for good contact and transfer of current. That's why our custom built wires have crimp terminals on each end, along with an Orange Hy-Heat Silcone boot on the spark plug end if so desired. If you ever have to remove the spark plug wire from the Distributor cap with those terminal ends, in most cases, that end stays behind in the cap and it rips the jacket on the wire. Grim design... very grim.... 
|
 |


 Topic Options

 Post Options
 Thanks(0)

