| Author |
 Topic Search Topic Search  Topic Options Topic Options
|
coggonobrien 
Orange Level Access

Joined: 14 Nov 2010
Location: Eastern Iowa
Points: 1888
|
 Post Options Post Options
") Thanks(0) Thanks(0)
 Quote Quote  Reply Reply
 Posted: 19 Jan 2015 at 2:50am Posted: 19 Jan 2015 at 2:50am |
|
gotcha, found the timing cover on my nos is the same casting but not machined to accept the stator. Cleaned up the old ccka timing cover and got a new crank seal and cover gasket. Just waiting on the arrival of the governor seal. Anything special when reinstalling the cover? Or just make sure the governor is oriented the right direction.
|
 |
|
Sponsored Links
|
|
|
coggonobrien
Orange Level Access
Joined: 14 Nov 2010
Location: Eastern Iowa
Points: 1888
|
Post Options
Thanks(0)
Quote Reply
Posted: 21 Jan 2015 at 11:55pm |
|
still waiting on governor seal, should be here friday. unfortunately noticed after cleaning that my flywheel is cracked so I will be purchasing a replacement.
|
|
coggonobrien
Orange Level Access
Joined: 14 Nov 2010
Location: Eastern Iowa
Points: 1888
|
Post Options
Thanks(0)
Quote Reply
Posted: 26 Jan 2015 at 11:57pm |
new lip seals installed in the 616 timing cover, new gasket, a dab of silicone and it's torqued down. I was surprised to find the governor shaft was different on the cckb engine which was kind of disappointing but there was minimal wear on the 616 so we used it. Now just trying to line up a new flywheel as we discovered a crack in mine. David
|
|
coggonobrien
Orange Level Access
Joined: 14 Nov 2010
Location: Eastern Iowa
Points: 1888
|
Post Options
Thanks(0)
Quote Reply
Posted: 20 Feb 2015 at 4:05pm |
finally got a little work done today, swapped over the correct cckb timing cover and the oil pan from the ccka (same casting but not machined to mount some of the extra doo dads) just an fyi if you need onan parts call a cummins dealership, they own them now and the prices will be less than half of what agco charges
|
|
coggonobrien
Orange Level Access
Joined: 14 Nov 2010
Location: Eastern Iowa
Points: 1888
|
Post Options
Thanks(0)
Quote Reply
Posted: 27 Feb 2015 at 7:28pm |
|
|
|
Tracy Martin TN
Orange Level Access

Joined: 11 Sep 2009
Location: Gallatin,TN
Points: 10920
|
Post Options
Thanks(0)
Quote Reply
Posted: 27 Feb 2015 at 7:51pm |
|
How much was the stator? Where did you find it at? thanks tracy
|
|
No greater gift than healthy grandkids!
|
|
coggonobrien
Orange Level Access
Joined: 14 Nov 2010
Location: Eastern Iowa
Points: 1888
|
Post Options
Thanks(0)
Quote Reply
Posted: 27 Feb 2015 at 7:57pm |
|
Board member sold me the stator with new rectifier and regulator for 105 shipped
|
|
Tracy Martin TN
Orange Level Access
Joined: 11 Sep 2009
Location: Gallatin,TN
Points: 10920
|
Post Options
Thanks(0)
Quote Reply
Posted: 27 Feb 2015 at 7:59pm |
|
Was the engine for a generator? I have one similar to that one. Thanks tracy
|
|
No greater gift than healthy grandkids!
|
|
coggonobrien
Orange Level Access
Joined: 14 Nov 2010
Location: Eastern Iowa
Points: 1888
|
Post Options
Thanks(0)
Quote Reply
Posted: 01 Mar 2015 at 11:53pm |
|
yeah i think it was a generator engine. had no charging system and a big squirel cage fan mounted to the flywheel
|
|
Steve in NJ
Orange Level Access

Joined: 12 Sep 2009
Location: Andover, NJ
Points: 12071
|
Post Options
Thanks(0)
Quote Reply
Posted: 02 Mar 2015 at 8:22am |
|
Dave! Glad to see you finally got something to work for ya! Great to hear! Over another hurdle hopefully...
|
|
39'RC, 43'WC, 48'B, 49'G, 50'WF, 65 Big 10, 67'B-110, 75'716H, 2-620's, & a Motorhead wife
|
|
coggonobrien
Orange Level Access
Joined: 14 Nov 2010
Location: Eastern Iowa
Points: 1888
|
Post Options
Thanks(0)
Quote Reply
Posted: 22 Mar 2015 at 4:59pm |
ok discovered another hurtle as most of you probably know. front crank support is different (my generator motor does not have holes for mounting the front clutch magnet) will be calling cumin's tomorrow to order the gasket and lip seal. 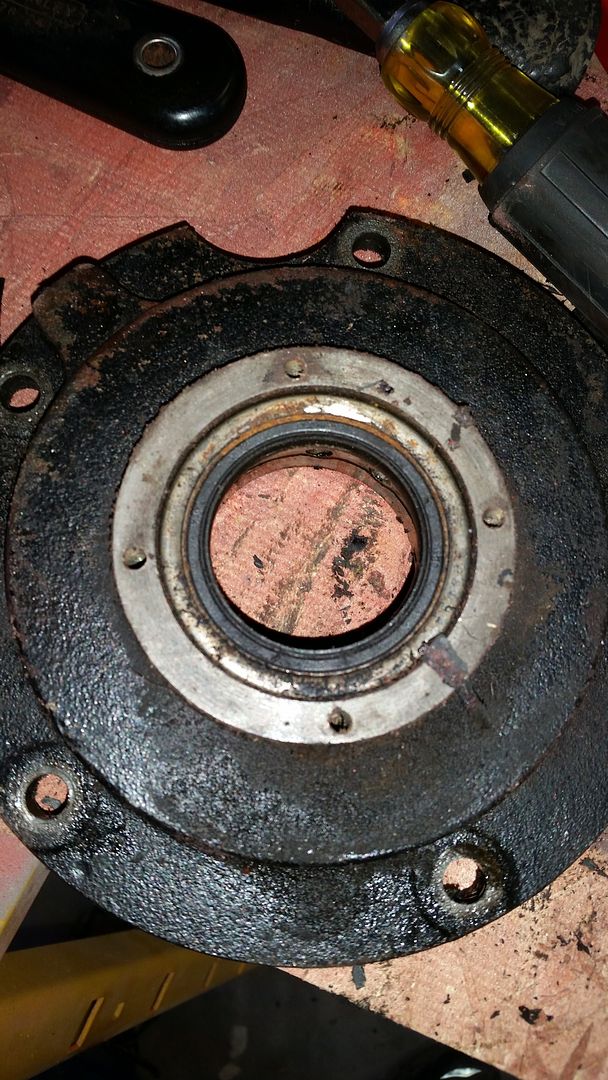 replaced the transcooler hoses while the engine was out. Got the b&b wiring harness spliced in and needing some direction from folks. I've got it sitting in the harness loop leading to the front rail but unsure how to route it from there. Does it just sitting inside the right between the right side of the engine and the rail? how do the wires route going to the ignition, charging system, starter and electric clutch? also this little do hickey was on the yellow wire of what was left of the old harness. Do I need it? 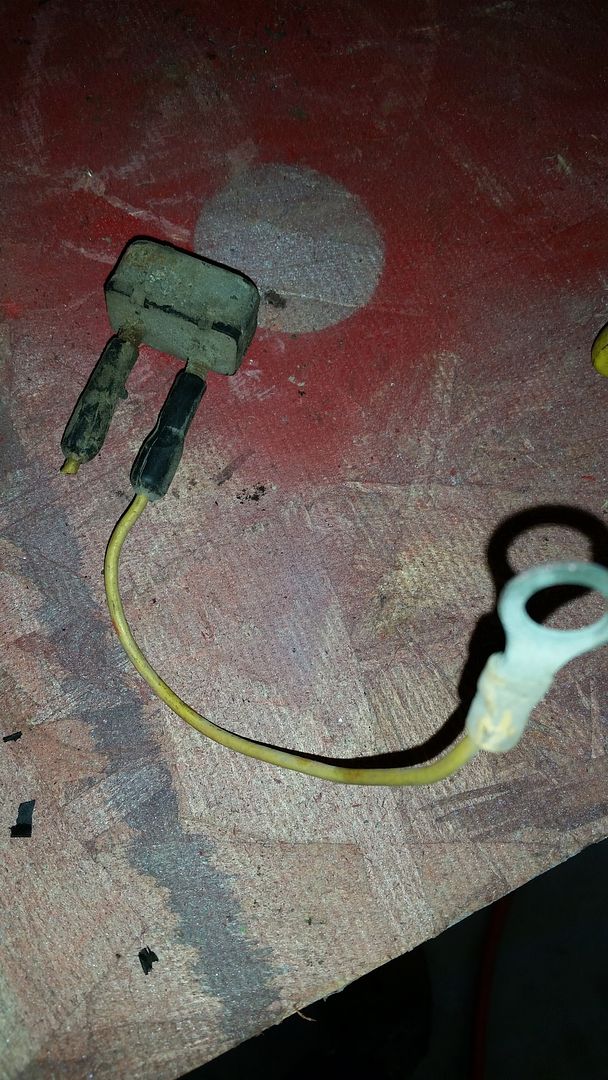 and where do these newer rectifier/regulator get mounted? 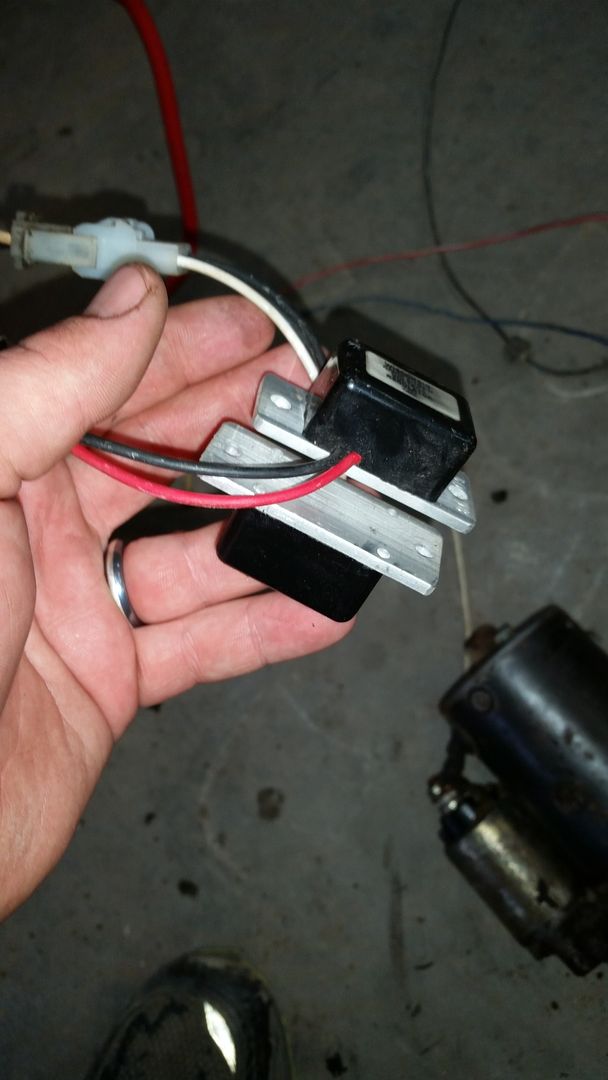 does anybody have part 46 from this drawing and the stud and want to part with them? http://s161.photobucket.com/user/coggonobrien/media/616/20150320_172347_zpsyd1nq9w7.jpg.html?sort=3&o=3 Can someone show me how the cckb pre-cleaner mounts to the engine shroud and if there is a hole cut in the shroud to let air in. and finally I need a belly pan so if somebody has one they want to sell reasonably let me know or I might just cut one on the laser at work. THanks! David
|
|
coggonobrien
Orange Level Access
Joined: 14 Nov 2010
Location: Eastern Iowa
Points: 1888
|
Post Options
Thanks(0)
Quote Reply
Posted: 25 Mar 2015 at 7:32pm |
|
anybody?
|
|
coggonobrien
Orange Level Access
Joined: 14 Nov 2010
Location: Eastern Iowa
Points: 1888
|
Post Options
Thanks(0)
Quote Reply
Posted: 29 Mar 2015 at 7:22pm |
|
|
|
Steve in NJ
Orange Level Access
Joined: 12 Sep 2009
Location: Andover, NJ
Points: 12071
|
Post Options
Thanks(0)
Quote Reply
Posted: 29 Mar 2015 at 9:05pm |
|
Sorry Dave, haven't been keeping up with your post lately. That do-hicky is a circuit breaker. Its located between the starter sol. and the wiring harness. That is you power in circuit. We have those in stock, but you should be able to pick one up in a Napa store or equiv. locally. They're usually 20 amp. The VR/Rectifier usually mounts down on the lower flywheel shroud. That one is a replacement which is much smaller than the original. I don't know if you need the muffler shield anymore, but there's a guy on e-bay that has a bunch of shields....
Steve
Forgot to add- on my 620, the harness just layed down along the inside of the frame rail between the engine and frame rail. Not sure if it was like that originally, but my 620 was pretty much untouched by the PO...
Edited by Steve in NJ - 30 Mar 2015 at 8:10am
|
|
39'RC, 43'WC, 48'B, 49'G, 50'WF, 65 Big 10, 67'B-110, 75'716H, 2-620's, & a Motorhead wife
|
|
coggonobrien
Orange Level Access
Joined: 14 Nov 2010
Location: Eastern Iowa
Points: 1888
|
Post Options
Thanks(0)
Quote Reply
Posted: 30 Mar 2015 at 11:03am |
|
awesome thanks Steve, you don't happen to have pictures of how the wires are routed up to the ignition do you?
|
|
Tracy Martin TN
Orange Level Access
Joined: 11 Sep 2009
Location: Gallatin,TN
Points: 10920
|
Post Options
Thanks(0)
Quote Reply
Posted: 30 Mar 2015 at 11:44am |
I see the tell tale signs of deck rot . Probably need to fix that before it gets worse. Tracy
|
|
No greater gift than healthy grandkids!
|
|
coggonobrien
Orange Level Access
Joined: 14 Nov 2010
Location: Eastern Iowa
Points: 1888
|
Post Options
Thanks(0)
Quote Reply
Posted: 30 Mar 2015 at 11:53am |
|
Tracy,
I'm going to strip it down and blast it. Then patch, paint and reassemble. I've got access to a laser at work so parts ought to fit pretty nice. Any particular spots you feel need attention besides the upper right corner?
|
|
Tracy Martin TN
Orange Level Access
Joined: 11 Sep 2009
Location: Gallatin,TN
Points: 10920
|
Post Options
Thanks(0)
Quote Reply
Posted: 30 Mar 2015 at 5:13pm |
|
The worst thing about those decks, is where they catch debris under the belt guards. They tend to rot out there, to the point a spindle housing will break out.
|
|
No greater gift than healthy grandkids!
|
|
coggonobrien
Orange Level Access
Joined: 14 Nov 2010
Location: Eastern Iowa
Points: 1888
|
Post Options
Thanks(0)
Quote Reply
Posted: 31 Mar 2015 at 7:59pm |
|
front hubs are back on but no pictures. total cost for all new bearings, races, and seals was $72.04
part numbers all x2
timl44610 $5.8115
TIMLM11949 $10.5320
TIMLM11910 $5.6646
TIML44643 $12.4909
WHLBPGS100 $1.5274
|
|
coggonobrien
Orange Level Access
Joined: 14 Nov 2010
Location: Eastern Iowa
Points: 1888
|
Post Options
Thanks(0)
Quote Reply
Posted: 10 Apr 2015 at 7:51am |
|
|
|
macvette
Orange Level

Joined: 13 Jun 2011
Location: nekoosa, wi
Points: 1658
|
Post Options
Thanks(0)
Quote Reply
Posted: 10 Apr 2015 at 2:15pm |
|
Boy, that little one sure is cute! I see she even has the AC sweat pants on. Definately got her headed down the right road. Looks like I can already see "my tractor" on her face about this 620!
|
|
Steve in NJ
Orange Level Access
Joined: 12 Sep 2009
Location: Andover, NJ
Points: 12071
|
Post Options
Thanks(0)
Quote Reply
Posted: 10 Apr 2015 at 5:42pm |
|
That little shop manager is a little doll! LOL! She looks a little like my Grandaughter Emily.
Dave, unfortunately, I dont' have a pic of what the OEM harness under the dash looks like. I have my own 620 wired, but its not even close to stock. Its all custom under the dash...
|
|
39'RC, 43'WC, 48'B, 49'G, 50'WF, 65 Big 10, 67'B-110, 75'716H, 2-620's, & a Motorhead wife
|
|
coggonobrien
Orange Level Access
Joined: 14 Nov 2010
Location: Eastern Iowa
Points: 1888
|
Post Options
Thanks(0)
Quote Reply
Posted: 11 Apr 2015 at 8:25am |
|
Steve I'm good with the underdash wiring, I'm just trying to figure out how to route wires from the frame rail up to the charging system/ignition/front clutch. did they just lay on the motor or was there something better than that.
also I posted a question about the deck spindles in another topic but if somebody wants to answer it here that is fine. do the 2 clamshells split to take a part and replace the bearings or do they stay together.
|
|
coggonobrien
Orange Level Access
Joined: 14 Nov 2010
Location: Eastern Iowa
Points: 1888
|
Post Options
Thanks(0)
Quote Reply
Posted: 11 Apr 2015 at 6:27pm |
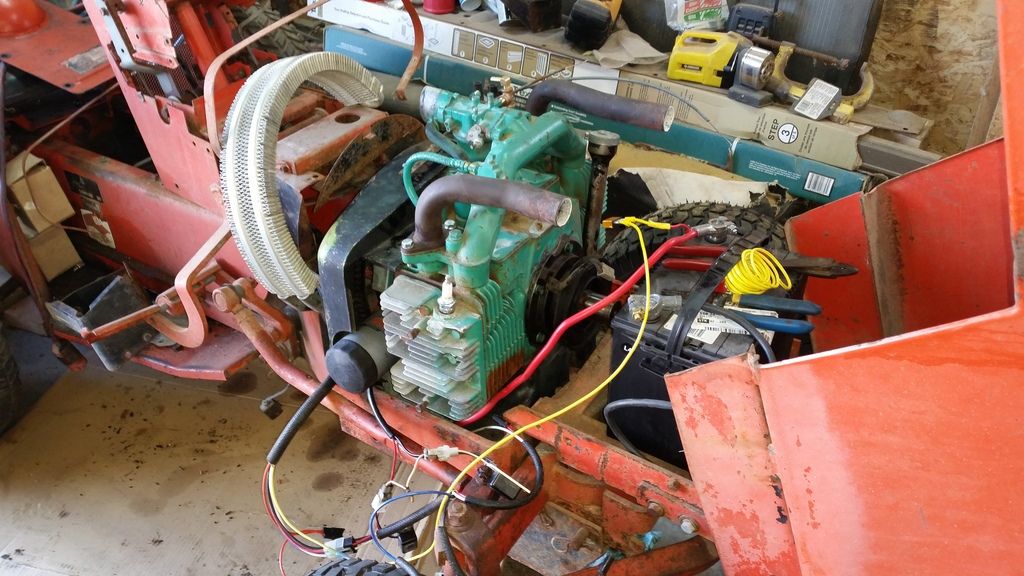 Spun the engine over before setting it in frame. Just used a 20 amp battery charger to juice it. Hooked up the white lead to the harness and the yellow through the 20 amp circuit breaker and then to the positive post on the battery. Hit the light switch and had juice so hit the key and even without the engine bolted down it grounded well enough to bump the.motor when I hit the key. Getting closer.
|
|
coggonobrien
Orange Level Access
Joined: 14 Nov 2010
Location: Eastern Iowa
Points: 1888
|
Post Options
Thanks(0)
Quote Reply
Posted: 11 Apr 2015 at 6:28pm |
|
How does the front portion of the clutch attach to the engine
|
|
HudCo
Orange Level

Joined: 29 Jan 2013
Location: Plymouth Utah
Points: 4063
|
Post Options
Thanks(0)
Quote Reply
Posted: 11 Apr 2015 at 6:52pm |
|
looks real great you have done alot of work But put a oil preasure gauge on while the tin is off and check oil presure i did before i started mine and had no oil presure had to take it bake down found out one of the gears [oil pump gears ] was sheared in side the pump sure glad i didnt wait till the light was hooked up
|
|
HudCo
Orange Level
Joined: 29 Jan 2013
Location: Plymouth Utah
Points: 4063
|
Post Options
Thanks(0)
Quote Reply
Posted: 11 Apr 2015 at 6:56pm |
|
buy the way i put a tee in and put a 2 " guage in the dash above the amp meter sothe light is still hooked up allso
|
|
coggonobrien
Orange Level Access
Joined: 14 Nov 2010
Location: Eastern Iowa
Points: 1888
|
Post Options
Thanks(0)
Quote Reply
Posted: 11 Apr 2015 at 8:36pm |
|
could you post a picture of where you tied oil pressure gauge into
|
|
HudCo
Orange Level
Joined: 29 Jan 2013
Location: Plymouth Utah
Points: 4063
|
Post Options
Thanks(0)
Quote Reply
Posted: 12 Apr 2015 at 10:20am |
|
likie i say when learn how to a pic i think i will have a pic each day but right above the oil filter there is the sen der for the oil light remove that it is 1/8" npt put a bronze close nip. in it screw 1/8 square tee run end with branch straight up put sender back in the end of the run oil line can then still run up with the ingintion wires
|
|
HudCo
Orange Level
Joined: 29 Jan 2013
Location: Plymouth Utah
Points: 4063
|
Post Options
Thanks(0)
Quote Reply
Posted: 12 Apr 2015 at 10:27am |
|
just noticed in a pic on here it shows 90 fittting with a oil line on it that is where your sender would thread in remove that 90 for your tee
|
|


 coggonobrien wrote:


