| Author |
 Topic Search Topic Search  Topic Options Topic Options
|
DanC911 
Orange Level

Joined: 22 Jul 2014
Location: CT, USA
Points: 598
|
 Post Options Post Options
") Thanks(0) Thanks(0)
 Quote Quote  Reply Reply
 Topic: Clutch release bearing on a B Topic: Clutch release bearing on a B
Posted: 09 Jan 2016 at 9:30pm |
The clutch was sticking on my B today and I thought it was just because I hadn't run it in a while but then I could not get it to engage and it wouldn't go into gear. I felt in the inspection hole and a ball bearing came out and the races are very loose. So I guess it has failed and needs replacement. This is the most significant repair I will have attempted so I would appreciate some advice:
I've never split the torque tube from the engine as the manual is telling me to. Any tips?
Any special tools needed for this job? The manual says to press the bearing off. Do I need a press? Could mean a trip to Harbor Freight!!
While I have it apart, is there anything else I should look at or just replace because I am already in there?
Thanks for any tips and advice.
|
|
1950 WD, 1955 B, 66 Jacobsen Chief-O-Matic, 68 Simplicity 2110, 77 IH Cub Cadet 1450 w/front loader
|
 |
|
Sponsored Links
|
|
|
CTuckerNWIL
Orange Level

Joined: 11 Sep 2009
Location: NW Illinois
Points: 22825
|
Post Options
Thanks(1)
Quote Reply
Posted: 09 Jan 2016 at 9:43pm |
|
It would be a good time to check out or replace the pilot bushing, clutch and pressure plate. Get a hold off Rick on here for the WHOLE works at a very good price.
Dick L has posted some good pictures of splitting the tractor. You have to block the front axle so the engine can't flop sideways and you can block the rear end up, lift the engine with an engine hoist and role it away from the rear.
Edited by CTuckerNWIL - 09 Jan 2016 at 9:44pm
|
|
|
|
Chalmersbob
Orange Level
Joined: 11 Sep 2009
Location: Pennsylvania
Points: 2122
|
Post Options
Thanks(1)
Quote Reply
Posted: 09 Jan 2016 at 10:11pm |
|
You will need an engine hoist , or a chain hoist, and some blocks. Jack up the tractor and block it under the torque tube. Then remove the valve cover and attach a chain from two points to support the front end. Then pull them apart. I like to raise the tractor slightly when I block it to take some weight off of the front wheels. You do not ned a puller the remove the throw out bearing. A good vice will do. Be sure to check other items as previously stated. LOL Bob
|
|
4 B's, 1 C's,3 CA's, 2 G's WD, D14, D15, B-1, B10, B12, 712S,
|
|
Hubnut
Orange Level

Joined: 30 Jul 2014
Location: Gainesville, FL
Points: 1817
|
Post Options
Thanks(1)
Quote Reply
Posted: 10 Jan 2016 at 5:36am |
I typically raise the front of the tractor and support the torque tube. Then I use an engine hoist to support the engine weight and pull the engine away from the TT. You can get an idea from this picture. You won't need a press, but it would make things a little easier. In my experience, the throwout bearing can be gently knocked off. A replacement can be gently tapped back onto the carrier with a 2 x 4 block and rubber mallet. If it was mine, while there, I'd rebuild the oil pump, check the pump's drive pin in the cam, resurface the flywheel, check the linkage for the clutch, replace the pilot bushing, and check the ring gear. Good luck and let us know how it goes. Not a hard job at all, just be careful and make sure the tractor is properly supported at all times. 
|
|
1940 B "Lucy"
1941 B w/ Woods L59 "Flavia"
1942 B w/ finish mower "Dick"
1941 C w/ 3-point "Maggie"
1947 C SFW w/ L306 "Trixie"
1972 314H
|
|
PatrickBeth
Silver Level


Joined: 04 Oct 2015
Location: Wisconsin
Points: 184
|
Post Options
Thanks(1)
Quote Reply
Posted: 10 Jan 2016 at 7:01am |
|
Don't do it alone! Two person job. Drop two heavy pieces of channel down to the floor, mounted to the four holes on the torque tube. I welded a horizontal piece to the channels 8 inches off the floor. So I can mount the channels, then roll in floor jack, lift tractor, put a one inch board under, take jack out, better than NASCAR pits! Not tripping on anything. Engine hoist on the front end works nice, give yourself room. If ball bearings are loose, think you many need to look at how it effected the push on clutch plate. New pilot bearing for sure, Sandy Lake gots the bushings. Get a chance to to see the pilot bearing wick. I replaced my wick, but don't know if it was worth it. Grease up that pilot bearing! Two people to align it all up on assembly! Not a bad job, should check the oil pump out while you are there!
|
|
DanC911
Orange Level
Joined: 22 Jul 2014
Location: CT, USA
Points: 598
|
Post Options
Thanks(0)
Quote Reply
Posted: 10 Jan 2016 at 2:03pm |
Thanks for the pic, it is helpful. I will also look for the others mentioned. It look like I need to remove the 4 bolts at the back of the engine...not where you have the front off correct? [/QUOTE]
|
|
1950 WD, 1955 B, 66 Jacobsen Chief-O-Matic, 68 Simplicity 2110, 77 IH Cub Cadet 1450 w/front loader
|
|
DanC911
Orange Level
Joined: 22 Jul 2014
Location: CT, USA
Points: 598
|
Post Options
Thanks(0)
Quote Reply
Posted: 10 Jan 2016 at 2:26pm |
 PatrickBeth wrote: PatrickBeth wrote:
Don't do it alone! Two person job. Drop two heavy pieces of channel down to the floor, mounted to the four holes on the torque tube. I welded a horizontal piece to the channels 8 inches off the floor. So I can mount the channels, then roll in floor jack, lift tractor, put a one inch board under, take jack out, better than NASCAR pits! Not tripping on anything. Engine hoist on the front end works nice, give yourself room. If ball bearings are loose, think you many need to look at how it effected the push on clutch plate. New pilot bearing for sure, Sandy Lake gots the bushings. Get a chance to to see the pilot bearing wick. I replaced my wick, but don't know if it was worth it. Grease up that pilot bearing! Two people to align it all up on assembly! Not a bad job, should check the oil pump out while you are there! |
Thanks for the advice. What should I look for on the oil pump? It seems to have pressure on the gauge.
|
|
1950 WD, 1955 B, 66 Jacobsen Chief-O-Matic, 68 Simplicity 2110, 77 IH Cub Cadet 1450 w/front loader
|
|
steve(ill)
Orange Level Access

Joined: 11 Sep 2009
Location: illinois
Points: 90661
|
Post Options
Thanks(1)
Quote Reply
Posted: 10 Jan 2016 at 2:31pm |
|
I park under a beam in the garage... Jack up under the torque tube like the photo above and block the rear wheels so it don't roll backward..... Take off the gas tank / hood/ battery cables / harness / etc... I leave the motor and axle together.... pound a 2 x 2 between front axle and motor mount as mentioned so the front axle don't pivot side to side.. take the 4 bolts out from the bell housing to the block.... put a chain fall on the roof rafter to two stud bolts on the engine valve cover.... pry the motor and front axle forward and roll it out several inches from the torque tube with support on the motor from the chainfall......... after you roll it out several inches, turn the wheels sideways and park the motor / axle so you can get to the flywheel / throwout ..... you can use the chainfall and beam method if you have no engine hoist.
|
|
Like them all, but love the "B"s.
|
|
wdtom
Silver Level
Joined: 08 Dec 2015
Location: Foster, R.I.
Points: 74
|
Post Options
Thanks(1)
Quote Reply
Posted: 10 Jan 2016 at 2:45pm |
|
As the front end, engine and axle/wheels, is the most unstable and hardest to move I block it, hang it from a beam and move the rear end. You need a dolly and some stable blocks to block up under the torque tube/bell housing and then you can roll the back half of the tractor away. You will need a pilot tool to line up the clutch if you take it off of the flywheel. You can make it out of wood if you have a lathe or can spin a dowel someway. It needs to fit the inside of the splines in the clutch disc and be reduced in dia. for an inch or tow to fit the pilot bearing in the end of the crankshaft. Done carefully splitting a tractor isn't difficult, especially a B. Tom
|
|
steve(ill)
Orange Level Access
Joined: 11 Sep 2009
Location: illinois
Points: 90661
|
Post Options
Thanks(1)
Quote Reply
Posted: 10 Jan 2016 at 2:55pm |
|
|
|
Like them all, but love the "B"s.
|
|
PatrickBeth
Silver Level
Joined: 04 Oct 2015
Location: Wisconsin
Points: 184
|
Post Options
Thanks(1)
Quote Reply
Posted: 10 Jan 2016 at 5:39pm |
|
When I split my B this spring, had good oil pressure on gauge, but when I took the pump apart, I found an old piece of bearing shim, about half the size of my pinky nail! While you are looking at it, might as well check it out. From SandyLake or elsewhere buy the onion gasket for the rebuild of the oil pump. Check the book for the clearance of the pump plate and vane, .oo4 but that's from memory. You also check with a feeler gauge the clearance tight spot of the vane and sidewall, maybe that's the .004 measurement, again from memory. There is also a spring, ball, and little retainer post. It's not a bad job, the whole splitting of it, just take your time, and don't drop anything! I also found on my 38, it's hand crank so 9 inch clutch, but someone in the past has a 8 1/8 clutch in there! So cleaned that up. Machining of the flywheel is 25 bucks well spend. Has anyone ever seen the cork plug in the balancing hole on the flywheel? I thought a broken stud, but it was a piece of cork! Might as well change the felt rear seal!
Edited by PatrickBeth - 10 Jan 2016 at 5:40pm
|
|
WC7610
Orange Level
Joined: 11 Sep 2009
Location: Sioux City, IA
Points: 764
|
Post Options
Thanks(1)
Quote Reply
Posted: 10 Jan 2016 at 6:26pm |
|
some excellent advice here. Unless finances limit you, the clutch/pressure plate/oil pump/pilot bearing will never be easier to get to. Get a shop manual and with the advice on this site, you won't have a problem- if I can do this anyone can!
|
|
Thanks
Most Bad Government has grown out of Too Much Government- Thomas Jefferson
|
|
DanC911
Orange Level
Joined: 22 Jul 2014
Location: CT, USA
Points: 598
|
Post Options
Thanks(0)
Quote Reply
Posted: 25 Jan 2016 at 12:38pm |
I read or heard somewhere that there is a "wick" in the end of the crankshaft that provides just enough lube to keep the pilot bushing from being dry all of the time, which could cause it to seize to the input shaft.
Is this something I need to look at while I have the tractor split? What kind of lube does it take? Does it gets soaked in a heavier oil or is it greased? I checked in the manuals but I don't know what I am looking for.
Thanks everyone for all of your help.
|
|
1950 WD, 1955 B, 66 Jacobsen Chief-O-Matic, 68 Simplicity 2110, 77 IH Cub Cadet 1450 w/front loader
|
|
MrHDC
Orange Level

Joined: 14 Mar 2015
Location: Wichita, KS
Points: 254
|
Post Options
Thanks(1)
Quote Reply
Posted: 25 Jan 2016 at 3:07pm |
|
The wick you speak of goes all the way through the crank into the crankcase. It "wicks" crankcase oil onto the shaft/bushing. It's been pretty accurately described as a controlled leak although some are more controlled than others. Most recommend plugging it and installing an Oilite bushing. I'm sure you'll get some more detail/advice from other folks on here.
Hervey
|
|
PatrickBeth
Silver Level
Joined: 04 Oct 2015
Location: Wisconsin
Points: 184
|
Post Options
Thanks(1)
Quote Reply
Posted: 27 Jan 2016 at 6:50am |
|
[/QUOTE]
It's hard to see much mention in the book for the wick. Sandylake stocks them. It's about 5 inches long 1/2 inch dia. It's like a tights white cotton wick. I don't think you could push it through the hole in the center of the crank from the outside. My old one looked like a cinnamon twig, some say originally asbestos. It was hard enough with the crank out to do. Most drill and tap a plug to seal the hole, there is a pilot bushing bronze in mine, some had fancier bearings or modified the flywheel. Grease up the bushing real good, it lasted how many years without a problem, should be good for our life time.
Edited by PatrickBeth - 27 Jan 2016 at 6:53am
|
|
WD45
Orange Level

Joined: 20 Sep 2009
Location: STAYNER,ONTARIO
Points: 960
|
Post Options
Thanks(0)
Quote Reply
Posted: 27 Jan 2016 at 7:26am |
|
Were do you split or undo the radius rod to the steering box when splitting the tractor?
|
|
Fred Dunlop, G,B,CA, WC,WF, 3 WD45`s,gas, diesel and LP,U,D10 series III, D12,D14,D15 SERIES II,D17 Series IV in Gas and Diesel ,D19 GAS and D21,170 185,210 ,220 an I-600 8070 fwd, 716H and 1920H
|
|
Gary
Orange Level Access
Joined: 13 Sep 2009
Location: Peterborough,On
Points: 5911
|
Post Options
Thanks(1)
Quote Reply
Posted: 27 Jan 2016 at 8:17am |
|
Fred
You got one down south here you are working on? LOL
Easyiest way to disconnect that arm is at the front end of the arm.
Remove the cotter pin, with a large screwdriver Back the end plug out, Lift arm off stud.
Gary
|
|
Ted in NE-OH
Orange Level

Joined: 12 Nov 2009
Location: Austinburg OH
Points: 1703
|
Post Options
Thanks(1)
Quote Reply
Posted: 27 Jan 2016 at 8:13pm |
|
Be careful as the engine will want to flop sideways as it pivots at the front axle . Best if you lift from valve cover bolts or wedge the front axle so the engine can't pivot.
|
|
CA, WD, C, 3 Bs, 2 Gs, WC, I-400, 914
|
|
Chalmersbob
Orange Level
Joined: 11 Sep 2009
Location: Pennsylvania
Points: 2122
|
Post Options
Thanks(1)
Quote Reply
Posted: 27 Jan 2016 at 11:32pm |
The engine can't flop sideways when it is lifted from the valve cove bolts. You lift the engine and the front axle just hangs there. Your not jacking the engine from underneath. Its a job that one person can do very easily. I just did a C and a while back did a D15 by my self. LOL Bob
|
|
4 B's, 1 C's,3 CA's, 2 G's WD, D14, D15, B-1, B10, B12, 712S,
|
|
DanC911
Orange Level
Joined: 22 Jul 2014
Location: CT, USA
Points: 598
|
Post Options
Thanks(0)
Quote Reply
Posted: 28 Feb 2016 at 8:09pm |
Well I've made time to fix the clutch and have it almost back together. I need a little help. Can someone post a pic or diagram of how the clutch return spring is installed? When I took it apart there wasn't one which is probably why the the throw-out fell apart.
Thanks for any help.
|
|
1950 WD, 1955 B, 66 Jacobsen Chief-O-Matic, 68 Simplicity 2110, 77 IH Cub Cadet 1450 w/front loader
|
|
Hubnut
Orange Level
Joined: 30 Jul 2014
Location: Gainesville, FL
Points: 1817
|
Post Options
Thanks(1)
Quote Reply
Posted: 28 Feb 2016 at 8:40pm |
|
Not sure what part you're talking about. The "return" spring on a B is outside near the pedal assembly. Nothing inside the torque tube.
|
|
1940 B "Lucy"
1941 B w/ Woods L59 "Flavia"
1942 B w/ finish mower "Dick"
1941 C w/ 3-point "Maggie"
1947 C SFW w/ L306 "Trixie"
1972 314H
|
|
DanC911
Orange Level
Joined: 22 Jul 2014
Location: CT, USA
Points: 598
|
Post Options
Thanks(0)
Quote Reply
Posted: 29 Feb 2016 at 1:33pm |
I didn't think it was in the torque tube but I cannot tell based on the diagram in the service manual how it connects to the pedal.
Here is a pic of my pedal. I know the linkage is on the wrong side, I just stuck it in there to hold it.
Is the cotter pin one of the attachment points? Where does the other end go?
|
|
1950 WD, 1955 B, 66 Jacobsen Chief-O-Matic, 68 Simplicity 2110, 77 IH Cub Cadet 1450 w/front loader
|
|
MrHDC
Orange Level
Joined: 14 Mar 2015
Location: Wichita, KS
Points: 254
|
Post Options
Thanks(1)
Quote Reply
Posted: 29 Feb 2016 at 2:21pm |
This is on a CA but I think it's the same. Hervey 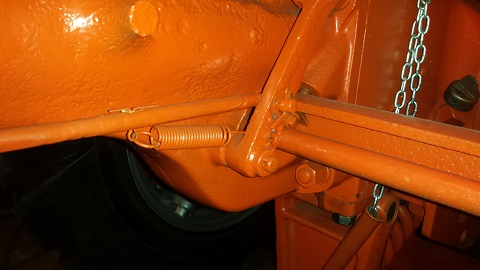
|
|
DanC911
Orange Level
Joined: 22 Jul 2014
Location: CT, USA
Points: 598
|
Post Options
Thanks(0)
Quote Reply
Posted: 29 Feb 2016 at 2:24pm |
MrHDC wrote:
This is on a CA but I think it's the same.
Hervey |
That explains the cotter pin in the linkage. What does the other end hook to? It looks like it goes through the pedal below the linkage.
Edited by DanC911 - 29 Feb 2016 at 2:26pm
|
|
1950 WD, 1955 B, 66 Jacobsen Chief-O-Matic, 68 Simplicity 2110, 77 IH Cub Cadet 1450 w/front loader
|
|
MrHDC
Orange Level
Joined: 14 Mar 2015
Location: Wichita, KS
Points: 254
|
Post Options
Thanks(0)
Quote Reply
Posted: 29 Feb 2016 at 2:33pm |
|
Yeah there's a hole there about midway between the other two. The B might attach differently. Sorry if this is apples and oranges.
Hervey
|
|
DanC911
Orange Level
Joined: 22 Jul 2014
Location: CT, USA
Points: 598
|
Post Options
Thanks(0)
Quote Reply
Posted: 29 Feb 2016 at 2:46pm |
|
Thanks for the help. It clarifies the grainy pic in the manual
|
|
1950 WD, 1955 B, 66 Jacobsen Chief-O-Matic, 68 Simplicity 2110, 77 IH Cub Cadet 1450 w/front loader
|
|
CTuckerNWIL
Orange Level
Joined: 11 Sep 2009
Location: NW Illinois
Points: 22825
|
Post Options
Thanks(0)
Quote Reply
Posted: 29 Feb 2016 at 4:10pm |
DanC911 wrote:
That explains the cotter pin in the linkage. What does the other end hook to? It looks like it goes through the pedal below the linkage.
|
If it went thru the pedal, it won't pull the pedal back. I has to hook to the cross brake shaft or something else that doesn't move. 
Edited by CTuckerNWIL - 29 Feb 2016 at 5:17pm
|
|
|
|
MrHDC
Orange Level
Joined: 14 Mar 2015
Location: Wichita, KS
Points: 254
|
Post Options
Thanks(0)
Quote Reply
Posted: 29 Feb 2016 at 8:50pm |
|
It does go through the pedal and it does pull it back. It's all about the angle of the pedal. The spring only puts a minimal amount of pressure to pull the pedal back an inch or two. The pressure plate springs do most of the work. Trust me, it works.
Hervey
|
|
DanC911
Orange Level
Joined: 22 Jul 2014
Location: CT, USA
Points: 598
|
Post Options
Thanks(0)
Quote Reply
Posted: 01 Mar 2016 at 8:47am |
|
I didn't find a hole in the pedal so I hooked it to the cotter pin that holds the pedal on the shaft. Seems to work. Well except for my next post below
|
|
1950 WD, 1955 B, 66 Jacobsen Chief-O-Matic, 68 Simplicity 2110, 77 IH Cub Cadet 1450 w/front loader
|
|
DanC911
Orange Level
Joined: 22 Jul 2014
Location: CT, USA
Points: 598
|
Post Options
Thanks(0)
Quote Reply
Posted: 01 Mar 2016 at 8:58am |
|
So it is finally back together but the transmission spins whether the clutch pedal is depressed or not. We set the clutch fingers at 1 13/16 inch as the book says and it looks like I have clearance between the bearing and clutch fingers.
Any ideas to what I am not seeing?
|
|
1950 WD, 1955 B, 66 Jacobsen Chief-O-Matic, 68 Simplicity 2110, 77 IH Cub Cadet 1450 w/front loader
|
|


