| Author |
 Topic Search Topic Search  Topic Options Topic Options
|
Hunt4Allis 
Orange Level

Joined: 13 Mar 2018
Location: Ohio
Points: 1172
|
 Post Options Post Options
") Thanks(0) Thanks(0)
 Quote Quote  Reply Reply
 Topic: CA Pump and Drawbar Control Repairs Topic: CA Pump and Drawbar Control Repairs
Posted: 07 Apr 2020 at 5:48pm |
|
Right, ok
|
 |
|
Sponsored Links
|
|
|
Dave(inMA)
Orange Level

Joined: 12 Sep 2009
Location: Grafton, MA
Points: 2400
|
Post Options
Thanks(0)
Quote Reply
Posted: 07 Apr 2020 at 5:21pm |
Thanks, Matt.
I have to push on them - doesn't take hardly any pressure though. They'd drop like a rock if an implement were on there!
|
|
WC, CA, D14, WD45
|
|
Hunt4Allis
Orange Level
Joined: 13 Mar 2018
Location: Ohio
Points: 1172
|
Post Options
Thanks(0)
Quote Reply
Posted: 07 Apr 2020 at 5:13pm |
|
Hey Dave nice video. When you push forward on your pump handle lever to lower the arms do yours go down on their own or are you pushing on them to make them go down?
|
|
Dave(inMA)
Orange Level
Joined: 12 Sep 2009
Location: Grafton, MA
Points: 2400
|
Post Options
Thanks(0)
Quote Reply
Posted: 07 Apr 2020 at 5:09pm |
I am happy to report that the pump is back on the tractor! It works much better than before - no more waiting a minute or two for the first lift of the day to happen. The leak from the drawbar control is no more. In fact, there are no leaks! All that's left is to reinstall the platform and she'll be good to go.
Here's a short video:
[TUBE]fvh-n2mPneU[/TUBE]
I want to thank everyone who lent a hand to help me through this project. I have to say that it was more than a little scary to dig into the pump - way too many ways for something to go wrong. So whether you texted or Pm'd or posted on here or just read the thread, THANKS! And it helped a lot to have Hunt4Allis's thread going at the same time.
Stay safe, everyone. Dave
Edited by Dave(inMA) - 07 Apr 2020 at 5:10pm
|
|
WC, CA, D14, WD45
|
|
Dave(inMA)
Orange Level
Joined: 12 Sep 2009
Location: Grafton, MA
Points: 2400
|
Post Options
Thanks(0)
Quote Reply
Posted: 05 Apr 2020 at 12:52pm |
Jim wins the prize! Yes, the pump isn't on the tractor. I'm glad to hear that the engage shaft will limit D's travel. 
|
|
WC, CA, D14, WD45
|
|
Jim.ME
Orange Level
Joined: 19 Nov 2016
Location: Maine
Points: 979
|
Post Options
Thanks(0)
Quote Reply
Posted: 05 Apr 2020 at 12:27pm |
|
It sounds like you are adjusting with the pump off the tractor, if so, it doesn't have the PTO control shaft to hit as Hunt4Allis pointed out.
|
|
Hunt4Allis
Orange Level
Joined: 13 Mar 2018
Location: Ohio
Points: 1172
|
Post Options
Thanks(0)
Quote Reply
Posted: 05 Apr 2020 at 12:12pm |
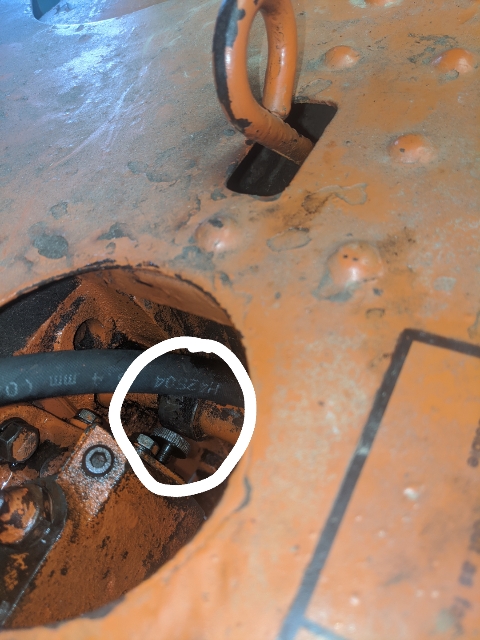 PTO engage shaft circled in white
|
|
Hunt4Allis
Orange Level
Joined: 13 Mar 2018
Location: Ohio
Points: 1172
|
Post Options
Thanks(0)
Quote Reply
Posted: 05 Apr 2020 at 12:10pm |
|
That's weird because my thumb screw that you're talkin about labeled d hits the engage PTO shaft and won't let it come all the way out
|
|
Dave(inMA)
Orange Level
Joined: 12 Sep 2009
Location: Grafton, MA
Points: 2400
|
Post Options
Thanks(0)
Quote Reply
Posted: 05 Apr 2020 at 11:38am |
Couple of quick updates:
1. I flushed both lift cylinders today. Cylinder in the vise, hose end in a small container of clean hydraulic oil; worked piston out to suck clean oil in and then pushed it in to "spit" the fluid into another container. Took several cycles to get the fluid to run clean. [In hindsight, I think it'd have been easier to disassemble the cylinders and wash them out!] Interesting: small globs of blue RTV were lurking in one cylinder; I had found some larger chunks when I took the pump apart - just 2-3. Someone has been in here before me!
2. I decided to reset the controls [A,B,C,D] on the pump before reinstalling it. I have an issue with D. The instruction I was following reads: "Screw D out as far as possible." I found that D will thread completely out of the pump....I'm doubting that this is right - certainly not desirable. D is the Control Valve Adjusting Screw [#26 in the parts diagram].
Can anyone confirm that D should not thread all the way out? I plan to find a small nut to thread onto the shaft of D to use as a locking nut so D will not vibrate out. Does that sound like a reasonable approach?
Edited by Dave(inMA) - 05 Apr 2020 at 11:39am
|
|
WC, CA, D14, WD45
|
|
Dave(inMA)
Orange Level
Joined: 12 Sep 2009
Location: Grafton, MA
Points: 2400
|
Post Options
Thanks(0)
Quote Reply
Posted: 02 Apr 2020 at 6:05pm |
Absolutely! 
|
|
WC, CA, D14, WD45
|
|
chaskaduo
Orange Level

Joined: 26 Nov 2016
Location: Twin Cities
Points: 5200
|
Post Options
Thanks(0)
Quote Reply
Posted: 02 Apr 2020 at 5:51pm |
This Help? 
|
|
1938 B, 79 Dynamark 11/36 6spd, 95 Weed-Eater 16hp, 2010 Bolens 14hp
|
|
Dave(inMA)
Orange Level
Joined: 12 Sep 2009
Location: Grafton, MA
Points: 2400
|
Post Options
Thanks(0)
Quote Reply
Posted: 02 Apr 2020 at 4:59pm |
Here's an update.
I removed the remaining parts from the two round bores in the pump. Everything looked pristine. Installed the new o-rings that came in the kit from Sandy Lake. Installed three gaskets using high-tack gasket adhesive. The pump is all reassembled - just waiting for a gasket from Sandy Lake, the one that's between the pump and the pto reservoir case.
Thanks for all the help thus far. Please keep fingers crossed that there are no leaks when I fire this tractor up.
Dave
|
|
WC, CA, D14, WD45
|
|
Hunt4Allis
Orange Level
Joined: 13 Mar 2018
Location: Ohio
Points: 1172
|
Post Options
Thanks(0)
Quote Reply
Posted: 31 Mar 2020 at 6:31pm |
|
I bet I can get it all cleaned out now, thanks 2 the guy that commented about having three drain plugs removed?
I had some thousand grit sandpaper so I'm polishing everything up and making sure nothing looks out of place or damaged in mine and using brake cleaner and an air compressor today to get it all super clean...
|
|
Dave(inMA)
Orange Level
Joined: 12 Sep 2009
Location: Grafton, MA
Points: 2400
|
Post Options
Thanks(0)
Quote Reply
Posted: 31 Mar 2020 at 6:27pm |
|
I'm pretty sure that the tranny drain is the lowest of the three, so you might find the worst in there. You should be good to go now that you've drained all three.
|
|
WC, CA, D14, WD45
|
|
Hunt4Allis
Orange Level
Joined: 13 Mar 2018
Location: Ohio
Points: 1172
|
Post Options
Thanks(0)
Quote Reply
Posted: 31 Mar 2020 at 6:19pm |
|
Hey Dave once I realized that I was not removing the farthest forward plug I did so and the same milky nasty-looking oil came out!
so I think I finally found the reason why I could not clean up my oil...
|
|
Dave(inMA)
Orange Level
Joined: 12 Sep 2009
Location: Grafton, MA
Points: 2400
|
Post Options
Thanks(0)
Quote Reply
Posted: 31 Mar 2020 at 6:07pm |
 Hunt4Allis wrote: Hunt4Allis wrote:
Dave I know what you mean, because the rear of my tractor is so covered in oil and junk that I think it would take me an entire day to clean all of it off (which I may get to do depending on how long I'm off work) |
Took me 20 minutes to clean up after I came in from the shop!
|
|
WC, CA, D14, WD45
|
|
Hunt4Allis
Orange Level
Joined: 13 Mar 2018
Location: Ohio
Points: 1172
|
Post Options
Thanks(0)
Quote Reply
Posted: 31 Mar 2020 at 4:12pm |
|
Dave I know what you mean, because the rear of my tractor is so covered in oil and junk that I think it would take me an entire day to clean all of it off (which I may get to do depending on how long I'm off work)
|
|
Dave(inMA)
Orange Level
Joined: 12 Sep 2009
Location: Grafton, MA
Points: 2400
|
Post Options
Thanks(0)
Quote Reply
Posted: 31 Mar 2020 at 3:36pm |
Thanks to cdsloop's post on Hunt4Allis's CA Hydraulic Pump thread, I located and drained the differential drain plug this afternoon. Needless to say, this is the first time that's been done since I bought this tractor in 2007. The oil that came out was not too ugly!
I bought new crush washers at the local NAPA shop and installed all three drain plugs. Not a big deal, though I got to practice my contortionist skills when installing the differential plug. Started cleaning the accumulated oil/dirt/grease that has accumulated all over the SC hitch system over the years. Hopefully I've cured the oil leaks that have fueled the accumulation of the gunk!
|
|
WC, CA, D14, WD45
|
|
Dave(inMA)
Orange Level
Joined: 12 Sep 2009
Location: Grafton, MA
Points: 2400
|
Post Options
Thanks(0)
Quote Reply
Posted: 30 Mar 2020 at 2:13pm |
I have ordered the set of gaskets from Sandy Lake.
Also talked with Bill in the service area about some of my questions. He thinks that the original problem (slow rising arms on cold start) was being caused by low oil level.
I know that I was leaking oil from the drawbar control unit - and likely also from the tranny oil plug. When I drained the tranny, I noticed that oil had been leaking at the drain plug, probably due to a worn crush washer. So the next steps are to put the pump back together once I get the new gaskets and to replace the crush washer.
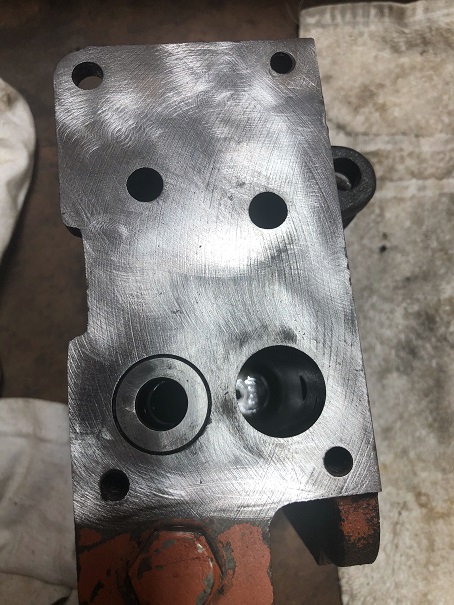
Started reassembling the pump by cleaning up the surface that mates to the drawbar control:
Hopefully this will all go well!
Dave
Edited by Dave(inMA) - 30 Mar 2020 at 4:54pm
|
|
WC, CA, D14, WD45
|
|
Dave(inMA)
Orange Level
Joined: 12 Sep 2009
Location: Grafton, MA
Points: 2400
|
Post Options
Thanks(0)
Quote Reply
Posted: 29 Mar 2020 at 3:11pm |
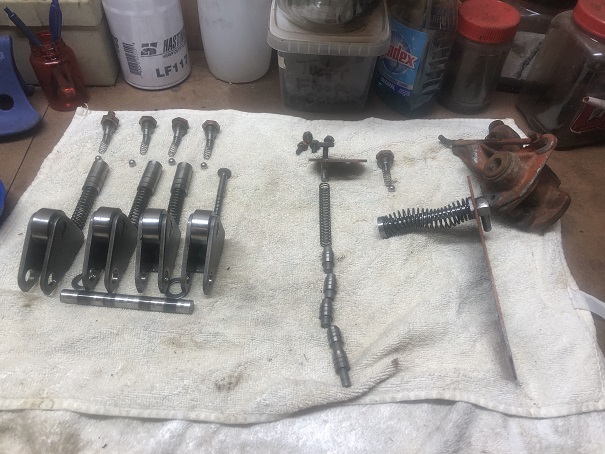
More disassembly this morning. Here's what's out of the pump thus far:
I've laid everything out in exactly the order it came out of the pump - no parts have jumped across the shop yet!
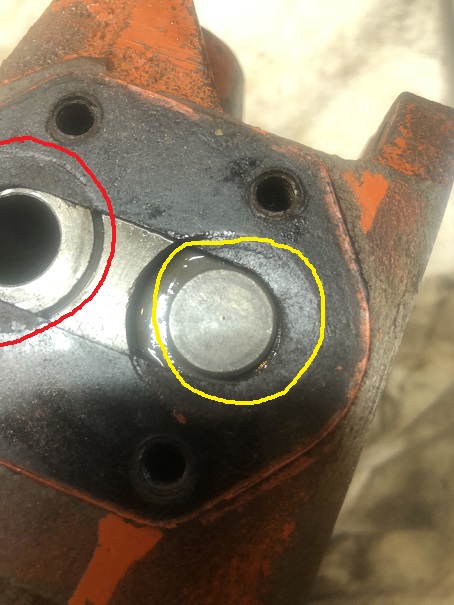
Couple of things I could use some help with. First, here's the the scene with the control valve cover off and the inner (smaller diameter) parts of the control valve assembly removed. Note the area marked in red:
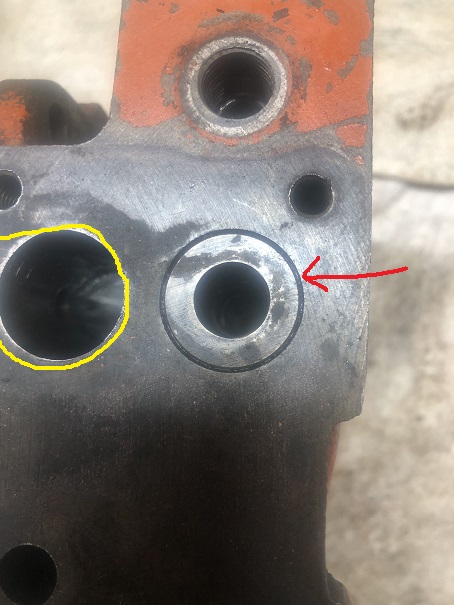
How is the outer part of the control valve assembly removed? This is the other end of this assembly:
The red arrow is pointing to the outer part of the control valve assembly.
And how are the parts inside the bore circled in yellow removed? Hunt4Allis says they all come out......just a little concerned about trying to drive them out.
Any hints would be happily accepted! And thanks for your help.
Stay well and safe. Dave
Edited by Dave(inMA) - 29 Mar 2020 at 3:35pm
|
|
WC, CA, D14, WD45
|
|
frnkeore
Silver Level


Joined: 07 May 2019
Location: Southern Oregon
Points: 362
|
Post Options
Thanks(0)
Quote Reply
Posted: 29 Mar 2020 at 2:27pm |
SteveM C/IL wrote:
I understand all the concern about silicon but the biggest problem is everyone uses WAAAAYYY too much. |
Yes!!! Although it is hard to not use to much. As a old mechanic, I dislike "sealers" that harden. I only use wheel bearing type grease on gaskets. It seals well and will actually expand a gasket, if it embeds into it. As a machinist, I don't use gaskets to much, unless there are end play issues to be aware of. 2 machined surfaces, that are flat and have a smooth surface (a must), won't leak. They can't leak because there is no space for the fluid to migrate. If the surface has visible machine marks and is still flat, a VERY small amount of silicon will seal the machined surface. It doesn't even have to be gasket type silicon. Run a file over the surface, to make sure that there are no raised spots. Start with a amount of silicon, that you know is NOT enough and add small amounts to it. Spread it as thin as possible. Try to leave a space on the oil side of the part, for it to expand into and completely around any bolt holes. Again, a very thin coat.
|
|
Frank
1959 D17 Series I #24001+, '59 D14
'55 & '59 Ford 850 & 861
Ferguson TO 35 Deluxe, Oliver 70 and 5 more.
|
|
SteveM C/IL
Orange Level Access
Joined: 12 Sep 2009
Location: Shelbyville IL
Points: 8995
|
Post Options
Thanks(0)
Quote Reply
Posted: 29 Mar 2020 at 12:54pm |
|
I understand all the concern about silicon but the biggest problem is everyone uses WAAAAYYY too much.
|
|
sparky
Orange Level Access

Joined: 13 May 2011
Location: So. Indiana
Points: 1838
|
Post Options
Thanks(0)
Quote Reply
Posted: 29 Mar 2020 at 11:46am |
|
I use the dark brown sealant in a can with a cap brush.
|
|
It's the color tractor my grandpa had!
|
|
Hunt4Allis
Orange Level
Joined: 13 Mar 2018
Location: Ohio
Points: 1172
|
Post Options
Thanks(0)
Quote Reply
Posted: 29 Mar 2020 at 11:43am |
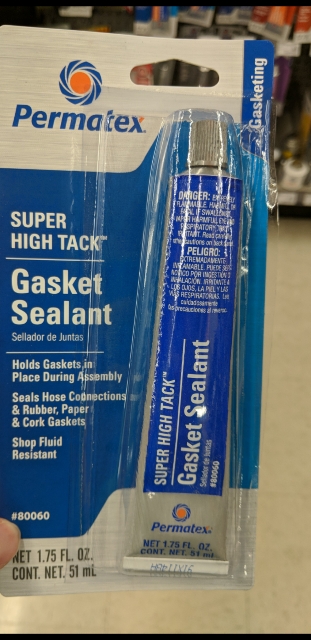 I ended up with this
|
|
sparky
Orange Level Access
Joined: 13 May 2011
Location: So. Indiana
Points: 1838
|
Post Options
Thanks(0)
Quote Reply
Posted: 29 Mar 2020 at 11:37am |
I personally use aviation gasket sealer from Permatex. Won’t use silicone. A guy had me work on his CA pump once when he said it worked fine one day and the next day wouldn’t work. I pulled the pump and found 3 little globs of silicone in the pick up tube. I still have those globs of silicone on the bench as a reminder.
|
|
It's the color tractor my grandpa had!
|
|
Hunt4Allis
Orange Level
Joined: 13 Mar 2018
Location: Ohio
Points: 1172
|
Post Options
Thanks(0)
Quote Reply
Posted: 29 Mar 2020 at 8:40am |
|
Dr Allis
What is recommended to use as a sealer for all 4 gaskets that are required to rebuild the pump and associated components?
Is it readily available at auto parts stores or is it something special...
Edited by Hunt4Allis - 29 Mar 2020 at 8:41am
|
|
jaybmiller
Orange Level Access
Joined: 12 Sep 2009
Location: Greensville,Ont
Points: 25276
|
Post Options
Thanks(0)
Quote Reply
Posted: 29 Mar 2020 at 8:03am |
The gasgek material I used wasn't 'paper thin', maybe 50-60 thou thick and said 'oil proof'. I can see needing glue if paper thin. I did 'polish' the surfaces real good with fine wire brush in angle grinder. if you have glue, I'd use it though...
|
|
3 D-14s,A-C forklift, B-112
Kubota BX23S lil' TOOT( The Other Orange Tractor)
Never burn your bridges, unless you can walk on water
|
|
DrAllis
Orange Level Access
Joined: 12 Sep 2009
Points: 22844
|
Post Options
Thanks(0)
Quote Reply
Posted: 29 Mar 2020 at 7:46am |
|
No sealer on those paper gaskets will insure that you will have oil leaks. If this is OK, go right ahead.
|
|
Hunt4Allis
Orange Level
Joined: 13 Mar 2018
Location: Ohio
Points: 1172
|
Post Options
Thanks(0)
Quote Reply
Posted: 29 Mar 2020 at 7:37am |
|
Right, so all gaskets ok to be dry?( No sealer?)
My only fear is if another problem arises with pump disassembly would be easier if put in dry...
|
|
Dave(inMA)
Orange Level
Joined: 12 Sep 2009
Location: Grafton, MA
Points: 2400
|
Post Options
Thanks(0)
Quote Reply
Posted: 29 Mar 2020 at 6:57am |
Jay - what they say: "necessity is the mother of invention". Maybe that gasket is supposed to be glued on, but it sure makes disassembly a challenge!
Matt - that is weird...someone with imagination did that!!
|
|
WC, CA, D14, WD45
|
|