| Author |
 Topic Search Topic Search  Topic Options Topic Options
|
ryan_allis180_MN 
Bronze Level

Joined: 30 Jun 2019
Location: MN
Points: 22
|
 Post Options Post Options
") Thanks(0) Thanks(0)
 Quote Quote  Reply Reply
 Topic: Allis 180 3 point lift cylinder removal Topic: Allis 180 3 point lift cylinder removal
Posted: 03 Jan 2020 at 5:51pm |
|
I've got an Allis 180 with both 3 point lift cylinders leaking copious amounts of fluid. I have read on the forum about the process to get the cylinders off but I have one issue. My tractor has a cab and it is impossible to work on the front pins from the top side. And on the left side, I can't even access the front window in the casing to work from that direction unless I remove the battery box and all that goes with that. I have read the seals can be replaced without removing the cylinder from the tractor but you have to work off a clip down the oil inlet hole. I can get the elbow removed but won't be able to see down the hole to see what I am doing. Any suggestions? Can the clip removal and replacement be done blind by someone never having done it?
|
 |
|
Sponsored Links
|
|
|
ryan_allis180_MN
Bronze Level
Joined: 30 Jun 2019
Location: MN
Points: 22
|
Post Options
Thanks(0)
Quote Reply
Posted: 03 Jan 2020 at 8:16pm |
Update...I took the right cylinder off since I could access the front hole on that one. Figured I could practice getting the internal snap ring off on that one so I could do it blind on the left one. Took the elbow off and I don't really see a definite ring to remove. There appears to be several grooves, almost like threads? Really tough to see through the fitting hole and in addition they are shifted to one side of the hole, not directly underneath. Can anyone look at the picture and tell me if this is the type of cylinder with the internal snap ring? I am not sure if they are original to the tractor. 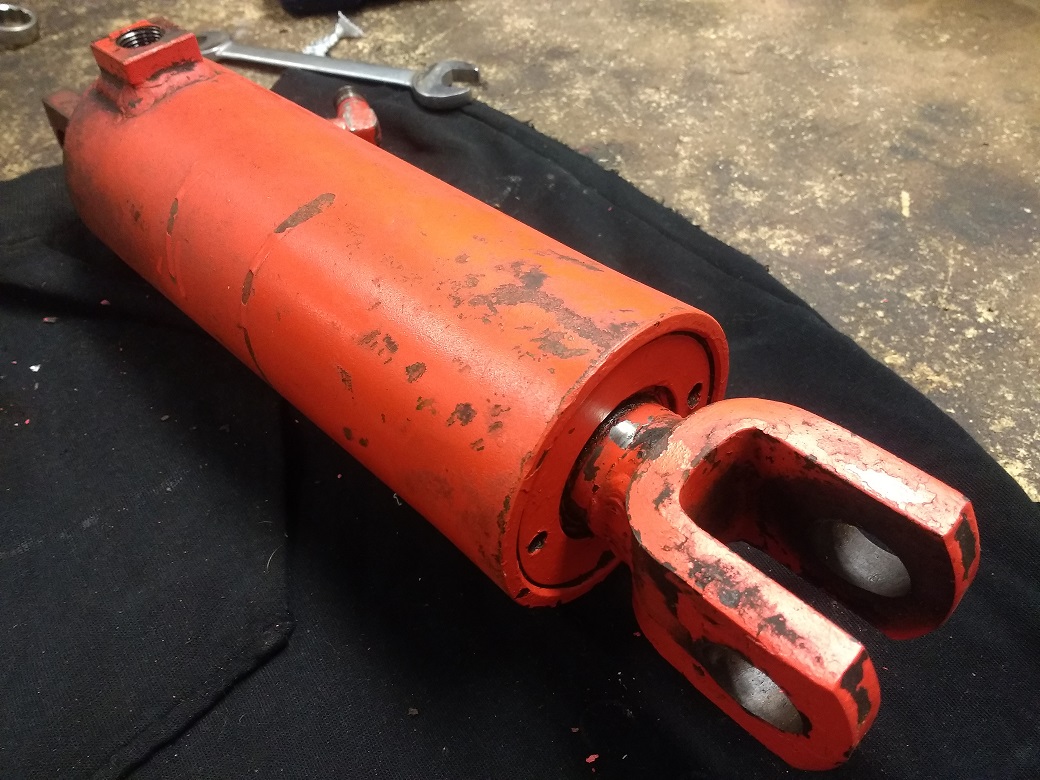
|
|
DSeries4
Orange Level


Joined: 12 Sep 2009
Location: Ontario, Canada
Points: 7628
|
Post Options
Thanks(0)
Quote Reply
Posted: 03 Jan 2020 at 8:24pm |
|
That is the original cylinder to the tractor. I do not have a 100 series tractor with a cab, but I did the cylinders on my 185 last winter and it was an easy job to remove the battery box. That gave a lot more room to access the cylinder pin. I needed that space. The front pins were rusted solid on both sides. Was a hell of a job getting those things loosened up.
|
|
'49 G, '54 WD45, '55 CA, '56 WD45D, '57 WD45, '58 D14, '59 D14, '60 D14, '63 D15D, '66 D15II, '66 D21II, '67 D17IV, '67 D17IVD, '67 190XTD, '73 620, '76 185, '77 175, '84 8030, '85 6080
|
|
ryan_allis180_MN
Bronze Level
Joined: 30 Jun 2019
Location: MN
Points: 22
|
Post Options
Thanks(0)
Quote Reply
Posted: 03 Jan 2020 at 8:35pm |
|
Thanks DSeries4. The ring clip that is supposed to be under the fitting hole, it supposedly moves into a deeper groove to give clearance to remove the rod? Is that groove towrd the front or rear of the cylinder? In other words, does the ring get moved to the front or rear of the cylinder (pretending it is still on the tractor)? Also, how on god's great earth do you get the ring back on after reassembly?
|
|
DrAllis
Orange Level Access
Joined: 12 Sep 2009
Points: 22748
|
Post Options
Thanks(0)
Quote Reply
Posted: 03 Jan 2020 at 8:39pm |
|
The cylinder in that picture is the old design that takes a spanner wrench to remove the nut on the outside and once pulled apart, the nut on the inside. Loctite inside nut or it will work loose.
|
|
ryan_allis180_MN
Bronze Level
Joined: 30 Jun 2019
Location: MN
Points: 22
|
Post Options
Thanks(0)
Quote Reply
Posted: 03 Jan 2020 at 8:43pm |
|
Thanks Dr. Allis. I thought something was wrong when I looked into the fitting hole. I assume the spanner wrench uses the two holes on the cylinder cap?
|
|
DrAllis
Orange Level Access
Joined: 12 Sep 2009
Points: 22748
|
Post Options
Thanks(0)
Quote Reply
Posted: 03 Jan 2020 at 8:49pm |
|
Yup and it may take a torch to loosen the Loctite on the threads.
|
|
ryan_allis180_MN
Bronze Level
Joined: 30 Jun 2019
Location: MN
Points: 22
|
Post Options
Thanks(0)
Quote Reply
Posted: 03 Jan 2020 at 8:52pm |
|
Any idea what seal kit this particular cylinder uses? The ones I have seen only have the 2 seals but I'm guessing those are for the internal snap ring style.
|
|
DrAllis
Orange Level Access
Joined: 12 Sep 2009
Points: 22748
|
Post Options
Thanks(0)
Quote Reply
Posted: 03 Jan 2020 at 8:56pm |
|
V- packing stack. Same as most all series 4 D-17's or 190XT's.
|
|
JC-WI
Orange Level Access
Joined: 11 Sep 2009
Location: wisconsin
Points: 34595
|
Post Options
Thanks(0)
Quote Reply
Posted: 03 Jan 2020 at 9:29pm |
You need a spanner wrench that goes in them two holes on the outer
end of the tube... in the threaded collar, and turn it out and then the
whole rod will come out of tube... Put new seals in and put it back
together. And the seal kit for that cylinder form ACGO will have
instructions in it... Remember that you need the seals for the small Rod cylinder, not the big bore rod..
|
|
He who says there is no evil has already deceived himself
The truth is the truth, sugar coated or not. Trawler II says, "Remember that."
|
|
DrAllis
Orange Level Access
Joined: 12 Sep 2009
Points: 22748
|
Post Options
Thanks(0)
Quote Reply
Posted: 04 Jan 2020 at 4:56am |
|
Use plenty of grease on the new packing and try to screw it back into the barrel to minimize damage to the new V-packing.
|
|
ryan_allis180_MN
Bronze Level
Joined: 30 Jun 2019
Location: MN
Points: 22
|
Post Options
Thanks(0)
Quote Reply
Posted: 04 Jan 2020 at 10:00am |
|
Thanks guys. That diagram and instructions help a lot. I'm not coming up with any results when searching for that spanner wrench. Anyone have any insight as to a modern part number for it?
|
|
Kevin in WA
Orange Level Access
Joined: 08 Feb 2010
Location: Lynden, WA
Points: 614
|
Post Options
Thanks(0)
Quote Reply
Posted: 04 Jan 2020 at 11:01am |
|
I have taken the cylinder bracket off with the cylinder by cutting off the head of the bolt that's behind the pin and then use a press to remove the stuck pin, the rest of the cut bolt can then be removed with vise grips.
|
|
DougG
Orange Level
Joined: 20 Sep 2009
Location: Mo
Points: 8428
|
Post Options
Thanks(0)
Quote Reply
Posted: 04 Jan 2020 at 11:15am |
|
My opinion, I'd take it to a AGCO shop or tractor shop close and let them do it , last one I had done was $120 , saved a lot of time looking for the right spanner wrench etc,,
|
|
ryan_allis180_MN
Bronze Level
Joined: 30 Jun 2019
Location: MN
Points: 22
|
Post Options
Thanks(0)
Quote Reply
Posted: 04 Jan 2020 at 11:51am |
|
I hear ya Doug. I am working on getting the left cylinder off now. Loosened the battery box and was able to lift it enough to access the opening in front of the pin. Having a cab on this one really hinders access and makes getting the battery box completely out almost impossible. The pin on the right side came out using the chisel method described in other posts. Hoping the left one does the same. The seal kit costs roughly $50 per side and an elcheapo adjustable spanner is about $30 off Amazon. Supposedly need two of those. So that's $160 for everything. We have a cylinder rebuilder here in town (not Agco). I think I'll check with them and the nearest Agco for a quote.
|
|
ac fleet
Orange Level
Joined: 12 Jan 2014
Location: Arrowsmith, ILL
Points: 2337
|
Post Options
Thanks(0)
Quote Reply
Posted: 04 Jan 2020 at 1:00pm |
|
Spanners are a piece of cake to make!---- I made some for my Case 580ck backhoe, the 1530 skid loader, and several other odd sizes. I have no idea where you get new ones, quite expensive probably.
|
|
http://machinebuildersnetwork.com/
|
|
ryan_allis180_MN
Bronze Level
Joined: 30 Jun 2019
Location: MN
Points: 22
|
Post Options
Thanks(0)
Quote Reply
Posted: 04 Jan 2020 at 1:53pm |
|
Got the left one off. I appreciate my Allis but not sure what someone was smoking when they dreamed up that design for anchoring the cylinder!
|
|
DougG
Orange Level
Joined: 20 Sep 2009
Location: Mo
Points: 8428
|
Post Options
Thanks(0)
Quote Reply
Posted: 04 Jan 2020 at 1:56pm |
|
No kidding there !
|
|
Alvin M
Orange Level
Joined: 24 Jun 2018
Location: PA
Points: 819
|
Post Options
Thanks(0)
Quote Reply
Posted: 04 Jan 2020 at 2:40pm |
|
I Rebuilt Those Right On The Tractor Don't Have To Pull Front Pin
|
|
JC-WI
Orange Level Access
Joined: 11 Sep 2009
Location: wisconsin
Points: 34595
|
Post Options
Thanks(0)
Quote Reply
Posted: 04 Jan 2020 at 3:01pm |
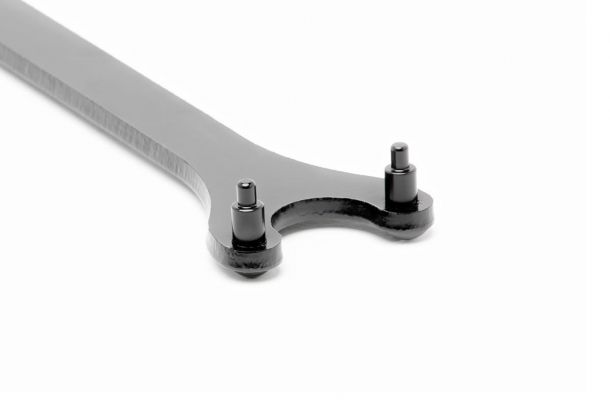
Just like Alvin, I rebuilt mine right on the tractor... No hose removal, No taking cylinder off brackets, just pull the pin on the lift arm side and raise the 3pt arms up and out of your way and then use a spanner wrench to take the end cap off and slide the rod out and work on it.
Spanner wrench will look something like this or equivalent item homemade to do the job... And you can do it for the cost of the seals and the wrench /time.
|
|
He who says there is no evil has already deceived himself
The truth is the truth, sugar coated or not. Trawler II says, "Remember that."
|
|
ryan_allis180_MN
Bronze Level
Joined: 30 Jun 2019
Location: MN
Points: 22
|
Post Options
Thanks(0)
Quote Reply
Posted: 04 Jan 2020 at 3:45pm |
|
The cab makes it difficult to do anything "on the tractor" in that region. You just can't get in there to see what you are doing. Taking the wheels off would probably help. Pick your poison I guess!
|
|
levipatch
Bronze Level
Joined: 05 Jan 2019
Location: North carolina
Points: 46
|
Post Options
Thanks(0)
Quote Reply
Posted: 04 Jan 2020 at 8:04pm |
|
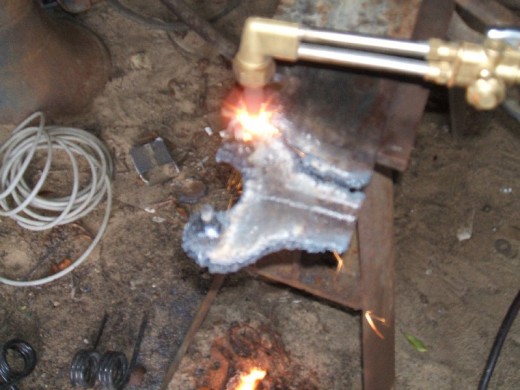
Make you a steel flat bar like the picture bout 14 in long. Weld it to (good tack) the spanner nut carefully. Put cyl in a vice just right.. Heat upper cyl with torch,, Hit it one solid lick with 5,6 lb hammer and if your very lucky, it will loosen. or repeat............Spanner wrench worthless for this application. Don't waste money. little holes too bugered up to hold
|
|
Billy..Big cam 300, bcam 400,,941 CAT.,,Deere excavator..900 row crop.. 66 D 17 diesel IV... 985 Pratt and Whitney..4360 Pratt and Whitney... gitten tired !
|
|
TimNearFortWorth
Orange Level

Joined: 12 Dec 2009
Points: 2014
|
Post Options
Thanks(0)
Quote Reply
Posted: 05 Jan 2020 at 7:59am |
Scrutinize the seal area closely on the barrel when you get them apart as they do not tolerate any material loss/pitting well. Nothing like removing them for redress only to have theweep hole say "hello" after reinstalling. Reputable shop can build exact match barrel housing reasonably, good for another 30+ years, if rod plating is also good.
|
|
DrAllis
Orange Level Access
Joined: 12 Sep 2009
Points: 22748
|
Post Options
Thanks(0)
Quote Reply
Posted: 05 Jan 2020 at 8:06am |
|
You still need a spanner wrench to replace the seals inside and it is the same wrench used to disassemble.
|
|
JC-WI
Orange Level Access
Joined: 11 Sep 2009
Location: wisconsin
Points: 34595
|
Post Options
Thanks(0)
Quote Reply
Posted: 05 Jan 2020 at 9:56am |
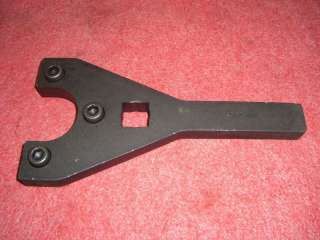
From picture, the spanner holes do not look to bad yet, but you do need a good solid spanner tool...
One man's answer to getting a spanner wrench...
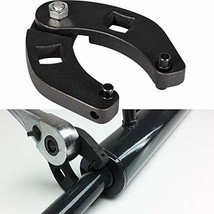
An adjustable spanner, not my preference for this spot, but it might work like a charm.
-Going back to the instruction book above, it talks about locktite... I have not needed to heat any of the cylinders to take apart that I have put seals into... and did not put locktite on afterwards either.
|
|
He who says there is no evil has already deceived himself
The truth is the truth, sugar coated or not. Trawler II says, "Remember that."
|
|
DrAllis
Orange Level Access
Joined: 12 Sep 2009
Points: 22748
|
Post Options
Thanks(0)
Quote Reply
Posted: 05 Jan 2020 at 1:05pm |
|
Back in their day, when plowing using the Traction Booster system, those cylinders went in and out hundreds of times every day, let along in 5 or 10 years of plowing. I'd say 50% of them I took apart (back then) was because there wasn't any Loctite used and the inner nut had backed off, allowing the V-packing to be loose.
|
|
ryan_allis180_MN
Bronze Level
Joined: 30 Jun 2019
Location: MN
Points: 22
|
Post Options
Thanks(0)
Quote Reply
Posted: 06 Jan 2020 at 4:54pm |
|
Thanks everyone. I think I'm going to let the local hydraulics shop tackle them. i called the AGCO dealer and they said they don't do them and they bring theirs to the same local shop, lol. I just have the feeling that the cheapo adjustable spanner is going to basically be worthless on these. And If I spend the money on a decnt one (actually 2 needed) I might as well just let the shop do it. My only fear is that I'm going to get the old "these need a lot of work (read money)" story, lol.
|
|
ryan_allis180_MN
Bronze Level
Joined: 30 Jun 2019
Location: MN
Points: 22
|
Post Options
Thanks(0)
Quote Reply
Posted: 13 Jan 2020 at 5:53pm |
|
Update, the cylinders are at the local shop. They estimated $40 in seals per cylinder and an hour per cylinder labor. Their shop rate is $95/hr. So probably looking at @$140 per cylinder.
|
|
ryan_allis180_MN
Bronze Level
Joined: 30 Jun 2019
Location: MN
Points: 22
|
Post Options
Thanks(0)
Quote Reply
Posted: 20 Jan 2020 at 6:14pm |
|
Update, according to the shop the cylinders came apart relatively easy. Cylinder bores were in good shape and did not require honing. Total for 2 cylinders came in at $240. Got them installed and am now leak free (at least at that one specific area, lol).
|
|
DougG
Orange Level
Joined: 20 Sep 2009
Location: Mo
Points: 8428
|
Post Options
Thanks(0)
Quote Reply
Posted: 20 Jan 2020 at 6:40pm |
|
Good job ! Glad to hear it was cheap,, a lot of the time you think your saving money , but in all your time finding / making spanner wenches etc,, its cheaper to have it done
|
|