| Author |
 Topic Search Topic Search  Topic Options Topic Options
|
nikel 
Bronze Level


Joined: 31 Oct 2013
Location: Callahan, Flori
Points: 15
|
 Post Options Post Options
") Thanks(0) Thanks(0)
 Quote Quote  Reply Reply
 Topic: AC 160 hydraulic remote Topic: AC 160 hydraulic remote
Posted: 30 Dec 2022 at 12:10pm |
Wondering if there is anyone on this forum with experience/knowledge of the hydraulic remote option on an AC 160? The remote used to work... I tore the tractor down for a engine rebuild and new clutch and after assembly it appears that the return flow is blocked. When the remote valve is engaged, the engine will bog down and the loader I have attached to the remote does not function.
I have removed and torn a part the directional valves on the loader and found no issue. I have connected a single hose to the remotes, forming a loop back setup, and the issue still occurred.
I have removed the remote valve and torn it down. What I found is that one of the balls that rides on the valve rod was missing. Not sure how, as this is the first time I have taken this valve apart however, it would seem from studying the profile of the valve rod that this ball would not cause any engagement in the plunger for this port. The port in question being the one at the rear of the valve body.
As of last night I became concerned that I might have reassembled this port without the top washer/seal on the banjo fitting. Surprisingly, it seems that this might actually not leak as expected but, testing and measurements show that the banjo bolt would actually prevent the plunger from ever moving. This theory arose when I realized I only had 1 of these washer/seals on my work bench and have not been able to locate it.
With all that background; I am trying to find out what the actual diameter is for the ball that is used to actuate against the valve rod. The one that was present slid into the lower lubrication channel, where this is a small magnet embedded in the copper plug that seals the drill hole created during manufacturing. I don't think it is ever coming out... ;)
Please reach out if you might have any info.
|
 |
|
Sponsored Links
|
|
|
MACK
Orange Level

Joined: 17 Nov 2009
Points: 7664
|
Post Options
Thanks(0)
Quote Reply
Posted: 30 Dec 2022 at 8:33pm |
|
Sounds more like the problem Is in the remote couplers. Mismatched or tip worn out or not properly plugged In. MACK
|
|
nikel
Bronze Level
Joined: 31 Oct 2013
Location: Callahan, Flori
Points: 15
|
Post Options
Thanks(0)
Quote Reply
Posted: 31 Dec 2022 at 1:02pm |
Given that I just located the "missing" banjo seal washer, which blows my theory of the bolt protruding too far, this could be a possibility.
The hoses and connectors have not changed. Both the remote connectors and the hose ends were protected by plugs/caps. I did pull the female connectors on the remotes and clean and examine them; they appeared to be fine. I removed the remote hoses and connectors and blew air through them to ensure there were no internal blockages. What I did not do is examine the actual hose connectors...
Guess that is my next step.
Thank you MACK
|
|
AC720Man
Orange Level

Joined: 10 Oct 2016
Location: Shenandoah, Va
Points: 5474
|
Post Options
Thanks(0)
Quote Reply
Posted: 31 Dec 2022 at 3:56pm |
|
I did a full engine rebuild a year ago. Once I put everything back together my 3 pt arms wouldn’t lift. After making sure fluid levels were full, I took a 3 ft hose and fitting and plugged it into the upper remote. Should be PIONEER 4050 couplings with the round ball. Hose also has to have the round tip. Operated the remote lever back and forth to expel the air until I had a good stream. Moved the hose to the second remote and did the same thing. After doing that procedure my 3 pt and remotes worked normally. I would try this simple procedure before moving to other components. I am presently adding a second remote and lines. I’m sure I will need to do the same procedure once I get it all back together. I bought all new sealing washers from Schmitz and sons in Kansas. They are an Agco dealer. There are 2 different sizes for each line, top and bottom. There are also rubber seals in the valve body where it bolts together. Make sure you did not loose those upon disassembly and also that no dirt entered the valve body while it was apart.
|
|
1968 B-208, 1976 720 (2 of them)Danco brush hog, single bottom plow,52" snow thrower, belly mower,rear tine tiller, rear blade, front blade, 57"sickle bar,1983 917 hydro, 1968 7hp sno-bee, 1968 190XTD
|
|
AC720Man
Orange Level
Joined: 10 Oct 2016
Location: Shenandoah, Va
Points: 5474
|
Post Options
Thanks(0)
Quote Reply
Posted: 31 Dec 2022 at 4:06pm |
|
What part number is the ball that you are referring to? I don’t see a ball on the hydraulic line link?
Apparently you have the dual remote option since your using the remotes to operate the loader. 460 AC loader?
Edited by AC720Man - 31 Dec 2022 at 4:22pm
|
|
1968 B-208, 1976 720 (2 of them)Danco brush hog, single bottom plow,52" snow thrower, belly mower,rear tine tiller, rear blade, front blade, 57"sickle bar,1983 917 hydro, 1968 7hp sno-bee, 1968 190XTD
|
|
AC720Man
Orange Level
Joined: 10 Oct 2016
Location: Shenandoah, Va
Points: 5474
|
Post Options
Thanks(0)
Quote Reply
Posted: 31 Dec 2022 at 5:55pm |
|
|
|
1968 B-208, 1976 720 (2 of them)Danco brush hog, single bottom plow,52" snow thrower, belly mower,rear tine tiller, rear blade, front blade, 57"sickle bar,1983 917 hydro, 1968 7hp sno-bee, 1968 190XTD
|
|
AC720Man
Orange Level
Joined: 10 Oct 2016
Location: Shenandoah, Va
Points: 5474
|
Post Options
Thanks(0)
Quote Reply
Posted: 31 Dec 2022 at 5:58pm |
|
Rubber seals, seal against these 5 ports. 2 large rubber seals and 3 small ones.
Edited by AC720Man - 31 Dec 2022 at 5:59pm
|
|
1968 B-208, 1976 720 (2 of them)Danco brush hog, single bottom plow,52" snow thrower, belly mower,rear tine tiller, rear blade, front blade, 57"sickle bar,1983 917 hydro, 1968 7hp sno-bee, 1968 190XTD
|
|
nikel
Bronze Level
Joined: 31 Oct 2013
Location: Callahan, Flori
Points: 15
|
Post Options
Thanks(0)
Quote Reply
Posted: 02 Jan 2023 at 11:18am |
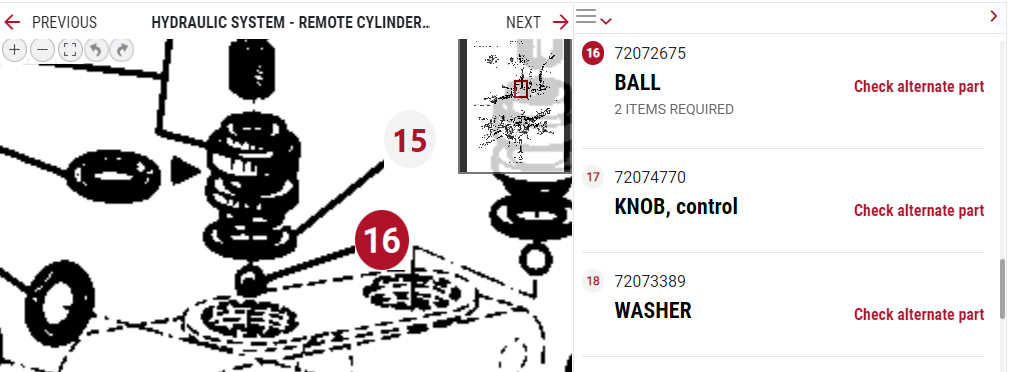
This looks like the valve I am working on. The ball I am referring to is in this image:
Identified as #16, part number 72072675
I found one place that can get the O-Rings, a bit pricey, so I might just measure the ID/OD of the existing O-Rings (taking into account the crush deformity, and source them from McMaster Car.
These are the part numbers I have gathered for a proper rebuild:
72072670 ring wiper 72073002 Valve Lever 72072683 left side seal. x2 72072624 O-Ring small right side, x1 70928035 (New part number for above O-Ring) 72072567 O-Ring large right side, x2 72072675 Ball, x2
70923645 O-Ring 15,54 x 2,62 mm Rear valve rod seal, x1 70923574 O-Ring Front valve rode seal, x1 70923376 O-Ring Plunger body seal, x2
Banjo Fitting seal washers 72072621 Upper 72072595 Lower
The loader I have on the tractor is a Bush Hot 2425 QT
Edited by nikel - 02 Jan 2023 at 11:27am
|
|
nikel
Bronze Level
Joined: 31 Oct 2013
Location: Callahan, Flori
Points: 15
|
Post Options
Thanks(0)
Quote Reply
Posted: 02 Jan 2023 at 12:19pm |
 MACK wrote: MACK wrote:
Sounds more like the problem Is in the remote couplers. Mismatched or tip worn out or not properly plugged In. MACK |
I pulled both male and female connectors and confirmed when coupled do not seem to have any restriction in fluid flow. Connectors where swapped and tested as well.
|
|
nikel
Bronze Level
Joined: 31 Oct 2013
Location: Callahan, Flori
Points: 15
|
Post Options
Thanks(0)
Quote Reply
Posted: 02 Jan 2023 at 12:38pm |
AC720Man wrote:
I did a full engine rebuild a year ago. Once I put everything back together my 3 pt arms wouldn’t lift. After making sure fluid levels were full, I took a 3 ft hose and fitting and plugged it into the upper remote. Should be PIONEER 4050 couplings with the round ball. Hose also has to have the round tip. Operated the remote lever back and forth to expel the air until I had a good stream. Moved the hose to the second remote and did the same thing. After doing that procedure my 3 pt and remotes worked normally. I would try this simple procedure before moving to other components. I am presently adding a second remote and lines. I’m sure I will need to do the same procedure once I get it all back together. I bought all new sealing washers from Schmitz and sons in Kansas. They are an Agco dealer. There are 2 different sizes for each line, top and bottom. There are also rubber seals in the valve body where it bolts together. Make sure you did not loose those upon disassembly and also that no dirt entered the valve body while it was apart. |
I was going back and forth on whether an air lock could occur. Maybe it can here since I think these valves change the flow to a closed center configuration?
I did attempt to bleed the system by loosening the in/out fittings on the directional valve. Though some air did escape, it did not make any difference.
I am not seeing how doing this on the return line would help as I though any pressure it had was via the return flow from the pressured out. Or maybe I have a completely incorrect understanding of this hydraulic system? Only recently learned about open/closed center.
Perhaps a good question to ask is if one of these ports is in fact a return. I have come to the conclusion that this valve changes the remotes to operate closed center.
|
|
MACK
Orange Level
Joined: 17 Nov 2009
Points: 7664
|
Post Options
Thanks(0)
Quote Reply
Posted: 02 Jan 2023 at 8:36pm |
|
It is a open center system. Take the couplers off hoses and work levers both directions. If it pulled engine then, you have valve problems. If it squirts oil, you have coupler problems. Return on a two way system is same both ways, just the direction you work the lever. MACK
|
|
nikel
Bronze Level
Joined: 31 Oct 2013
Location: Callahan, Flori
Points: 15
|
Post Options
Thanks(0)
Quote Reply
Posted: 04 Jan 2023 at 12:38pm |
|
@AC720Man If you still have the valve body in that picture sitting on the bench, would you be able to measure the size of the ball located under the plunger?
|
|
nikel
Bronze Level
Joined: 31 Oct 2013
Location: Callahan, Flori
Points: 15
|
Post Options
Thanks(0)
Quote Reply
Posted: 04 Jan 2023 at 7:45pm |
MACK wrote:
It is a open center system. Take the couplers off hoses and work levers both directions. If it pulled engine then, you have valve problems. If it squirts oil, you have coupler problems. Return on a two way system is same both ways, just the direction you work the lever. MACK |
Thank you. I see that I do not have a complete understanding between the two...
Once I get the valve body back together I will do the test you mentioned.
|
|
AC720Man
Orange Level
Joined: 10 Oct 2016
Location: Shenandoah, Va
Points: 5474
|
Post Options
Thanks(0)
Quote Reply
Posted: 04 Jan 2023 at 7:47pm |
|
I have already assembled it on my tractor. Let me look at the parts book to see exactly where the ball in question is located. I happen to have a spare valve body that I may be willing to examine if I see seals are still available. Once I open something up I put new seals back to avoid leaks. Did you check with an AGCO dealer to see if it’s available?
|
|
1968 B-208, 1976 720 (2 of them)Danco brush hog, single bottom plow,52" snow thrower, belly mower,rear tine tiller, rear blade, front blade, 57"sickle bar,1983 917 hydro, 1968 7hp sno-bee, 1968 190XTD
|
|
AC720Man
Orange Level
Joined: 10 Oct 2016
Location: Shenandoah, Va
Points: 5474
|
Post Options
Thanks(0)
Quote Reply
Posted: 04 Jan 2023 at 7:52pm |
|
Looks like #11 is a seal. Will check to see if it’s available.
|
|
1968 B-208, 1976 720 (2 of them)Danco brush hog, single bottom plow,52" snow thrower, belly mower,rear tine tiller, rear blade, front blade, 57"sickle bar,1983 917 hydro, 1968 7hp sno-bee, 1968 190XTD
|
|
nikel
Bronze Level
Joined: 31 Oct 2013
Location: Callahan, Flori
Points: 15
|
Post Options
Thanks(0)
Quote Reply
Posted: 04 Jan 2023 at 8:02pm |
AC720Man wrote:
I have already assembled it on my tractor. Let me look at the parts book to see exactly where the ball in question is located. I happen to have a spare valve body that I may be willing to examine if I see seals are still available. Once I open something up I put new seals back to avoid leaks. Did you check with an AGCO dealer to see if it’s available? |
I just sent an email to to Scmitz & Sons to see what they have. I completely agree on replacing the seals. The ball in question is accessible without breaking apart the valve body. If you remove the plunger from one of the top ports, cup you hand over the opening and turn it upside down, the ball should fall out into your hand... though even a little bit of oil can cause it stay in place.
I can send a picture of what I am referring to... an actual pic of my parts laid out.
|
|
nikel
Bronze Level
Joined: 31 Oct 2013
Location: Callahan, Flori
Points: 15
|
Post Options
Thanks(0)
Quote Reply
Posted: 04 Jan 2023 at 8:24pm |
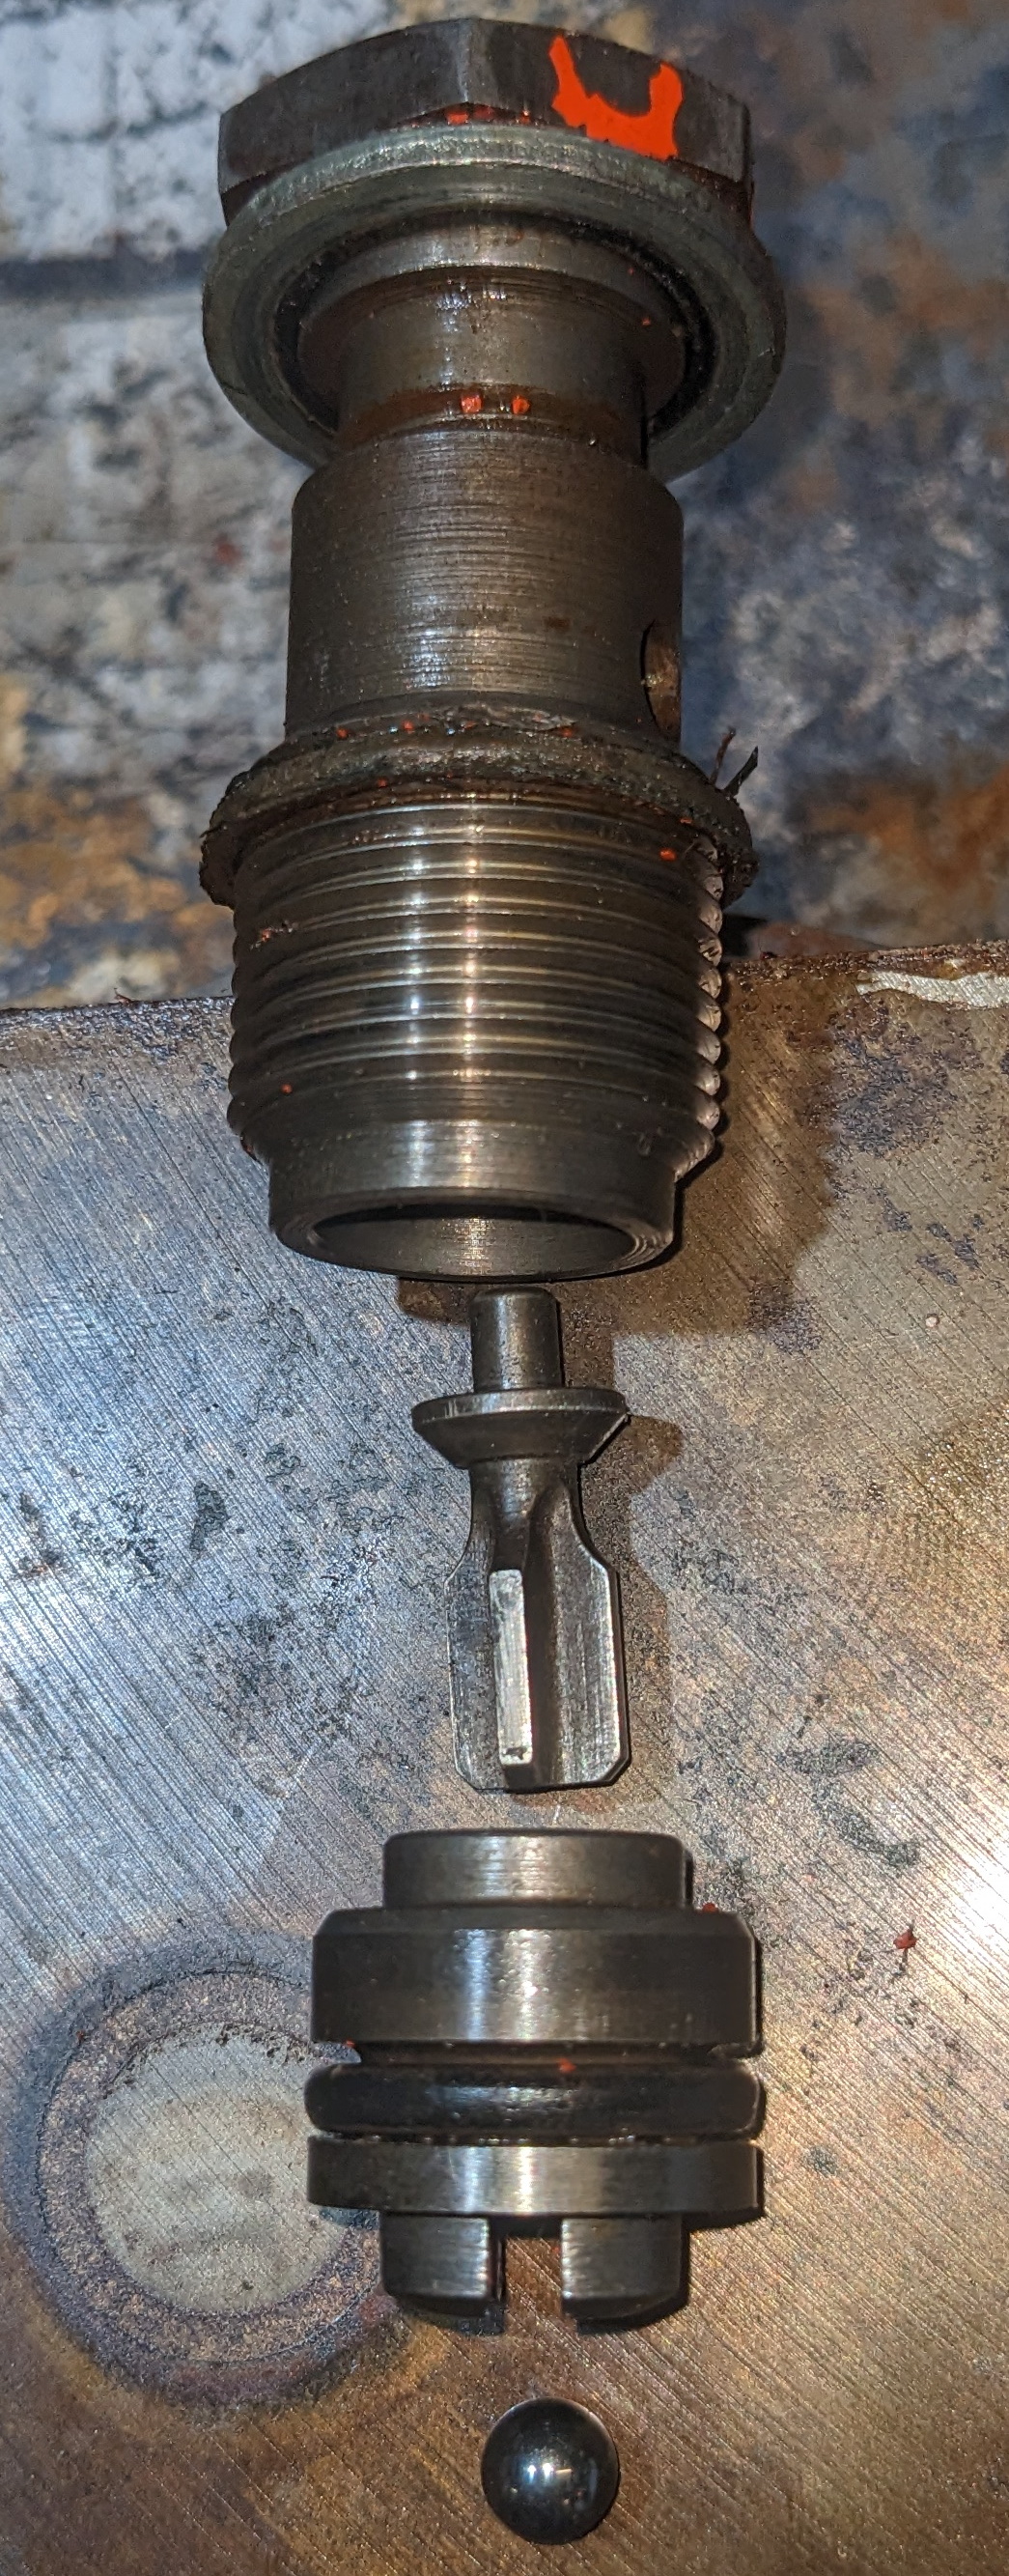
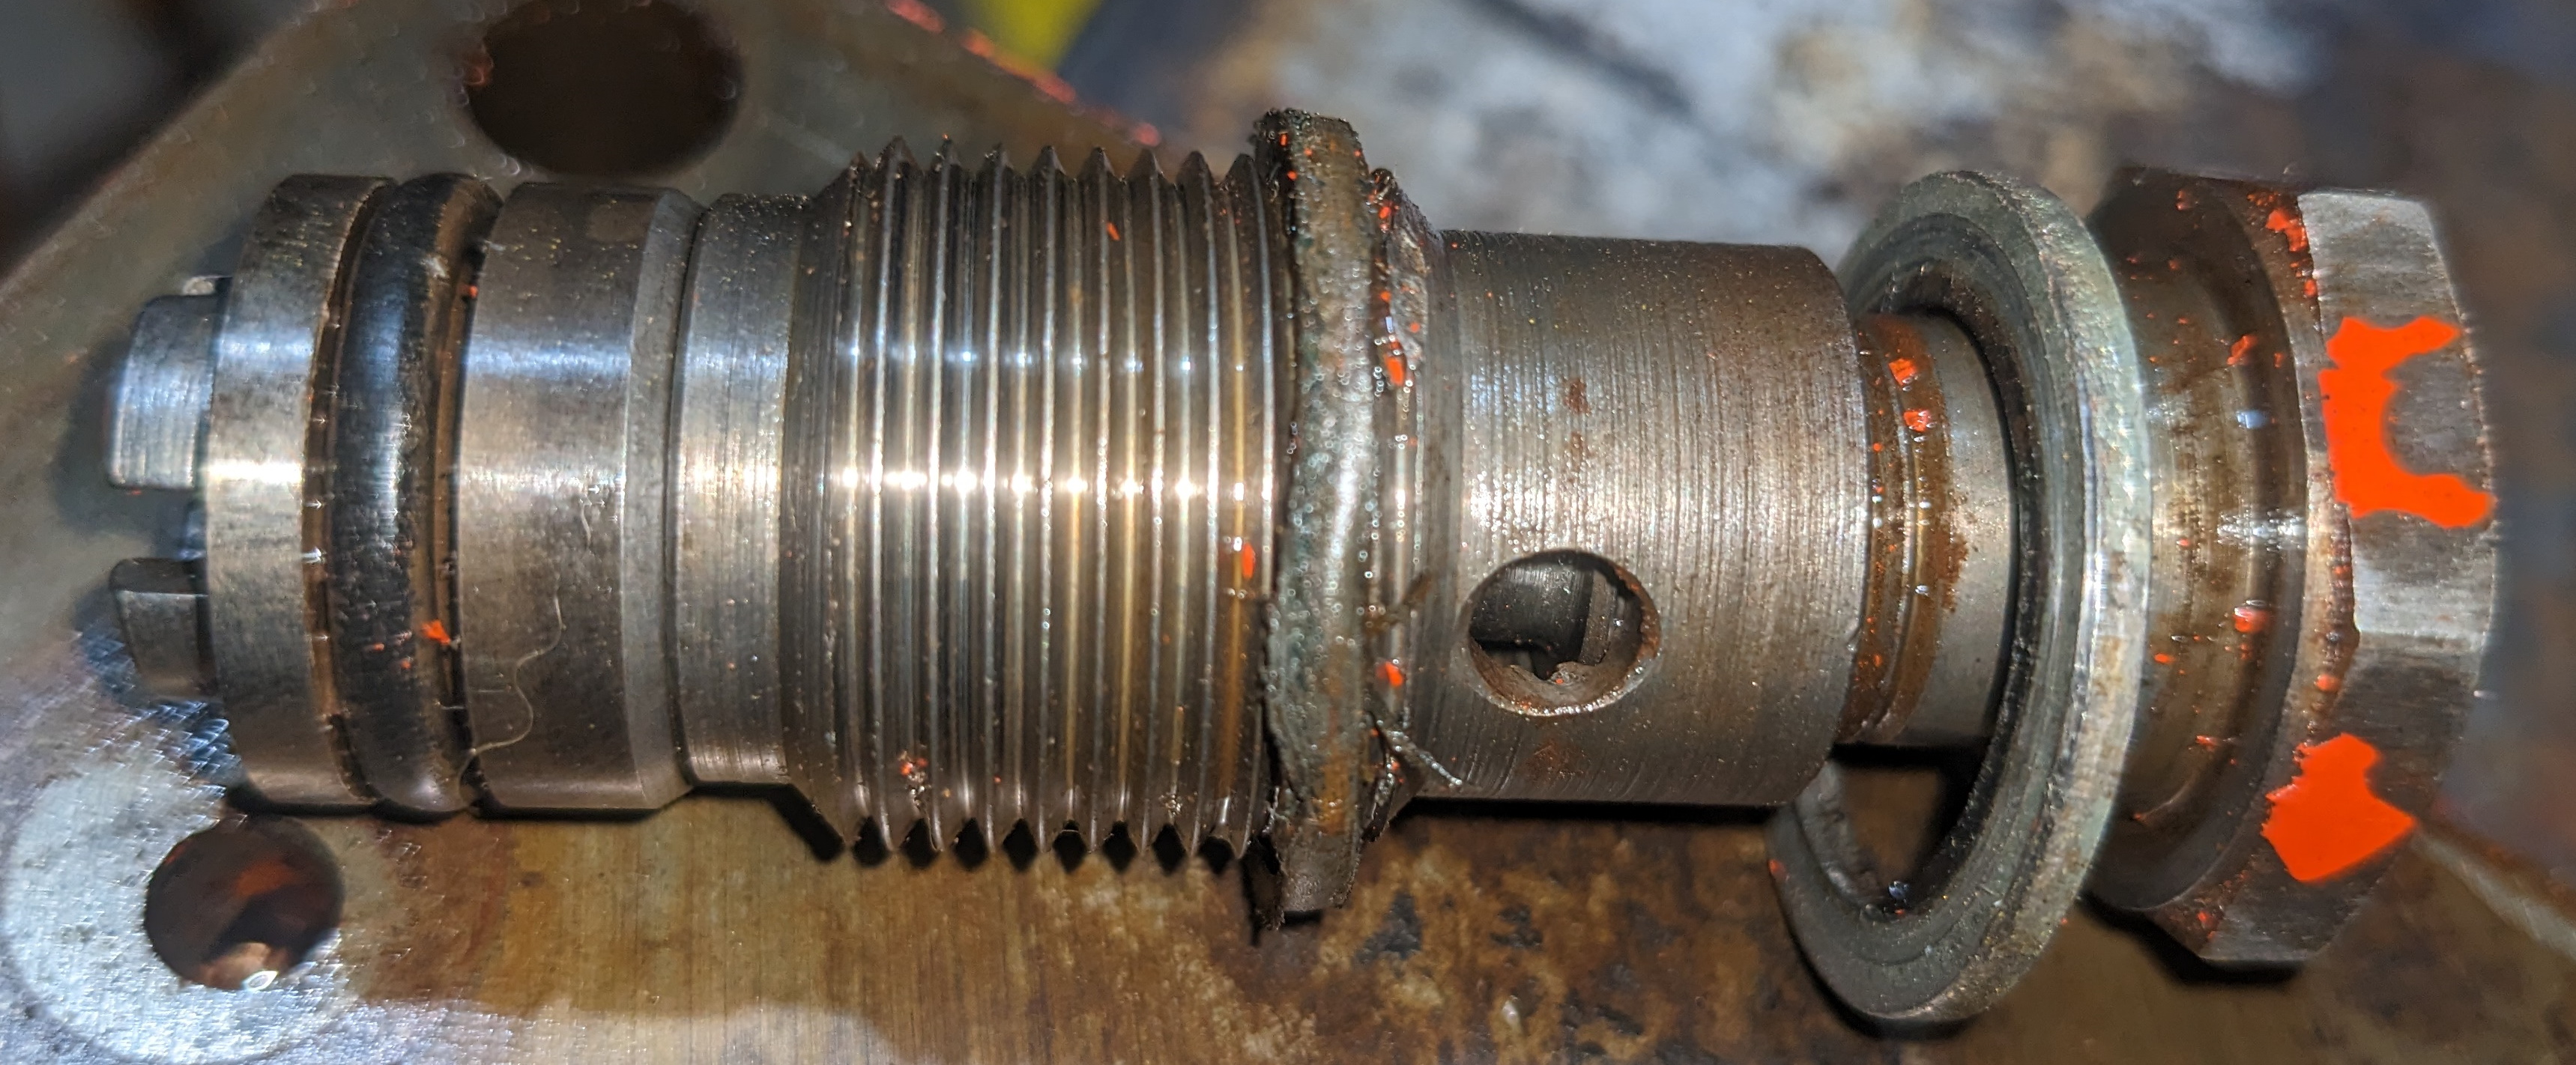
Apologies up front if you already know what I was referring to.
Poor mans exploded view: The ball shown above is 6mm ball I was testing with to see how well if fit and functioned. It is not to spec, that I know of.
How the to mate when installed:
Edited by nikel - 04 Jan 2023 at 8:25pm
|
|
AC720Man
Orange Level
Joined: 10 Oct 2016
Location: Shenandoah, Va
Points: 5474
|
Post Options
Thanks(0)
Quote Reply
Posted: 04 Jan 2023 at 9:55pm |
|
The seal in question goes below the valve assembly. Trust me I want to help, Ive been trying to figure out this second remote addition for over a year and luckily came across a entire complete set at a big expense a few weeks ago. As long as I can obtain seal #15 I have no problem opening it to get what you need. They will be the ones I call because they seam to have 160 parts and sold and serviced quite a few 160’s. Are you missing both steel balls? Parts for 160’s are hard to come by so I hope you understand my reluctance to disassemble a perfectly good valve body that I may need one day.
Edited by AC720Man - 04 Jan 2023 at 10:08pm
|
|
1968 B-208, 1976 720 (2 of them)Danco brush hog, single bottom plow,52" snow thrower, belly mower,rear tine tiller, rear blade, front blade, 57"sickle bar,1983 917 hydro, 1968 7hp sno-bee, 1968 190XTD
|
|
nikel
Bronze Level
Joined: 31 Oct 2013
Location: Callahan, Flori
Points: 15
|
Post Options
Thanks(0)
Quote Reply
Posted: 05 Jan 2023 at 12:57am |
|
Ah. I completely miss understood. I thought got another remote valve assembly. Please don't tear into on my account. I believe the dual remote option is just two remote valve assemblies bolted together with the same end plate.
I have come to the following conclusions:
1. The rear port on the valve body was missing
2. I might to not reinstall the washer between the return spring and the valve body
3. I will have to bleed the air out of the system
I now have an assortment of chrome balls , 1 to 8 mm in size. It seems like a 6mm ball works best.
Now i just need to get all new o-rings abd put it back together.
Do you have the lever on your valve? If so, is it able to hold the valve in the remote position? There are no detents, so I am guessing the lever works like an angle lock.
|
|
nikel
Bronze Level
Joined: 31 Oct 2013
Location: Callahan, Flori
Points: 15
|
Post Options
Thanks(0)
Quote Reply
Posted: 05 Jan 2023 at 1:00am |
|
One more thing, that seal you are referring to is actually a set steel shims.
The piece that sits on top of the shims does not need to come out. The ball in question fits down the same bore the plunger goes into
Edited by nikel - 05 Jan 2023 at 1:01am
|
|
AC720Man
Orange Level
Joined: 10 Oct 2016
Location: Shenandoah, Va
Points: 5474
|
Post Options
Thanks(0)
Quote Reply
Posted: 05 Jan 2023 at 10:46pm |
|
I’m confused, I’m assuming your loader was working before the engine rebuild. Only to have issues after the rebuild? How could it have worked before with the issues you are now finding in the valve body? It also sounds like the loader has its own controls. Trying to figure out how it operated with 2 different controls, the remote levers and the loader controls? As far as the operation of my remotes mine only had one set and now I’m adding the second set. They do just piggyback using the same backing plate but using longer bolts. As far as how it operated I only used it to raise and lower our haybine to service it, not field use so I can’t tell you other than raising and lowering....not float. I’ve only had the 160 for 1 1/2 years, without the second set of remotes it has limited capabilities. I use the 3 pt quite a bit but need 4 remotes for our hay Tedder.
According to my factory manual it is a seal, the shim is below the valve assembly.
Edited by AC720Man - 05 Jan 2023 at 10:51pm
|
|
1968 B-208, 1976 720 (2 of them)Danco brush hog, single bottom plow,52" snow thrower, belly mower,rear tine tiller, rear blade, front blade, 57"sickle bar,1983 917 hydro, 1968 7hp sno-bee, 1968 190XTD
|
|
victoryallis
Orange Level
Joined: 15 Apr 2010
Location: Ludington mi
Points: 2887
|
Post Options
Thanks(0)
Quote Reply
Posted: 06 Jan 2023 at 6:05am |
720 man
Before you add remotes research a Fasse, V&M, or Summit multipler. Might be much simpler.
|
|
8030, 7060, six 6080’s grandpa’s D17, 8760, 8100, and 8970 Deere.
|
|
victoryallis
Orange Level
Joined: 15 Apr 2010
Location: Ludington mi
Points: 2887
|
Post Options
Thanks(0)
Quote Reply
Posted: 06 Jan 2023 at 6:06am |
Nikel
Keep in mind those tractors are ultra fussy with air in the system waaaay fussier than any other tractor I’ve worked on.
|
|
8030, 7060, six 6080’s grandpa’s D17, 8760, 8100, and 8970 Deere.
|
|
AC720Man
Orange Level
Joined: 10 Oct 2016
Location: Shenandoah, Va
Points: 5474
|
Post Options
Thanks(0)
Quote Reply
Posted: 06 Jan 2023 at 1:18pm |
|
Yes those other options are available and around the same price I have in the factory remotes and lines from a donor tractor. I just prefer the factory look. Received my new seals and I am in the process of adding the lines.
Edited by AC720Man - 06 Jan 2023 at 1:19pm
|
|
1968 B-208, 1976 720 (2 of them)Danco brush hog, single bottom plow,52" snow thrower, belly mower,rear tine tiller, rear blade, front blade, 57"sickle bar,1983 917 hydro, 1968 7hp sno-bee, 1968 190XTD
|
|
nikel
Bronze Level
Joined: 31 Oct 2013
Location: Callahan, Flori
Points: 15
|
Post Options
Thanks(0)
Quote Reply
Posted: 13 Mar 2023 at 9:01am |
Wanted to provide an update on my endeavor. I was able to order all new seals, the two steel balls that operate the plungers, and a new lever arm for the valve. Finished rebuilding it yesterday and installed it. Started up the tractor and the first thing I noticed was that the 3 point hydraulics are now super responsive. Moved the lever to activate the remotes and the loader worked perfectly. I have not done any bleeding of the lines thus far.
For future reference, the steel ball that actuates the plunger is part number: 72072675. I was shocked Schmidt & Sons in Mt Hope Kansas was able to get them. Also wanted to note that these balls are 0.2329" in diameter should anyone be in a position needing to find a substitute. I measured both of the ones I ordered with a Mitutoyo No. 293-330 caliper. Caliper reference is for future readers so they can judge the accuracy of the measurements.
Thank you to all who took the time to reply. Your information was vital. Many thanks to AC720Man for recommending Schmidt & Sons ( www.schmidtinc.com). They seem to have access to a lot of older AC parts. |
|
Dave(inMA)
Orange Level

Joined: 12 Sep 2009
Location: Grafton, MA
Points: 2400
|
Post Options
Thanks(0)
Quote Reply
Posted: 13 Mar 2023 at 11:08am |
|
Nice to read a story with a happy ending!
|
|
WC, CA, D14, WD45
|
|
AC720Man
Orange Level
Joined: 10 Oct 2016
Location: Shenandoah, Va
Points: 5474
|
Post Options
Thanks(0)
Quote Reply
Posted: 13 Mar 2023 at 6:43pm |
|
I’m glad you got it working, sounds like the correct size ball was the key. They do have a good selection of parts, I recently got the only remaining AGCO leather gasket for my D17 manifold plug for the pre heat chamber from them. Had no idea they were made of leather.
Edited by AC720Man - 13 Mar 2023 at 6:47pm
|
|
1968 B-208, 1976 720 (2 of them)Danco brush hog, single bottom plow,52" snow thrower, belly mower,rear tine tiller, rear blade, front blade, 57"sickle bar,1983 917 hydro, 1968 7hp sno-bee, 1968 190XTD
|
|