| Author |
 Topic Search Topic Search  Topic Options Topic Options
|
steve(ill) 
Orange Level Access


Joined: 11 Sep 2009
Location: illinois
Points: 88595
|
 Post Options Post Options
") Thanks(0) Thanks(0)
") Quote Quote  Reply Reply
 Posted: 31 Dec 2021 at 7:00pm Posted: 31 Dec 2021 at 7:00pm |
|
"in theory" you have .002 clearance on the bearings.. Once you TIGHTEN and CRUSH things into place, that might change a thousandth.. If you have to put one thin shim in to get easy rotation, that would not be abnormal..... maybe / maybe not.
|
|
Like them all, but love the "B"s.
|
 |
|
Sponsored Links
|
|
|
SteveM C/IL
Orange Level Access
Joined: 12 Sep 2009
Location: Shelbyville IL
Points: 8684
|
Post Options
Thanks(0)
Quote Reply
Posted: 31 Dec 2021 at 7:23pm |
|
While it seems unorthodox, it looks to have worked out well.
|
|
MACK
Orange Level
Joined: 17 Nov 2009
Points: 7664
|
Post Options
Thanks(0)
Quote Reply
Posted: 31 Dec 2021 at 8:29pm |
If the bore was out of round, how did you center them on the rotary table? No more than it cost at a machine shop with a rod machine, why would you go to that much work. MACK
|
|
ac55tractor
Silver Level

Joined: 20 Oct 2012
Location: Raymond, Maine
Points: 240
|
Post Options
Thanks(0)
Quote Reply
Posted: 31 Dec 2021 at 9:22pm |
By removing .002 or .003 from the parting lines, I turned an egg shaped bore into a round one, before clamping it down to the rotary table. That gave me .005 to remove from the inside of the bore. All of this information is stated above.
I used a finger type dial indicator and trued the center of the rotary table to the machine.
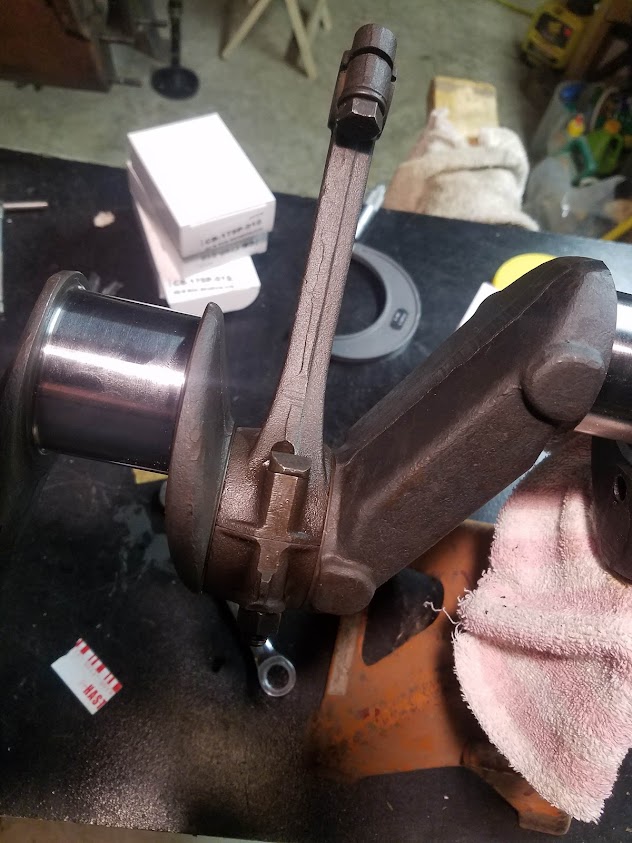
I eyeballed the connecting rod on to the rotary table and lightly snugged it down to the table with the clamps and used a 12 inch long, 3/8 diameter brass rod to lightly tap it into position while using the finger dial indicator to locate the part to the center of the table.
I clamped it down tight, rechecked the part with the indicator and cut it to size. I hope that I was clear.
The way I do things, unorthodox, maybe, after over 45 years as a machinist, it was nothing that I was unfamiliar with. Besides I had all of the tools, the machine, and the Yankee Ingenuity to get the job done. All it cost me was the $29.00 for the dial bore gauge from eBay and I didn't have to leave the house.
I don't mean any disrespect at all, ever, but what does it cost to have something like that done on a rod machine?
Happy new year to everyone. Steve From Maine
|
|
Fred in Pa
Orange Level
Joined: 13 Sep 2009
Location: Hanover Pa.
Points: 9210
|
Post Options
Thanks(0)
Quote Reply
Posted: 01 Jan 2022 at 8:32am |
|
Cut cap ,cut rod , resize bore.Sept. 2021 cost $22.00 pre rod.
Edited by Fred in Pa - 01 Jan 2022 at 8:33am
|
|
He who dies with the most toys is,
nonetheless ,still dead.
If all else fails ,Read all that is PRINTED.
|
|
steve(ill)
Orange Level Access
Joined: 11 Sep 2009
Location: illinois
Points: 88595
|
Post Options
Thanks(0)
Quote Reply
Posted: 01 Jan 2022 at 8:49am |
|
I try to do EVERY job i can at home.. Of course i cant grind a crank. I repair everything i can and make as many new parts as i can.. I dont just do it to save money, i enjoy the challenge.. If i add my time, sometimes i am working for $5. an hour. Sometimes it comes out at $100. an hour. If i CAN do the job, i DO it myself.. Just been that way for over 50 years ....... Probably saved enough money in that time to buy a new truck... all it takes is TIME.
|
|
Like them all, but love the "B"s.
|
|
Fred in Pa
Orange Level
Joined: 13 Sep 2009
Location: Hanover Pa.
Points: 9210
|
Post Options
Thanks(0)
Quote Reply
Posted: 01 Jan 2022 at 9:08am |
|
Business is Business time is money . if you are doing it your self go for it .
|
|
He who dies with the most toys is,
nonetheless ,still dead.
If all else fails ,Read all that is PRINTED.
|
|
ac55tractor
Silver Level
Joined: 20 Oct 2012
Location: Raymond, Maine
Points: 240
|
Post Options
Thanks(0)
Quote Reply
Posted: 01 Jan 2022 at 10:44am |
Thanks Everyone, I appreciate the positive input.
Steve from Maine
|
|
SteveM C/IL
Orange Level Access
Joined: 12 Sep 2009
Location: Shelbyville IL
Points: 8684
|
Post Options
Thanks(0)
Quote Reply
Posted: 01 Jan 2022 at 10:51am |
|
Sometimes the smile it puts on your face is worth the work it takes....no mater how practical it is to every one else. I have the "I can fix this" gene too.
|
|
tadams(OH)
Orange Level Access

Joined: 17 Sep 2009
Location: Jeromesville, O
Points: 11037
|
Post Options
Thanks(0)
Quote Reply
Posted: 01 Jan 2022 at 2:25pm |
And a lot depend on the tools you have to work with.
|
|
B26240
Orange Level
Joined: 21 Nov 2009
Location: mn
Points: 3866
|
Post Options
Thanks(0)
Quote Reply
Posted: 01 Jan 2022 at 2:37pm |
|
You are doing a great job ! one thing I would do is check the chamfer with some bluing on the bearings to make sure they are seated and not hung up on the chamfer. You did not remove enough to cause a problem at .0025 but as mentioned they were probly filed in the past and maybe only one side. Great job!!
|
|
ac55tractor
Silver Level
Joined: 20 Oct 2012
Location: Raymond, Maine
Points: 240
|
Post Options
Thanks(0)
Quote Reply
Posted: 01 Jan 2022 at 2:50pm |
|
Thank you for pointing that out. I have some Dykem Blue. I will check for contact. on the bearings. I will leave the rotary table set up and I can re-cut the chamfer if necessary. Nice to see that someone noticed that while I removed .005 from the diameter, it was only .0025 on a side radially that was removed from the bore.
|
|
ac55tractor
Silver Level
Joined: 20 Oct 2012
Location: Raymond, Maine
Points: 240
|
Post Options
Thanks(0)
Quote Reply
Posted: 01 Jan 2022 at 5:18pm |
The Plastigage shows somewhere between .002
and .003. clearance after hand tightening the nuts with a wrench. After I
removed the mark line left over from the Plastigage, the connecting rod just glides on the
crankshaft. No shims were added. 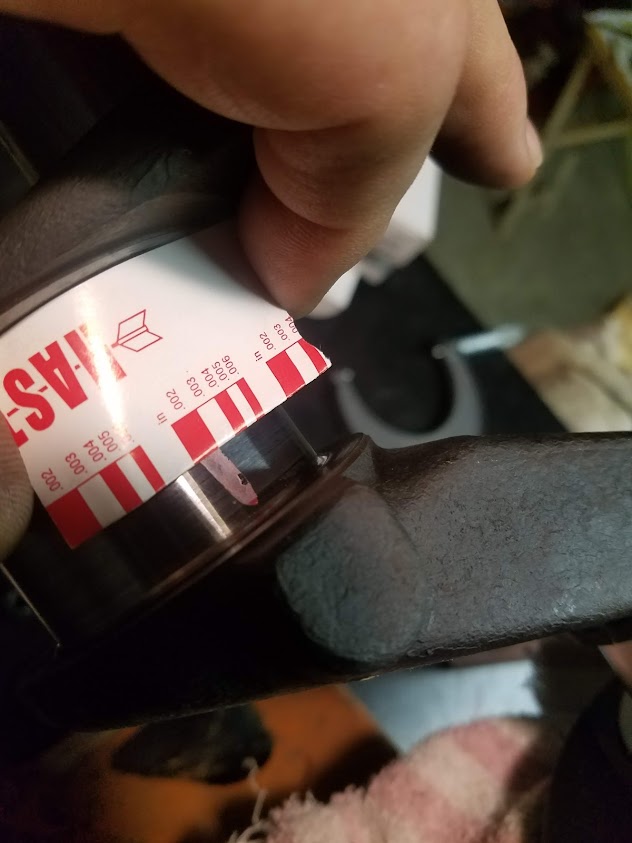
|
|
ac55tractor
Silver Level
Joined: 20 Oct 2012
Location: Raymond, Maine
Points: 240
|
Post Options
Thanks(0)
Quote Reply
Posted: 01 Jan 2022 at 5:20pm |
There was plenty of clearance at the bearing chamfers.
|
|
ac55tractor
Silver Level
Joined: 20 Oct 2012
Location: Raymond, Maine
Points: 240
|
Post Options
Thanks(0)
Quote Reply
Posted: 01 Jan 2022 at 5:45pm |
Oh, after removing the connecting rod from the rotary table, I measured the distance from the center-line of the crank bore to the center-line of the wrist pin and it was 6.497. So I lost .003 to the overall length. We used to say at work, What's a few thousandths between friends. The bearing bore was parallel to the wrist pin within 1/10th of 1 degree. It seems that at the end of the day, all of the prep work, and lining things up, paid off.
I am off to donate to the forum.
Thanks to everyone for the help.
Steve from Maine
|
|
wjohn
Orange Level

Joined: 19 Jan 2010
Location: KS
Points: 2263
|
Post Options
Thanks(0)
Quote Reply
Posted: 01 Jan 2022 at 8:37pm |
|
This was great - thanks for asking questions, and then documenting what you did. It's a good reminder for me to check this as I put my WD engine back together.
|
|
1939 B, 1940 B, 1941 WC, 1951 WD, 1952 CA, 1956 WD-45
|
|
MACK
Orange Level
Joined: 17 Nov 2009
Points: 7664
|
Post Options
Thanks(0)
Quote Reply
Posted: 01 Jan 2022 at 9:03pm |
I to do all I Can in house. Just seamed like alot of work for the cost done on a rod machine. Have built alot of pulling tractor parts. Overdrive gear boxes, aluminum cylinder heads, and ect. Still make steel fire rings for head gaskets. Thanks for your post, it was interesting. MACK
|
|
ac55tractor
Silver Level
Joined: 20 Oct 2012
Location: Raymond, Maine
Points: 240
|
Post Options
Thanks(0)
Quote Reply
Posted: 01 Jan 2022 at 11:01pm |
Thanks, it was fun to show and tell.
It's was really not a lot of work to setup and run these parts. I had the time, tools and the machine.
Most of my time was spent taking measurements, and
decide whether to scrap them out, or rework the ones I have, and fix them myself.
Once
I found that they were straight, I started chatting with the forum to try to
figure out what need to be done to correct the egg shaped bores.
https://www.allischalmers.com/forum/crankshaft-end-play_topic184466.html?KW=
I got a message from Lon(MN)
He said "I send the rods out to be resized without shims. I also get them aligned. All the rods I have sent out were egg shaped"
I sort of read between the lines in what he was saying, and decided to fix them myself.
After that, Steve(ill) said to me, as I understood it,
"Most do not
send them out due to time and cost... , Being a machinist and "you need
the practice"  .. eliminating the shims and boring the rods to size is an excellent idea !"
So I ran with it.
I know that there are people out there with skills that I don't have. I am no better than anyone else. Nor, do I try to be.
Being a machinist, sure I get a bit anal about stuff.
But you know, I guess that being that way can sometimes work in my favor. I tend to find a direction to go in, and follow the path. At times, it takes some forethought. "thinking two or three steps ahead" But with that mindset, in the end, things do tend to fall into the right place for me. Sure there are times that I have failed, that's why they make welding machines and Welders to run them.
As an example, If I make one edge flat. I can be confident that I can rely on that edge to get the next step to fall into place. It usually does.
Joking here >If I was a hack the final result would be a pile of #$@%.
I hear that these engines are designed to be repaired in the field. That may be true, but my goal is, if I get this done right, and into tolerance, I won't have to pull it apart 30 minutes after I fire it up for the first time.
It looks like I got a bit long winded here.
Pushing midnight
Good night.
Steve from Maine
|
|
BrianC
Orange Level Access
Joined: 16 Jun 2011
Location: New York
Points: 1619
|
Post Options
Thanks(0)
Quote Reply
Posted: 02 Jan 2022 at 8:30am |
Were the ends of the bearing shells too long, did you have to fit them?
|
|
ac55tractor
Silver Level
Joined: 20 Oct 2012
Location: Raymond, Maine
Points: 240
|
Post Options
Thanks(1)
Quote Reply
Posted: 02 Jan 2022 at 1:25pm |
Yes, I hand fit them,
I have to up front here. The method that I used here will not work for everyone. If you are more comfortable with a hand file, than by all means, file them in to height.
After machining the parting lines on the caps and rods, I knew that I could count on the bearings to be flat and parallel to the bores in the rods.
I flat lapped the ends of the bearings into place using a full-size sheet
of 240 emery cloth, laid down flat on my large drill press table.
I shot
the emery cloth with WD-40 as a lubricant. < lubricant is very important. Looking at the cap in front of you, the bolt holes should be front to back, and not to the left and right as you lap them in.
I placed a bearing in the cap, and or
the rod, placed my thumb and fore finger on the cap holes, applied even pressure and started rubbing (lapping) the cap and bearing back and forth and in a figure "8" pattern.
This brought the bearing into height inside the cap. The material that the bearing is made of is considerably softer than
the cap, and rod.
If you press lightly as you go, and keep the emery cloth wet, nothing will get damaged. Do not force them. Once I felt it reach the flats on the cap, I stopped, and looked close at the part.
If it looks like you have reached the parting line, remove the bearing. Wipe everything off clean and break the lapped sharp edges on the bearing flats with a file, wipe them off clean again, and reinstall into the cap.
Yes I know, I have zero "crush" on the bearings, when they were assembled.
My cap faces are flat, and true to the bearing bores. When assembled, the bearing ends and the caps make 100% contact to each other, the bearing ends are not crooked and didn't go under size in the process.
If you use shims, stop lapping before reaching the parting line, and measure how far the bearing extends out of the cap. That will give you the room for shimming and crush. That is an option that will work for you. It worked for me two or three weeks ago when I was experimenting with shims and crush in the caps.
I have lapped parts more than once with emery
cloth and WD-40 on all sorts of jobs at work. In the
end you will get a surface as flat as the surface under the emery cloth. Choose your flat surface wisely. You can also use a full size table saw table to lap parts with.
Steve from Maine
|
|
ac55tractor
Silver Level
Joined: 20 Oct 2012
Location: Raymond, Maine
Points: 240
|
Post Options
Thanks(0)
Quote Reply
Posted: 02 Jan 2022 at 10:18pm |
I think that I was over confident about the zero crush fit.
I can skim cut the cap and get the.0015 crush.
|
|
steve(ill)
Orange Level Access
Joined: 11 Sep 2009
Location: illinois
Points: 88595
|
Post Options
Thanks(0)
Quote Reply
Posted: 02 Jan 2022 at 11:15pm |
|
Im not sure thats a necessity... You might be better off to leave it as is. ?? You have your .002 bearing clearance to shaft, and there is no way the bearing is going to move or get out.
|
|
Like them all, but love the "B"s.
|
|
SteveM C/IL
Orange Level Access
Joined: 12 Sep 2009
Location: Shelbyville IL
Points: 8684
|
Post Options
Thanks(0)
Quote Reply
Posted: 02 Jan 2022 at 11:26pm |
|
I would bet that without some crush,the bearing will loosen in it's bore. All inserts I am aware of use a certain amount of crush to keep things tight.
|
|
ac55tractor
Silver Level
Joined: 20 Oct 2012
Location: Raymond, Maine
Points: 240
|
Post Options
Thanks(0)
Quote Reply
Posted: 03 Jan 2022 at 10:22am |
After some internet searching last night, I read this statement.
When applied to the technologies of shell bearings, it is not a good idea to 'crush'; it is absolutely necessary.
Will this solution work?
I have only fit one set of bearings so far. It's the #3 connecting rod.
All of the other bearing shells are new and unaltered. I went through the other bearing cap dimensions. They all vary within .003 based on how much I had to remove when I took the parting lines to clean.
The #1 cap is .002 shorter than #3 cap from the parting line to the bottom of the bore radius.
I can swap out the bearing shell from #3 cap into the #1 cap, then place a new half shell into the #3 cap.
When I finish, after a slight lapping, the #1 cap will have a bearing crush height of .0015, and the #3 cap with the new bearing, can be lapped into .0015 crush height.
|
|
steve(ill)
Orange Level Access
Joined: 11 Sep 2009
Location: illinois
Points: 88595
|
Post Options
Thanks(0)
Quote Reply
Posted: 03 Jan 2022 at 11:56am |
|
sounds like a good plan !. I was just worried if you machine the rod face, you loose the .002 bearing to shaft clearance and then you starting over.
|
|
Like them all, but love the "B"s.
|
|
ac55tractor
Silver Level
Joined: 20 Oct 2012
Location: Raymond, Maine
Points: 240
|
Post Options
Thanks(0)
Quote Reply
Posted: 03 Jan 2022 at 1:04pm |
Thanks for confirming that Steve
There is so much to know, and to understand with the engine work when looking at it through machinist eyes.
I think that I may now have a grasp on shimming. At first, It just didn't make any sense to me.
|
|
steve(ill)
Orange Level Access
Joined: 11 Sep 2009
Location: illinois
Points: 88595
|
Post Options
Thanks(0)
Quote Reply
Posted: 03 Jan 2022 at 1:15pm |
|
IF you had already cut all the bearing, is would have taken one half and tapped on the last 1/16 inch with a ball peen hammer to distort the edge out .001 to get some CRUSH ( dont looked shocked.. dont take much to get .001 distortion)... but since you still have the other bearings to mix and match, that is a good idea.
|
|
Like them all, but love the "B"s.
|
|
ac55tractor
Silver Level
Joined: 20 Oct 2012
Location: Raymond, Maine
Points: 240
|
Post Options
Thanks(0)
Quote Reply
Posted: 03 Jan 2022 at 1:51pm |
How did you know that I looked shocked? Is my camera on?
I got to get back to it. I goofed off way too much this weekend.
I have to finish fitting the rod bearings.
For now, let me throw this question out.
With out damaging anything, what is the best way to torque the connecting rod to the wrist pin?
The torque required for the rod to the wrist pin is not listed in my Allis Chalmers service manual. It only says "Clamped in rod" I know one thing, it took a lot of "reefing" to get the bolt loose on the connecting rod.
Very grateful for all the help. Steve
|
|
steve(ill)
Orange Level Access
Joined: 11 Sep 2009
Location: illinois
Points: 88595
|
Post Options
Thanks(0)
Quote Reply
Posted: 03 Jan 2022 at 2:11pm |
when no torque is listed, you normally use grade 5 specs, unless you are SURE it is a grad 8 bolt...
Read the book TWICE on installing the piston and rod assemblies in the engine.. There is a FRONT and BACK to the rods... they are offset.
|
|
Like them all, but love the "B"s.
|
|
ac55tractor
Silver Level
Joined: 20 Oct 2012
Location: Raymond, Maine
Points: 240
|
Post Options
Thanks(0)
Quote Reply
Posted: 03 Jan 2022 at 2:16pm |
Okay thanks. I understand Grade 5 and Grade 8 specs.
Thanks again Steve
|
|