| Author |
 Topic Search Topic Search  Topic Options Topic Options
|
RUBYD14 
Bronze Level


Joined: 22 Nov 2017
Location: Palisade,CO
Points: 30
|
 Post Options Post Options
") Thanks(0) Thanks(0)
 Quote Quote  Reply Reply
 Topic: 1958 D14 In frame Overhaul Topic: 1958 D14 In frame Overhaul
Posted: 30 Mar 2020 at 1:36pm |
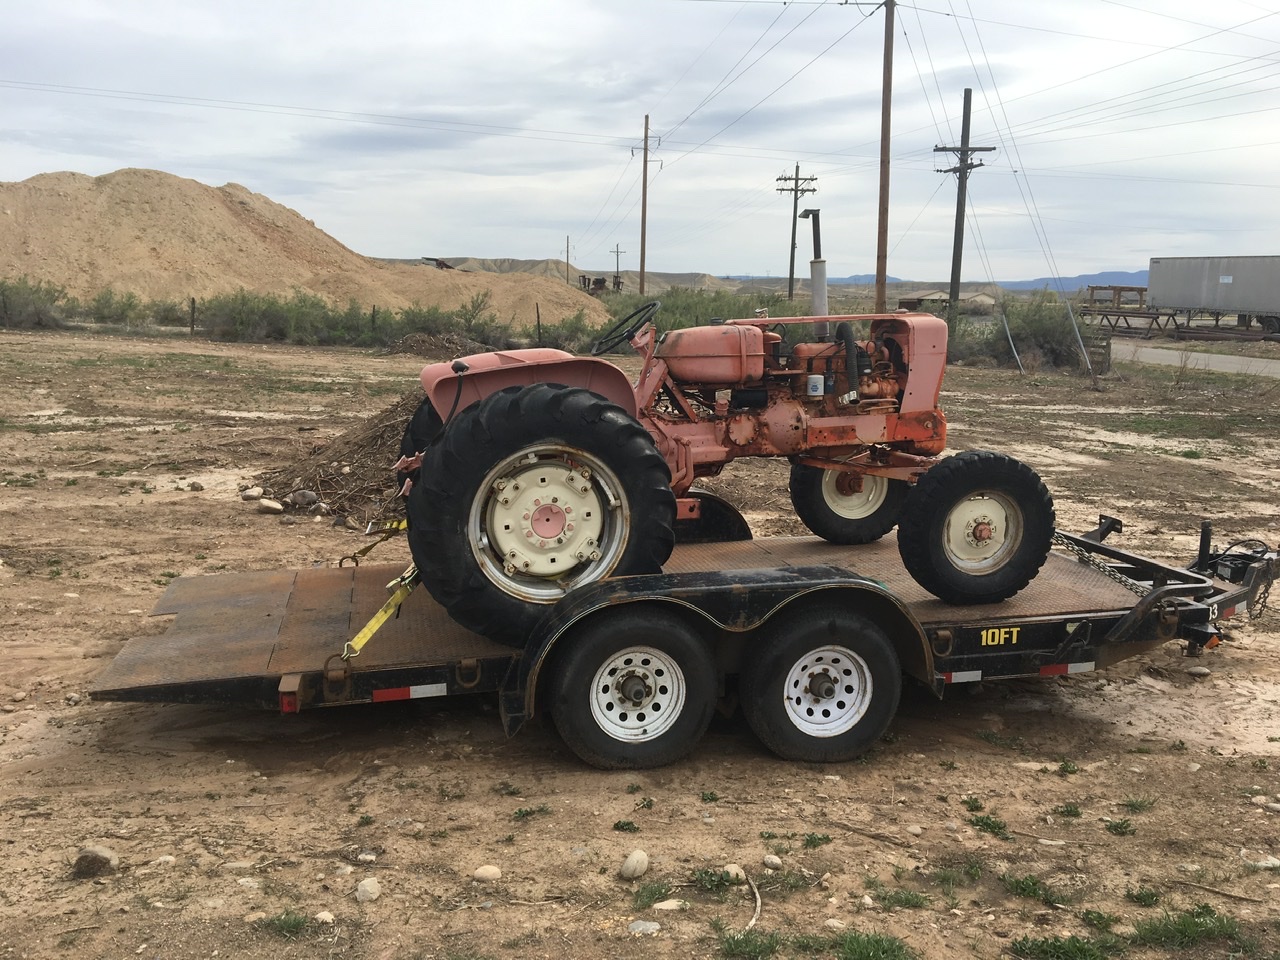
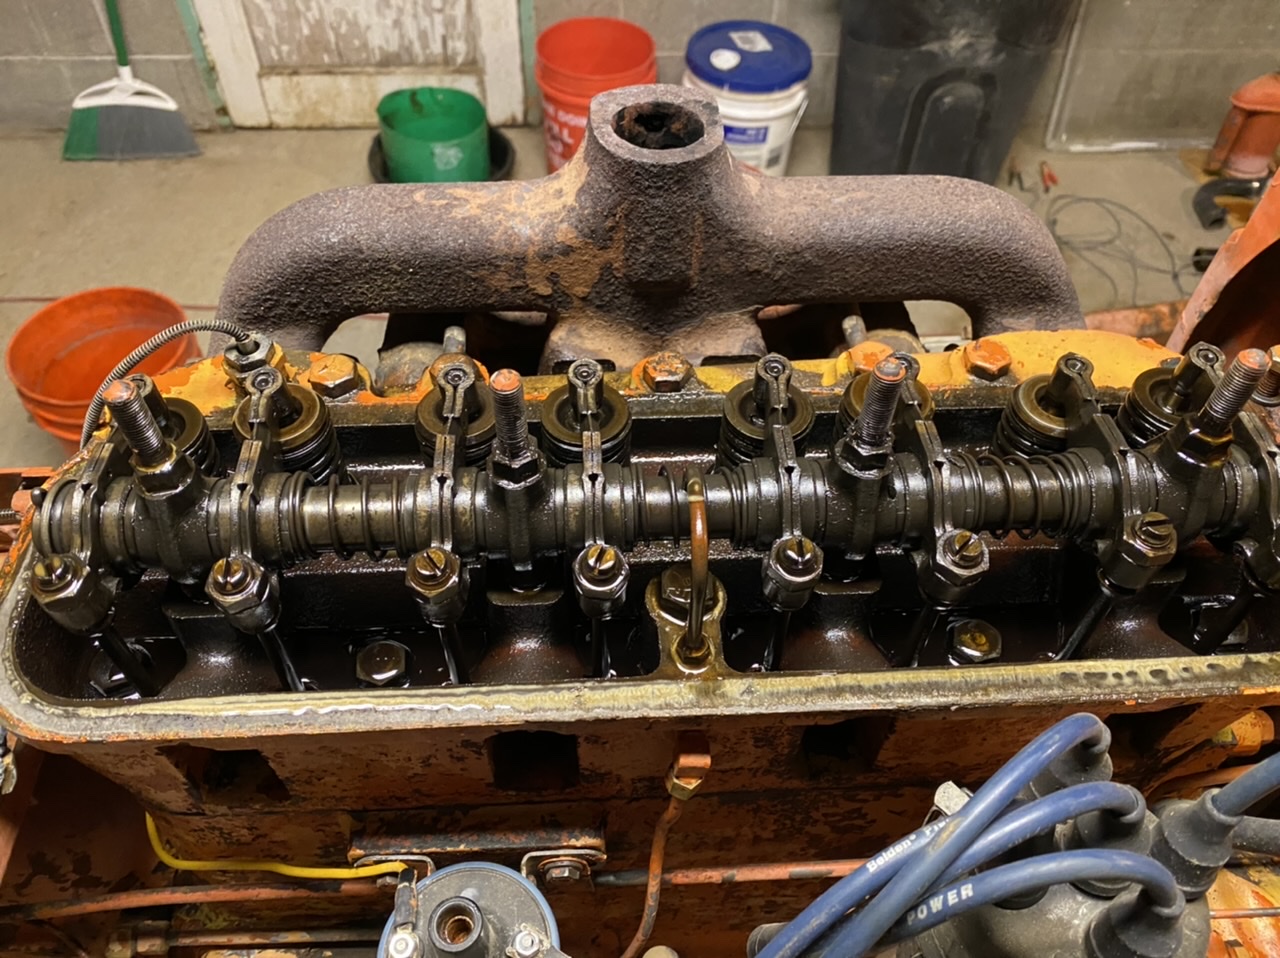
I am in the Middle of a in frame over haul on my tractor who the wife has dubbed "Ruby". A 1958 Allis-Chalmers D14. I purchased this tractor from an old farmer in western Colorado were I currently live. When I first got her the tires were really bad but held air. I recently got new rubber all around . (fluid filled all around) The transmission, Clutch, Hydraulics are all great. The brakes are even operational. The engine is the 149 CID straight 4 gasoline. It had so much blow by that the valve cover looked like a second exhaust pipe but still ran. I have in completely torn down and cleaned up. Here is a list of what is getting done. New Cylinder Sleeves and pistons. Rod bearings obviously. Valve train Kit New Muffler Oil Pressure Gauge Water Temp Gauge Ammeter Gauge Gear Shift dust boot Gear shift lever washer and snap ring Air Cleaner mushroom cap Fuel Strainer New Carb (Zenith) Fuel Filter Fuel Gauge Tank Webbing 12v Ignition Coil Pentronix Electronic Ignition 12v negative ground. Spark Plugs Spark plug wires Alternator 12v 63amp Alternator Bracket New Belt Water pump Cross MFG Leveling arms (Pair) Hastings oil filter Radiator pads Thermostat 180 Deg F After this overhaul the only things that does not work is the power steering pump. It steers very easy now so I did not feel like messing with it. One Piece of information that I am missing is Torque Specs . I purchased a service manual from Steiner Tractor but it does not have torque specs or tightening patterns. Can someone help me out with this information. Will be posting some pictures.
|
 |
|
Sponsored Links
|
|
|
john(MI)
Orange Level


Joined: 12 Sep 2009
Location: SE MI
Points: 9262
|
Post Options
Thanks(0)
Quote Reply
Posted: 30 Mar 2020 at 4:37pm |
|
I think there must be a special manual for torque specs. I have the three normal books, shop, service and parts and I couldn't find anything in them.
|
|
D14, D17, 5020, 612H, CASE 446
|
|
Boss Man
Orange Level
Joined: 03 Mar 2018
Location: Greenleaf, WI
Points: 617
|
Post Options
Thanks(0)
Quote Reply
Posted: 30 Mar 2020 at 4:48pm |
|
Head bolts 80-85 ft lbs start in the center and work your way out in a circular pattern, tappet gap 12-14 hot, I would initially set 16-18 cold, rod nuts 35-40 ft lbs
|
|
WF owner
Orange Level
Joined: 12 May 2013
Location: Bombay NY
Points: 5191
|
Post Options
Thanks(0)
Quote Reply
Posted: 30 Mar 2020 at 7:52pm |
A suggestion; since you are changing to an alternator, you might want to think about swapping the ammeter for a volt meter. Ammeters are n't really built for handling the current from an alternator and can be a fire hazard. A voltmeter will monitor what you need to know and work much better with the alternator.
Don't forget that you need to change it to negative ground and change the wires on the coil.
|
|
DSeries4
Orange Level

Joined: 12 Sep 2009
Location: Ontario, Canada
Points: 7639
|
Post Options
Thanks(0)
Quote Reply
Posted: 30 Mar 2020 at 8:16pm |
|
If you are putting a new fuel strainer on it, you do not need a separate fuel filter. People often add them when they get a bunch of crud in the fuel tank. Give the fuel tank a good cleaning out (and lining if rusted) and use good fresh gas and you will not have any problems.
|
|
'49 G, '54 WD45, '55 CA, '56 WD45D, '57 WD45, '58 D14, '59 D14, '60 D14, '63 D15D, '66 D15II, '66 D21II, '67 D17IV, '67 D17IVD, '67 190XTD, '73 620, '76 185, '77 175, '84 8030, '85 6080
|
|
Sugarmaker
Orange Level

Joined: 12 Jul 2013
Location: Albion PA
Points: 8661
|
Post Options
Thanks(0)
Quote Reply
Posted: 30 Mar 2020 at 8:22pm |
Nice job on the D14! And the list can go on and on! Dont ask me how I know! We need some pictures too. Regards, Chris
|
|
D17 1958 (NFE), WD45 1954 (NFE), WD 1952 (NFE), WD 1950 (WFE), Allis F-40 forklift, Allis CA, Allis D14, Ford Jubilee, Many IH Cub Cadets, 32 Ford Dump, 65 Comet, 66 F100.
|
|
MACK
Orange Level
Joined: 17 Nov 2009
Points: 7664
|
Post Options
Thanks(0)
Quote Reply
Posted: 30 Mar 2020 at 8:56pm |
|
Why not go the rest of the way and wash the crud out of block then new mains, crank seals, piolet bearing, throw out bearing and check clutch? MACK
|
|
Lon(MN)
Orange Level
Joined: 11 Sep 2009
Location: Merrill Wi
Points: 2048
|
Post Options
Thanks(0)
Quote Reply
Posted: 31 Mar 2020 at 7:54am |
|
I would get the crank surfaced and new cam bearings. I have three D14s that failed due to spun bearings.
|
|
RUBYD14
Bronze Level
Joined: 22 Nov 2017
Location: Palisade,CO
Points: 30
|
Post Options
Thanks(0)
Quote Reply
Posted: 31 Mar 2020 at 3:38pm |
|
The previous owner already went through the drive train. I will get there on the rest of the stuff. Right now I got farming to do and I am on a budget. This is a working tractor and I don't plan on it ever leaving my Family.
|
|
RUBYD14
Bronze Level
Joined: 22 Nov 2017
Location: Palisade,CO
Points: 30
|
Post Options
Thanks(0)
Quote Reply
Posted: 31 Mar 2020 at 3:40pm |
|
The pictures are coming I am having a hard time figure out how to upload them. Tells me the file is to big.
|
|
RUBYD14
Bronze Level
Joined: 22 Nov 2017
Location: Palisade,CO
Points: 30
|
Post Options
Thanks(0)
Quote Reply
Posted: 31 Mar 2020 at 3:48pm |
 Boss Man wrote: Boss Man wrote:
Head bolts 80-85 ft lbs start in the center and work your way out in a circular pattern, tappet gap 12-14 hot, I would initially set 16-18 cold, rod nuts 35-40 ft lbs |
Thank you sir I am pretty new at this. What do you mean tappet gap. is that on the valves or push rods. Where did you find that information or are you just knowing from experience.
|
|
jaybmiller
Orange Level Access
Joined: 12 Sep 2009
Location: Greensville,Ont
Points: 25271
|
Post Options
Thanks(0)
Quote Reply
Posted: 31 Mar 2020 at 3:59pm |
Does it have brakes ?? Crawl under the read end, shoot a light intot he cavity where the brake roads go in.. If there's oil in them ,or dripping out then the differential carrier axle seals are gone..Left side took me 6 days, right side 1 day (kinda KNEW what tools and how to do it). If you need to do it, PM me , I can write it out with the National seal numbers. the 'trick' I learned here is to put TWO seals in to replace the old one. Old one is 1/2" think, new ones 1/4", so 2 nicely fit AND 2X the protection AND different wear spot on the axle.
|
|
3 D-14s,A-C forklift, B-112
Kubota BX23S lil' TOOT( The Other Orange Tractor)
Never burn your bridges, unless you can walk on water
|
|
Boss Man
Orange Level
Joined: 03 Mar 2018
Location: Greenleaf, WI
Points: 617
|
Post Options
Thanks(0)
Quote Reply
Posted: 31 Mar 2020 at 4:26pm |
|
I have an I & T Manual. Most the torques are listed in the paragraph that covers the particular item. Tappet gap is the same as valve lash. Feeler gauge between the rocker arm and valve
|
|
RUBYD14
Bronze Level
Joined: 22 Nov 2017
Location: Palisade,CO
Points: 30
|
Post Options
Thanks(0)
Quote Reply
Posted: 31 Mar 2020 at 6:09pm |
|
|
|
RUBYD14
Bronze Level
Joined: 22 Nov 2017
Location: Palisade,CO
Points: 30
|
Post Options
Thanks(0)
Quote Reply
Posted: 31 Mar 2020 at 6:10pm |
|
Got it will be posting pictures of the Tear down this evening
|
|