| Author |
 Topic Search Topic Search  Topic Options Topic Options
|
oscarjwm 
Bronze Level

Joined: 17 Jan 2012
Location: MO
Points: 11
|
 Post Options Post Options
") Thanks(0) Thanks(0)
 Quote Quote  Reply Reply
 Topic: Valve Job on a WD45? Topic: Valve Job on a WD45?
Posted: 17 Jan 2012 at 2:02pm |
Short question: I've pulled the head off of my WD45 to extract a broken spark plug, and was wondering if there any pro's and con's of doing a valve job while it is off of the tractor? I have the head at home with me, but the rest of the tractor is 2 hours away, so I am not able to check the pistons and rings anytime soon.
Long story: I have a WD45 that has been in the family since the 60's. It has been a workhorse that has needed minimal repair. In the summer of 2010, I was brushogging with it and it stalled on a steep hill. After verifying that it had fuel, I tried to pull a plug to check the spark. Unfortunately, the plug snapped, leaving the threads stuck inside the head. After 2 years (I had another project tractor- a 1967 Ford 4000 to use in the interim) of using plenty of PB blaster, a propane torch, and two extractors, I gave up. One extractor fell into the cylinder, and the other extractor broke flush with the head when I applied too much torque. So, I pulled the head last weekend.
The engine was running kind of rough in 2010, would fire on 3 cylinders (miss), backfire a bit until it was warm and then it would start firing on the 4th. It was definitely overdue for a tuneup when I broke the plug. I also noticed when I pulled the head that the valves need adjustment- there was quite a gap between the valve and arm. The cylinder walls look good, maybe some slight scoring on one, but there is a lot of carbon build up on the piston and valves.
I'm taking it to a machine shop to get the spark plug removed, and while I am at it, I'll have them check out the valves. Any pro's or con's to getting a valve job done if needed? I've heard this might increase blowby if the pistons/rings are in bad shape, which I can't verify.
Just for fun, here is a pic with the head removed. 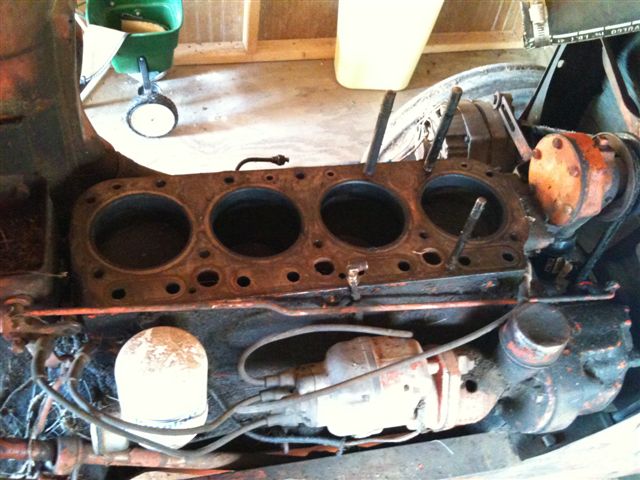
This forum looks like a great resource. Thanks in advance for any advice! I'll definitely be using some anti-seize compound on the plugs when I get this put back together!
|
 |
|
Sponsored Links
|
|
|
mlpankey
Orange Level

Joined: 13 Sep 2009
Location: Vols country
Points: 4580
|
Post Options
Thanks(1)
Quote Reply
Posted: 17 Jan 2012 at 2:29pm |
be a good idea to overhaul it top to bottom
|
|
Denis in MI
Orange Level
Joined: 15 Sep 2009
Location: Norvell, MI
Points: 832
|
Post Options
Thanks(1)
Quote Reply
Posted: 17 Jan 2012 at 2:52pm |
If I were you I'd have the Valve Job done and check the bearings with some plastigauge and look for a ridge a the top of the cylinders. If it has a lip in the cylinder you can either ream the lip off and cobble it back together with some oversize rings (I've done this and while I'm not proud of it I can't see spending more money than the tractor is worth on a set of sleeves and pistons) or do a complete overhaul. It is all up to you, do you want to spend a couple hundred bucks or more than likely over a thousand? If there isnt a lip you might be able to just throw a set of rings in it or check to see how much end gap they have. Just my humble opinion, Denis
Edited by Denis in MI - 17 Jan 2012 at 2:54pm
|
|
1938 B, 1945 B, 1941 IB, 1949 C, 2 1938 WCs, 3 1950 WDs, 1951 WD, 2 1955 WD45, 1957 D-14
|
|
DaveKamp
Orange Level Access
Joined: 12 Apr 2010
Location: LeClaire, Ia
Points: 6071
|
Post Options
Thanks(2)
Quote Reply
Posted: 17 Jan 2012 at 2:58pm |
|
Hi Oscar, welcome to the forum!
Well, if you already have the head off, you're at a perfect point to freshen up lots of things, and it's not very difficult to handle. If you're not satisfied with your own abilities, you have two good options- one is to have the machine shop do it, another is to find another tractor or old engine enthusiast to stand alongside and show you how to do it.
There's NOTHING... and I mean NOTHING in a WD-45 that cannot be accomplished by a sensible guy with basic tools and a little knowledge. Having experience, just means you've taken the time to obtain the knowledge whilst using the basic tools. With this, and the fact that you've already pulled the head, fresh in mind, I'd say that you're fine with EITHER approach, but the latter is a perfect opportunity.
First of all, take a valve spring compressor and compress one of the valve springs, remove the retainer clips and spring, put the stuff in a tupperware container so it doesn't get dropped into a crack in the floor.
Next, withdraw the valve, and give it a really close look. Does it look like there's much wear between the guide and the valve stem? Does the sealing edge of the valve (the face) look eroded, pitted, burned, or mutilated? If not, you'll need a lapstick, some lapping compound, a radio, and a can of your favorite beverage. If not, you'll need a valve-grinder, some seats, guides, and a little more experince at your side. Probably better to have the machine-shop do it, unless you're willing to keep her out-of-commission for a while.
To lap the valves, coat the valve face in a few places with some lapping compound. If the compound is dry, take a little motor oil and make it into a moderate paste. Drop the valve into it's place, put the lapstick's suction cup against it, and pray to the God of Valves... put your hands together (as in prayer) with the lapstick between, and roll the lapstick back-and-forth... don't try to spin it really fast, and don't try to push really hard. You'll feel the abrasive working... it'll feel 'rough'... and then, it'll start to smooth out. Lift up the valve, and observe what the lapping compound does to the sealing 'face' of the valve. You'll see that as you work it, the valve seat and valve faces will adopt a 'pattern'... a stripe where the contact occurs, and the lapping compound has 'ground' the face of the valve, and the face of the seat, to create a sealing surface. After you've made a good, consistent band all the way around, wipe off the lapping compound, and move it to the next valve, and repeat. What you're doing, is re-machining the valve faces to match their 'mated' valve seats, so don't re-arrange the valves after you've lapped 'em!
Make sure you rinse out all the lapping compound before you reassemble the engine. Invariably, SOME abrasive will find it's way into the cylinders, which isn't good for cylinders, but most will go right out the exhaust... better to hose it all down, then wipe everything off with clean paper towels.
When you reassemble the head, set the valve clearances per the book.
As for cylinders experiencing blowby from a new valve job... bah... if they're blowin' by from wear, they'll blow. Again, the WC/WD/WD45/D17 engines- they're all wet-sleeve design... if you get lots of wear, you can pop the pan, unbolt each rod, bump the rod and liner straight up, and lift the whole assembly out, one cylinder at-a-time, drop in new liners and liner O-rings, put new rings on new pistons on the original rods, replace and/or shim the rod and main bearings, put it back together and head for the field.
As for one cylinder dropping out, if you suffer an oily plug (compare 'em all side-by-side) then either it's because there's a little blowby, or your magneto and wires need a little refreshing. Try new wires first (use solid core, not resistor type). Also- non-resistance plugs... and my suggestion is to use something other than Champion plugs... (simply because the only plugs I've ever had that clearly failed, were Champions). Many guys recommend Autolites, but there's many suitable plugs available.
Anti-seize on the plugs probably won't help much... as hot as the plug gets, aluminum and copper-based compounds frequently don't survive. Best thing is just to take the plugs out once-a-year for an inspection, and tighten them only enough to seat 'em solid.
|
|
Charlie175
Orange Level
Joined: 11 Sep 2009
Location: Shenandoah, VA
Points: 6369
|
Post Options
Thanks(1)
Quote Reply
Posted: 17 Jan 2012 at 3:22pm |
just as a FYI I just had the head on my 226 done at a engine shop. They replaced the exhaust valves, guides and seats, resurfaced the face and hot boiled it to get some of the crude out. The intakes were fine. Also fluxed the head for cracks.
$300 was my bill.
|
|
Charlie
'48 B, '51 CA, '56 WD45 '61 D17, '63 D12, '65 D10 , '68 One-Ninety XTD
|
|
oscarjwm
Bronze Level
Joined: 17 Jan 2012
Location: MO
Points: 11
|
Post Options
Thanks(0)
Quote Reply
Posted: 17 Jan 2012 at 4:07pm |
 Denis in MI wrote: Denis in MI wrote:
If I were you I'd have the Valve Job done and check the bearings with some plastigauge and look for a ridge a the top of the cylinders. If it has a lip in the cylinder you can either ream the lip off and cobble it back together with some oversize rings (I've done this and while I'm not proud of it I can't see spending more money than the tractor is worth on a set of sleeves and pistons) or do a complete overhaul. It is all up to you, do you want to spend a couple hundred bucks or more than likely over a thousand? If there isnt a lip you might be able to just throw a set of rings in it or check to see how much end gap they have.
Just my humble opinion,
Denis |
Denis- Thanks! Great advice. I'm going to get a complete gasket set since the rear main seal is leaking, so I might as well check out the bearings while I have the oil pan off. I'll check for a lip on the cylinder before I install the head too. As you can see from the shape the tractor is in, its not worth much, but worth much more to me in sentimental value and worth a couple hundred bucks to keep it running.
|
|
oscarjwm
Bronze Level
Joined: 17 Jan 2012
Location: MO
Points: 11
|
Post Options
Thanks(0)
Quote Reply
Posted: 17 Jan 2012 at 4:18pm |
DaveKamp wrote:
Hi Oscar, welcome to the forum!
Well, if you already have the head off, you're at a perfect point to freshen up lots of things, and it's not very difficult to handle. If you're not satisfied with your own abilities, you have two good options- one is to have the machine shop do it, another is to find another tractor or old engine enthusiast to stand alongside and show you how to do it.
There's NOTHING... and I mean NOTHING in a WD-45 that cannot be accomplished by a sensible guy with basic tools and a little knowledge. Having experience, just means you've taken the time to obtain the knowledge whilst using the basic tools. With this, and the fact that you've already pulled the head, fresh in mind, I'd say that you're fine with EITHER approach, but the latter is a perfect opportunity.
First of all, take a valve spring compressor and compress one of the valve springs, remove the retainer clips and spring, put the stuff in a tupperware container so it doesn't get dropped into a crack in the floor.
Next, withdraw the valve, and give it a really close look. Does it look like there's much wear between the guide and the valve stem? Does the sealing edge of the valve (the face) look eroded, pitted, burned, or mutilated? If not, you'll need a lapstick, some lapping compound, a radio, and a can of your favorite beverage. If not, you'll need a valve-grinder, some seats, guides, and a little more experince at your side. Probably better to have the machine-shop do it, unless you're willing to keep her out-of-commission for a while.
To lap the valves, coat the valve face in a few places with some lapping compound. If the compound is dry, take a little motor oil and make it into a moderate paste. Drop the valve into it's place, put the lapstick's suction cup against it, and pray to the God of Valves... put your hands together (as in prayer) with the lapstick between, and roll the lapstick back-and-forth... don't try to spin it really fast, and don't try to push really hard. You'll feel the abrasive working... it'll feel 'rough'... and then, it'll start to smooth out. Lift up the valve, and observe what the lapping compound does to the sealing 'face' of the valve. You'll see that as you work it, the valve seat and valve faces will adopt a 'pattern'... a stripe where the contact occurs, and the lapping compound has 'ground' the face of the valve, and the face of the seat, to create a sealing surface. After you've made a good, consistent band all the way around, wipe off the lapping compound, and move it to the next valve, and repeat. What you're doing, is re-machining the valve faces to match their 'mated' valve seats, so don't re-arrange the valves after you've lapped 'em!
Make sure you rinse out all the lapping compound before you reassemble the engine. Invariably, SOME abrasive will find it's way into the cylinders, which isn't good for cylinders, but most will go right out the exhaust... better to hose it all down, then wipe everything off with clean paper towels.
When you reassemble the head, set the valve clearances per the book.
As for cylinders experiencing blowby from a new valve job... bah... if they're blowin' by from wear, they'll blow. Again, the WC/WD/WD45/D17 engines- they're all wet-sleeve design... if you get lots of wear, you can pop the pan, unbolt each rod, bump the rod and liner straight up, and lift the whole assembly out, one cylinder at-a-time, drop in new liners and liner O-rings, put new rings on new pistons on the original rods, replace and/or shim the rod and main bearings, put it back together and head for the field.
As for one cylinder dropping out, if you suffer an oily plug (compare 'em all side-by-side) then either it's because there's a little blowby, or your magneto and wires need a little refreshing. Try new wires first (use solid core, not resistor type). Also- non-resistance plugs... and my suggestion is to use something other than Champion plugs... (simply because the only plugs I've ever had that clearly failed, were Champions). Many guys recommend Autolites, but there's many suitable plugs available.
Anti-seize on the plugs probably won't help much... as hot as the plug gets, aluminum and copper-based compounds frequently don't survive. Best thing is just to take the plugs out once-a-year for an inspection, and tighten them only enough to seat 'em solid.
|
Dave- Wow, I'm blown away from the time everyone has taken to help me out! Thanks! Can I nominate this for post of the year?
I think I could handle the valve job myself, but it would be quite a while before I'd have the time. I think I'm going to save your "how-to" for next time, since I have quite a few old engines sitting around that I might tackle myself someday. I appreciate the advice about not worrying about the blowby. I'm also happy to know that this seems to be an easy engine to work on if I need to overhaul the pistons/rings/cylinders. I think I'll go ahead and have the machine shop drill out the spark plug, and have them check out the valves. I've got two shops quoting me a worst case scenario of $230-250 for the spark plug extraction and a complete valve job. I'll check out the cylinders and bearings based on Denis' advice, and assuming everything is good, I'll give it a tune up and hope to have it running in a month or so.
FYI- the spark plug that snapped was an AC Delco. I'll admit it has been a few years since I removed them- but that is just a testament to how well this thing has been running over the years (and what can happen if you neglect routine maintenance on your tractor).
|
|
mlpankey
Orange Level
Joined: 13 Sep 2009
Location: Vols country
Points: 4580
|
Post Options
Thanks(0)
Quote Reply
Posted: 17 Jan 2012 at 5:41pm |
|
well it would be great advice . But most of the time the valves are sunken and need new seats due to years of running on unleaded gas. If this is the case then new seats and a valve job is the only correct repair. unless you are wanting bigger valves then the old seats can be cut to get a few more years of service from. just my humble opinion. I have done both and sold several refurbished heads on this site. ps oversized rings are not a remedy for worn bores either . They were designed so one can file fit the rings for a specific ring end gap and performance gains from doing so. Not to mention valve springs usually havve fallen way below specification as well
Edited by mlpankey - 17 Jan 2012 at 5:45pm
|
|
Brian G. NY
Orange Level

Joined: 12 Sep 2009
Location: 12194
Points: 2269
|
Post Options
Thanks(0)
Quote Reply
Posted: 18 Jan 2012 at 11:51am |
If you do decide that new sleeves and pistons are required, check to see if you have a WD-45 or WD engine. The pistons are different. I suspect you have a WD (201) engine rather than the WD-45 (226) engine based on the fact that it is equipped with a magneto and there is a side plate which covers the push rods.
With the head removed, it is easy to check the stroke by measuring the distance between BDC and TDC of the piston travel. 4" for the WD and 4-1/2" for the WD-45.
|
|
j.w.freck
Orange Level

Joined: 16 Sep 2009
Location: karnack texas
Points: 1153
|
Post Options
Thanks(0)
Quote Reply
Posted: 18 Jan 2012 at 9:29pm |
|
have to go along with pankey and dave...do it right or park it...one thing dave failed to mentionwas,make sure the recess where the top of the sleeves are super clean,also make sure the bottom of the block where the sleeve o rings fit are ultra clean and smooth also...go for it
|
|
DaveKamp
Orange Level Access
Joined: 12 Apr 2010
Location: LeClaire, Ia
Points: 6071
|
Post Options
Thanks(0)
Quote Reply
Posted: 18 Jan 2012 at 9:43pm |
mlpankey wrote:
...most of the time the valves are sunken and need new seats due to years of running on unleaded gas... |
ML- What year did Allis stop installing hardened valve seats in their engines? I haven't found one that had recession problems...
Edited by DaveKamp - 18 Jan 2012 at 9:44pm
|
|
captaindana
Orange Level
Joined: 14 Sep 2009
Location: Fort Plain, NY
Points: 2572
|
Post Options
Thanks(0)
Quote Reply
Posted: 19 Jan 2012 at 6:20am |
|
Oscar I was just where you are at last year with my 15 II. I personally would get the head checked out by a pro and get his opinion. 300 bucks should probably get you a head ready for another 50 years. Dana
|
|
Dave H
Orange Level

Joined: 11 Sep 2009
Location: Central IL
Points: 3583
|
Post Options
Thanks(0)
Quote Reply
Posted: 19 Jan 2012 at 7:12am |
oscdar A post like that always gets the same answer. if the thing did not smoke or knock and it was mine i would just get that head back on right. That is if you do not plan on working the bejesus out of it. I have a reired JD 420 out in the barn with 120 hours on the motor in the last 10 years. I am the only one that knows that there are new pistons and a rebore in the motor. so to me it is how it was running and what you are gonna do with it.
|
|
mlpankey
Orange Level
Joined: 13 Sep 2009
Location: Vols country
Points: 4580
|
Post Options
Thanks(0)
Quote Reply
Posted: 19 Jan 2012 at 7:12am |
DaveKamp wrote:
mlpankey wrote:
...most of the time the valves are sunken and need new seats due to years of running on unleaded gas... |
ML- What year did Allis stop installing hardened valve seats in their engines? I haven't found one that had recession problems...
|
all 201 3 inch allis heads did not come with replaceable seats. the 4 226 heads did but some of them even have been sunken could have been from valve jobs in the past but if you replace the seats it requires more than lapping compound. Valves should be flush with cylinder head surface when seated. not to mention 60 year old guides and springs need attention along with 60 year old seats and valves. Rocker arm geometry stinks from the factory and most the valve tips cause of it are worn off to a angle as well
Edited by mlpankey - 19 Jan 2012 at 12:38pm
|
|
DaveKamp
Orange Level Access
Joined: 12 Apr 2010
Location: LeClaire, Ia
Points: 6071
|
Post Options
Thanks(0)
Quote Reply
Posted: 19 Jan 2012 at 10:12pm |
|
So you're saying that NO 201 3 inch Allis head came with replaceable valve seats... obviously, if they're not replaceable, you expect someone to send in a head to have non-replaceable valve seats to be replaced?
No, if there's a valve in ANYTHING, the seat is somehow replaceable... that means that NO valve seats are non-replaceable.
My point here should be pretty clear... but if not, I'll offer my observations. I currently own one '37, two '38's and a '39WC, a '50 WD, and a D-17 Series 1. Every one has hardened valve seats, and out of all those engines, not a single one has ever shown the slightest reason to need new valve seats, and NONE of them show any signs of receeding.
I've rebuilt three Model A Fords, and had people tell me horror stories about how I shouldn't run them on unleaded fuel, because of valve seat recession.
It's total bullcrap.
Study your history: Kettering Labs introduced TEL to the fuel market, and tried for YEARS to get it carried in motor fuel mixes, but nobody was interested in the cost. Tetraethyl lead was not added to motor fuels in substantial amounts until AFTER WW2, as it was added to aviation fuels to help improve performance at higher altitudes, at combat-power levels.
It wasn't until well after WW2 that auto manufacturers (particularly those in close economic proximity to Kettering Labs) decided to 'save' the cost of hardened valve seats and rely on the TEL (and planned obsolescense) to keep their AUTOMOBILE engines in Joe Public's pocketbook. When the NO-LEAD mandates were being drawn up, the horror-stories started circulating.
Hardened valve seats were part of industrial engine history from the git-go. Model A Fords were never built with the intention of running TEL, nor were agricultural, industrial, or heavy truck engines that were expected to last long enough to satisfy a SMART customer.
As for poor workmanship prior, or active position of valvetrain, even what you consider to be poor valvetrain geometry, that's totally irrelevant- if they're trashed because some fool worked on it before, it either ran, or it didn't. If the rocker arm geometry wasn't good enough for you from the factory, apparently that's why Allis went out of business before the WD, D17, and 170 were made.
Remember what he said was happening before this started? Bushhogging?
It's dropping one cylinder occasionally... probably a combination of several things... the broken spark-plug was probably one contributor... but a little freshening-up of the seats, a lash adjustment, and visit to the magneto wizard probably will... along with a check out the manifold gasket/mating surfaces, and make sure there's no crack between the intake and exhaust side causing a leak.
It needs a little TLC and some exercise, not a heart, lung, and kidney transplant.
|
|
mlpankey
Orange Level
Joined: 13 Sep 2009
Location: Vols country
Points: 4580
|
Post Options
Thanks(0)
Quote Reply
Posted: 20 Jan 2012 at 7:20am |
DaveKamp wrote:
So you're saying that NO 201 3 inch Allis head came with replaceable valve seats... obviously, if they're not replaceable, you expect someone to send in a head to have non-replaceable valve seats to be replaced?
No, if there's a valve in ANYTHING, the seat is somehow replaceable... that means that NO valve seats are non-replaceable.
My point here should be pretty clear... but if not, I'll offer my observations. I currently own one '37, two '38's and a '39WC, a '50 WD, and a D-17 Series 1. Every one has hardened valve seats, and out of all those engines, not a single one has ever shown the slightest reason to need new valve seats, and NONE of them show any signs of receeding.
I've rebuilt three Model A Fords, and had people tell me horror stories about how I shouldn't run them on unleaded fuel, because of valve seat recession.
It's total bullcrap.
Study your history: Kettering Labs introduced TEL to the fuel market, and tried for YEARS to get it carried in motor fuel mixes, but nobody was interested in the cost. Tetraethyl lead was not added to motor fuels in substantial amounts until AFTER WW2, as it was added to aviation fuels to help improve performance at higher altitudes, at combat-power levels.
It wasn't until well after WW2 that auto manufacturers (particularly those in close economic proximity to Kettering Labs) decided to 'save' the cost of hardened valve seats and rely on the TEL (and planned obsolescense) to keep their AUTOMOBILE engines in Joe Public's pocketbook. When the NO-LEAD mandates were being drawn up, the horror-stories started circulating.
Hardened valve seats were part of industrial engine history from the git-go. Model A Fords were never built with the intention of running TEL, nor were agricultural, industrial, or heavy truck engines that were expected to last long enough to satisfy a SMART customer.
As for poor workmanship prior, or active position of valvetrain, even what you consider to be poor valvetrain geometry, that's totally irrelevant- if they're trashed because some fool worked on it before, it either ran, or it didn't. If the rocker arm geometry wasn't good enough for you from the factory, apparently that's why Allis went out of business before the WD, D17, and 170 were made.
Remember what he said was happening before this started? Bushhogging?
It's dropping one cylinder occasionally... probably a combination of several things... the broken spark-plug was probably one contributor... but a little freshening-up of the seats, a lash adjustment, and visit to the magneto wizard probably will... along with a check out the manifold gasket/mating surfaces, and make sure there's no crack between the intake and exhaust side causing a leak.
It needs a little TLC and some exercise, not a heart, lung, and kidney transplant.
|
Obviously you dont know the difference in cutting and adding a replaceable seats into a head vs running a tig torch over a factory supplied replacement seat to remove it pops right out. Look in the allis manual no 201 came with removable replacement seats. wither you think its bs or not 60 years of opening and closing valves sinks the valve further down in the seat than its original placement . laping it only seats it even further down . The geometry is off from the factory and stems wear is uneven due to it. It is a tractor and most did get worked on by shade tree mechanics at best. 60 years of a stem running through the guide opens it up more than factory set it at also . new valve springs fall off 5lbs through a couple of heat cycles imagine what 60 years of heat cycles make them fall off to.
Edited by mlpankey - 20 Jan 2012 at 7:21am
|
|
DaveKamp
Orange Level Access
Joined: 12 Apr 2010
Location: LeClaire, Ia
Points: 6071
|
Post Options
Thanks(1)
Quote Reply
Posted: 20 Jan 2012 at 8:14am |
mlpankey wrote:
[ Obviously you dont know the difference in cutting and adding a replaceable seats into a head vs running a tig torch over a factory supplied replacement seat to remove it pops right out. Look in the allis manual no 201 came with removable replacement seats. wither you think its bs or not 60 years of opening and closing valves sinks the valve further down in the seat than its original placement . laping it only seats it even further down . The geometry is off from the factory and stems wear is uneven due to it. It is a tractor and most did get worked on by shade tree mechanics at best. 60 years of a stem running through the guide opens it up more than factory set it at also . new valve springs fall off 5lbs through a couple of heat cycles imagine what 60 years of heat cycles make them fall off to. |
I most certainly DO know how to remove seats, and I've done it with many other techniques besides a TIG. So make up your mind- did they, or didn't they come with replaceable seats? Regardless of what the manual says, EVERY SEAT is replaceable. That doesn't mean it needs to be replaced... nor does every head need to be blanket rebuilt and blueprinted to do a respectable job. You may be of the opinion that the geometry is faulty, but is YOUR 60-year-old geometry as solid and reliable as THAT engine's? I doubt any of us could say so. We still work just fine, and there's plenty of tolerance for wear. Lapping it doesn't change the position of the seat with respect to the head. Lapping it DOES cause the valve to drop in a smidgen, but I challenge you to get an accurate measurement on a DI... because you won't... the amount of drop is insignificant not only to a DI, but also in terms of wether the valve will continue to operate well and flow appropriately for an ordinary stock non-competition idiot-performance engine. MOST of these engines have NO REASON to be suspected of poor shade-tree-mechanic work. MOST of these engines got the best thing an INDUSTRIAL engine could ever need- nothing more than regular exercise and occasional oil-changes. To expect that they were frequently worked on is downright WRONG- most of the time, they didn't even get the occasional freshening-up (ignition tuneup, valve lash adjustments, etc) that were specified, and they kept running days-to-years. Your presumption of valve spring pressures falling off in terms of new-break-in being an indication to extended-length weakening is false. The premise that new-to-break-in pressure drop of 5lbs on the seat continues is not true- it is a function of elastic properties of the steel. When manufactured, springs are wound of a specific steel alloy that is initially annealed. A manufacturer may choose to heat-treat the springs, and in less expensive alloys, heat-treatment was necessary to make a spring last... but Allis had the forefront in metallurgists, foundry, and machining engineers guided by the absolute best industrial engineers on the planet. Rather than subject an inexpensive alloy to manufacturing process, and then run it through a lengthy heat-treatment process, they made them from a more expensive alloy, and went from hot wire to a cooling spring within a very controlled timeframe, so that the wire HEAT TREATED ITSELF... the initial temperature change from annealing, to roll/wrapping to cutting, then to cooling established the 'test pressure' that a new spring should indicate. Once installed, the FINAL HARDENING was by WORK. In the WORKING WINDOW, a spring's internal stresses cause it to harden, and some of the initial indications will drop off. At that point, the spring's final properties will be established, and it will last incredibly well. You regularly base your statements upon drivel written in automotive performance magazines. With the exception of some cars made up through 1935, automobiles haven't had 'industrial' engines. They were built (and advertised in rating) to satisfy consumers, and last just long enough so that consumers would return and buy another when they got tired of the first one. As many in the service world would put it "Built to be profitable before AND AFTER the sale." Industrial engines, on the other hand, were built to satisfy a very serious function, and be perpetually serviceable under performance criteria that an automobile magazine would never respect: Real numbers, with conservative ratings, operating under the worst conditions, with minimal maintenance. This is the reason why you'll see a whole lot more old industrial engines out chugging away, when cars of the same era are long-since-gone. You respond to virtually every post from the perspective that the poster is somehow interested in making a competition engine... this is incredibly misguiding for those who ask, and for everyone else, illustrates you as being an arrogant and foolish man, when you're actually probably not. When reading posts, consider the reality of the OP's question, suspend your inclinations to suggest radicalism, and accept the fact that when these tractors were built, the ENGINEER's performance criteria, and performance criteria of the farmers who BOUGHT the machines, were substantially different from YOURS.
Edited by DaveKamp - 20 Jan 2012 at 8:15am
|
|
Ted J
Orange Level

Joined: 05 Jul 2010
Location: La Crosse, WI
Points: 18943
|
Post Options
Thanks(0)
Quote Reply
Posted: 20 Jan 2012 at 10:10am |
|
WELL said Dave. I too am not building a hot rod, only trying to fix up an old relic before it gets worse. Can't afford all those extras and just want to farm with her.
Thanks for the input. Ted
|
|
"Allis-Express"
19?? WC / 1941 C / 1952 CA / 1956 WD45 / 1957 WD45 / 1958 D-17
|
|
CTuckerNWIL
Orange Level

Joined: 11 Sep 2009
Location: NW Illinois
Points: 22825
|
Post Options
Thanks(1)
Quote Reply
Posted: 20 Jan 2012 at 10:44am |
|
I would also like to know if I can tell the difference between a factory spec valve train and one that has had seats and valves ground a couple times, while I am out raking hay? NOT!!
|
|
|
|
mlpankey
Orange Level
Joined: 13 Sep 2009
Location: Vols country
Points: 4580
|
Post Options
Thanks(0)
Quote Reply
Posted: 20 Jan 2012 at 12:39pm |
CTuckerNWIL wrote:
I would also like to know if I can tell the difference between a factory spec valve train and one that has had seats and valves ground a couple times, while I am out raking hay? NOT!! |
you can hear it in the exhaust by a poping sound. Dave you can cut the heads casting and insert a hardened replaceable seat if the cast iron is thick enough which the last one a 201 with non removable seats that i sonic tested wasnt. if the bowl has been hogged and seat blended a tig torch is the only way to pop them out. when a valve is sunken in the seat you have two options go to a bigger valve or change the seat if it reqiures cutting for a replacement hope no water finds its way to the valve . its darn near impossible to stop a water leak behind the seat .Again 60 years of water errosion and corrosion factor. 60 year old factor period. need to follow your own suggestions sometimes about the boat captain.
Edited by mlpankey - 20 Jan 2012 at 12:53pm
|
|
DaveKamp
Orange Level Access
Joined: 12 Apr 2010
Location: LeClaire, Ia
Points: 6071
|
Post Options
Thanks(0)
Quote Reply
Posted: 20 Jan 2012 at 9:20pm |
mlpankey wrote:
you can hear it in the exhaust by a poping sound. |
I'll be more willing to bet that if Charlie and you were listening to exhaust, he'd be able to tell a whole lot more about the engine than you could. I've seen his shop, and his work.
mlpankey wrote:
Dave you can cut the heads casting and insert a hardened replaceable seat if the cast iron is thick enough which the last one a 201 with non removable seats that i sonic tested wasnt. |
Really? What were you measuring with... a pitchfork?
mlpankey wrote:
if the bowl has been hogged and seat blended a tig torch is the only way to pop them out. |
If the bowl has been hogged and seat blended, it's obviously not this gentleman's engine now, is it?
mlpankey wrote:
when a valve is sunken in the seat you have two options go to a bigger valve or change the seat if it reqiures cutting for a replacement hope no water finds its way to the valve . its darn near impossible to stop a water leak behind the seat .Again 60 years of water errosion and corrosion factor. 60 year old factor period. need to follow your own suggestions sometimes about the boat captain. |
Panky, I find it hard to believe that ANYONE would be such a foolish liar to make this statement. If you had half the experience you boast of working on these, you would've sawed a few bad ones in half to see what there really was for meat. "60 years of corrosion and erosion" don't mean squat on an engine
that's been filled with coolant, devoid of an oxygen environment, even if not kept in a
running condition. If you've really been IN them, and had the wisdom to tell the truth, you wouldn't have made that statement.
Anybody with HALF an interest in these, knows that the old 3" tall heads have a thicker deck than the later 4" tall
ones... I observed .370-.330 thick on a 3" head and about .270 -.300 thick on the 4" heads. I'd venture a guess that there wasn't much deviation and very little core shift on these castings. Anyone care to put up their numbers or contest mine?
|
|
mlpankey
Orange Level
Joined: 13 Sep 2009
Location: Vols country
Points: 4580
|
Post Options
Thanks(0)
Quote Reply
Posted: 20 Jan 2012 at 9:46pm |
DaveKamp wrote:
mlpankey wrote:
you can hear it in the exhaust by a poping sound. |
I'll be more willing to bet that if Charlie and you were listening to exhaust, he'd be able to tell a whole lot more about the engine than you could. I've seen his shop, and his work.
mlpankey wrote:
Dave you can cut the heads casting and insert a hardened replaceable seat if the cast iron is thick enough which the last one a 201 with non removable seats that i sonic tested wasnt. |
Really? What were you measuring with... a pitchfork?
mlpankey wrote:
if the bowl has been hogged and seat blended a tig torch is the only way to pop them out. |
If the bowl has been hogged and seat blended, it's obviously not this gentleman's engine now, is it?
mlpankey wrote:
when a valve is sunken in the seat you have two options go to a bigger valve or change the seat if it reqiures cutting for a replacement hope no water finds its way to the valve . its darn near impossible to stop a water leak behind the seat .Again 60 years of water errosion and corrosion factor. 60 year old factor period. need to follow your own suggestions sometimes about the boat captain. |
Panky, I find it hard to believe that ANYONE would be such a foolish liar to make this statement. If you had half the experience you boast of working on these, you would've sawed a few bad ones in half to see what there really was for meat.
"60 years of corrosion and erosion" don't mean squat on an engine that's been filled with coolant, devoid of an oxygen environment, even if not kept in a running condition. If you've really been IN them, and had the wisdom to tell the truth, you wouldn't have made that statement.
Anybody with HALF an interest in these, knows that the old 3" tall heads have a thicker deck than the later 4" tall ones... I observed .370-.330 thick on a 3" head and about .270 -.300 thick on the 4" heads. I'd venture a guess that there wasn't much deviation and very little core shift on these castings.
Anyone care to put up their numbers or contest mine?
|
. did you measure a early 3 inch or latter 3 inch probably never seen the differences. 2 versions of 3 inch heads. most filled with water and drained for winter around here Boat captain . do you need pictures of one cut in half do you need customers on this site who have puchased worked over heads from me . no pictures of any 226 on site of yours ive seen . ultrasonic thickness meter is no pitch fork either boat captain. the 1.059 outside diameter comp valve springs i use fall off 5lbs do you want me to send you a new one vs one that has had 5 pulls on it with install height new spring 125llbs on seat old spring 120 lbs just pay the postage . Boat captain no lies here. not bushhogging with them or running from barn to trailor to set at show either if i was i probably could get by with a little more inferior particulars like the last allis 60 year old springs that were removed had just 12lbs on the seat when checked.
Edited by mlpankey - 20 Jan 2012 at 10:14pm
|
|
scott
Orange Level Access
Joined: 12 Sep 2009
Location: michigan
Points: 2736
|
Post Options
Thanks(0)
Quote Reply
Posted: 21 Jan 2012 at 8:02am |
|
My D-17 went from a stumble to a oil pan full of water. I changed the o rings, honed the cylinders, and installed new rings on the pistons. The water is now gone from the oil pan but it still has a small stumble... I wish I'd sent the head in and had the valves reworked while I had the head off. The head may cost $300 but also have to add in gaskets, antifreeze, oil, etc. if it has to be torn into again. I'd do it while the head is off.
|
|
DaveKamp
Orange Level Access
Joined: 12 Apr 2010
Location: LeClaire, Ia
Points: 6071
|
Post Options
Thanks(0)
Quote Reply
Posted: 21 Jan 2012 at 8:27am |
|
Keep backpedalin' pankey, someday you'll get somewhere other than nowhere.
You started with the woes of valve seat recession, then on to guides, geometry, and springs, and every step of the way, it's all about 'competition'. Each time you get caught with a lie, you backpedal.
You have no concept of what constitutes tractor and industrial engine performance.
Edited by DaveKamp - 21 Jan 2012 at 8:36am
|
|
mlpankey
Orange Level
Joined: 13 Sep 2009
Location: Vols country
Points: 4580
|
Post Options
Thanks(0)
Quote Reply
Posted: 21 Jan 2012 at 8:40am |
|
Oh I ain't back peddling. Just realized you don't know much about the composition of cast iron. .I f you ever did anything above lapping like grinding you would find not all castings the same.
|
|
CTuckerNWIL
Orange Level
Joined: 11 Sep 2009
Location: NW Illinois
Points: 22825
|
Post Options
Thanks(0)
Quote Reply
Posted: 21 Jan 2012 at 9:12am |
|
So what's the big deal about springs falling off 5 lbs? I know guys that pull and have to run half sized or less spring because the cam is ground half way in two to let the rods clear. They run 850+ cu in in a MM block and run by the rules in their class. 10% over rated engine RPM. Tractor engines at rated RPM with proper grinding of the valve kinda makes a check valve, it has to be pushed open and compression only pushes it shut, so why the fuss about spring pressure.
|
|
|
|
DaveKamp
Orange Level Access
Joined: 12 Apr 2010
Location: LeClaire, Ia
Points: 6071
|
Post Options
Thanks(0)
Quote Reply
Posted: 21 Jan 2012 at 9:13am |
|
Scott- describe the stumble, and your situation a bit more... there's many things that will cause running problems, and the cylinder head is the last one to blame.
When the head is off, it's easy and advantageous to give them a good workover, and it doesn't take carrying it off to a shop and dropping three bills to do it. A boy with a spring-compressor, lapstick, compound, and wire wheel can work wonders in 30 minutes. If there's any expensive problems (and usually there isn't), you'll see them firsthand, and the repair is pretty obvious.
Let me explain what I see to be the big sociological problem here.
To many people, cylinder heads, valvetrain, etc., are voodoo, because when they talk to someone across a counter at a machine shop, they get quoted a high pricetag. They infer from this (and panky's exhaust popping) that there's some mysterious and fantastic precision magic that has to occur in order to make this thing 'just right'.
It could not be farther from the truth. These cylinder heads were made of good castings, and the manufacturing assembly was elegantly simple to watch, and also to work on after.
A cured casting is placed it in a hand-made locating fixture, and drilled for all head bolts and valve guides. Once cooled (again), it's moved to a milling machine that cut the surface of the cylinder head. It was allowed to cool again, then placed in a jig that located and pressed in the valve guide inserts... the press was just a basic arbor-press with an operator stepping on a pedal. After that, it was placed in a mill that cut the valve seat recess AND any flashing that appeared inside the valve bowl.
After that, the valve seat was set in place using a tool that looked somewhat like a slide hammer, and it slide into the valve guide bore... basically whacked it in place, and then 'staked' the edges. Then, a motorized grinding tool was dropped into each guide and slid down to take a slight cut in the guide... not for making the guide properly shaped, but so that the inspector could verify that the guide was concentric to the hole, and flush in the recess... if it wasn't, the pattern would be askew on the hardened valve's face. After that, the valves were set in position and lapped, rinsed, springs, retainers, and keepers installed, and off to engine assembly.
The result was an excellent cylinder head, produced with very good accuracy and consistency in a very short time.
The great thing, is because of it's simplicity, and the amount of tolerance allowed in it's design, they were easy to keep within good operating tolerance, and henceforth, it didn't take rocket-science to make them run well forever.
If you take the casting, bare, and knock out all the seats and valve guides, scrub it clean, check it for cracks, and then install new guides and seats (with a simple locating tool and hammer), then you can use an antique hand-operated grinder, a lapping stick and compound, with new valves, springs, and keepers.
Or you can put the head on a table, release each valve with a spring compressor, wire brush each valve, scrub the head, look for cracks, check the welch (frost) plugs, drop in each valve, see if it wobbles in the guide, then lap it, reinstall the springs, and it'll work great. You'll know if you've got a sacked-out spring... if you can't get the valve to move by pressing with the heel of your hand, you've got plenty of seat force.
2 hours on a Saturday afternoon, and you're back in operation, running well, and you saved your $300 for a carb kit, a manifold gasket set, plugs, wires, cap, rotor, and one new front tire.
|
|
DaveKamp
Orange Level Access
Joined: 12 Apr 2010
Location: LeClaire, Ia
Points: 6071
|
Post Options
Thanks(0)
Quote Reply
Posted: 21 Jan 2012 at 9:51am |
mlpankey wrote:
Oh I ain't back peddling. Just realized you don't know much about the composition of cast iron. .I f you ever did anything above lapping like grinding you would find not all castings the same. |
(and in doing so, he backpedals more) What would you like to know about the composition of cast iron? nickle, silicon, and other alloys, metallurgy, shrink rates, mold preparation, malleability testing, selection of cutting tools, speed or feed rates for HSS or carbide, preheat for welding? They're not all required for an engineering degree, but it's all excellent stuff to know if you plan on being worthwhile around machine tools, or at the very least, understanding how economy-of-scale gave Allis Chalmers the ability to produce these things cheaply, in the face of substantially larger competition. BTW... have you ever cast iron in your driveway? Yeah, I have... I've stood atop the gas blowing engines of the furnaces in Bethlehem, PA too... even have cross-section diagrams of the brick-patterns of the stove towers. For your next trick, I suggest you attempt to dismiss the viability of nickle introduction into nodular vs. grey iron, or how it limits crystalization to yield higher shear strength under conditions of assymetrical section modulus, as that would have the greatest correlation and relevancy to any attempt you've made so far.
|
|
mlpankey
Orange Level
Joined: 13 Sep 2009
Location: Vols country
Points: 4580
|
Post Options
Thanks(0)
Quote Reply
Posted: 21 Jan 2012 at 10:28am |
|
so you know its porous which contradicts just cutting it in half and measruing deck thickness.
Edited by mlpankey - 21 Jan 2012 at 10:29am
|
|
Rod B
Orange Level
Joined: 25 Jul 2011
Location: Peoria
Points: 415
|
Post Options
Thanks(0)
Quote Reply
Posted: 21 Jan 2012 at 12:03pm |
|
pankey must be out of magazines to read again.
|
|


