| Author |
 Topic Search Topic Search  Topic Options Topic Options
|
modirt 
Orange Level Access

Joined: 18 Jul 2018
Location: Missouri
Points: 9131
|
 Post Options Post Options
") Thanks(0) Thanks(0)
 Quote Quote  Reply Reply
 Posted: 07 Aug 2025 at 12:42pm Posted: 07 Aug 2025 at 12:42pm |
|
BTW, where does one go to get new crosses? I did know a guy........he could match anything.......but he up and died on us a while back and his shop is closed.
|
 |
|
Sponsored Links
|
|
|
steve(ill)
Orange Level Access
Joined: 11 Sep 2009
Location: illinois
Points: 89925
|
Post Options
Thanks(0)
Quote Reply
Posted: 07 Aug 2025 at 1:22pm |
I buy all my u-joints from these guys... Farm Store carries 2 sizes in the 30- 50 HP range.. These guys carry EVERYTHING and the adaptors... You just got to know the bearing OD and joint width...
|
|
Like them all, but love the "B"s.
|
|
modirt
Orange Level Access
Joined: 18 Jul 2018
Location: Missouri
Points: 9131
|
Post Options
Thanks(0)
Quote Reply
Posted: 08 Aug 2025 at 12:39pm |
More progress.
After going over the pulley setup numerous times, concluded there HAD to be a seam somewhere, if only I could find it. No way to assemble it otherwise. Turns out the cap screws were only holding a plate on in front......not the entire pulley. Seam was on insider corner.
As it turns out, didn't need to do anything to pto shaft / yolk / u-joint. Just remove those 4 cap screws. Now I know. Now we all know. Next one will be easy.
|
|
plummerscarin
Orange Level Access
Joined: 22 Jun 2015
Location: ia
Points: 4126
|
Post Options
Thanks(0)
Quote Reply
Posted: 08 Aug 2025 at 1:20pm |
|
Can be frustrating trying to figure something out and then the realization it is not that difficult once you understand the thing. Obviously, service manuals can be very important if you can even find one. Glad you got it apart. I see a set screw on the yoke. Does that hold it to a stub shaft? If so, now you can put some heat to it and separate those two pieces and make it more easy next time. If there is a next time.
Glad to see you’re making progress
|
|
PaulB
Orange Level
Joined: 12 Sep 2009
Location: Rocky Ridge Md
Points: 5226
|
Post Options
Thanks(0)
Quote Reply
Posted: 08 Aug 2025 at 2:24pm |
|
For U-Joints: there is a "Fleetpride" Heavy truck parts place close to me that can match nearly anything. If they can't match it there is a Farm drivelines place that can.
|
|
If it was fun to pull in LOW gear, I could have a John Deere.
Real pullers don't have speed limits.
If you can't make it GO... make it SHINY
|
|
modirt
Orange Level Access
Joined: 18 Jul 2018
Location: Missouri
Points: 9131
|
Post Options
Thanks(0)
Quote Reply
Posted: 08 Aug 2025 at 5:05pm |
Got the big cap screw holding pulley on off and now appears to be
same boat as normal case of having to pull the harmonic
balancer.......except this pulley setup isn't normal. Have borrowed the loan of a
balancer pulling tool, but short bolts normally used doesn't work with
this pulley setup. Need to procure some much longer bolts in range of
3/8" x 3 1/2" fine thread......just to be able to reach the holes to
pull it off with. Apparently neat trick is to delete the big washer,
then put big cap screw back in and use that to push against. Whole unit
is supposed to slide past it. Will see.
|
|
steve(ill)
Orange Level Access
Joined: 11 Sep 2009
Location: illinois
Points: 89925
|
Post Options
Thanks(0)
Quote Reply
Posted: 08 Aug 2025 at 7:39pm |
|
you knew they didnt put a special crank shaft in the motor with a 3 inch longer snout... Had to be an adaptor plate or something... Makes a lot more sence after you got it apart !
|
|
Like them all, but love the "B"s.
|
|
modirt
Orange Level Access
Joined: 18 Jul 2018
Location: Missouri
Points: 9131
|
Post Options
Thanks(0)
Quote Reply
Posted: 09 Aug 2025 at 6:56am |
Not sure if time will permit any further progress will be made over the weekend.
Found this video of a guy facing similar problem. Same bolt. This is what I fear may be causing the stuck bolt problem. Corrosion.
Fast forward to around 5 min to get started. NO amount of prying was getting his cover free from that bolt. Seems like a design flaw.
|
|
modirt
Orange Level Access
Joined: 18 Jul 2018
Location: Missouri
Points: 9131
|
Post Options
Thanks(0)
Quote Reply
Posted: 11 Aug 2025 at 1:05pm |
More progress and hit yet another wall.
With the right puller, the big pulley walked right off just like harmonic balancer would.
As
feared, corrosion around that broken bolt may have the cover welded on
tight. I thought maybe if i got it freed on one side, I could wedge it
off. Is free on top, left side and bottom Entire right side is stuck
down tight. Have driven wedges in, banged on cover and bolt.....rise and
repeat......and no joy. It has hit the wall.
Trying
to free it around the fuel pump damaged the cover to point of no
return. It's toast. Have given thought to drilling a hole in the cover
to the bolt.......say 3/16" or so......then filling that with PB Blaster
and letting it soak a bit in hopes it might give it up......or just
quit the subtle stuff and get out a saw and start hacking it up.
|
|
DiyDave
Orange Level Access

Joined: 11 Sep 2009
Location: Gambrills, MD
Points: 54958
|
Post Options
Thanks(0)
Quote Reply
Posted: 11 Aug 2025 at 4:27pm |
Thread and bolt a piece of steel to the bolts above and below the broken one, weld a piece of threaded steel to the bolted steel, the same size as will thread onto a slide hammer. slide hammer the cover off. this suggestion will only work if you have room for said slide hammer... 
|
|
Source: Babylon Bee. Sponsored by BRAWNDO, its got what you need!
|
|
modirt
Orange Level Access
Joined: 18 Jul 2018
Location: Missouri
Points: 9131
|
Post Options
Thanks(0)
Quote Reply
Posted: 11 Aug 2025 at 5:32pm |
Had to quit early and unscheduled field trip all day tomorrow.
As stands now, drilled the hole thru cover above the bolt, and have been irrigating with PB blaster. Sitting under serious tension with driven in wedges above and below. If it doesn't give it up in a day or two, will pull out the Fein multitool and start hacking. Get on the edge of that bolt and ride it to the bottom.
|
|
DaveKamp
Orange Level Access
Joined: 12 Apr 2010
Location: LeClaire, Ia
Points: 6111
|
Post Options
Thanks(0)
Quote Reply
Posted: 11 Aug 2025 at 9:17pm |
For what it's worth...
Chrysler, like Ford and GM, had manufacturing lines specific for 'industrial' engines.... so if you assume an engine to be same as automotive/truck, there's a fair chance you'll be wrong.
My Clark IT-60 has a 225 slant six. While it looks just like what'd be in as Plymouth Volare, Chrysler LeBaron, or Dodge Aspen... or an A or D-series truck or van...
But it's different. About 80% of the parts are different. Different crank, different intake, different pan, different water pump...
|
|
Ten Amendments, Ten Commandments, and one Golden Rule solve most every problem. Citrus hand-cleaner with Pumice does the rest.
|
|
modirt
Orange Level Access
Joined: 18 Jul 2018
Location: Missouri
Points: 9131
|
Post Options
Thanks(0)
Quote Reply
Posted: 12 Aug 2025 at 7:31am |
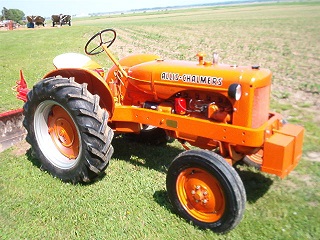
Widely believed the Deweze version (this one) left factory with engine, tranny, front and rear axles same as Dodge D600. The rest was fabricated and grafted on. Spoke to the young man I bought this from and he replaced the original factory engine with a used 318 engine sourced from a salvage yard. He had no idea what it came out of. It has an odd casting number.........xxxxxx-318-16. The 16 part is where numbers vary depending on use. Nobody seems to know what a 318-16 was intended for. Aside from cars and trucks, we know they were used in a whole slew of military vehicles, RV's, boats, irrigation pumps, Oliver combines and who knows what else. Some floating around were just spare crate engines, which is what this one may have been.
The MOPAR guys gas on about cams, headers, carbs, etc., with most of them interested in high RPM horsepower and if it will hold together above 6,000 RPM long enough to smoke the tires off. At other end of the spectrum would have been that Dodge D600 truck. High torque at low RPM's not intended for high road speed. (Not a muscle car). Carb, headers, cam shaft all optimized for that use. That would be ideal for this rig, but not sure how close it matches......if at all. It does have same NP 540 transmission, but only single speed rear axle. So the geared way down, high torque setup.
If i was to go on a hunt to replace engine, I'd be looking for a donor from some form of Dodge D600 truck. Actually have a line on one in form of an old firetruck, which is sitting in a salvage yard. Some of these D600 trucks were retired with less than 30,000 actual miles.
|
|
tadams(OH)
Orange Level Access

Joined: 17 Sep 2009
Location: Jeromesville, O
Points: 11301
|
Post Options
Thanks(0)
Quote Reply
Posted: 12 Aug 2025 at 2:55pm |
|
Try putting some heat on the area that the bolt is in
|
|
modirt
Orange Level Access
Joined: 18 Jul 2018
Location: Missouri
Points: 9131
|
Post Options
Thanks(0)
Quote Reply
Posted: 13 Aug 2025 at 11:44am |
Cover is off (and it wasn't easy) and broken bolt is finally out. Had to
hack up the cover and once inside was very plain to see, corrosion to
the bolt was holding it on. No amount of heat or soaking was going to
free it up. Had to go postal on it. Once cover was off, the bolt backed
out easy with vice grips.
Once inside, looks
to me like timing chain is suspect. Good amount of slack in it. If going
to replace, no time like the present.
|
|
plummerscarin
Orange Level Access
Joined: 22 Jun 2015
Location: ia
Points: 4126
|
Post Options
Thanks(0)
Quote Reply
Posted: 13 Aug 2025 at 12:43pm |
|
Your issue was same as one shown in video link you posted. Corrosion of dissimilar metals in the cover itself. The flaw in design is not addressing the problem before the corrosion begins. Some sort of anti seize or bushing would be in order.
|
|
modirt
Orange Level Access
Joined: 18 Jul 2018
Location: Missouri
Points: 9131
|
Post Options
Thanks(0)
Quote Reply
Posted: 13 Aug 2025 at 3:52pm |
Have given thought all manner of fixes.......everything from a hard plastic bolt.....some sort of ceramic coating, etc. Cheap and easy might be to butter it up with Anti-Seize before installing. Once installed, this one bolt would be the only one of several that would ever have to turn. It is one of three that is used to hold alternator bracket on, but this one also does double duty, being lower anchor point for the arm used to adjust fan belt tension on alternator. Anytime the fan is adjusted, or to replace the belt, that bolt has to turn. Somewhere along the line somebody tried and broke it.
And again, it does extend into the block where end is exposed to coolant. Some design engineer screwed the pooch on this one.
|
|
Les Kerf
Orange Level
Joined: 08 May 2020
Location: Idaho
Points: 1556
|
Post Options
Thanks(0)
Quote Reply
Posted: 13 Aug 2025 at 7:31pm |
 modirt wrote: modirt wrote:
... this one also does double duty, being lower anchor point for the arm used to adjust fan belt tension on alternator. Anytime the fan is adjusted, or to replace the belt, that bolt has to turn... |
Is it practical to install a custom stud rather than a bolt to allow future maintenance?
|
|
steve(ill)
Orange Level Access
Joined: 11 Sep 2009
Location: illinois
Points: 89925
|
Post Options
Thanks(0)
Quote Reply
Posted: 13 Aug 2025 at 7:55pm |
|
stainless bolt... plenty of pipe dope and thread tape to seal the coolant.. if you realy want to get fance, drill out the housing hole and put in a brass bushing.
|
|
Like them all, but love the "B"s.
|
|
modirt
Orange Level Access
Joined: 18 Jul 2018
Location: Missouri
Points: 9131
|
Post Options
Thanks(0)
Quote Reply
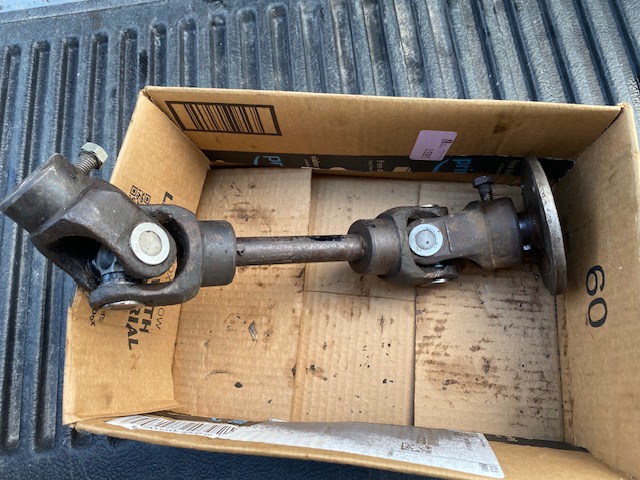
Posted: 22 Aug 2025 at 5:32pm |
Found a solution for the PTO U joints. There is a welding /
fabrication shop about 20 miles from here in middle of nowhere.
Bearings, U joints, hydraulics and related. If they don't have it, you
don't need it. Total cost........$30 installed.
|
|
PaulB
Orange Level
Joined: 12 Sep 2009
Location: Rocky Ridge Md
Points: 5226
|
Post Options
Thanks(0)
Quote Reply
Posted: 22 Aug 2025 at 7:23pm |
|
If you are looking for a replacement 318 TRUCK engine, you need to look at where the data codes are STAMPED into the block, if you are reading numbers casted on the side of the block, they are irrelevant. You want to find a 318-3 engine, this will have the steel crankshaft. Back in 1974 we special ordered a new D500 that had a 318 in it. with a 5 speed and 6.8:1 rear, it would haul anything a pull a loaded trailer to boot. Of course it would only do 62 MPH against the governor under the 2BBL but back then there was a national 55MPH speed limit.
|
|
If it was fun to pull in LOW gear, I could have a John Deere.
Real pullers don't have speed limits.
If you can't make it GO... make it SHINY
|
|
modirt
Orange Level Access
Joined: 18 Jul 2018
Location: Missouri
Points: 9131
|
Post Options
Thanks(0)
Quote Reply
Posted: 17 Sep 2025 at 3:14pm |
Together again........
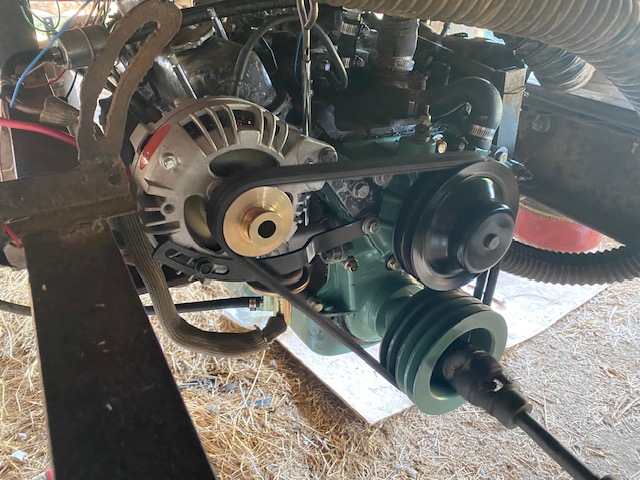
Now sporing a new 90 amp one wire Powermaster Alternator from Summit Racing. Looks to be charging!
Once that bolt came out, it was clear sailing. Having said that, this turned into bigger project than I expected. In no particular order.......
1. Upgraded battery cables to #4....upgrade charging wire to #6.....hot and ground. 2. Installed new alternator, which required specific alternator brackets to match old cast iron water pump. Those took some looking to find. Also....now running on two new fan belts. 3. New double roller timing chain and timing chain cover. Found and installed an oil slinger on crankshaft behind the big pulley. It was missing the slinger when I pulled it apart. 4. Pulled oil pan to clean out the sludge. So all new gaskets, front and back. 5. Installed new dip stick tupe into the block (that wasn't easy). As near as I can tell, it's half inch or so longer than the old, and came with the extra long dip stick needed for this jumbo sized oil pan. So using the shorter dip stick tube that was on the engine, I may have been running half a quart to quart low all along. That's not good. 5. Pulled and rotated distributor to get it in synch with timing marks.....then swapped out all the plug wires to match correct firing order. (Distributor had been installed backwards, so instead of fixing it, they swapped plug wires to match). 6. Found a harmonic balancer to get crankshaft to Top Dead Center for #1 cylinder, then installed the big 4 pulley replacement, and put timing marks on it (there were none). All that thru the timing off, but she did start....but ran ruff. Trial and error got her running great........needs to be fine tuned with timing light or vacuum gauge. 7. New crosses for U-joint that runs hydraulics. 8. Swapped engine temp sensor from water pump to correct position on top of engine block, so reads correctly. 9. Hard to tell from photos, but also painted all those parts. Paint job marred by all the sealant and anti-seize smeared all over everything. 10. Removed old insulation around fuel line from pump to carb. Replaced it with an aluminum / glass heat shield fabric tube. Old insulation was burnt off where it ran too close to the exhaust manifolds, so bent it a bit to give it some space. That may have been hot enough to have caused it to vapor lock and not start when hot. The water pump and timing gear bolts all new Grade 8. If they ended in the engine block in coolant, they got thread sealer, plus anti-seize on the shaft of the bolt. Bolts in oil were short, they got thread sealant. Bolts in dead ends in the block all got anti-seize. next guy won't have as much trouble pulling it apart as I did.
Anyway, as noted, cranked it a bit and she started........then once I got the timing right, she ran good. I'd say she purred, but with a pair of cherry bomb glass packs for mufflers, that is more of a deep throated rumble.
Long hard road and painful lessons learned, but learned a lot and added to my tool stash.........by a lot. Hope the juice I get was worth the squeeze!
Edited by modirt - 17 Sep 2025 at 4:15pm
|
|
modirt
Orange Level Access
Joined: 18 Jul 2018
Location: Missouri
Points: 9131
|
Post Options
Thanks(0)
Quote Reply
Posted: 17 Sep 2025 at 4:35pm |
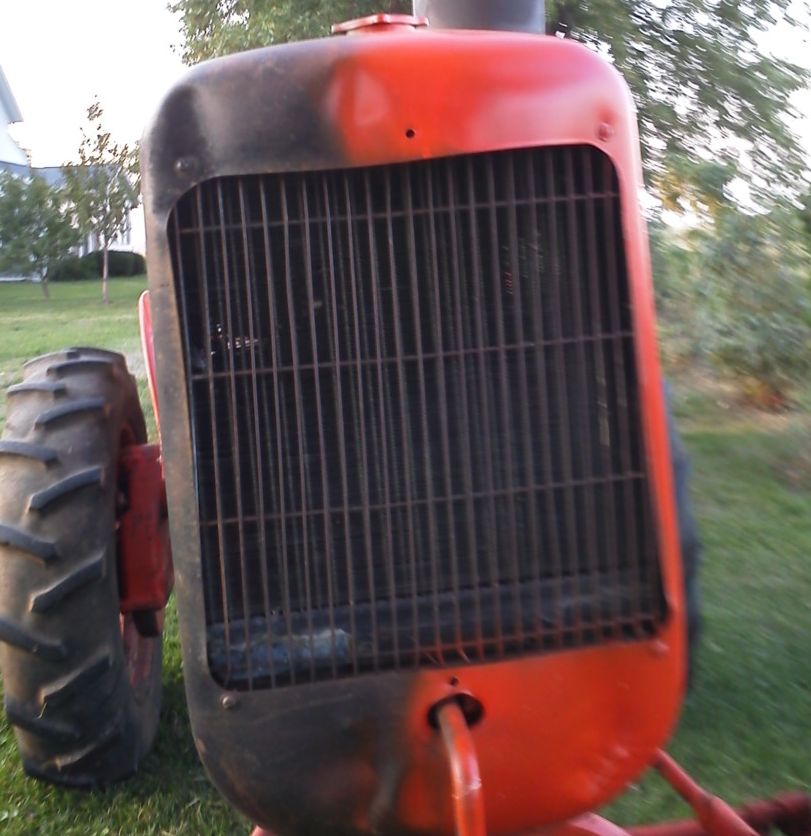
Bolt circled in green was the culprit that started all the trouble. It runs thru tensioning bracket, mounting bracket, cast iron water pump, aluminum timing cover, then into threads in cast block, but also terminates with end exposed to engine coolant.
Bolt circled in red ends in a blind pocket in the engine block. It is the main support for the alternator. When tightening belts, tendency may be to loosen the problem child bolt too, but if you do, that would break the seal on the thread sealant......maybe now a leak. One just has to remember to never, ever touch that bolt. The bolt in red and tightning screw on the alternator......and nothing else.
|
|
Les Kerf
Orange Level
Joined: 08 May 2020
Location: Idaho
Points: 1556
|
Post Options
Thanks(0)
Quote Reply
Posted: 17 Sep 2025 at 5:13pm |
Thank you for the excellent documentation and follow-up 
|
|
Lars(wi)
Orange Level Access

Joined: 14 Sep 2009
Location: Permian Basin
Points: 8338
|
Post Options
Thanks(0)
Quote Reply
Posted: 18 Sep 2025 at 9:40am |
|
Keep on eye on that alternator, the belt appears to ‘riding high’, the pulley may be too narrow. The top of the belt should be level with the top of the pulley grove.
|
|
I tried to follow the science, but it was not there. I then followed the money, and that’s where I found the science.
|
|
TedN
Bronze Level

Joined: 30 Apr 2025
Location: Central WA
Points: 139
|
Post Options
Thanks(0)
Quote Reply
Posted: 18 Sep 2025 at 10:31am |
|
That looks much better than it did in your youtube video. Did you get your steering figured out, or decide that's another project for another day?
Whoever did the tension bracket to the frame setup that it had probably came to the same stuck bolt that you did and tried to cut corners. It isn't always easy to do a job properly, but it is a good feeling to know it is right when you are done.
Ted
|
|
190XTD seriesIII, 190XTD seriesI, maroon belly 7000, 190XTD series??? project(or maybe parts)
|
|
DiyDave
Orange Level Access
Joined: 11 Sep 2009
Location: Gambrills, MD
Points: 54958
|
Post Options
Thanks(0)
Quote Reply
Posted: 18 Sep 2025 at 3:56pm |
Lars(wi) wrote:
Keep on eye on that alternator, the belt appears to ‘riding high’, the pulley may be too narrow. The top of the belt should be level with the top of the pulley grove. |
X2 on the high riding belt. Looks like a B belt in an A pulley...
|
|
Source: Babylon Bee. Sponsored by BRAWNDO, its got what you need!
|
|
modirt
Orange Level Access
Joined: 18 Jul 2018
Location: Missouri
Points: 9131
|
Post Options
Thanks(0)
Quote Reply
Posted: 18 Sep 2025 at 7:03pm |
The belt is riding high on the 3/8" pulleys on the alternator. The other two.....water pump and lower crank pulley's are 1/2". The ride flush on those two. So not matched. Lessor of two evils seemed to be to let belts ride high on alternator. The older AC Delco was done the same way and belts didn't cause the problems. At worst, belts may wear faster.
Option B would be to try to replace pulleys on alternator. Instructions that came with it had some dire warnings about that. So for now, have left it as is.
|
|
modirt
Orange Level Access
Joined: 18 Jul 2018
Location: Missouri
Points: 9131
|
Post Options
Thanks(0)
Quote Reply
Posted: 18 Sep 2025 at 7:17pm |
TedN wrote:
That looks much better than it did in your youtube video. Did you get your steering figured out, or decide that's another project for another day?
Whoever did the tension bracket to the frame setup that it had probably came to the same stuck bolt that you did and tried to cut corners. It isn't always easy to do a job properly, but it is a good feeling to know it is right when you are done.
Ted |
As near as I can tell, someone put a sleeve on the steer cylinder shaft as a hard stop to prevent it from going any further. I cannot understand why.......unless cylinder is also mismatched and seal in the middle is not centered. Have hit a few new snags, but once all that is sorted, plan is to run it about 15 miles to same welding / fabrication shop that had the PTO crosses and they are going to do some welding on it for me. They also work on hydraulics, so will pull cylinder off to have a look.
On the old alternator had a guy look at it and not only was all else wrong, but they wired it wrong. They got a lot wrong with that one. That and several other fixes.....non fixes......and patch it up to keep going. I have left all the baling wire they had hanging on it. Not sure if that was from some busted bales, or busted bales for the baling wire to make fixes with. To date, have found no chewing gum.
|
|
PaulB
Orange Level
Joined: 12 Sep 2009
Location: Rocky Ridge Md
Points: 5226
|
Post Options
Thanks(0)
Quote Reply
Posted: 18 Sep 2025 at 7:17pm |
The Brillman Co. offer a wide assortment of different pulleys for alternators. There one that I use often that will work for B & C belts that is a small OD to spin the alternator faster at slower engine speeds.
|
|
If it was fun to pull in LOW gear, I could have a John Deere.
Real pullers don't have speed limits.
If you can't make it GO... make it SHINY
|
|