| Author |
 Topic Search Topic Search  Topic Options Topic Options
|
CA13414 
Bronze Level

Joined: 25 Feb 2024
Location: Nebraska
Points: 58
|
 Post Options Post Options
") Thanks(0) Thanks(0)
 Quote Quote  Reply Reply
 Posted: 03 May 2024 at 7:23pm Posted: 03 May 2024 at 7:23pm |
Agree and thank you!
I do have new bushings! Planning to put them in this weekend and finish up the front. Will still need to sandblast the front rims with the back rims and mount new tires.
Getting closer!!
< id="idg-io-safe-browsing-enabled" ="" oninit="true">
Edited by CA13414 - 03 May 2024 at 7:24pm
|
|
Helping the aged survive and thrive! 1953 CA
|
 |
|
Sponsored Links
|
|
|
CA13414
Bronze Level
Joined: 25 Feb 2024
Location: Nebraska
Points: 58
|
Post Options
Thanks(0)
Quote Reply
Posted: 05 May 2024 at 6:44pm |
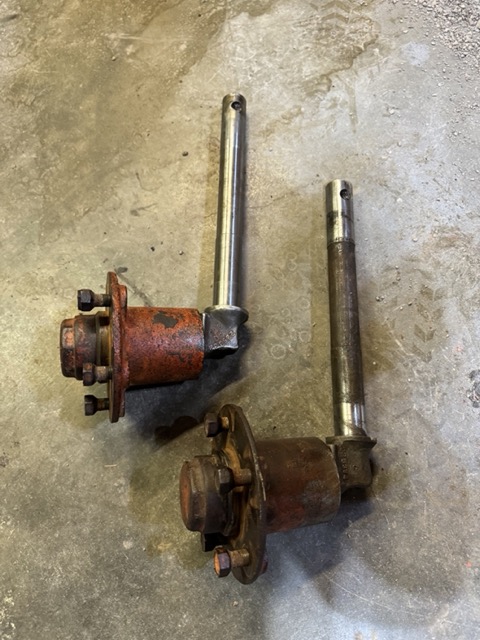
We worked on the front axil bearing and hubs. Cleaned them up. Wire brush, drill with a wire burr, and emory cloth.
Then pressed on the front wheel seals. Used the front wheel hub flipped over and with a rubber mallet "pressed" them....... or more appropriately hammered them on! The bearing cones were in good condition thus, we repacked them using a bearing repacking cup, cone and grease gun.
WOW the cup and cone was a ton easier and faster than doing it by hand!!!
Here it is reassembled with a new cotter pin!!
The assembled hubs, ready to put into the front end.
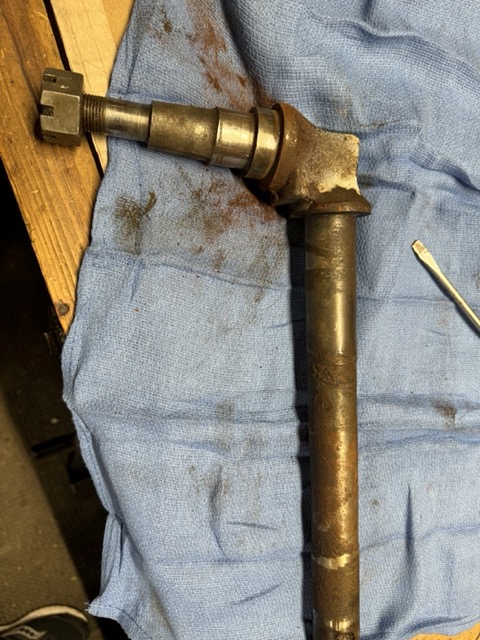
We did have enough time to press in three of the spindle bushings. However, we didn't really press them in (just like the front wheel seals) but used a rubber mallet and a piece of hard wood to set them in the front end spindle. Was a bit of a pain to get the job done without damaging the bushings, but we succeeded.
This is where I miss all the tools on the farm. Today I wish I had the hydraulic press!!!
Finally, started painting parts that we have stripped and cleaned. This is going to look awesome!!
< id="idg-io-safe-browsing-enabled" ="" oninit="true">
Edited by CA13414 - 05 May 2024 at 9:21pm
|
|
Helping the aged survive and thrive! 1953 CA
|
|
IBWD MIke
Orange Level


Joined: 08 Apr 2012
Location: Newton Ia.
Points: 3474
|
Post Options
Thanks(0)
Quote Reply
Posted: 06 May 2024 at 7:12am |
That's progress for sure.
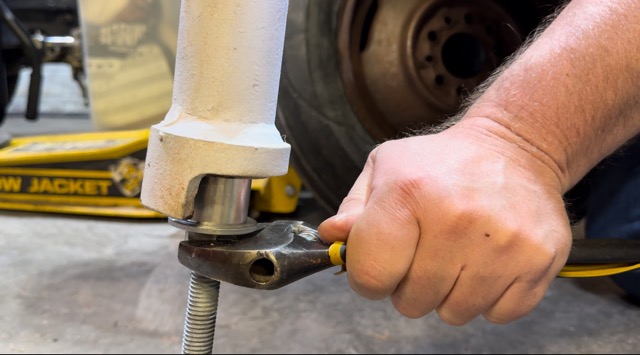
I use a 1" piece of all thread to pull those bushings in with, works pretty good.
|
|
CA13414
Bronze Level
Joined: 25 Feb 2024
Location: Nebraska
Points: 58
|
Post Options
Thanks(0)
Quote Reply
Posted: 06 May 2024 at 8:00am |
 IBWD MIke wrote: IBWD MIke wrote:
That's progress for sure.
I use a 1" piece of all thread to pull those bushings in with, works pretty good.
|
That is awesome!! Will definitely do that for the last one vs. taking it off the front end.
Thank you!
< id="idg-io-safe-browsing-enabled" ="" oninit="true">
Edited by CA13414 - 06 May 2024 at 8:01am
|
|
Helping the aged survive and thrive! 1953 CA
|
|
IBWD MIke
Orange Level
Joined: 08 Apr 2012
Location: Newton Ia.
Points: 3474
|
Post Options
Thanks(0)
Quote Reply
Posted: 07 May 2024 at 9:13am |
|
You're welcome. I've changed more of those bushings than it seems like I ever should have had to! If I have a spindle out for whatever reason, new bushings go in. I kind of have a thing about sloppy steering.
|
|
CA13414
Bronze Level
Joined: 25 Feb 2024
Location: Nebraska
Points: 58
|
Post Options
Thanks(0)
Quote Reply
Posted: 07 May 2024 at 8:54pm |
I could not find a 1" all-thread, but did find a 5/8"! It really worked awesome to set the spindle bushings.
The washer did spin a bit and flared the bushing. Nothing that a dill burr and emory cloth won't quickly fix. Awesome job!!! Very much appreciate the suggestion, IBWD Mike!!!
< id="idg-io-safe-browsing-enabled" ="" oninit="true">
Edited by CA13414 - 07 May 2024 at 8:58pm
|
|
Helping the aged survive and thrive! 1953 CA
|
|
IBWD MIke
Orange Level
Joined: 08 Apr 2012
Location: Newton Ia.
Points: 3474
|
Post Options
Thanks(0)
Quote Reply
Posted: 08 May 2024 at 8:36am |
|
Glad it worked for you! I think I have used two big flat washers on both ends. 1" are pretty heavy stuff and didn't deform.
|
|
CA13414
Bronze Level
Joined: 25 Feb 2024
Location: Nebraska
Points: 58
|
Post Options
Thanks(0)
Quote Reply
Posted: 11 May 2024 at 5:27pm |
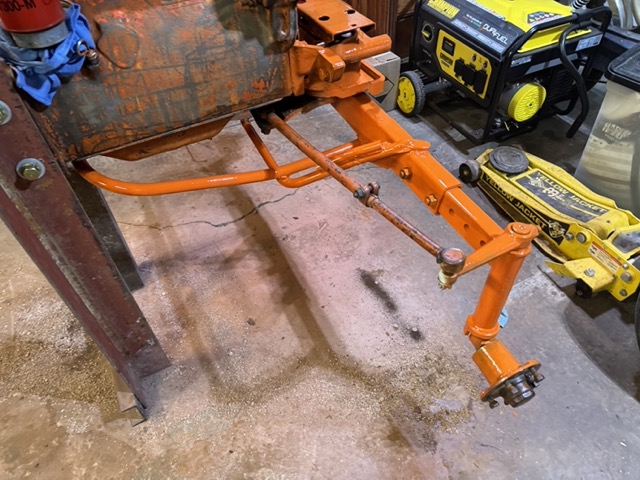
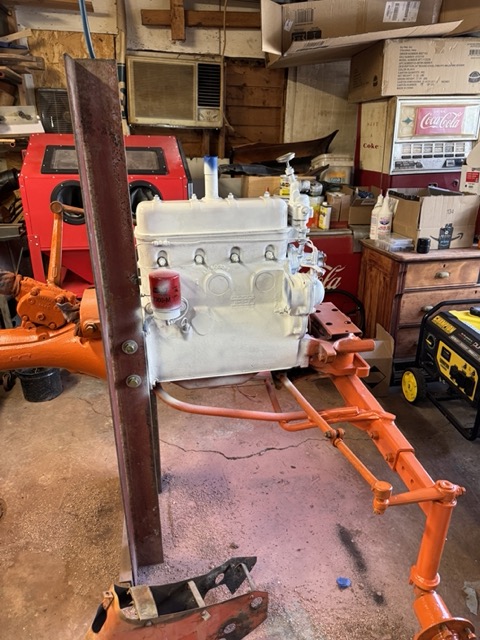
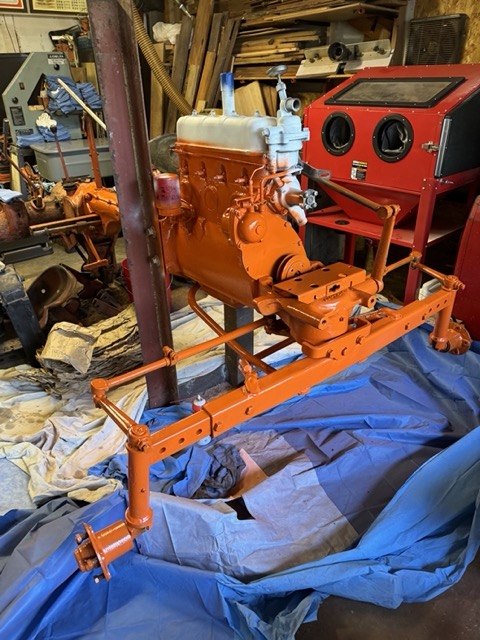
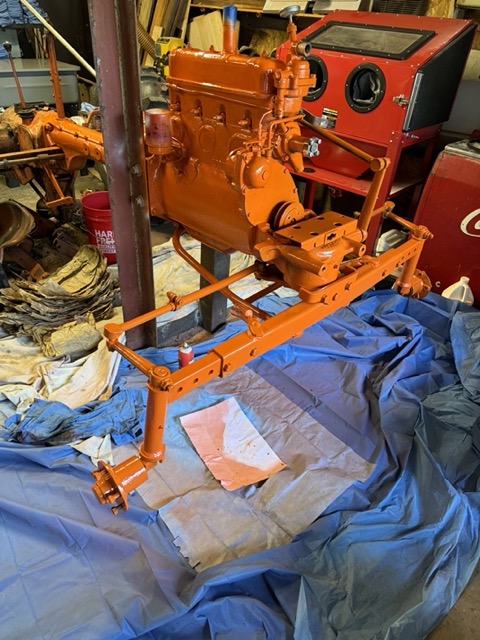
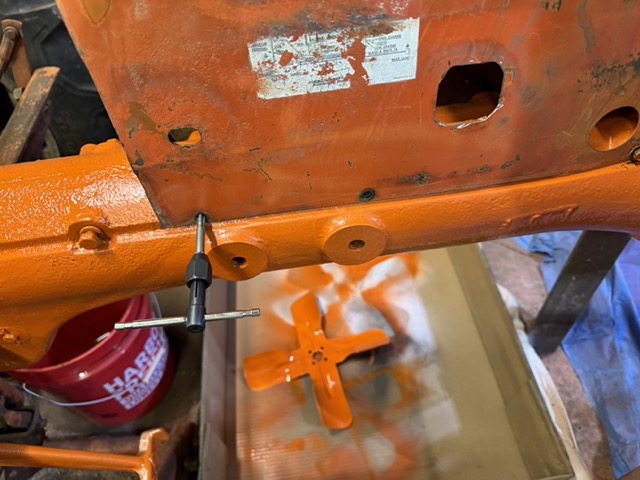
Well had Friday off from work and got a ton done. Finished assembling the front end by installing the spindles and attaching the tie rods. Had a few burrs, wear edges and rust on the spindles that had sat for 40 years in the trees. Took them off and finished up with some emory cloth. When installed, were awesome, tight and rotated super easy. Thanks to everyone for their help!! Also the first coat of paint!
< id="idg-io-safe-browsing-enabled" ="" oninit="true">
Edited by CA13414 - 11 May 2024 at 5:29pm
|
|
Helping the aged survive and thrive! 1953 CA
|
|
CA13414
Bronze Level
Joined: 25 Feb 2024
Location: Nebraska
Points: 58
|
Post Options
Thanks(0)
Quote Reply
Posted: 11 May 2024 at 5:37pm |
Today we spent some time cleaning up other parts. Again love that brake clearner. While I was working on the CA, we also installed new bearings and hubs on the trailer that went out.
Primed the engine first.
Next is black manifold paint. Ceramic and "resistant" to 2000 degrees. We will see, but I am skeptical!!
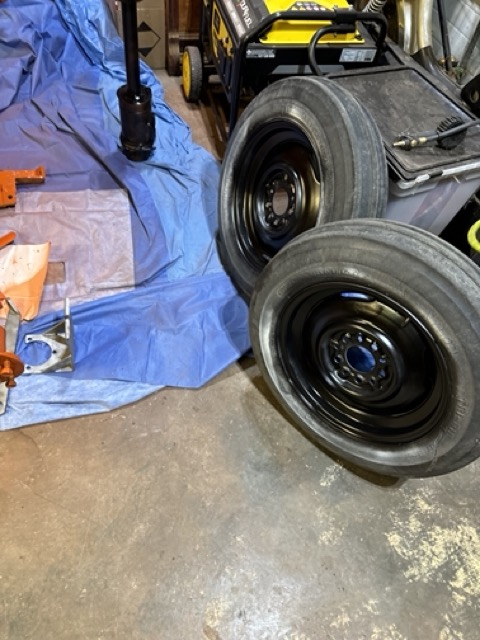
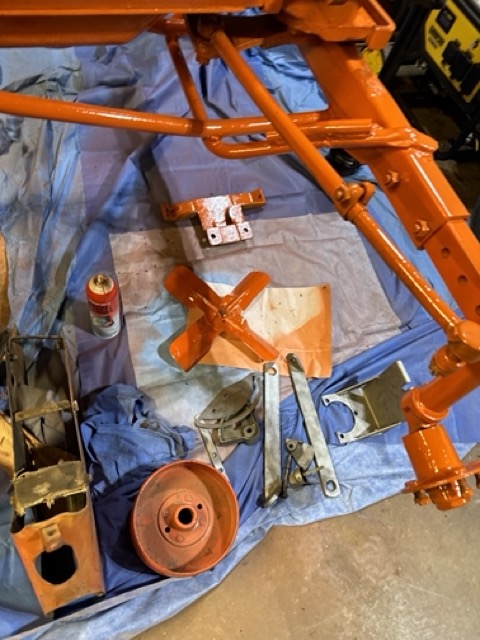
Cleaned up the rims with a wire brush and drill. There were a few bent parts of the rims that we straightened and cleaned up. Then primed them and finally at the end of the day gave them the first coat of gloss black. New tires go on this week.
You can also see the air filter that has its first coat of gloss black.
Then after more clean up..... and when the primer was dry, we painted more.
It looks awesome!!! 
And some miscellaneous pieces painted and to be painted.
< id="idg-io-safe-browsing-enabled" ="" oninit="true">
Edited by CA13414 - 11 May 2024 at 8:25pm
|
|
Helping the aged survive and thrive! 1953 CA
|
|
CA13414
Bronze Level
Joined: 25 Feb 2024
Location: Nebraska
Points: 58
|
Post Options
Thanks(0)
Quote Reply
Posted: 11 May 2024 at 7:52pm |
As an aside, the Northern Lights were spectacular here in Nebraska early this AM. We were up at 0200 this morning and took these pictures.
< id="idg-io-safe-browsing-enabled" ="" oninit="true">
Edited by CA13414 - 11 May 2024 at 8:08pm
|
|
Helping the aged survive and thrive! 1953 CA
|
|
CA13414
Bronze Level
Joined: 25 Feb 2024
Location: Nebraska
Points: 58
|
Post Options
Thanks(0)
Quote Reply
Posted: 19 hours 31 minutes ago at 2:56pm |
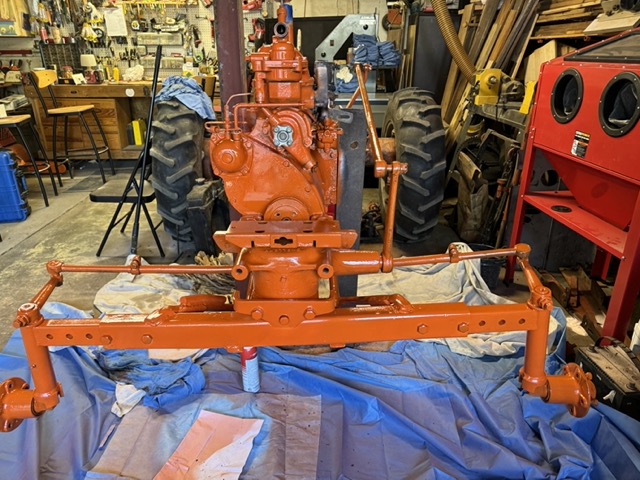
As a general rule, we are straightening everything but not making it perfect to show the years. We plan to finish the fenders, tank, engine cover and radiator cover/grill as a professional finish with a clear coat.
Today, we straightened out the "tool box", took off the old hinge to the tool box cover and ground down the prior spot welds. Then wire welded the new cover on and ground down the wire weld.
Also cut a hole for an hour meter just because...... I am curious how much we run the CA in its new life!
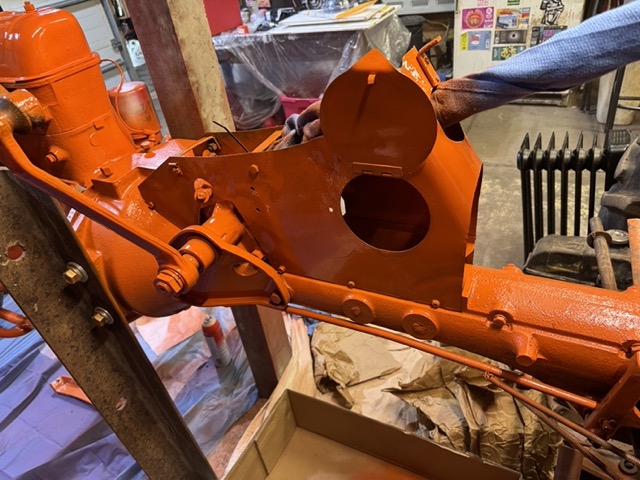
After sliding it over the steering shaft and onto the torque tube we did have to use a tap to clean out the threads.
Then hit it with a coat of paint.

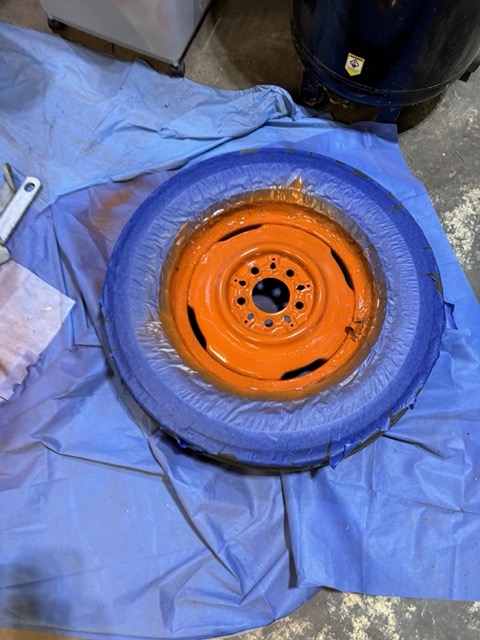
Then hit the tire center with paint. The outer rim will be black, then the middle orange and the wheel hub and hub bolts black. My bother masked this off and put on the first coat. His idea.... I think it will look awesome.
Plan the new battery box this week with new tires on the front rims. Did find a battery that will fit in the battery box. Ended up being a DieHard, which I thought was fitting!
Finally bought a Delco-Remy 63 amp alternator. Partly straightened the old generator bracket..... need some heat to finish. Then chop saw some iron and weld the support for the alternator mount on the underside, and finally drill new mounting holes.
Next time on the farm need to snag an alternator off one of the old cars so I can get the core charge refunded!
< id="idg-io-safe-browsing-enabled" ="" oninit="true">
Edited by CA13414 - 13 hours 26 minutes ago at 9:01pm
|
|
Helping the aged survive and thrive! 1953 CA
|
|
IBWD MIke
Orange Level
Joined: 08 Apr 2012
Location: Newton Ia.
Points: 3474
|
Post Options
Thanks(0)
Quote Reply
Posted: 5 hours 8 minutes ago at 5:19am |
|
It's coming right along.
|
|