| Author |
 Topic Search Topic Search  Topic Options Topic Options
|
russell 
Bronze Level

Joined: 08 Feb 2024
Location: australia
Points: 36
|
 Post Options Post Options
") Thanks(0) Thanks(0)
 Quote Quote  Reply Reply
 Posted: 04 Apr 2024 at 10:29pm Posted: 04 Apr 2024 at 10:29pm |
Hi Codger Have apart bearing spun on top of other have photos just not sure on the best way to post on here cheers
|
 |
|
Sponsored Links
|
|
|
russell
Bronze Level
Joined: 08 Feb 2024
Location: australia
Points: 36
|
Post Options
Thanks(0)
Quote Reply
Posted: 04 Apr 2024 at 11:30pm |
|
|
|
russell
Bronze Level
Joined: 08 Feb 2024
Location: australia
Points: 36
|
Post Options
Thanks(0)
Quote Reply
Posted: 04 Apr 2024 at 11:33pm |
Codger a bit different one on top off other
|
|
russell
Bronze Level
Joined: 08 Feb 2024
Location: australia
Points: 36
|
Post Options
Thanks(0)
Quote Reply
Posted: 04 Apr 2024 at 11:35pm |
Codger next journal as good as gold 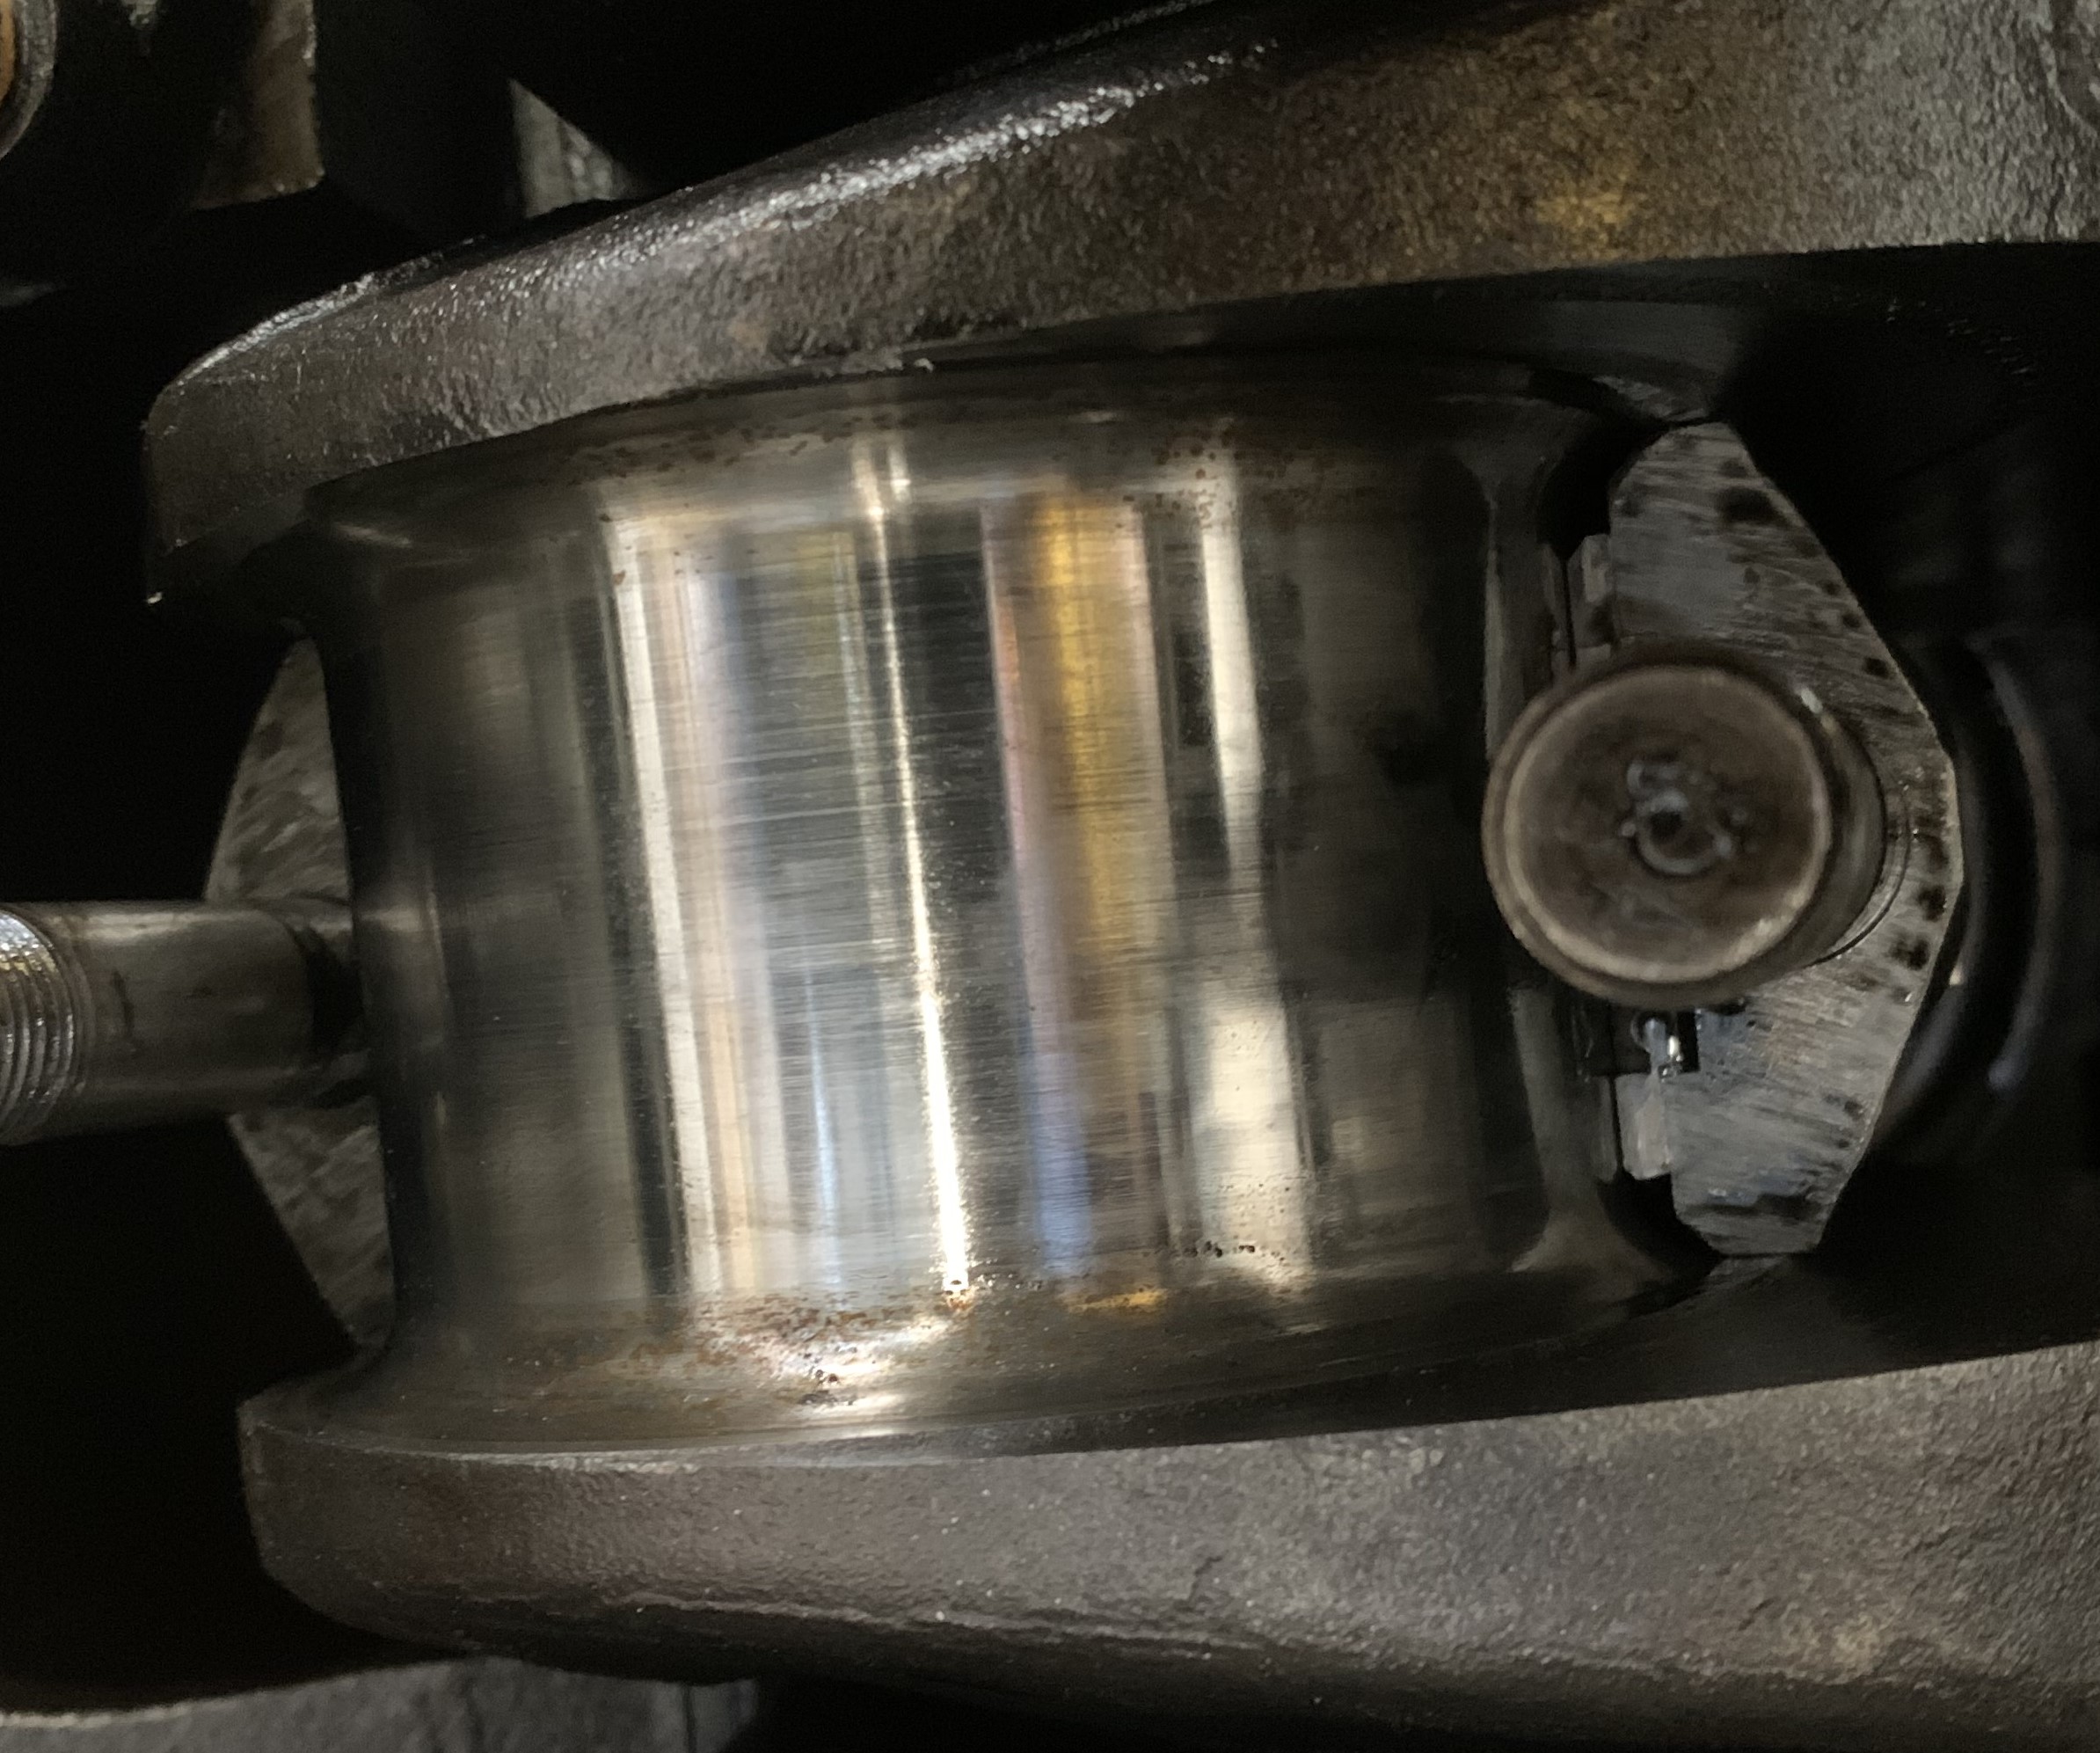 |
|
russell
Bronze Level
Joined: 08 Feb 2024
Location: australia
Points: 36
|
Post Options
Thanks(0)
Quote Reply
Posted: 04 Apr 2024 at 11:36pm |
Std bearings  |
|
russell
Bronze Level
Joined: 08 Feb 2024
Location: australia
Points: 36
|
Post Options
Thanks(0)
Quote Reply
Posted: 04 Apr 2024 at 11:37pm |
std 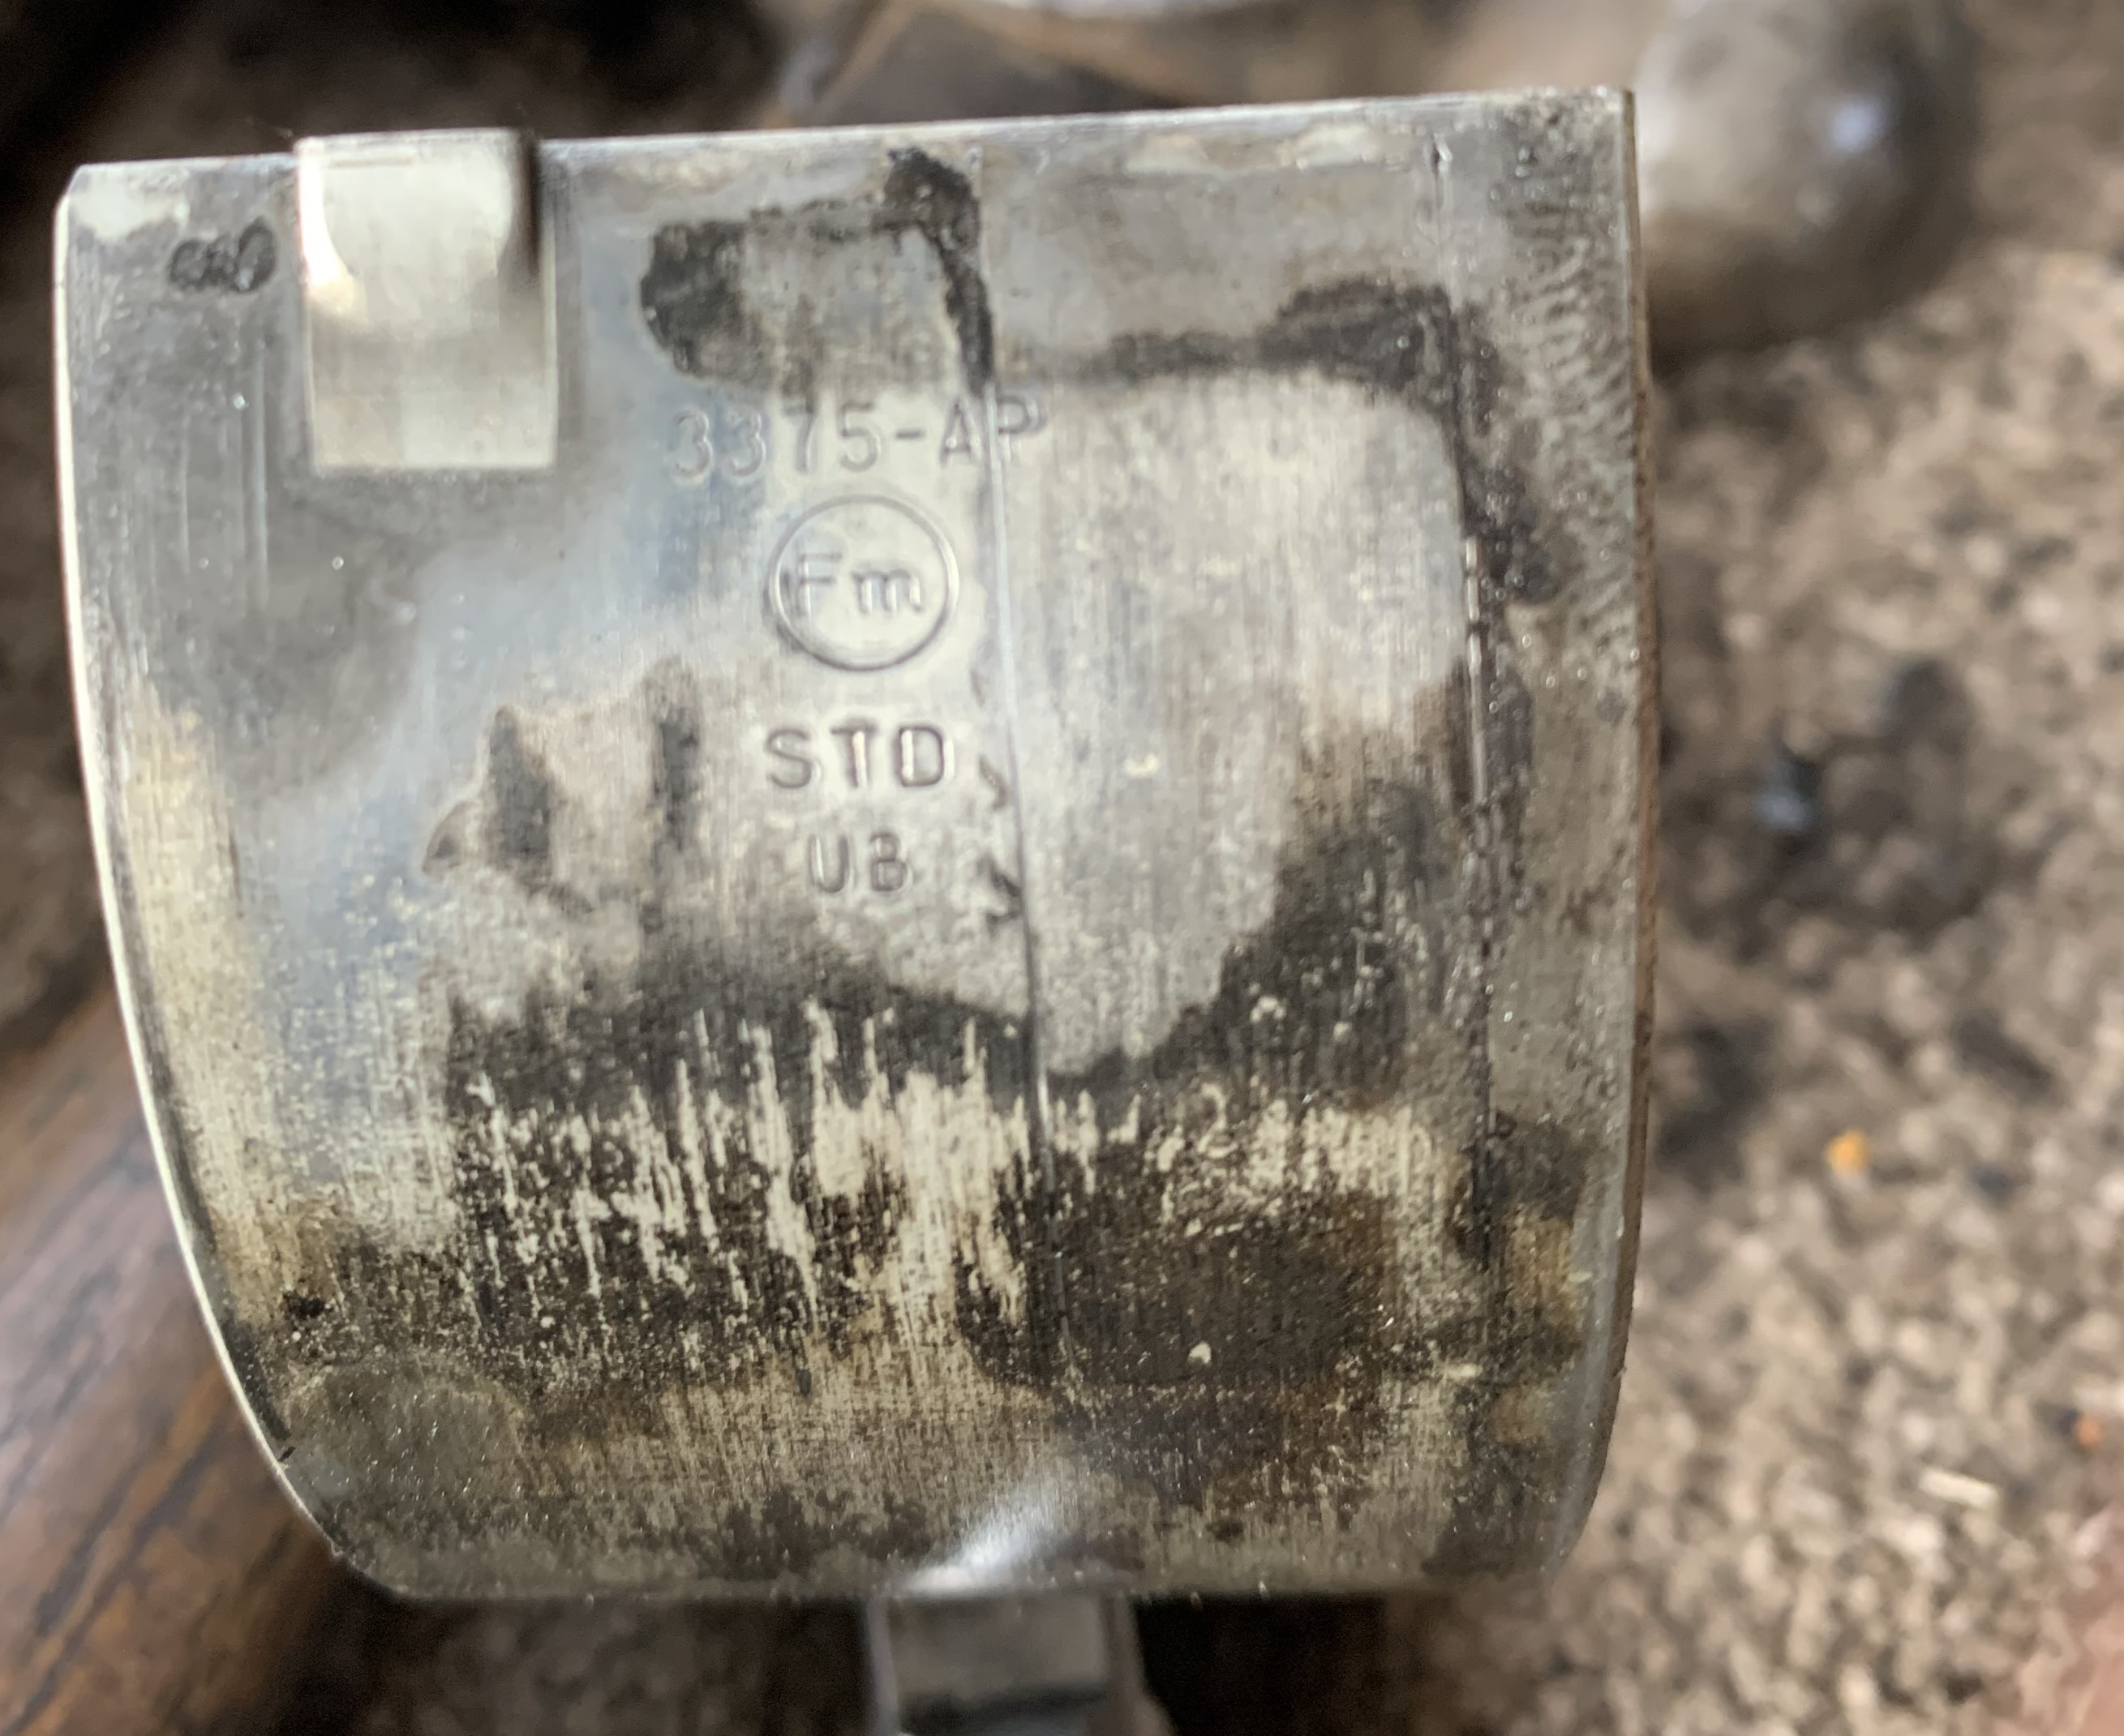
|
|
russell
Bronze Level
Joined: 08 Feb 2024
Location: australia
Points: 36
|
Post Options
Thanks(0)
Quote Reply
Posted: 04 Apr 2024 at 11:48pm |
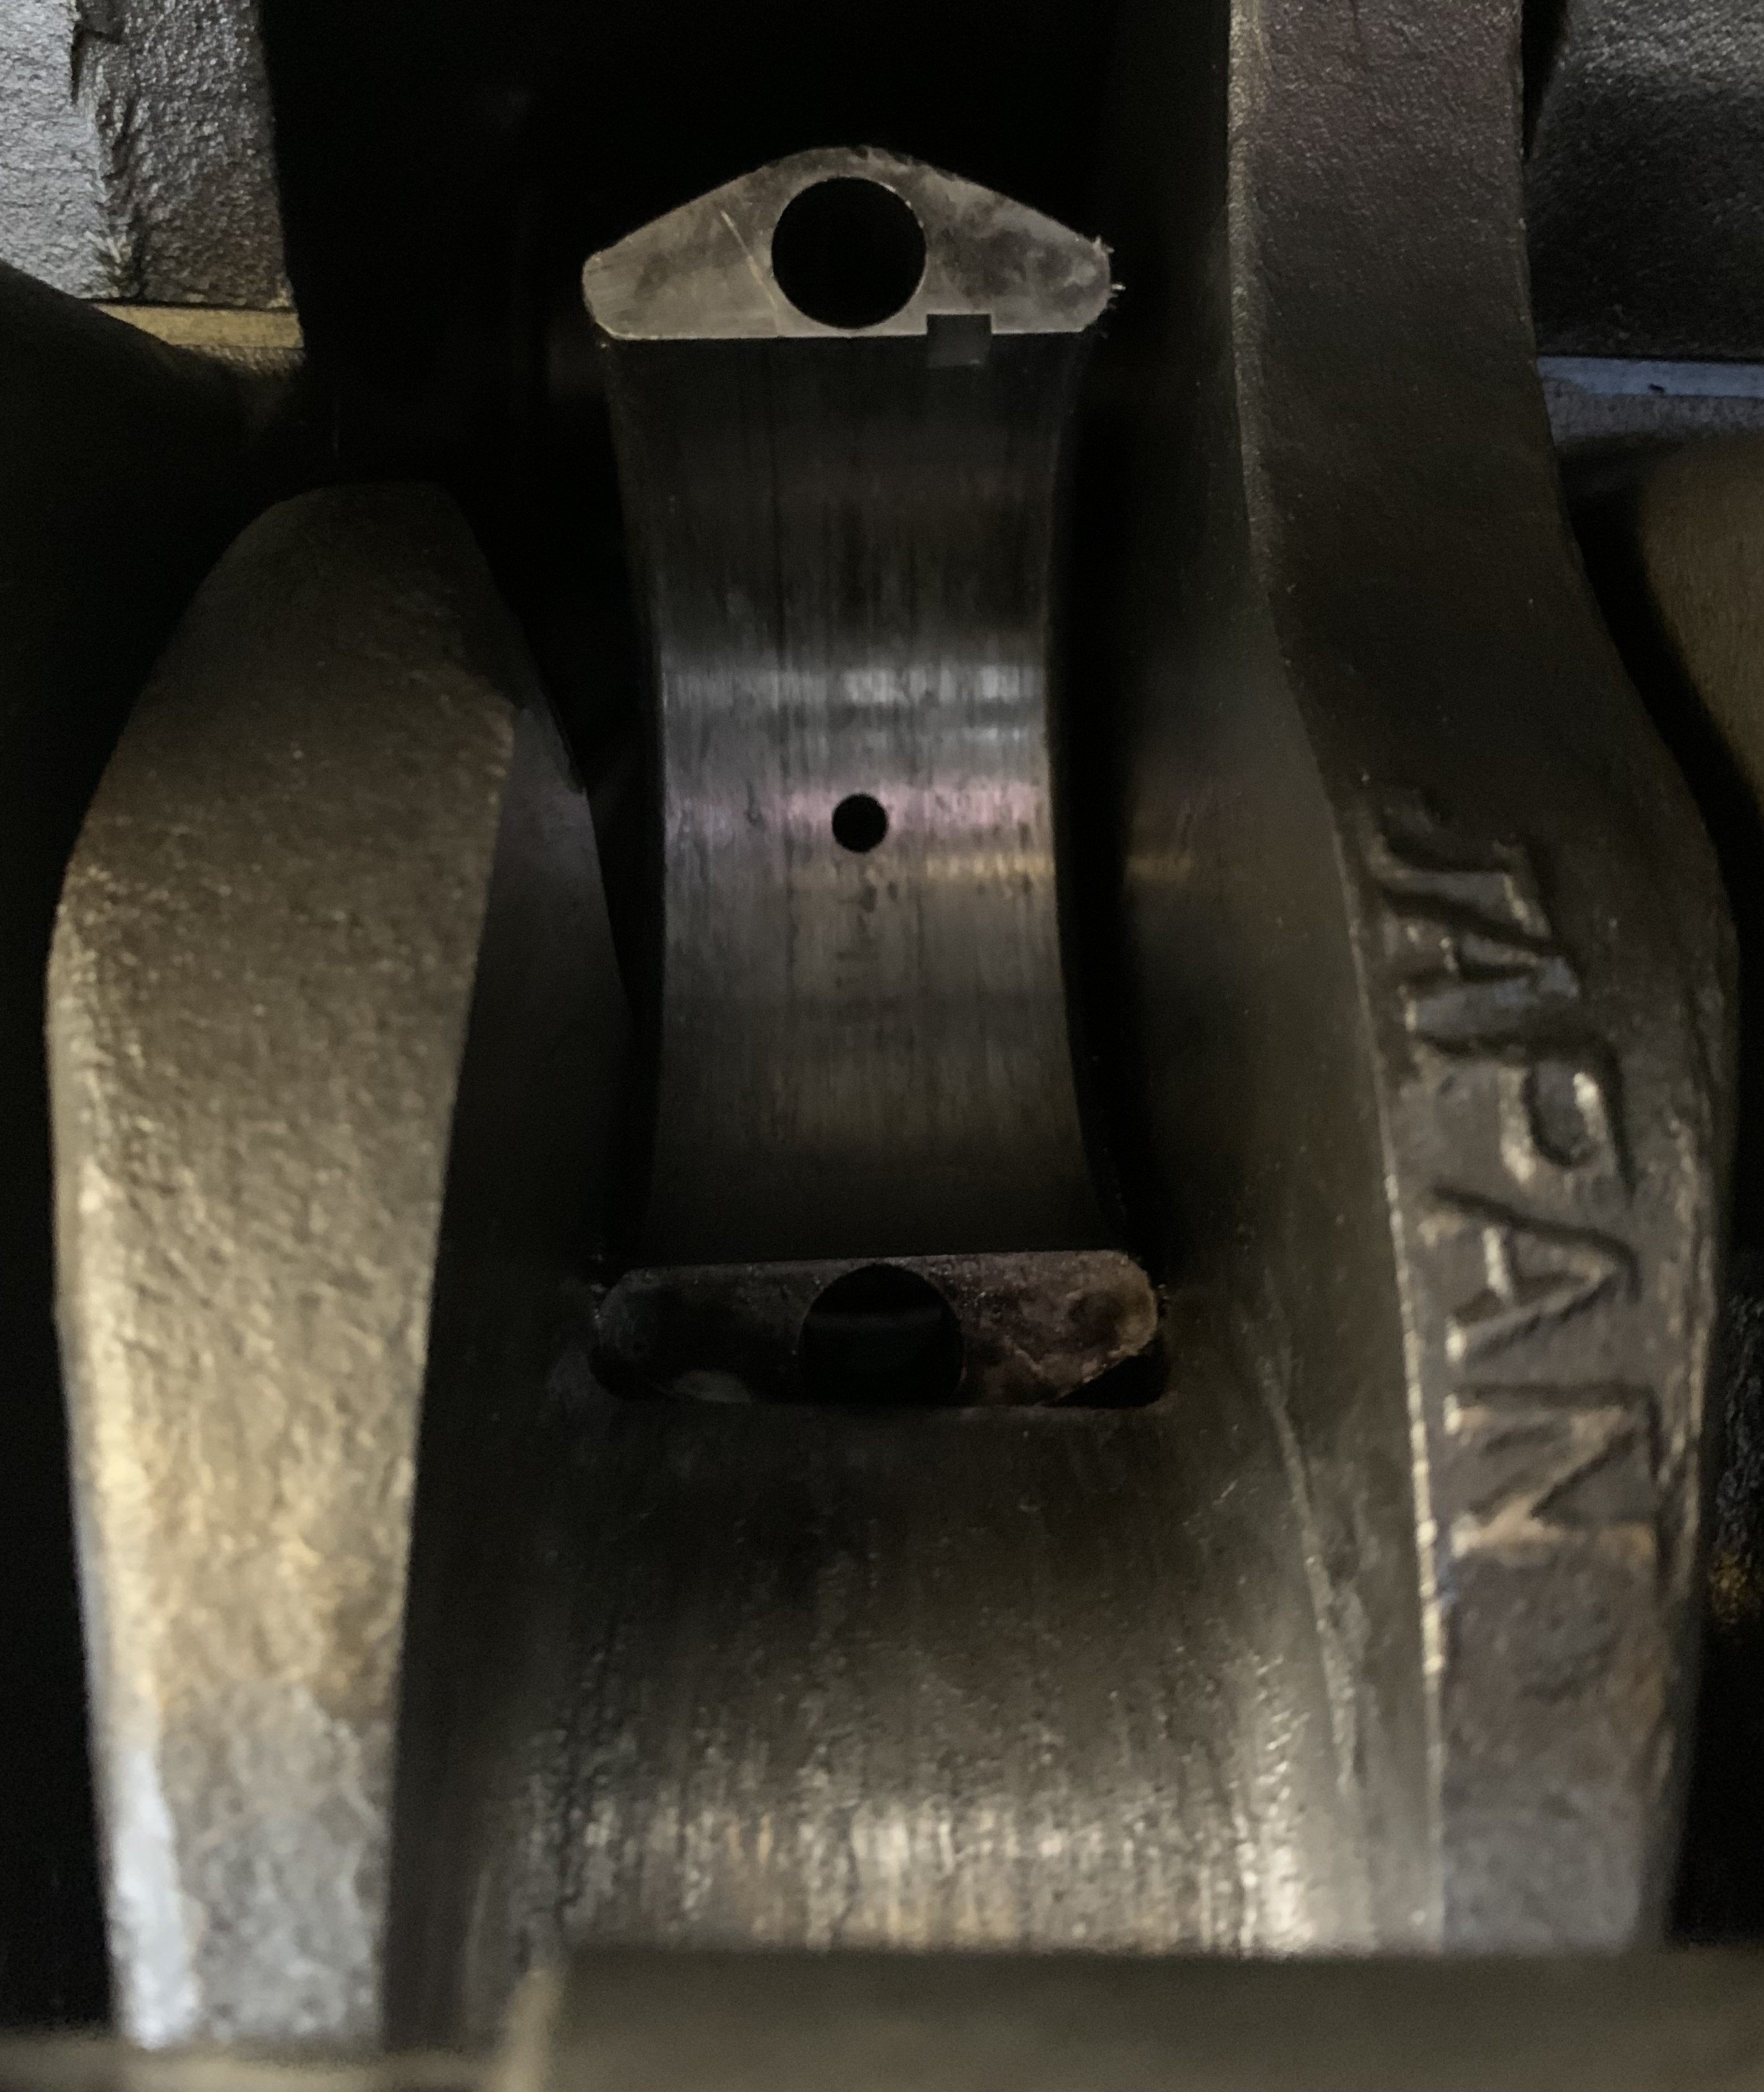
Has any one got any thoughts looking at the crank shaft you would have to agree its pretty bad funny thing is not a lot of heat on rod ends or backings hmmm has any one been here before ? Is the metal on the crank just soft metal and if polished off crank may be ok? Its the Japan crank which i was surprised with i thought my model still had the usa crank geee i should give up but i keep thinking how good it was when using in the past any thoughts criticism welcome cheers
|
|
DiyDave
Orange Level Access


Joined: 11 Sep 2009
Location: Gambrills, MD
Points: 50528
|
Post Options
Thanks(0)
Quote Reply
Posted: 05 Apr 2024 at 4:28am |
 russell wrote: russell wrote:
HelloWell had some rain dust settled decided it was time to pull the sump of the engine . Once of all looked pretty good no discoloured caps no metal showing up so i decided to grab hold of rod ends and could move just a little side to side all felt good but no movement in number three so im thinking this is the problem it got dark so left it at that will have a go at pulling rod cap off today and see the result . cheers
|
Another way to check this is to take a long tapered punch, hold the punch in your hand and swing against an anvil striking the hammered surface, to the anvil. remember this sound. Ping! now strike against each individual bearing cap(if there's room!) the bad one(s) will make a Pock sound, instead of the ping sound... 
|
|
Source: Babylon Bee. Sponsored by BRAWNDO, its got what you need!
|
|
Codger
Orange Level

Joined: 23 Dec 2020
Location: Illinois
Points: 1784
|
Post Options
Thanks(0)
Quote Reply
Posted: 05 Apr 2024 at 6:13am |
Ok Russell; The engine may need to be removed for repairs. However to ensure the crankshaft will require regrinding it needs measured up before going much further. I would take an inch wide and 18' length piece of emery cloth strip and after rotating the crankpin, (journal) to the bottom of it's stroke and pushing the rod away for clearance, polish that journal with the abrasive pulling the emery cloth fully around the journal each way using your hands. Usually the soft babbit, antimony, and copper based materials will easily remove with the cloth. You will than need to clean that journal using a clean, lint free cloth. Using an outside micrometer measure the journal top and bottom, and side to side at perpendicular axis to one another. This will tell you if the journal is out of round. Any more than about a .001" - .0015 out of round and the engine probably won't hold a bearing very long. If the journal is out of round, you can wager the rod is also and probably worse. These most times can be repaired also, but it requires cutting the cap and resizing the rod journal end to correct dimensions.
If it were me, I'd clean that journal up best possible with engine in the tractor, get a good measurement and ascertain this part before going further. If proven satisfactory for both dimension, and out of round, then rotate the crankshaft 90 degrees, and pull the rod and piston down with a wire around it's base, install the rod cap, and measure the interior at 90 degree spacing basically the same as you did the crankshaft journal. If anything is found out of tolerance, the engine will need further repair.
Given the scuffing I see on the other bearing shell you posted, the engine could use a "freshening" which is easy in the grand scheme of things. Citing the engine still has standard sized journals is in your favor for economical repairs, (relatively speaking).
I'm interested in what you find out with the measurements. Keep the sump mounted back up onto the engine to preclude any rusting from the humidity in the air too along with catching airborne dirt.
|
|
A career built on repairing and improving engineering design deficiencies, shortcomings, and failures over 50 years now.
|
|
russell
Bronze Level
Joined: 08 Feb 2024
Location: australia
Points: 36
|
Post Options
Thanks(0)
Quote Reply
Posted: 05 Apr 2024 at 6:36pm |
Hi Codger Thanks for the reply Do you have a suggestion for the grade of emery paper to use i have plenty here but its pretty course i think its about 120 grit . I will have a look at my micrometres i have here im not sure i have one the right size you would kind of think with the bearing halves stuck together that the conrod would have to be out of round but like you said start with the crank. Do you know or would some one else know if its a big job to get engine out of the dozer ? can you remove engine with out removing radiator cheers
|
|
Codger
Orange Level
Joined: 23 Dec 2020
Location: Illinois
Points: 1784
|
Post Options
Thanks(0)
Quote Reply
Posted: 05 Apr 2024 at 7:42pm |
Hi Russell;
I typically use 320 Emery cloth when polishing journals. Also use a light machine oil and polish just till a clean surface. I expect you will need another connecting rod but am always conservative on the internet with suggestions as to not paint "doom and gloom" which is so prevalent. I think if the crank journal is found to be good, you can pull cylinder head #1, install a bolt and clipped washer into the block deck to ensure the liner doesn't push out of the block while you push the piston and rod out from the bottom to renew the connecting rod. Hopefully the prognosis is good once the crankshaft is measured up. Many times a rod can be resized, but many times not.
I wouldn't attempt to pull the engine with the hard nose and radiator in place myself as it needs to move forward to clear encumbrances to remove. Usually best to lift a little and pull more from the front than straight up. A wheel loader, or crawler loader is a good tool to use for the lifting as everything is heavy. Hopefully you can do an inframe rebuild and all be good. Regardless it will be much easier to work with if the blade and push beams are removed.
|
|
A career built on repairing and improving engineering design deficiencies, shortcomings, and failures over 50 years now.
|
|
russell
Bronze Level
Joined: 08 Feb 2024
Location: australia
Points: 36
|
Post Options
Thanks(0)
Quote Reply
Posted: 05 Apr 2024 at 8:42pm |
Hi Codger Thanks again i will have to get some 320 grit emery this is a different question if the crank is ok would it be possible to pull the piston downwards enough to get conrod off ? Im not sure if gudgeons pins are press in or just slide in just a thought . I guess the crank journal is the first thing and go from there. Looking at the exhaust manifold bolts they are going to be a big problem nuts are rusted pretty badly i guess i could just cut them of and try remove studs latter. Did ails ever make a tool to hand wind the motor over i have been baring through the timing mark plate its ever so slow any way first job crank shaft go from there thank you for your help cheers
|
|
Codger
Orange Level
Joined: 23 Dec 2020
Location: Illinois
Points: 1784
|
Post Options
Thanks(0)
Quote Reply
Posted: 05 Apr 2024 at 9:15pm |
Hi Russell;
Don't know if I've ever seen an engine where you could remove the wrist pin from the piston with the crank still in place. I really cannot say for certain but probably not. Many times those pins will push free with a little force after the circlips are removed from their ends. Sometimes a little more force than fingers is needed and I've used a large "C" clamp and spacer a lot of times but usually a hydraulic shop press is the tool to use.
I would get those exhaust studs and/or nuts soaking in 50/50 ATF Acetone mix a couple of times per day. Then a torch to warm the fasteners red, allow to cool, then red again and after a cooling period attempt to gingerly break them free. It would be helpful if a helper were to warm the area around the fastener just before you apply torque to the frozen fastener to expand the direct area. The penetrant works, but takes a while when things are really bad.
|
|
A career built on repairing and improving engineering design deficiencies, shortcomings, and failures over 50 years now.
|
|
russell
Bronze Level
Joined: 08 Feb 2024
Location: australia
Points: 36
|
Post Options
Thanks(0)
Quote Reply
Posted: 08 Apr 2024 at 7:18pm |
Hi Codger Had a couple hours spare yesterday started to emery crank shaft i spent probably a hour or so but did not make a lot of progress still plenty of white metal on the crank shaft is this normal? using 320 grit paper wondering if i am doing somthing wrong or its just one of those jobs that will take lots of time cheers
|
|
Codger
Orange Level
Joined: 23 Dec 2020
Location: Illinois
Points: 1784
|
Post Options
Thanks(0)
Quote Reply
Posted: 08 Apr 2024 at 7:38pm |
Hi Russell;
You could start with 240grit but it will scratch deep if aggressive. That bearing has been very hot to be adhered so tightly. Not what I consider abnormal as the appearance from your other bearing shells reveals oil starvation.
|
|
A career built on repairing and improving engineering design deficiencies, shortcomings, and failures over 50 years now.
|
|
russell
Bronze Level
Joined: 08 Feb 2024
Location: australia
Points: 36
|
Post Options
Thanks(0)
Quote Reply
Posted: 08 Apr 2024 at 7:42pm |
Thanks codger I will do a bit more and see how i go with the 320 probably just one of those jobs that take time
|
|
Codger
Orange Level
Joined: 23 Dec 2020
Location: Illinois
Points: 1784
|
Post Options
Thanks(0)
Quote Reply
Posted: 08 Apr 2024 at 9:02pm |
|
It can take some time and elbow grease when attempting to not do further damage. I've seen many engines over the years carry great oil pressure hot and cold but still starve the rod bearings out on supply as they gain clearance over time and usage.
|
|
A career built on repairing and improving engineering design deficiencies, shortcomings, and failures over 50 years now.
|
|
Eric B
Orange Level

Joined: 09 Feb 2012
Location: British Columbi
Points: 888
|
Post Options
Thanks(0)
Quote Reply
Posted: 09 Apr 2024 at 1:35pm |
|
I know Codger has you well covered, I'm encouraged by the one picture of the journal. Measuring the journal with a calliper will be important. What I would add is using plastigauge if you manage to get a hold of a new set of bearing shells. Even if the clearances are critical it may do for an OK bandaid for your dozer. You would need to determine that your rod is acceptable without resizing and yet if that would be a game changer it's worth pulling the head and that one piston. This may be somewhat of a gamble but it wouldn't have to cost you much money...
|
|
Currently- WD,WC,3WF's,2 D14's B. Previously- I 600,TL745,200,FL9,FR12,H3,816 LBH. Earth has no sorrow that Heaven cannot heal!
|
|
russell
Bronze Level
Joined: 08 Feb 2024
Location: australia
Points: 36
|
Post Options
Thanks(0)
Quote Reply
Posted: 09 Apr 2024 at 6:00pm |
Thanks Eric I have not had the chance to get back to the crank i have a lot of cleaning up to do there hope i get the metal of and its ok underneath cheers
|
|
Ian Beale
Orange Level
Joined: 03 Oct 2011
Location: New South Wales
Points: 933
|
Post Options
Thanks(0)
Quote Reply
Posted: 25 Apr 2024 at 4:13am |
I have a neighbour with vast experience of Allis dozers. He owned what would be a candidate for the best working HD 16 DP in Oz - machinery wise, not so much paint and decals.
I talked to him at the ANZAC service today and mentioned your Japanese crank. His comment was that there were 16000 series and 17000 series engines we got here.
Seems the 17000 ones came via a particular importer. He described them as "looking like a 16000 but weren't quite" and that he had never followed up in detail.
FWIW
|
|
CAL(KS)
Orange Level
Joined: 18 Sep 2009
Location: Chapman, KS
Points: 3734
|
Post Options
Thanks(0)
Quote Reply
Posted: 25 Apr 2024 at 9:47am |
|
16000 series is the 3 valve head and would have been out of production several years before the DP tractors were released
|
|
Me -C,U,UC,WC,WD45,190XT,TL-12,145T,HD6G,HD16,HD20
Dad- WD, D17D, D19D, RT100A, 7020, 7080,7580, 2-8550's, 2-S77, HD15
|
|