| Author |
 Topic Search Topic Search  Topic Options Topic Options
|
acisbest 
Bronze Level

Joined: 09 Oct 2009
Location: SE, PA
Points: 142
|
 Post Options Post Options
") Thanks(0) Thanks(0)
 Quote Quote  Reply Reply
 Topic: Allic C turns hard after engine kit Topic: Allic C turns hard after engine kit
Posted: 22 Jan 2010 at 4:54pm |
Hello,
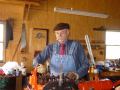
Finished putting my engine kit in the Allis C. New Sleeves, pistons, bearings, valves, gaskets, everything.. Used plastiguage on the bearings before assembling. Put it all together and boy does it turn hard. Should I expect that? Its all I can do to turn it over with the crank. The starter will turn it over but its putting a hurting on the starter and battery.
I dropped the oil pan and loosened the mains just to see if it would get better, not much... Maybe I need to re-check the connecting rods... Or, do I have to drag this tractor around the block in gear to loosen it up?
|
 |
|
Sponsored Links
|
|
|
ToddSin NY
Orange Level

Joined: 08 Nov 2009
Location: Newark,NY
Points: 1034
|
Post Options
Thanks(0)
Quote Reply
Posted: 22 Jan 2010 at 5:25pm |
|
Something doesn't sound right! Should be able to use the hand crank to spin it over. Did you put any lube or grease on the crank to help keep it lubed while cranking it over til the oil gets there? Did you put the connecting rods in the right way? It should not turn that hard and you will do damage if its not found!
|
|
acisbest
Bronze Level
Joined: 09 Oct 2009
Location: SE, PA
Points: 142
|
Post Options
Thanks(0)
Quote Reply
Posted: 22 Jan 2010 at 7:02pm |
Todd, OK, I will start pulling things apart and double checking my clearances... Yes, something is not right.
|
|
TomMN
Orange Level

Joined: 13 Sep 2009
Location: Elbow Lake, MN
Points: 858
|
Post Options
Thanks(0)
Quote Reply
Posted: 22 Jan 2010 at 7:28pm |
|
[TUBE]5tq7EbSh2kc[/TUBE]
It should turn with nothing dragging. This is an RC engine which is the same as a C pretty much. I torqued everything down with no rings and it turns with fingers, with rings there is that friction I just wanted to make sure nothing was binding. Maybe the rods are egged out so even if there is proper clearance on top and bottom they may be too tight on the sides.
|
|
acisbest
Bronze Level
Joined: 09 Oct 2009
Location: SE, PA
Points: 142
|
Post Options
Thanks(0)
Quote Reply
Posted: 24 Jan 2010 at 5:36am |
|
Tom, Wow, I wish I had seen that video before I bolted it together.... I have some serious work to do..... I think the engine is coming back out.....
|
|
Dave H
Orange Level

Joined: 11 Sep 2009
Location: Central IL
Points: 3576
|
Post Options
Thanks(0)
Quote Reply
Posted: 24 Jan 2010 at 6:56am |
|
One thing I do on assembly is hand spin the assembly each time something new is torqued down. like a main or a rod. that has saved my bacon before.
|
|
SteveM C/IL
Orange Level Access
Joined: 12 Sep 2009
Location: Shelbyville IL
Points: 8573
|
Post Options
Thanks(0)
Quote Reply
Posted: 24 Jan 2010 at 3:41pm |
|
"Turns hard" is hard to determine....compared to what? A loose worn engine?New cyl kits will have a LOT more drag that a well worn engine.
|
|
Dick L
Orange Level
Joined: 12 Sep 2009
Location: Edon Ohio
Points: 5087
|
Post Options
Thanks(0)
Quote Reply
Posted: 24 Jan 2010 at 3:43pm |
|
Thanks Tom,
I have been telling newbees for some time to put the rods and pistone in without rings to make sure they know that the crankshaft turns free and they are not fighting tight bearings.
Great job.
|
|
Brian Jasper co. Ia
Orange Level
Joined: 11 Sep 2009
Location: Prairie City Ia
Points: 10508
|
Post Options
Thanks(0)
Quote Reply
Posted: 24 Jan 2010 at 4:01pm |
|
I had the same problem when I rebuilt my CA engine. It turned out to be the main bearing bores were not in line. With no rod/pistons installed, torquing the main caps made the crank almost impossible to turn. I had it line bored and did away with the shims all at once.
|
|
"Any man who thinks he can be happy and prosperous by letting the government take care of him better take a closer look at the American Indian." Henry Ford
|
|
Richard B
Bronze Level
Joined: 23 Oct 2009
Location: maryland
Points: 24
|
Post Options
Thanks(0)
Quote Reply
Posted: 24 Jan 2010 at 4:57pm |
|
did it turn over easy before you bolted it in the tractor
|
|
acisbest
Bronze Level
Joined: 09 Oct 2009
Location: SE, PA
Points: 142
|
Post Options
Thanks(0)
Quote Reply
Posted: 24 Jan 2010 at 5:07pm |
Engine is back out. Starting over. I did have the crank on my workbench to work on the rods. I did not think they were tight, but as SteveM said, compared to what... They certainly were not as loose as that video... They were snug and gave me platiguage readings within tolerance.
Pistons out, rear main is too tight to start with... STD bearings... How many shims is too many? I don't want to in-lin-bore if I don't have to... I have a vertical mill, could that do it? I don't have a bore that would go that deep... Would rather avoid removing crank from block again, timing cover is on as is that pain in the but front pulley.
|
|
Carl(NWWI)
Orange Level
Joined: 13 Sep 2009
Location: NW WI
Points: 954
|
Post Options
Thanks(0)
Quote Reply
Posted: 24 Jan 2010 at 5:07pm |
|
check your skirt clearance and ring gap
|
|
TomMN
Orange Level
Joined: 13 Sep 2009
Location: Elbow Lake, MN
Points: 858
|
Post Options
Thanks(0)
Quote Reply
Posted: 24 Jan 2010 at 6:16pm |
Thanks Dick, I am one of those newbees and need to take a few extra steps. I've done a couple now but not enough to call myself an engine builder. The rods on the one in the video each had a couple thousands taken from the rod caps then torqued on to the rod with no shims then honed until a bore gauge said they were just right. I checked with plastigauge anyway and they all were consistent at .002 clearance. It was fun using the hone too. I used shims on the mains though I think those ended up around .002 as well. With the mains all tightened you should easily be able to roll the crankshaft with no drag, make sure of that before putting any pistons in. The rods alternate so the narrow side is always toward a main bearing, although I don't know if they would fit any other way. Then I had to play with the video feature of my daughters camera. HTH Tom 
|
|
norm [ind]
Orange Level
Joined: 16 Sep 2009
Location: BOURBON,IN.
Points: 667
|
Post Options
Thanks(0)
Quote Reply
Posted: 24 Jan 2010 at 6:24pm |
|
is it the original crankshaft if not may need line bored
|
|
Dick L
Orange Level
Joined: 12 Sep 2009
Location: Edon Ohio
Points: 5087
|
Post Options
Thanks(0)
Quote Reply
Posted: 24 Jan 2010 at 6:36pm |
|
Sure Tom,
I saw your site and pictures from someones post over on YT and was looking for a chance to tell you what great pictures you took. Much better than mine. Without reconditioning the rods it will be hard for everyone to have the .015/.002 clearance without a little more drag than you have. The rods that I had reconditioned turned like yours.
Fantastic job in all ways. The valve job was just and good. I loved the lapping witness on your valves showing the seat area on the valve.
|
|
mlpankey
Orange Level
Joined: 13 Sep 2009
Location: Vols country
Points: 4580
|
Post Options
Thanks(0)
Quote Reply
Posted: 24 Jan 2010 at 7:33pm |
|
Tom thankyou for showing theese guys how a machine shop machinist can and will be youre friend on builds if you let them.
|
|
steve(ill)
Orange Level Access
Joined: 11 Sep 2009
Location: illinois
Points: 87273
|
Post Options
Thanks(0)
Quote Reply
Posted: 24 Jan 2010 at 7:43pm |
|
you can have quite a drag on a rebuild just from the new rings and hone on the cylinders. Since you are already together, you can loosen the main caps a half turn on all the bolts and then try to rotate. THen you can loosen the rod caps half a turn on all bolts and try to rotate. Whats left is in the rings. Get an oil gun and keep the bearings lubed during the testing, it makes a big difference. I normally have to get the bearings closer to .003 clearance to roll with no binding, but i alwalys use the old crank, no line boreing, etc. The more machining you get done, the closer your tolerances can be.
Edited by steve(ill) - 24 Jan 2010 at 7:45pm
|
|
Like them all, but love the "B"s.
|
|
acisbest
Bronze Level
Joined: 09 Oct 2009
Location: SE, PA
Points: 142
|
Post Options
Thanks(0)
Quote Reply
Posted: 25 Jan 2010 at 7:20pm |
Engine on bench again, pistons out.
This engine had been run without oil and the crank was moving around quite a bit. Front lower main had lost its sides. Other mains had a small groove in the sides, number 1 spun a bearing, crank was spent... So I replaced with mains and crank from another engine... Took the old main cap on and put it on my rear main that was binding... No more binding on that main now. I can now spin the crank by hand with all mains in, maybe not as easily as the video but pretty close to that.
On to each connecting rod now.... Had re-ground two bearings with winona in-the-block grinder, crank was put in a lathe when the grinder was running... Looks like the edges were not ground as well, a little bit of binding, bearings shiny on outer edges from the ones that were reground... Should have redressed the stone before grinding. Going to try to touch up with thin emery cloth, its not that far off and probably would run as is, but I will go for perfection.
Edited by acisbest - 25 Jan 2010 at 7:31pm
|
|
TomMN
Orange Level
Joined: 13 Sep 2009
Location: Elbow Lake, MN
Points: 858
|
Post Options
Thanks(0)
Quote Reply
Posted: 25 Jan 2010 at 11:08pm |
|
All caps - rods and mains, need to be assembled where they originally were. They should all be numbered and are machined in place. The only way to replace one is to torque it on and then machine it. If it is a main bearing cap then they all need to be bolted on and line bored, then stamped so they always get bolted back where they were when the machining was done. No two ever get to be the same. HTH Tom
|
|
JimD
Orange Level
Joined: 11 Sep 2009
Location: Mounds, OK
Points: 2116
|
Post Options
Thanks(0)
Quote Reply
Posted: 25 Jan 2010 at 11:29pm |
Swapping a cap can sure lead to a tight crank too.I've had a few customers do that and it drove them nuts. I always mark everything as it comes apart.
JimD
|
Owner of OKtractor.com PM for an instant response on parts. Open M-F 9-6 Central. We have new and used parts. 877-378-6543
|
|
mlpankey
Orange Level
Joined: 13 Sep 2009
Location: Vols country
Points: 4580
|
Post Options
Thanks(0)
Quote Reply
Posted: 26 Jan 2010 at 8:09am |
|
always need to check the side clearance of a rod with a feeler gauge . I like .020 side clearance but it can cost you a psi or 2 of oil pressure. usually you can hear the rings and feal the rings bite but its not for the entire 360 degrees of rotation.
Edited by mlpankey - 26 Jan 2010 at 8:13am
|
|
Denis in MI
Orange Level
Joined: 15 Sep 2009
Location: Norvell, MI
Points: 832
|
Post Options
Thanks(0)
Quote Reply
Posted: 26 Jan 2010 at 8:15am |
 mlpankey wrote: mlpankey wrote:
always need to check the side clearance of a rod with a feeler gauge . I like .020 side clearance but it can cost you a psi or 2 of oil pressure. |
won't cost any oil pressure on a BE or CE engine they are not pressure lubricated to the rod bearings they are sprayed by holes in the cam so why not run them a little loose on side clearence as long as the pin can't hit the cylinder wall.
|
|
1938 B, 1945 B, 1941 IB, 1949 C, 2 1938 WCs, 3 1950 WDs, 1951 WD, 2 1955 WD45, 1957 D-14
|
|


