| Author |
 Topic Search Topic Search  Topic Options Topic Options
|
JVON 
Bronze Level


Joined: 04 Dec 2016
Location: Macomb, Il
Points: 43
|
 Post Options Post Options
") Thanks(0) Thanks(0)
 Quote Quote  Reply Reply
 Topic: Paint Prep & Pointers Topic: Paint Prep & Pointers
Posted: 21 Jul 2017 at 10:58am |
All,
I am very close to laying some PO1 down and am looking for some pointers and feedback. I have the tractor (D17-1) all stripped, ground, blasted, wire wheeled, sanded, and primed with Case IH gray primer. I think I have about 40-50 hours just in stripped the paint and rust off. The rear wheels were the most time consuming but sure paid dividends on the final result. I feel I am ready to start with paint but keep thinking I am forgetting something. Primer has been applied for over a week and cured. All minor bolt on parts are taken off and cleaned up individually. Radiator, fan, generator, starter, fuel tank, air cleaner etc.. I have never painted final paint before only minor touch ups with a spray can. I keep reading up on what to use and get. From what i am reading an HVLP spray gun is preferred. Get a good respirator. I can get Nason paint from my local carquest mixed for PO1. I have thinner and hardner at my store both Valspar brand.
Any tips or suggestions on painting? Practice? I want to paint this myself. For one to learn and for two to stay within by bank account.
My goal is have it respectable finish. I have seen some paint jobs where there is clear coat on the whole machine (Sheetmetal and castings). I am looking for a clear coat finish on the sheetmetal and a good shine on the castings. I keep reading old posts on restorations other guys have done and see many great looking machines. I just wish Photobucket would work as all you see is the kitten and butterfly picture.
Any helps is EXTREMELY APPRECIATED!!!
Thanks!
Jay
|
 |
|
Sponsored Links
|
|
|
jaybmiller
Orange Level Access

Joined: 12 Sep 2009
Location: Greensville,Ont
Points: 24888
|
Post Options
Thanks(0)
Quote Reply
Posted: 21 Jul 2017 at 11:23am |
|
BEFORE you paint the 'colour' coat, drive the tractor around use levers, press pedals, do ALL the stuff you need to to engage PTO, cylinders etc.....then leave sit overnight.
This 'should' show you if ANY oil leaks are present.
I know, you want ORANGE, but wait 1-2 days and see if any oil drips out. This is THE time to have patience as nothing ruins a paint job that a trace of oil you didn't see...
Jay
Canuck Jay
The Other Jay, hehehe
|
|
3 D-14s,A-C forklift, B-112
Kubota BX23S lil' TOOT( The Other Orange Tractor)
Never burn your bridges, unless you can walk on water
|
|
JVON
Bronze Level
Joined: 04 Dec 2016
Location: Macomb, Il
Points: 43
|
Post Options
Thanks(0)
Quote Reply
Posted: 21 Jul 2017 at 11:50am |
Well, so here's the problem. As much as I would do that and make as i want this to be correct and done right. All of the small stuff is taken off already. Radiator, fuel tank, etc.. So that would reassembly all over again. Before I had it torn down I did run it several times and made sure to get everything good and warm. I did have two leaks that needed to take care of. The power director pivot on the left hand side had a small seap. I added another O-ring behind the flat washer and snap ring on the outside as I know the internal o-ring was changed when we went through the PD several years ago. Also the Traction booster linkage where it goes under the belly to the hyd pump had a seal leaking there. Replaced that and have since been dry. Everything else has been dry on the machine. So I think I am good on leaks. But as you say they can ruin a good paint job.
I should know better, patience is a virtue as they say! But it has been 11 years since I bought this tractor right after high school. I've been waiting for quite some time!! It has been stored at my Dad's farm for several years until I could get it down to where I live and work on it here recently. It's amazing how much more you can get done when something is much closer proximity to you!
Good to hear from another Jay!
Thanks!!
Jay
|
|
WF owner
Orange Level
Joined: 12 May 2013
Location: Bombay NY
Points: 5083
|
Post Options
Thanks(0)
Quote Reply
Posted: 21 Jul 2017 at 12:28pm |
I, personally, haven't done much painting myself, but I grew up helping a friend that had a body shop. My tips may be (long) outdated, but here is what I learned many years ago. First of all, you need to make sure all of the products you are using are compatible. You are talking about using products from several different companies. I was always told that you pick a paint brand and buy all the products (even primer) needed from the same company. I have seen paint have a reaction to the primer, where the whole thing (paint and primer) had to be stripped off. Did you etch all the parts that were taken down to bare metal? I know there are several self-etching primers available today (that didn't exist when I was younger). I was always told that all bare metal had to be etched or paint would eventually peel. Every imperfection needs to be removed. A small imperfection really stands out with shiny paint on it. When you get to the point you're at, everything needs to be lightly sanded and then wiped down with a surface prep to remove any oil film from your hands or any other contamination. You might want to spray something like a wheelbarrow or barrel before spraying something that you want to look good. The guys on here tell me the Harbor Freight HVLP guns are very inexpensive and actually not bad guns. Guys, please feel free to jump in and correct me on any mistakes or omissions.]
Edited by WF owner - 21 Jul 2017 at 12:33pm
|
|
Pete from IL
Silver Level

Joined: 29 Dec 2009
Location: Beecher IL.
Points: 311
|
Post Options
Thanks(0)
Quote Reply
Posted: 21 Jul 2017 at 12:54pm |
|
I thought a D-17 should have PO2 on it. I used the Nason paint on my truck last winter. Much cheaper than the Dupont or PPG but it was much thinner than any paint I used before. Very easy to get runs in the paint. I put on 5 coats and a very thin coat each time. It turned out ok but I would rather have a little thicker paint. I agree with WF owner. Paint another object first and you will get the feel of a different gun and different paint.
|
|
7060
Orange Level
Joined: 16 Sep 2009
Location: Missouri
Points: 1148
|
Post Options
Thanks(0)
Quote Reply
Posted: 21 Jul 2017 at 12:58pm |
|
I've painted several tractors and I always use epoxy primer. If your using Nason paint single stage or Base/Clear it should have its own hardener catalyst you have to use. I would also use DuPont thinner with it. You will want to rough up the primer with scotchbright or 320g and wipe down with wax and grease remover. Then I run a tack cloth over everything. Take your time spraying it. Lay a very light mist down over it first and start back where you started this will help with paint runs. Don't leave off in the middle of a panel to go get more paint as you will be able to see blend lines after your finished. I use a positive air hood, because that hardener is nasty stuff. If you don't use one I would at least look into charcoal filtered respirators. I buy two harbor freight guns for every tractor. One for primer and one for paint and throw them away when I'm done. They are a really good gun, but for $15 regular price it's not worth cleaning them.
Edited by 7060 - 21 Jul 2017 at 1:01pm
|
|
JVON
Bronze Level
Joined: 04 Dec 2016
Location: Macomb, Il
Points: 43
|
Post Options
Thanks(0)
Quote Reply
Posted: 21 Jul 2017 at 12:58pm |
|
I agree with what you are saying on paint manufacturers. I am already committed to Valspar primer. The Nason paint I mentioned from Carquest I could go change to another compatible brand. So nothing lost there yet. Nearly everything was taken down to bare metal.
|
|
tadams(OH)
Orange Level Access

Joined: 17 Sep 2009
Location: Jeromesville, O
Points: 11151
|
Post Options
Thanks(0)
Quote Reply
Posted: 21 Jul 2017 at 1:00pm |
Make sure you don't have to sand everything before you paint after letting the primer set that long
|
|
JVON
Bronze Level
Joined: 04 Dec 2016
Location: Macomb, Il
Points: 43
|
Post Options
Thanks(0)
Quote Reply
Posted: 21 Jul 2017 at 1:08pm |
 Pete from IL wrote: Pete from IL wrote:
I thought a D-17 should have PO2 on it. I used the Nason paint on my truck last winter. Much cheaper than the Dupont or PPG but it was much thinner than any paint I used before. Very easy to get runs in the paint. I put on 5 coats and a very thin coat each time. It turned out ok but I would rather have a little thicker paint. I agree with WF owner. Paint another object first and you will get the feel of a different gun and different paint. |
Mine is a 1957, PO1 would be the correct paint scheme.
|
|
allischalmerguy
Orange Level

Joined: 11 Sep 2009
Location: Deep River, IA
Points: 2894
|
Post Options
Thanks(0)
Quote Reply
Posted: 21 Jul 2017 at 3:10pm |
|
JVON,
you are correct on Perian Orange no 1 on that D17. Later years changed colors. Good luck. I hope you share a photo when done.
|
|
It is great being a disciple of Jesus! 1950 WD, 1957 D17...retired in Iowa,
|
|
Stan R
Orange Level Access
Joined: 03 Dec 2009
Location: MA
Points: 996
|
Post Options
Thanks(0)
Quote Reply
Posted: 21 Jul 2017 at 3:26pm |
|
|
|
Dakota Dave
Orange Level

Joined: 12 Sep 2009
Location: ND
Points: 3973
|
Post Options
Thanks(0)
Quote Reply
Posted: 21 Jul 2017 at 3:27pm |
|
Ive painted a couple tractors with Valspar paint. I did not take the original paint off. I just scraped the gunk off sprayed gunk engine cleaner on and hot pressure washed off. sprayed dollar store oven cleaner on and hot pressure washed it off. the sheet metal parts. hood fenders ect I sanded and primed the spots that I took paint off where I welded the cracks and bent metal. after blow drying every thing I wiped it all down with mineral spirits. primered with Valspar primer sealer. if you used sandable primer you need to apply sealer. let it dry a couple hours while checking my work. tack cloth it againg and spray the valspar paint make sure you add the hardener and use a breather mask. you can put the second coat on 15 minutes after the first coat. once the hardener is added you must use the paint within 2 hours so have all the sheet metal hung for painting and go from piece to piece I leave the tractor together and just remove the starter gen air cleaner carb and radiator. My WD45 that I painted 10 years ago still looks great. only some chipped paint under the seat where I toss the chains.
|
|
DougG
Orange Level
Joined: 20 Sep 2009
Location: Mo
Points: 8390
|
Post Options
Thanks(0)
Quote Reply
Posted: 21 Jul 2017 at 3:56pm |
|
Good luck on this project,, I have a few to do myself and always looking for pointers ,tips etc, I would've luved to seen AC,S spray booth at West Allis , they moved them thru fast !! I think one of the most important things said on this post is the POSITIVE AIR HOOD , it supplies air for you while your using paint etc,,, right now you may think , awe it will be ok,,, then when you cant breathe on your own setting in a nursing home having a machine breath for you its not , just my opinion
Edited by DougG - 21 Jul 2017 at 4:00pm
|
|
JVON
Bronze Level
Joined: 04 Dec 2016
Location: Macomb, Il
Points: 43
|
Post Options
Thanks(0)
Quote Reply
Posted: 21 Jul 2017 at 4:22pm |
|
|
|
JVON
Bronze Level
Joined: 04 Dec 2016
Location: Macomb, Il
Points: 43
|
Post Options
Thanks(0)
Quote Reply
Posted: 21 Jul 2017 at 4:25pm |
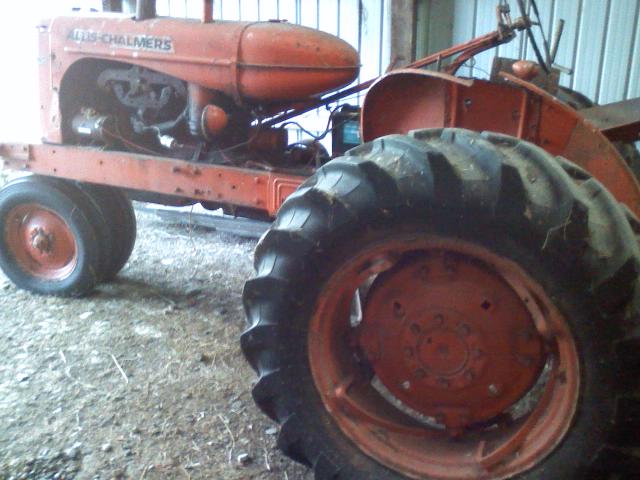
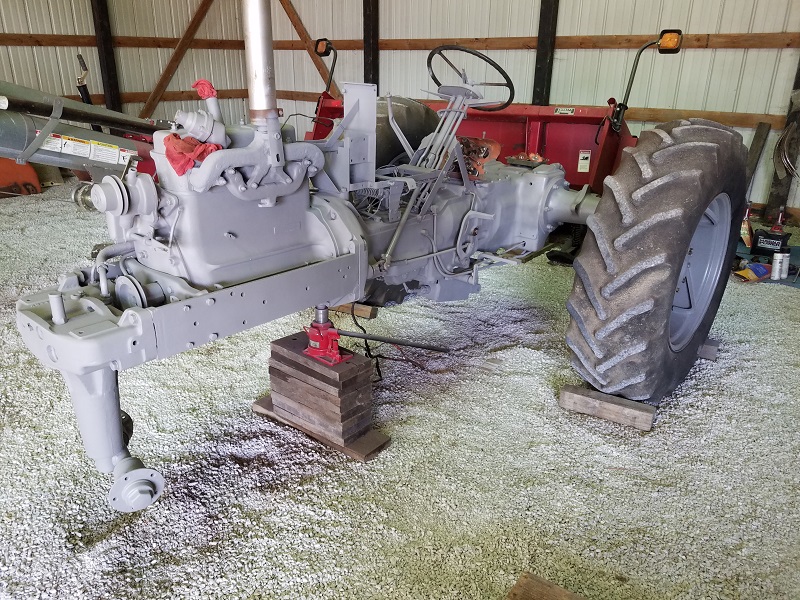
Here is my progress as of a week ago. I do have the harness removed now. 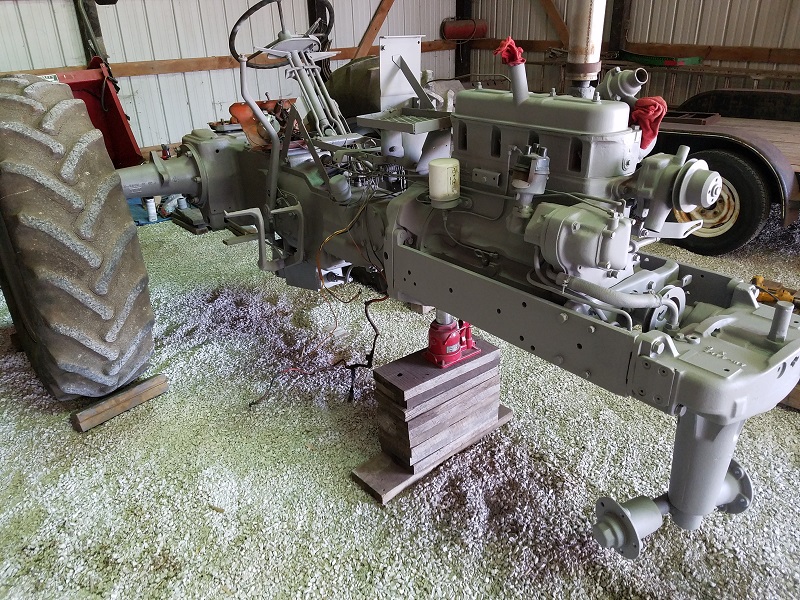
|
|
JVON
Bronze Level
Joined: 04 Dec 2016
Location: Macomb, Il
Points: 43
|
Post Options
Thanks(0)
Quote Reply
Posted: 21 Jul 2017 at 4:28pm |
|
I had to throw the tires back on to get things moved around. They are just temporarily on there until I can get everything back on jack stands.
|
|
Sugarmaker
Orange Level
Joined: 12 Jul 2013
Location: Albion PA
Points: 8625
|
Post Options
Thanks(0)
Quote Reply
Posted: 21 Jul 2017 at 10:45pm |
|
Jay,
Thanks for the pictures! Now I can see what my early 17 should look like in primer too.
Your doing a good job.
My tip would be to make sure you get enough paint on the tractor and parts. I know its easy to get a run. But your finished job will look better if you have several good coats.
HF guns work OK for this type of project. Not a expert on painting, but find satisfaction in doing it my self.
Looking forward to the PO1!
Regards,
Chris
|
|
D17 1958 (NFE), WD45 1954 (NFE), WD 1952 (NFE), WD 1950 (WFE), Allis F-40 forklift, Allis CA, Allis D14, Ford Jubilee, Many IH Cub Cadets, 32 Ford Dump, 65 Comet.
|
|
JVON
Bronze Level
Joined: 04 Dec 2016
Location: Macomb, Il
Points: 43
|
Post Options
Thanks(0)
Quote Reply
Posted: 21 Jul 2017 at 10:53pm |
|
Thanks Chris! I read your posts on your WD's and 17 several times over. Very well documented, made me feel like I could get mine accomplished! How did you exactly put a new bushing in your clutch pedal of your 17? I have the same slop that needs tightened up. It works now, just not as good as It could be. Why do 60 year old tractors have to be so worn out!? Lol
|
|


 s/16415/RESIZED.jpg